New to 3D Printing, trying to troubleshoot a couple issues
Hello, new user here! I run a machine shop, and I decided it's time to start learning the ways of 3D Printing. I bought the i3 MK3S kit and my son and I had a blast putting it together. In my long winded post below, I've laid out the areas that I'm having trouble with, I do hope someone can help me.
My first few prints were an absolute mess, but I managed to work through them and get somewhat decent prints off. Now I'm trying to fine-tune my settings and am certainly open to any ideas, thoughts or criticism.
What are the issues?
1) Warping. I started with the default PLA settings, but I wasn't able to make more than a dozen layers before the part popped off the bed (PC PEI sheet). I bumped up my temp to 215c/68c and managed to get decent prints out of it after that. After a few prints, I brought the bed down to 65c and printed a probe holder for my CMM. The first print came out rather nice, but the function of the part wasn't where I wanted it. I modified the design (Fusion 360 FTW) and printed the second version. That too came out well, but the edges curled. See photo below:

The first attempt did not do this, same settings. The part was slightly thicker, about 3mm more:

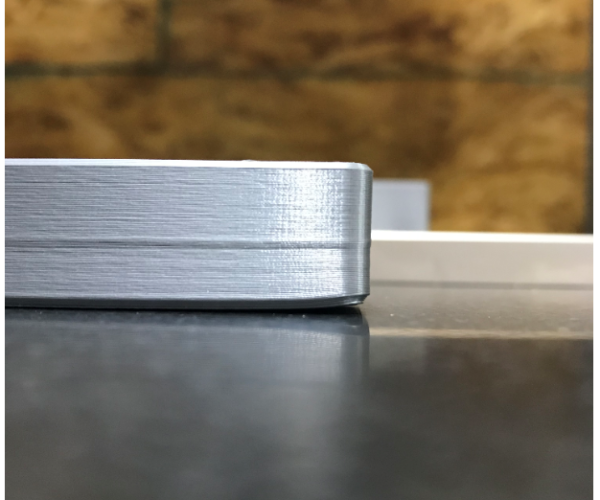
2) The other issue I'm finding (and you can see in both of the above photos) is that when it reaches a height where features are now complete (in this case, the bottom of the blind hole (only 9mm deep)) I end up with a very large line around the perimeter of the part. This wraps around the part 360 degrees.
Example #2:
Prior to the above prints, I built most of the parts needed for the Lack Enclosure (Prusa version). You can see the line as well here:
3) Ghosting. On the enclosure parts, I'm seeing this:

What should I be looking at first to eliminate that? I have tightened all my screws and double checked them all. I've re-tightened my belts after running for many hours as well
Or, are these printer or slicer settings? I'm using PrusaSlicer 2.1.0
Lastly, a couple general questions:
1) Sheet cleaning. Yep, using dish soap and paper towels. Should I be doing this after EVERY print? I did not wash between version 1 and 2 of the probe rack. I can try reprinting after I've washed again.
2) Belt Tension. How tight is needed, how does one actually measure it? My belt status (in the Support menu) is 273 and 278, X and Y respectively.
One last comment: I'm still using the sample roll of PLA Silver that came with the printer. I did purchase additional PLA and PETG (Amazon, top reviews). Should I just not worry about things until I get into "better" filament?
Thanks for reading,
Seth in Maine
www.libertymachineinc.com
RE: New to 3D Printing, trying to troubleshoot a couple issues
One other comment;
Measuring the part, compared to the CAD, I'm finding that along the Y axis, my part is measuring spot on. Modeled at .950" wide, it measures .948/.955". That's awesome!
On the X axis, the part is supposed to measure 5.250" and it's actually measuring 5.220". That's .03" shorter (almost 1mm for the rest of the world). Would this be material shrinkage or indicative of other mechanical issues?
RE: New to 3D Printing, trying to troubleshoot a couple issues
1. I clean with IPA ONCE A WEEK with blue shop towels or another low lint paper towel.
2. Belt tension 270-280 is my goal. https://prusacommunity.com/your-belt-status-and-you/
--------------------
Chuck H
3D Printer Review Blog
RE: New to 3D Printing, trying to troubleshoot a couple issues
In general, external finish issues can be dealt with 2 ways:
- Calibrate your extrusion multiplier to each filament. Over-extrusion will exhibit itself in a number of ways that mar finish.
- Slow down external perimeter print speeds. I have good luck with 25mm/s if I really care about finish.
- Add external perimeters if possible. (This won't help with thin walls with no infill.)
You can try tweaking acceleration and jerk settings to reduce ringing around those holes on the vertical surface.
and miscellaneous other tech projects
He is intelligent, but not experienced. His pattern indicates two dimensional thinking. -- Spock in Star Trek: The Wrath of Khan Unfortunately,…
RE: New to 3D Printing, trying to troubleshoot a couple issues
We beat the fat perimeter issue to death in another thread (search for buldge - the OP misspelling is a handy reference, lol). Printing slower was the most effective solution.
Ringing can be a couple of primary things: belt tension and jerk (initial stepper speed). Getting belt tension to 6 lbf is the best fix. The belt tension numbers on the LCD are meaningless since all it reports is motor drive current (lower numbers means higher axis friction). Using the deflection method for tension is easiest and accurate enough; or use a frequency meter and calculate the resonant tension.
And plastic contraction, aka shrinkage, usually affects unsupported thin walls. Generally with PLA it's a non-issue. But it lurks and can cause a problem. Many scale errors are due to adjusting the belts after doing XYZ calibration. So if you adjust the belts, they do stretch, and that invalidates the cal that was done (stepper vs distance multiplier the printer calculates and stores in NV during cal). There are mechanical standards built into the heat bed at those white rings.
The lifting at the corners is poor bed adhesion. Washing the bed in soap and water (alcohol does a poor job in my opinion) will significantly improve how well the plastic sticks. But larger pieces need help. Either a brim, or a local brim (flags on the corners), and raising bed temperature after layer one is down.