mk3s Z axis problems
Help solve the problem
It all started with the fact that at some point one of the edges began to peel off on large printed parts. I decided to calibrate the first layer and found that the zigzag on the right side was flattened, and on the left side it did not fit well enough.
After that, I did a complete printer reset and re-flashed the firmware version 3.10. In the 4 point calibration step of the initial setup wizard, when 2, 3, 4 points are calibrated, the right Z axis is slightly lowered by 2-5 mm. And when calibrating with a metal sheet at 9 points, the PINDA sensor after 3 measurements rises abnormally high and again takes 3 measurements, after which it moves to the next point and this behavior is repeated. As a result, at the last stage, the extruded zigzag line also turns out to be uneven, that is, it flattens on the right, and easily falls off with a fingernail on the left.
Then I swapped the left and right motor connections on the RAMBO board. Separate Z-axis calibration performed via printer menu. Moved the Z-axis from 0 to 210 several times, making sure there is no skew.
I calibrated the first layer and the extruded zigzag became jagged again on the left and right. Then it turned out that the right Z-axis is 2-5 mm lower than the left.
I have repeated all of the above written many times and the result is the same. What could it be? How do you know what the problem is?
Printer: prusa mk3s
Firmware: 3.10
Live Z cannot be set via calibration
Live Z is how you set Live Z. Calibration only brings you close enough to start the live Z dial in step.
Small variations in bed height can be compensated for via enabling bed mesh leveling - the 7x7 bed mesh level gives you the most accurate full bed coverage. It still doesn't set your live Z - you have to use the live-Z feature to lower or raise your nozzle relative to the bed/sheet/spool of filament you are running (yes, different rolls, different sheets will need different live z - sometimes even different colors of the same brand matter to what is the correct live Z.
Get use to setting it. You should be doing it frequently (when parameters like filament brand, filament material type, filament color, steel sheet) change.
mk3s Z axis problems
The printer is old, at least 1.5 years old. And I'm wondering if one of the stepper motors could fail and give a Z-axis error.
How would I check the Z-axis positioning accuracy?
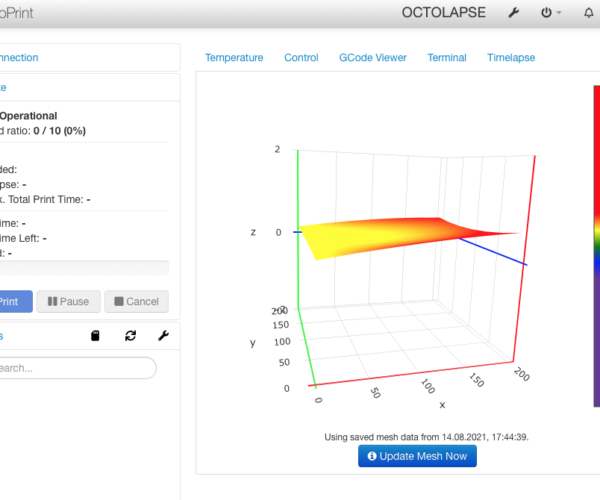
The 7x7 grid does not improve the situation. On one side along the Z axis, the printer is calibrated ~ 2-5 mm lower. And the test print is obtained with uneven adhesion.
How are you determining there is a skew?
The two carriage holders are not the same height. How are you determining there is a skew? Measuring from the top will not give you any usable data if you measure to the orange part. You have to measure to the round bar on the X axis. I just use a level. If the round bars are level, and the bed is level you're good.
It is possible for the Z motors to wear out or go bad. If you get the two measures level, then move the Z up and then back and you lose the level, you have a problem. 2-3 mm is a HUGE difference in level, left to right. But not measured to the orange plastic. That will always be skewed (it is designed that way).
Visualizer could be in wrong orientation, I am not saying that it IS, just that it could be....
To be sure you can put something between sheet and heatbed at one corner, (I took a toothpick), run MLB and see what it looks like
Here is a link to octoprint community https://community.octoprint.org/t/bed-level-visualizer-vs-actual-bed/15061
That thread deals with exactly this, and what to do to get visualizer in correct orientation
Prusa i3 MK3S+ FW 3.11.0 (kit dec -20), PrusaSlicer 2.6.1+win64, Fusion 360, Windows 10
Got a flat index? is the bed carriage bent?
If you have that degree of sensitivity to flatness - which is not a bad thing - do you have access to a flat index? They are usually slabs of stone that make a good index on flatness. The bed carriage (that wierd X shaped thing) is what I would want to be flat if I want the bed flat.
The other thing you can do is adjust your tightness differently. Float the screws a bit (e.g. loosen them a bit) and heat the bed up to PETG temp. Then tighten slowly slowly slowly by the prescribed pattern. By slowly I mean get them to a uniform looseness at temp, then start a quarter turn each screw in turn at a time - give the bed a chance to flex as you tighten it down - I'll bet you get a different outcome. And they don't all have to get to uniform tightness if you can measure flatness - a little looser will lift a valley, etc.
mk3s Z axis problems
Okay, I'll try to do it and post the result.
I want to ask you. I'm wondering what is in the places of the four touchpads circled around? Visually, the heater tracks bypass this place and the magnet is not magnetised? Is it empty or is there some kind of non-magnetic metal?
mk3s Z axis problems
I tightened the table at 85 degrees and it didn't improve the situation.
Someone can tell to what extent the printer compensates for surface irregularities? For example, no more than 0.1 mm or 0.5 mm.
