Re: life adjust Z - my way
i tried to print the 9 point stl file to check each one location's layer thickness and it is about 0.22mm thickness. z offset is about -840 and reducing to -860 also about 0.22mm thickness.
I focus more on left, right, rear, front and center, i adjusted the bed correction to have even layer thickness on these points, some at +50 micron, some at -20 micron.
I'm not sure which to measure, the middle of the square or the perimeters? ❓
Re: life adjust Z - my way
...I'm not sure which to measure, the middle of the square or the perimeters? ❓
➡ always middle of the square, not at the perimeters/edges because there the overlap will increase the thickness.
dem inscheniör is' nix zu schwör...
Re: life adjust Z - my way
I did measure them, in fact, it was much thinner by about 50 microns lesser
Re: life adjust Z - my way
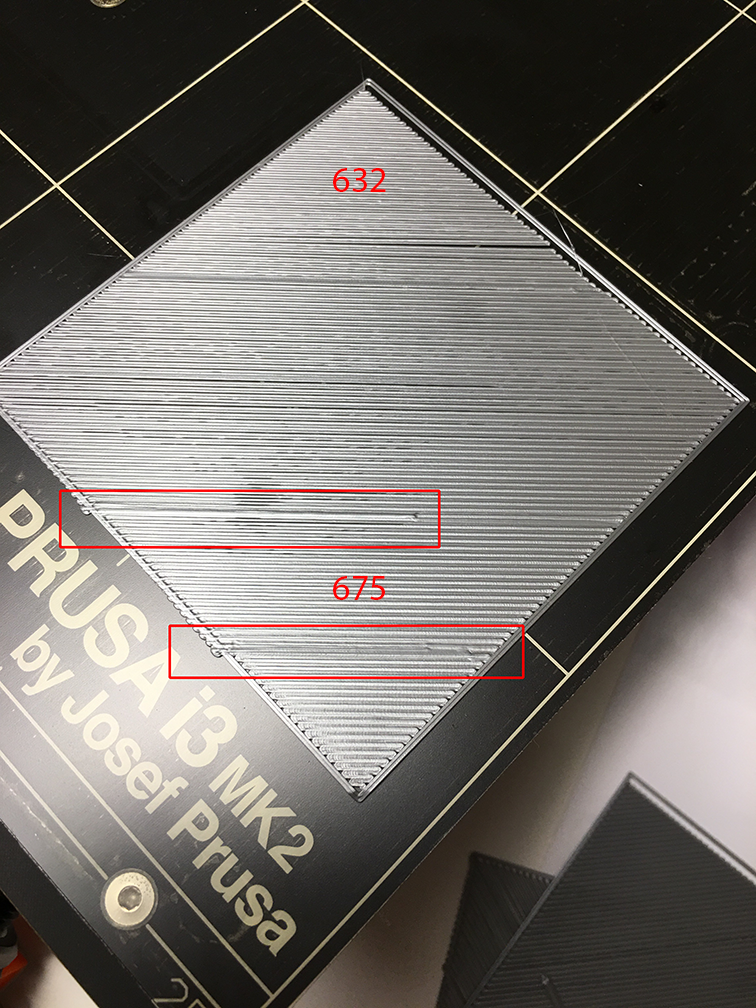
Hi everyone, new to 3D printing here. I just tried my first layer calibration using JeffJordan's gcode and can't seem to get the same results as the ones in the images. I have a feeling that I have a bigger problem than the Z level not calibrated. At 675 it seems to do well but I get these random 'misses' that I've boxed in red in the image below. Any advice?
Re: life adjust Z - my way
have you already done an extruder calibration ?
furthermore check the tension of the extruder springs.
does your filament spool run smooth (or are there any jerks) ?
furthermore make sure that you clean your pei sheet with 98% or 99% isopropyl alcohol and/or (every fifth time) pure acetone.
don't use tissues with balsam or pre-prepared alcohol pads... they usually contain aromatics or oils that you won't get in contact with your print surface because they'll avoid sticking.
dem inscheniör is' nix zu schwör...
Re: life adjust Z - my way
Hello, i need you help.
I have already calibrated the z-axis several times, but when I print parts that are close to 0,0 they are stuck, but the ones that are on the 255.255 side do not.
I put a white sheet to calibrate moving between the hot bed and the extruder, when I'm at 0.0 it gives me a setting of -1200, at 0.200 gives me -1367, at 200.0 it gives me 1810 and at 200.200 -700.
I can fix this problem
Thanks
Re: life adjust Z - my way
@ Daniek3d: make sure that you've installed the heatbed properly. in most cases a skewing of the heatbed is caused by forces in x/y direction applied through the screws & bolts when the heatbed is assembled at the y-carriage.
furthermore you can add a calibration value for each of the edges of the heatbed (front, rear, left, right) with +/- 50 µm (+/- 150µm when you patch the firmware).
if all these things aren't sufficient: align the heatbed manually using thin washers between the y-carriage and the standoffs.
furthermore: take in mind that if you move the printhead through the settings menu, the results of the meshbed-levelling are discarded !
dem inscheniör is' nix zu schwör...
Re: life adjust Z - my way
Dear Jeff
Thank you very much for the most useful advice - things were good before but they're even better now.
If you're ever in the New Forest in Southern England I owe you a beer - do please claim it.
Best wishes - James
This post is a natural product made with recycled electrons. Variations in spelling and grammar enhance its individual character and are not flaws or defects. Errors in tact or fact are transmission errors.
Re: life adjust Z - my way
Jeff thanks so much for this simple yet effective calibration test. I am having printing issues and did your test. I do not know yet if it will solve my problem but at least I should check the basics.
The printer default was -652um which was too much and created strings as you can see below. -500um is way too less, sweat spot seems to be -575um.

Re: life adjust Z - my way
have you already done an extruder calibration ?
furthermore check the tension of the extruder springs.
does your filament spool run smooth (or are there any jerks) ?
furthermore make sure that you clean your pei sheet with 98% or 99% isopropyl alcohol and/or (every fifth time) pure acetone.
don't use tissues with balsam or pre-prepared alcohol pads... they usually contain aromatics or oils that you won't get in contact with your print surface because they'll avoid sticking.Hi JeffJordan, thank you for your reply. I've performed all of the above and checks and now I can get good first layer prints. Now I'm just having some other print issues which I will post a new thread for since it's not relevant to this topic. Thank you once again!
Re: life adjust Z - my way
Thanks for the awesome calibration piece! Can you make one without the beeps? My dog goes batsh*t crazy when she hears them go off.
My bed isn't level. The left side seems to be lower than the right to the point whete it'll be perfect on the right and slightly stringy on the left. I tried adjusting the left side down to -50um and it made things better but not quite enough to be perfect, things got bad again when I did +50um on the opposite side which confused me.
Any other tips?
Re: life adjust Z - my way
...Any other tips?
read the thread about hyperfine bed leveling. and if you got the possibility, make PJR's amendment to the actual firmware version.
then you can super-fine-tune the z-height at all 9 calibration points (read about the changed G80 command).
dem inscheniör is' nix zu schwör...
Re: life adjust Z - my way
I'm new into this matter and I've just build up a MK2S over the last weekend. Most went fine besides the usual hiccups.
Thanks to this topic I've learned the first thing about calibration.
@JeffJordan: thanks for sharing and describing this really clever idea of z axis calibration!
However, there's one thing I struggle to understand about this method. On using the gcode isn't the assumption that there's no under extrusion? I mean as far as I got it there's a printer setting to compensate for that but this is factored in on generating the gcode; and the multiplier seems to vary from pinter and filament (mine is about 5% now, others reported up to 10%). Or am I mistaken?
Shouldn't we rather go for the stl file and slice it on our own with our optimzed printer settings?
Sorry if that might be stupid. As said I'm new into this topic.
Re: life adjust Z - my way
@JeffJordan
Thanks for the tip! I'm trying to learn as fast as I can
Re: life adjust Z - my way
I've tried this print after moving my printer and re-calibrating it and it really makes things much more precise. Thanks!
Re: life adjust Z - my way
Having trouble with the base layer ends curling up. Seems to happen more on the shorter runs. Related to Zcal or is this temp setting? Tried slowing the speed down and lowering and raising the nozzle temp by 5 degrees but did not help. Printing with the stock PLA the printer came with.
Thanks!
Re: life adjust Z - my way
why do you print at 3M tape instead of the genuine pei sheet with the pla ???
the 3M tape is relatively thick and i'm not sure if you can get the height of it absolutely identical (+/- 10µm) at every spot of the print surface (looking at the edges of the tape, i get some shingled impression).
furthermore the tape acts somehow elastic, so it'll be difficult to "squeeze" the filament during printing the first layer as required.
if you get your first layer adjustment right, without the 3M tape, & clean the PEI sheet with the proper stuff, your edges will stick to the printbed without warping. so you don't need to print with raft and most times won't need any brim (except in case of very tiny parts with little contact to the surface).
dem inscheniör is' nix zu schwör...
Re: life adjust Z - my way
Yeah good point. I am having trouble getting the PLA to stick and the tape seemed to help. I'll work on that first layer calibration more.
Re: life adjust Z - my way
Hey, I just wanted to thank you for posting this calibration file. It has been a very useful tool for me.
One small suggestion I would make is to "notch" an angle out of one of the corners, so that when you are evaluating the printed results, you can easily remember the orientation. (sort of like the folded corner of a book or the shape of a 3.5 inch floppy disk/save icon)
Perhaps I will at some point see if I can learn how to do this myself, but for now I thought I'd post the suggestion.
But again, most of all THANK YOU. As I've been learning to use this printer, this has helped me many times get past my frustration and get back to printing !!!
Re: life adjust Z - my way
Yeah good point. I am having trouble getting the PLA to stick and the tape seemed to help. I'll work on that first layer calibration more.
PLA not sticking to PEI sheet check your temp and print speed what software are you using ?
Prusa i3 MK2s MK2.5s Mk3 Mk3s BearPrusa Zaribo 320 - Kit Build - Rc Driver - Tweak freak...
“I know nothing about surpassing others. I only know how to outdo myself.†-Bushido-