RE: life adjust Z - my way
Thank you. I tried using a 3x3 pattern here: https://www.printables.com/model/36706-bed-level-test/files and notice when it gets to tracing out the lines on middle left to front left of the build plate, the PLA is briefly not touching the plate in a few spots. I went through the leveling using 'prusa leveling guide' addon in octo print and got my variance to 0.2 with the nylock mod.
Does this mean my bed is warped or i need to go even down even further on my z offset?
RE: life adjust Z - my way
Would this gcode work for any nozzle diameter? or just .4mm?
RE: life adjust Z - my way
The .gcode would be very nozzle-specific, as well as specific to countless other factors.
I see that the .stl is included, so I would simply re-slice it for a different configuration if needed.
RE: life adjust Z - my way
Hey Jeff, this may be a really ignorant question but when I downloaded the file I saw it's a gcode, so I can't modify the settings in my simplify 3D profile to print with a .8mm which is what I need to calibrate. Is there a similar file that can have the layer height settings available for modifying?
RE: life adjust Z - my way
Hi David,
that post is about 4 years old,
unfortunately I haven't seen Jeff on the forum for a long while.
the Gcodes have been archived twice that I am aware of, and I have re posted the originals for continuity.
I don't have the original S3D files myself.
sorry!
Joan
I try to make safe suggestions,You should understand the context and ensure you are happy that they are safe before attempting to apply my suggestions, what you do, is YOUR responsibility.Location Halifax UK
RE: life adjust Z - my way
Thanks Joan, I'll probably make a file of my own and if it works I'll post it here.
I appreciate your help.
RE: life adjust Z - my way
You can make your own model pretty simply right in PrusaSlicer.
I’m not at my computer so doing this by memory…
Open PrusaSlicer and right click on the platen.
Select ‘Add Part’ or ‘Add Shape’ (don’t recall the exact syntax).
Choose a cube from the shapes gallery.
Resize the cube to 75mm X 75mm X 0.2mm.
Slice the model using 0.2mm layer height with the profile for your nozzle size and filament.
Save and print the file.
If I missed something I’m sure someone will chime in and set me straight, but I think this will work.
Good luck.
Cheers
RE: life adjust Z - my way
this is very helpful, thanks! Trying it now.
RE:
the thickness of the sheet begins at about 0.27mm when the nozzle is to high. the thickness then drops down to 0.20mm when you've found the right z adjustment value. then it rises again to approx. 0.23mm when the nozzle is too low (then the surface gets somehow dim and rough).
so the challenge is to find the optimum.
🙄
This was fantastic to see. I was so confused when my lowest z setting produced the thickest print.
Thanks!
RE: life adjust Z - my way
This was fantastic compared to the built-in adjustment print.
I do have a couple comments.
1. The beep really startled me.
2. I don't understand warming up to a lower than printing temperature, doing the Z calibration and then warming up to printing temp. I stopped my first print before it finished and then started another. It had to wait for the temperature to go down before doing the Z calibration and then wait again to get up to printing temp.
3. I really wish the diagonal printing started from front left instead of front right. That way I could make at least 4 adjustments during the print. The problem with starting in the front right is that the printhead and fan block the view of the print until it is almost halfway complete.
Thanks!
RE: life adjust Z - my way
Hi Julie,
unfortunately Jeff Jordan, seems to have moved on.
so changes are unlikely!
regards Joan
I try to make safe suggestions,You should understand the context and ensure you are happy that they are safe before attempting to apply my suggestions, what you do, is YOUR responsibility.Location Halifax UK
RE: life adjust Z - my way
Hi @julie - welcome to the forums.
This was fantastic compared to the built-in adjustment print.
I do have a couple comments.
1. The beep really startled me.
2. I don't understand warming up to a lower than printing temperature, doing the Z calibration and then warming up to printing temp. I stopped my first print before it finished and then started another. It had to wait for the temperature to go down before doing the Z calibration and then wait again to get up to printing temp.
3. I really wish the diagonal printing started from front left instead of front right. That way I could make at least 4 adjustments during the print. The problem with starting in the front right is that the printhead and fan block the view of the print until it is almost halfway complete.
Thanks!
The built in Z level routine is good for getting in the general vicinity of a proper Z height. I regularly suggest Jeff Jordan’s ’Life Adjust Z - my way’ to new users as it allows you to fine tune to Z height with greater precision.
1. Jeff added the mid point beep in a later version of the files to alert users to change the Z height setting. If it bothers you, you can comment it out in the gcode file. Personally, I sometimes change the setting 4-5 times during a single print, jotting down the value with each change. So the beep doesn’t really impact me one way or another.
2. The lower initial temperature is to warm up the hotend to a point that prevents oozing of the filament prior to the mesh bed leveling routine. Many users prefer this behavior as it results in fewer drips and blobs before a print begins. There are many posts and links on this topic in the forums. If you’re pre-heating before running the ‘life adjust z - my way’ calibration, you then have to wait for the hotend to cool (per his gcode) before the mesh bed leveling begins. If you don’t like the pre-heat routine, you can comment out the lines in the gcode.
3. It’s not always easy to predict or control where on the build plate PrusaSlicer will start to print. I created my own 75mm X 75mm X 0.2mm files so I could more easily control temps and other values for specific filaments. My first slice of this file began printing from the left rear, completely obscuring the sight lines to what was happening. I was able to change some settings and get the prints to start at the right front, which is certainly better, but I understand your point. I guess I just got used to the original prints and am able to see them well enough to makes Z height changes as needed.
When I get a chance, I’ll see if I can figure a way to get the print to start from the left front. Or, perhaps another forum member knows how to do this and can share that info back here.
Good luck and enjoy your new printer.
Cheers
RE: life adjust Z - my way
I must have a older file since I don't have the beep. That would annoy me.
Every time I print I think I have like 5 or 6 different levels. you really don't need a lot of area to print to determine if there's an issue. I have paper and pen which I map out the adjustment heights. I have a flashlight that I is pointed down there so I can see what is going on.. I totally get the difficulty to see what's going on while it is printing, but usually I can see enough to get an idea. My method I am constantly making notes and adjusting.. I'm happy I don't have the beep. LOL.
If you need it, I can upload an older version so at least you can avoid the beep..
RE:
Hi Julie,
I am on My laptop now.
Try the attached files.
Jeff Jordan's 'Life Adjust Z My Way', is many years old, it was actually created for the Mk2 Printer, when that was new, and the first layer calibration file was a Gcode file that you had to Load from SD Card, because there was no option in the firmware.
Time has moved on, but the simple square has been a help for MANY users over the years.
I have created an oblong patch that is twice as long, but half as tall as the original, and it starts printing from the top left corner instead of the bottom right corner, also there are NO Bleeps and NO multi stage startup heating...
this may be more to your liking...
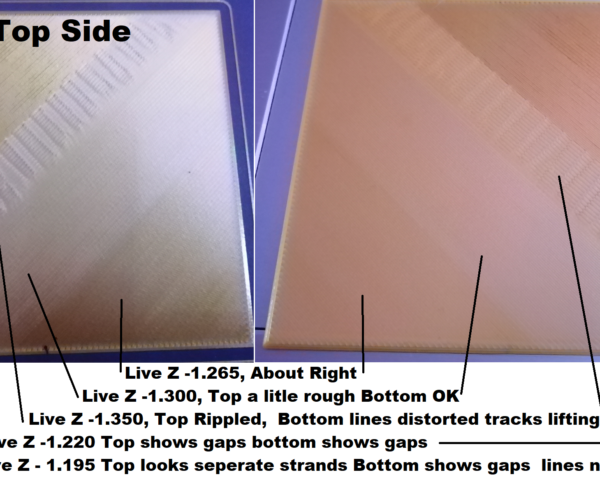
this diagram may help you understand good Live Z... the actual values are unique to my printer but the differences in values may give you an idea as to how small differences in values, can give you large differences in surface quality. (these images were based on the original 75x75mm square. the oblong version should give you more time to see the differences and make alterations.
I have included the .3mf file so that you can change the filament type, nozzle diameter and printer type to suit your needs.
regards Joan
I try to make safe suggestions,You should understand the context and ensure you are happy that they are safe before attempting to apply my suggestions, what you do, is YOUR responsibility.Location Halifax UK
RE: life adjust Z - my way
Thanks for the warm welcome everyone.
Regarding the beep, the first beep might just be the current firmware related to temperature. I realized that I hear it at other times. I also like a beep to notify me that the print is done because I am often in a different room. I thought the beeps were part of the test print because of the one in the center of the print.
I am curious about where the printing starts. All my prints with large flat bases seem to print the first layer diagonal starting at the front right. I wonder if it has anything to do with fan position and producing good adhesion to the bed.
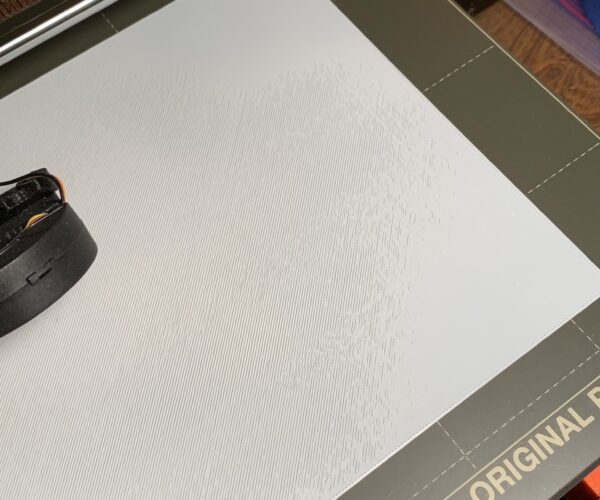
After the live adjust I have a first layer for the test that measures right at .2mm thick. I am pretty happy. I did a large print last night and saw a curious pattern on the first layer. I find it a little strange because the printer checks 9 points before each print, and because the small live calibration print was in the middle of the bed.
Here is the first layer which looks amazingly smooth for the front right (starting) corner and for the right rear. It surprised me that the center which was so nice on the test print doesn't look like the test print.
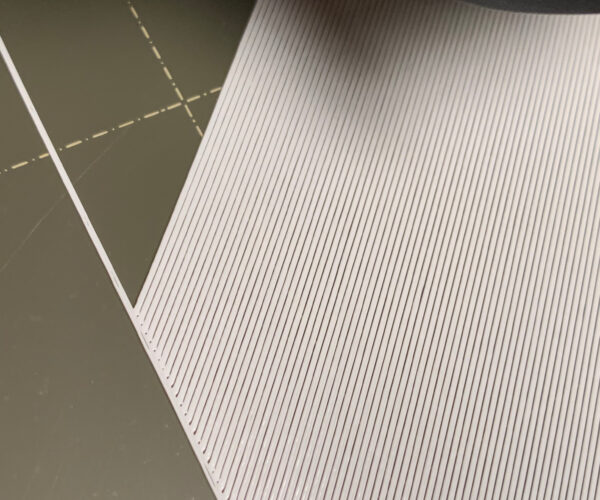
Here is the closeup of the left rear and how much separation it has between passes.
It just occurred to me that I did the test print with a different color filament, but the same brand. Could changing filament make this kind of difference?
Shouldn't the 9 point Z calibration before the print keep the print the same across the bed?
RE: life adjust Z - my way
If you look at the 'Mesh Bed Levelling' in the LCD Settings there is an option for 7x7 mesh bed levelling, it checks 49 points on the bed, and if you turn on Magnet compensation, 7 of these points are ignored, leaving 42 test points. you can select 3 tests, or more per point. (this actually takes about the same time as the older 9 point testing, but in my opinion, it gives better results.
regards Joan
I try to make safe suggestions,You should understand the context and ensure you are happy that they are safe before attempting to apply my suggestions, what you do, is YOUR responsibility.Location Halifax UK
RE:
FLAT - FLAT - FLAT - make sure model is flat.
What silly little boy I am....first few prints I must of just got lucky...all fine as got the '500 euro soap dish' I always wanted lol
then started getting a massive blob of plastic gunk on nozzle when printing Lucky 13 Mando head model...5 times...10's of tests adjusting Z axis
What did I take for granted? Was the model was already flat on plate in P Slicer??? NO it WAS NOT and I had not checked...idiot!
So now I have learned a vast spectrum of tolerances for the z axis in prints and can now different types of finish by how much 'squish' I put on the filament.
At least I learned the hard way... as they say. 😉
RE: life adjust Z - my way
Hi all. Having the same problem with my Mini+: prints come off the bed after they reach a half-inch or more in height.
I tried the calibration file posted for PLA, but OctoPrint is showing this warning when I go to print it:
PLA_S3D_calibration_surface_75x75mm@200um_v6.1.gcode exceeds the print volume of the currently selected printer profile, be careful when printing this.
More Object exceeds print volume in width.Travel exceeds print volume in width.Travel exceeds print volume in depth.Travel exceeds print volume in height.Travel area: (0.00, -3.00, 0.00) × (220.00, 200.00, 210.00)Object's bounding box: (0.00, -3.00, 0.00) × (220.00, 145.22, 0.20)Print volume: (0.00, -3.00, 0.00) × (180.00, 180.00, 180.00)
Also Joan's attachment for the Mini+ has been removed. I'm not sure how we're intended to use the GCode she posted.
Thanks for any insight!
RE: life adjust Z - my way
attachment for mini should be back in the first post on this thread,
regards Joan
I try to make safe suggestions,You should understand the context and ensure you are happy that they are safe before attempting to apply my suggestions, what you do, is YOUR responsibility.Location Halifax UK
RE: life adjust Z - my way
Yay! Thanks Joan!


