First Prints
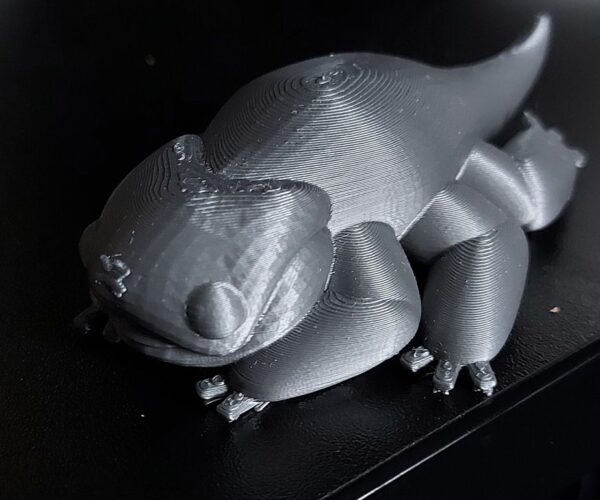
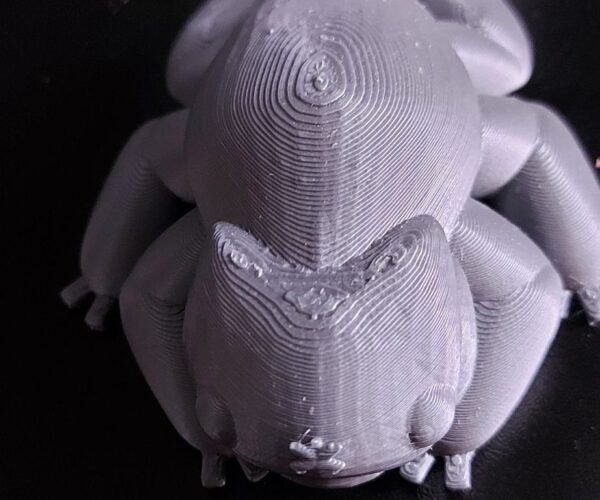
Hey as the title suggests, ive just created a few prints to test how my MK3S+ is printing. I was pleasantly surprised to find how compact the layers within the print were on my first prints but I noticed some odd results when it came to the end of the model prints. Both the top and the very bottom of the prints seem to be untidy and I was wondering if this is normal or possibly due to an incorrect configuration I have set up in the slicer software or a possibly just a height issue with the nozzle.
I have also printed off a Benchy to test this and this seems to of printed much cleaner overall with just a few obvious lines on the top and a somewhat untidy base.
If anyone could enlighten me on what they believe is normal and what might be a setup issue it would be greatly appreciated.
Benchy model plus 2 of my own models all printed with the same printer setup but my own models were printed with an altered slicer configuration (imported configuration by accident when trying to import model)
RE: First Prints
Your live z needs adjusting lots. Not enough squish by a long way. So the value needs to go more negative. So for example if you have it at -.600 then you would need to go -.650. (Note numbers are for example only the specific live z will be for your machine and setup depending on where the pinda probe is adjusted to). There are MANY threads on here about adjusting it properly. The best one is probably https://forum.prusa3d.com/forum/original-prusa-i3-mk3s-mk3-assembly-and-first-prints-troubleshooting/life-adjust-z-my-way/
Get that sorted first, otherwise your bed adhesion can fail and cause you all sorts of grief.
The top effect is called 'stair stepping' and is a natural part of slicing into layers. As they curve gradually like that that is what happens. Its why PS has a variable layer height feature so you can slice gradual slopes at thinner layer heights to reduce the effect (you cant entirely eliminate it as theres a minimum practical layer height a fdm 3d printer can do).
Thats what resin printers excel at.
You also seem to need supports for some of those model areas.
RE: First Prints
Your live z needs adjusting lots. Not enough squish by a long way. So the value needs to go more negative. So for example if you have it at -.600 then you would need to go -.650. (Note numbers are for example only the specific live z will be for your machine and setup depending on where the pinda probe is adjusted to). There are MANY threads on here about adjusting it properly. The best one is probably https://forum.prusa3d.com/forum/original-prusa-i3-mk3s-mk3-assembly-and-first-prints-troubleshooting/life-adjust-z-my-way/
Get that sorted first, otherwise your bed adhesion can fail and cause you all sorts of grief.
The top effect is called 'stair stepping' and is a natural part of slicing into layers. As they curve gradually like that that is what happens. Its why PS has a variable layer height feature so you can slice gradual slopes at thinner layer heights to reduce the effect (you cant entirely eliminate it as theres a minimum practical layer height a fdm 3d printer can do).
Thats what resin printers excel at.You also seem to need supports for some of those model areas.
Thankyou, ill try to take a look at it later on today and see how the prints differ. I thought the 'stair stepping' may have been a normal part of the process but wasn't entirely sure so thankyou for that clarification as well. I should have mentioned, the two models of my own were printed using supports as I read supports should be on for angles greater than 40 degrees though I didn't have any supports on for the Benchy model which I thought would need supports for the roof
RE: First Prints
Benchy doesn't need supports as the roof should bridge. Its one of those tests that is designed to stress the capabilities and not need supports.
That last pictured model looks like there was no supports under the ears/horns section that come out of the head. Thats why its massively 'loopy' in that area. Did you have supports enabled ?
Btw if you want help with specific things then the best way is to save your project file in PS (File>Save Project As). This will generate a .3mf file. The 3mf contains everything. So all the models, all the profiles you are using, your placement, any modifiers etc. It allows someone else to slice with exactly the same setup you are using. The important thing though is that you have to zip up a 3mf for the forum to accept it as an attachment. Actually you have to zip up most file types for it to use them.
That way they can check all the options on the slice preview. They can also then make modifications and suggestions in the project and post it back for you to examine. Saves lots of screen caps with settings, which usually dont apply anyway as its often the setting/thing you dont think it will be causing an issue 🙂
Hi, thankyou for the info and sorry it took a while to get back to you. I'm just now able to get back to printing and I am having a look at the areas you have mentioned. I have my live Z at a value of -1.350 which seems to be creating a nice clean layer during the test print and it seems that there was no supports under the horns of one model like you mentioned as I had the supports set to being printed only off of the bed.
Hopefully the 'Test print' below should also allow access to the other model I printed which may provide an insight to any configuration issues if there are any. Thanks again for the help you've already provided.
RE: First Prints
Test print 2 - Reprinted this with supports and found a cleaner edge around the horns but not perfect though I think the small size might be contributing to this. stringing seems to of increased with the addition of supports too (supports set to 'everywhere')
RE:
One problem with the first model (from test print) is that the low slope angles so close to the bed means there's not enough gap below them to fit any support in there at all. That's not going to change.
For models like these you should really familiarise yourself with the paint on support method of defining enforced areas and then make use of them.
Anyway just as an example here are both files with some painted on areas defined with how I would print the supports. (added in the same zip file)
Edit - odd it wont let me attach the zipped file , even though its only 9mb and so lower than the limit mentioned
Just as a note neither of these models are that good from a 3d print perspective, there are large internal voids that depending on the support method chosen, will either print without supports (and so might not print correctly) or will be filled with support that you can't see and can't remove (which is the better case, but if the models were of one volume could be better filled with normal infill without lots of extraneous perimeters etc which aren't needed and will slow the print down).
RE: First Prints
One problem with the first model (from test print) is that the low slope angles so close to the bed means there's not enough gap below them to fit any support in there at all. That's not going to change.
For models like these you should really familiarise yourself with the paint on support method of defining enforced areas and then make use of them.
Anyway just as an example here are both files with some painted on areas defined with how I would print the supports. (added in the same zip file)
Edit - odd it wont let me attach the zipped file , even though its only 9mb and so lower than the limit mentioned
Just as a note neither of these models are that good from a 3d print perspective, there are large internal voids that depending on the support method chosen, will either print without supports (and so might not print correctly) or will be filled with support that you can't see and can't remove (which is the better case, but if the models were of one volume could be better filled with normal infill without lots of extraneous perimeters etc which aren't needed and will slow the print down).
Right ill have a look into that now. As for the 'internal voids' and making the models into 'one volume' I'm not quite familiar with what you mean. I quickly created the models with ZBrush by merging subtools and paid no mind to dynameshing before exporting as an obj. Is this close to what you are referring to, the model not have a single outer shell but rather multiple over lapping shells (subtools)?
RE: First Prints
Yeah, the multiple shells isnt a problem, the models themselves are valid and slice. From a modelling perspective they are fine. It is just that from a slicing perspective this leads to a 'messy' wasteful interior.
For example none of that internal structure can be seen from the outside. Its adding extra complexity to the slice and some potentially thin spots in the pathing. These could show up as surface artefacts too as the extrusion changes in that area can sometimes be seen on the exterior. The inside of the characters mouth is still printing when there is no need.
Its similar to the kind of thing where you see a great model thats been created for a say a game or animation, where it has clothes and equipment modelled in, but the thin 'cloth' that looks so good in a video, doesn't make it into a 3d print in parts of the model as its so thin that it cant be sliced. Extreme example would be someone modelling a realistic football with the interior void in it. Looks great but when sliced nothing is there as the actual manifold shell is too thin to print.
Its just something to be aware of when you design stuff with 3d printing it as the eventual goal.


