Artifacts
Hi, after assembling my kit I was able to print consistently but with a lot of imperfections.
I mostly see ghosting and layers imperfections.
I'm using slic3r prusa edition, Prusa PLA and using slic3r default profile.
The first layer calibration is fine, and calibration wizard doesn't show any issue.
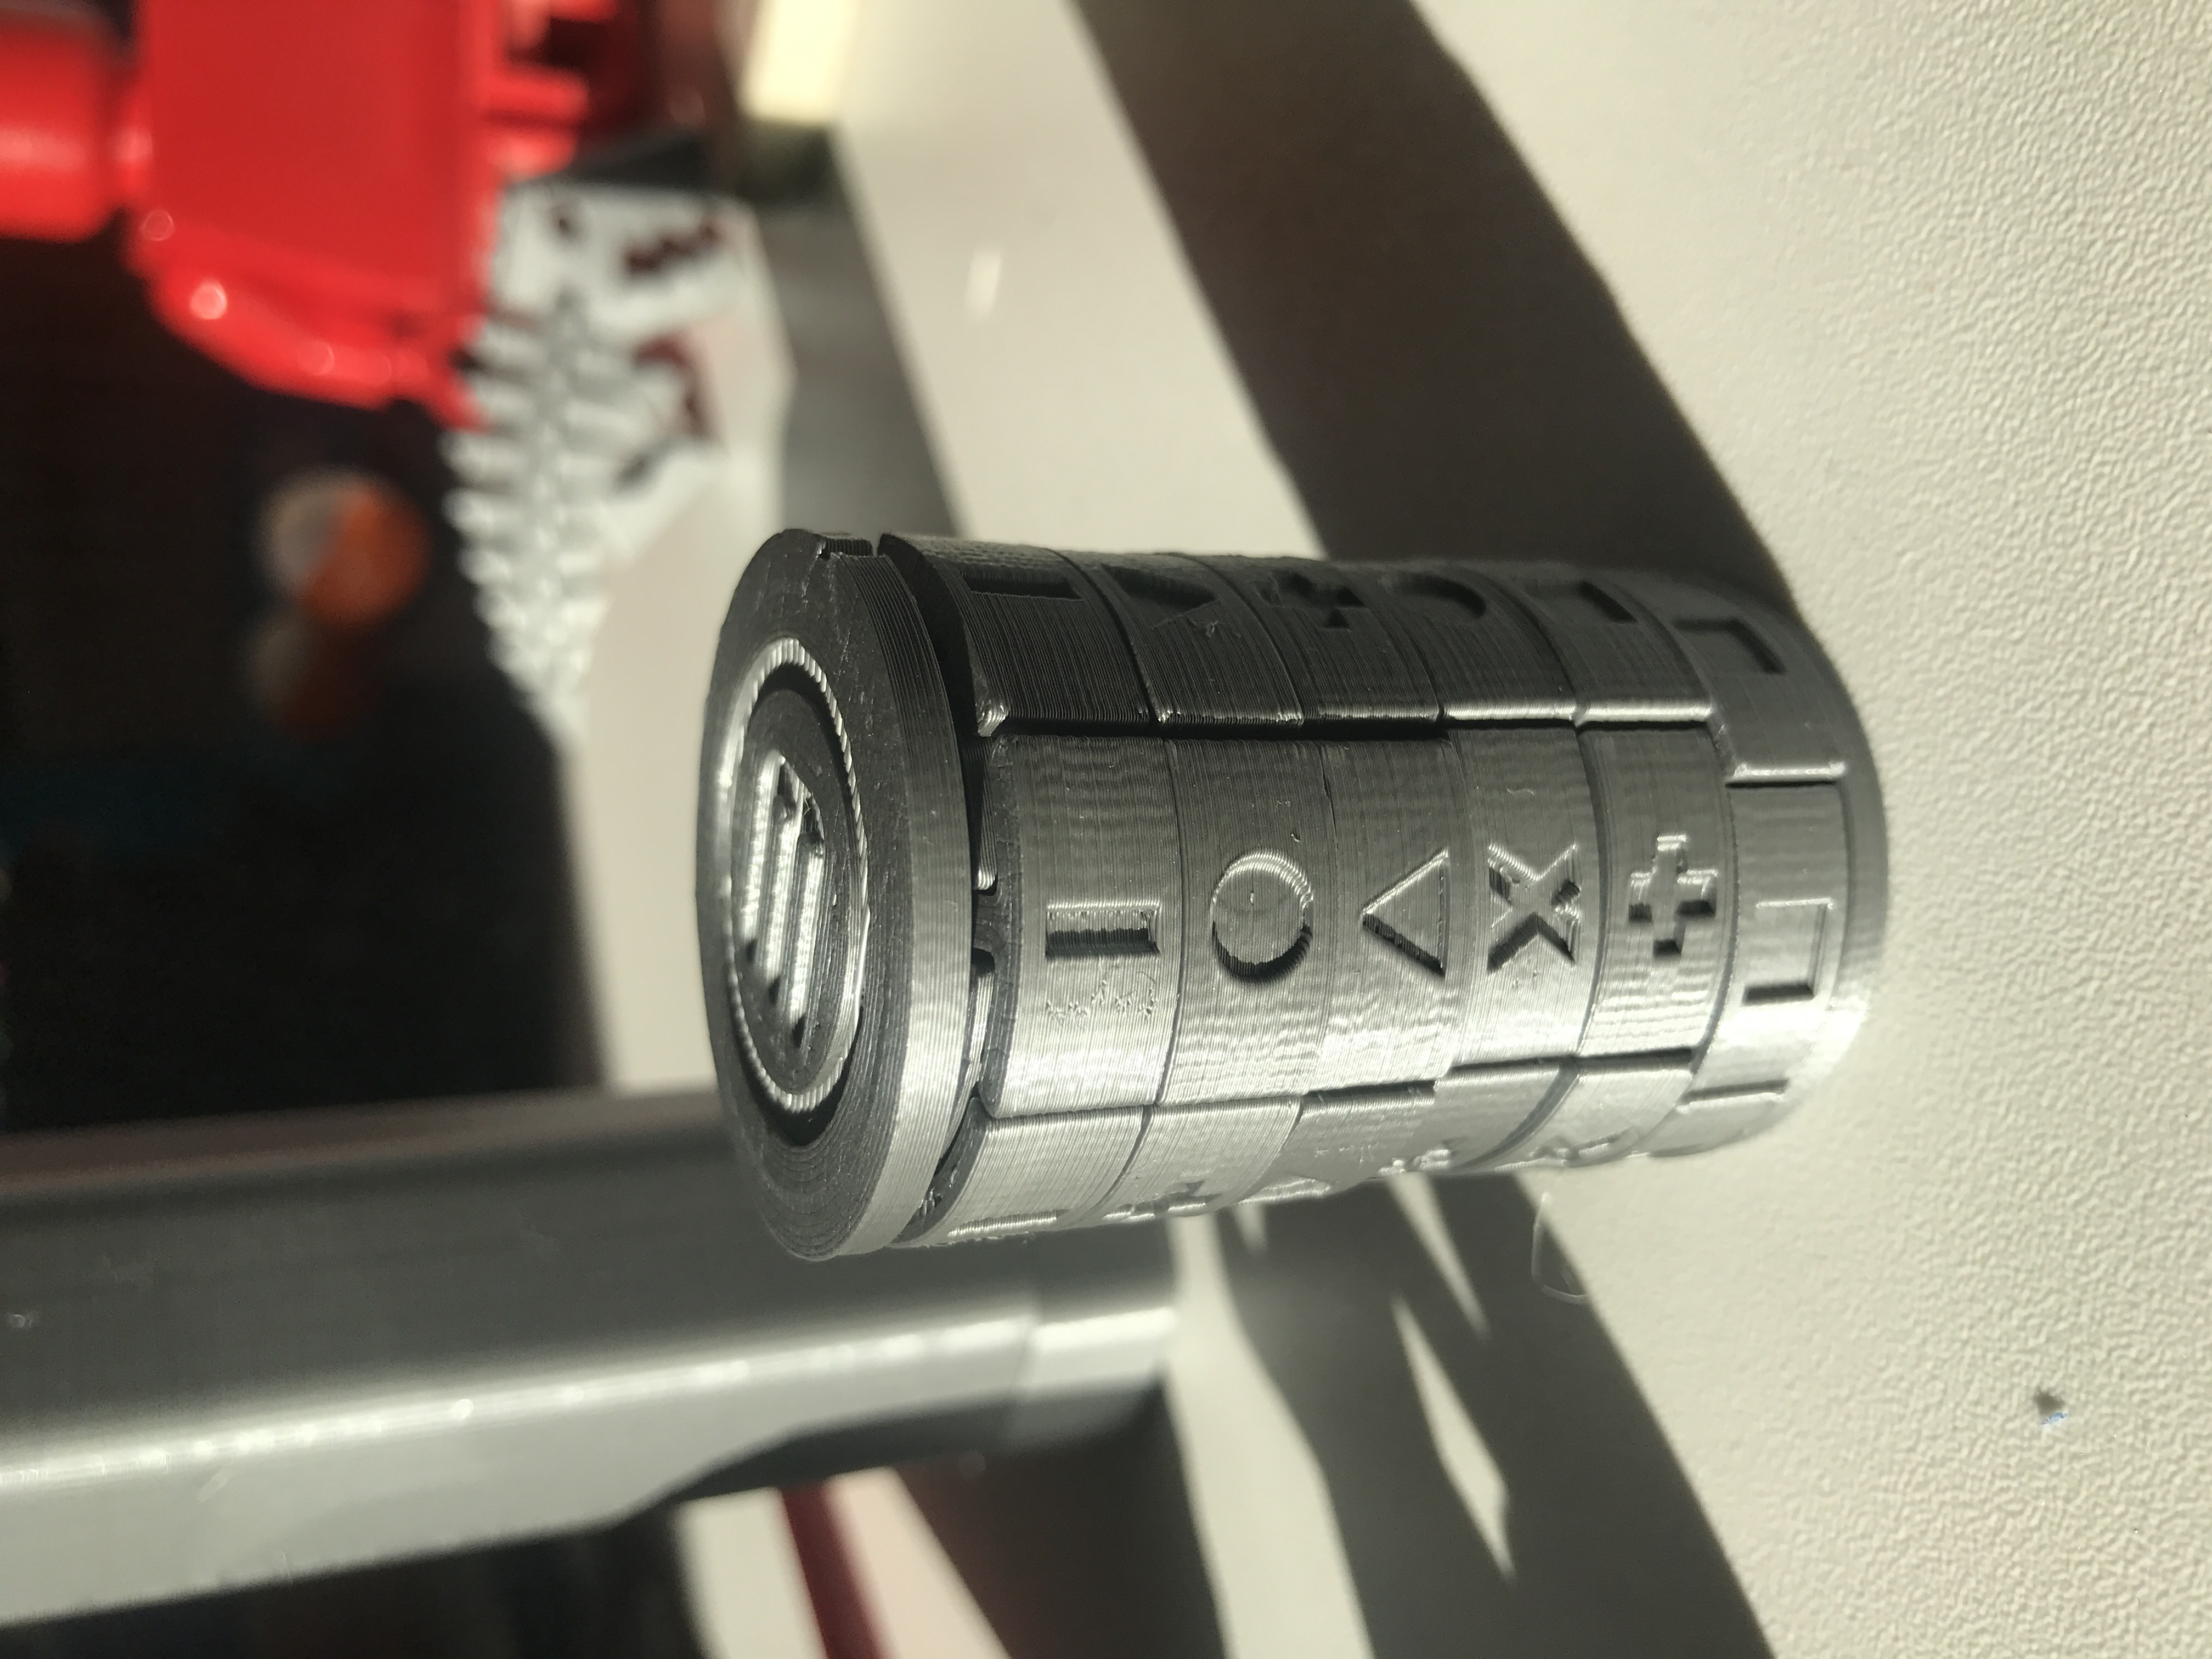
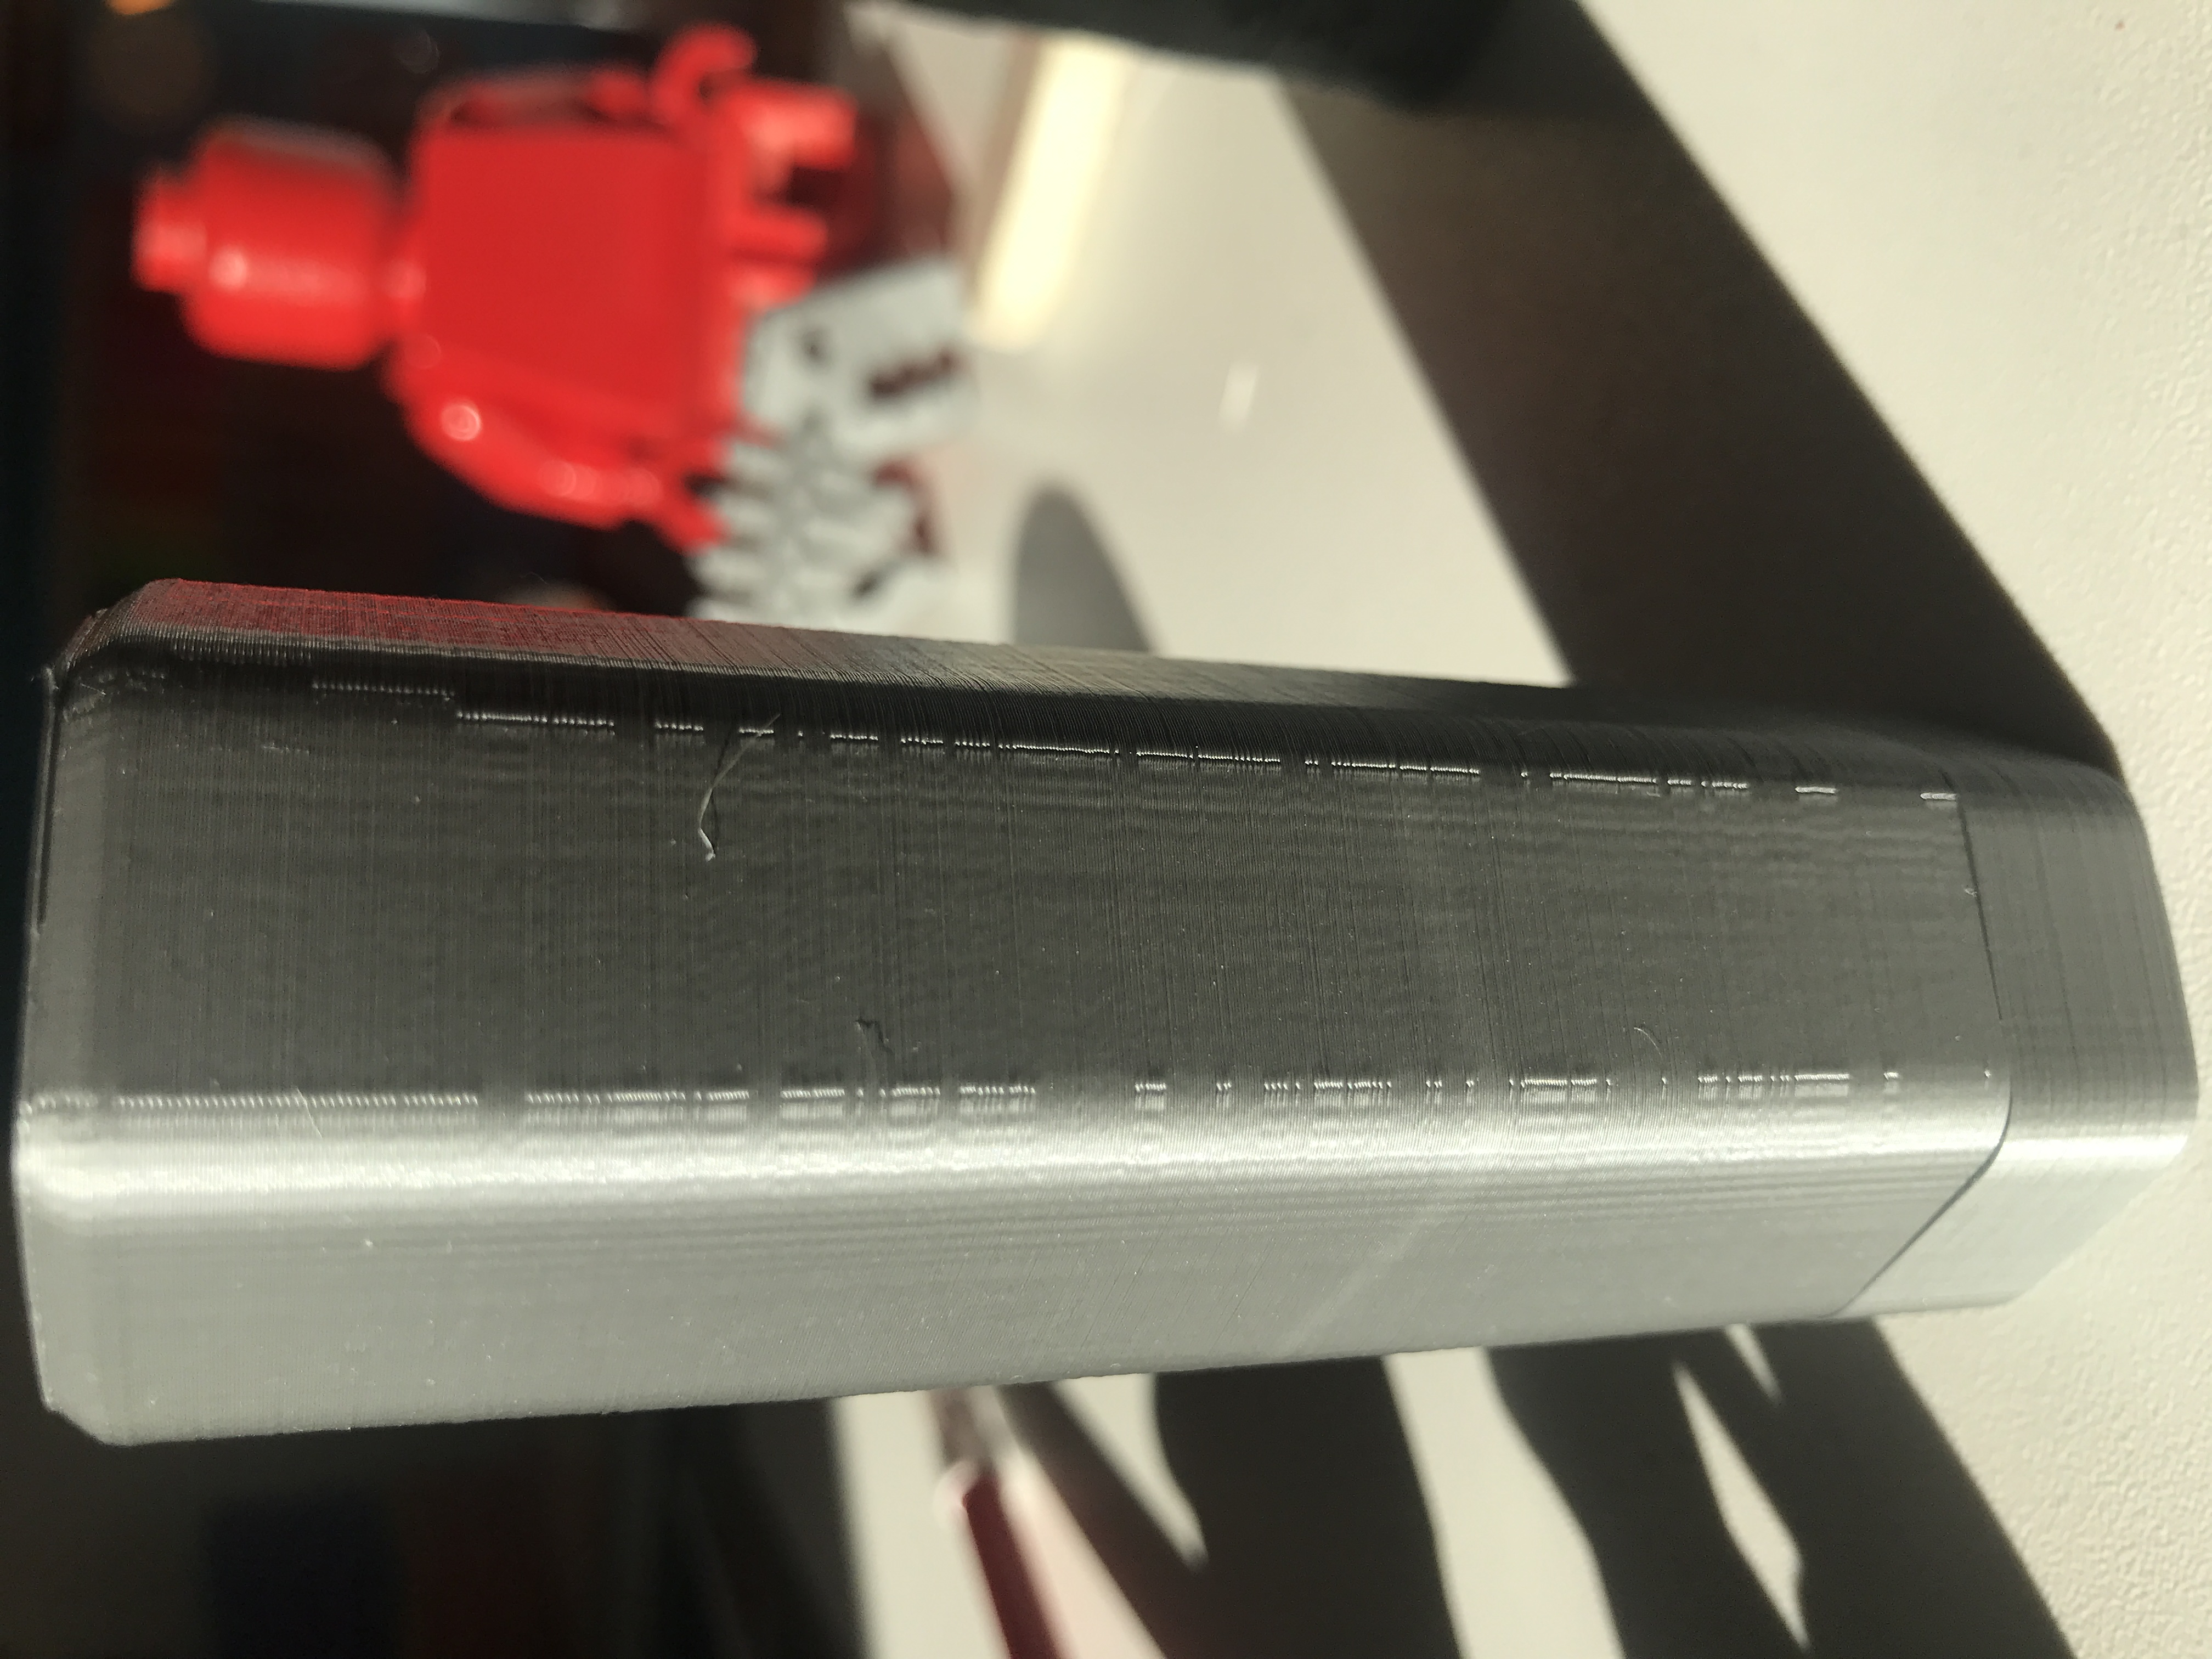
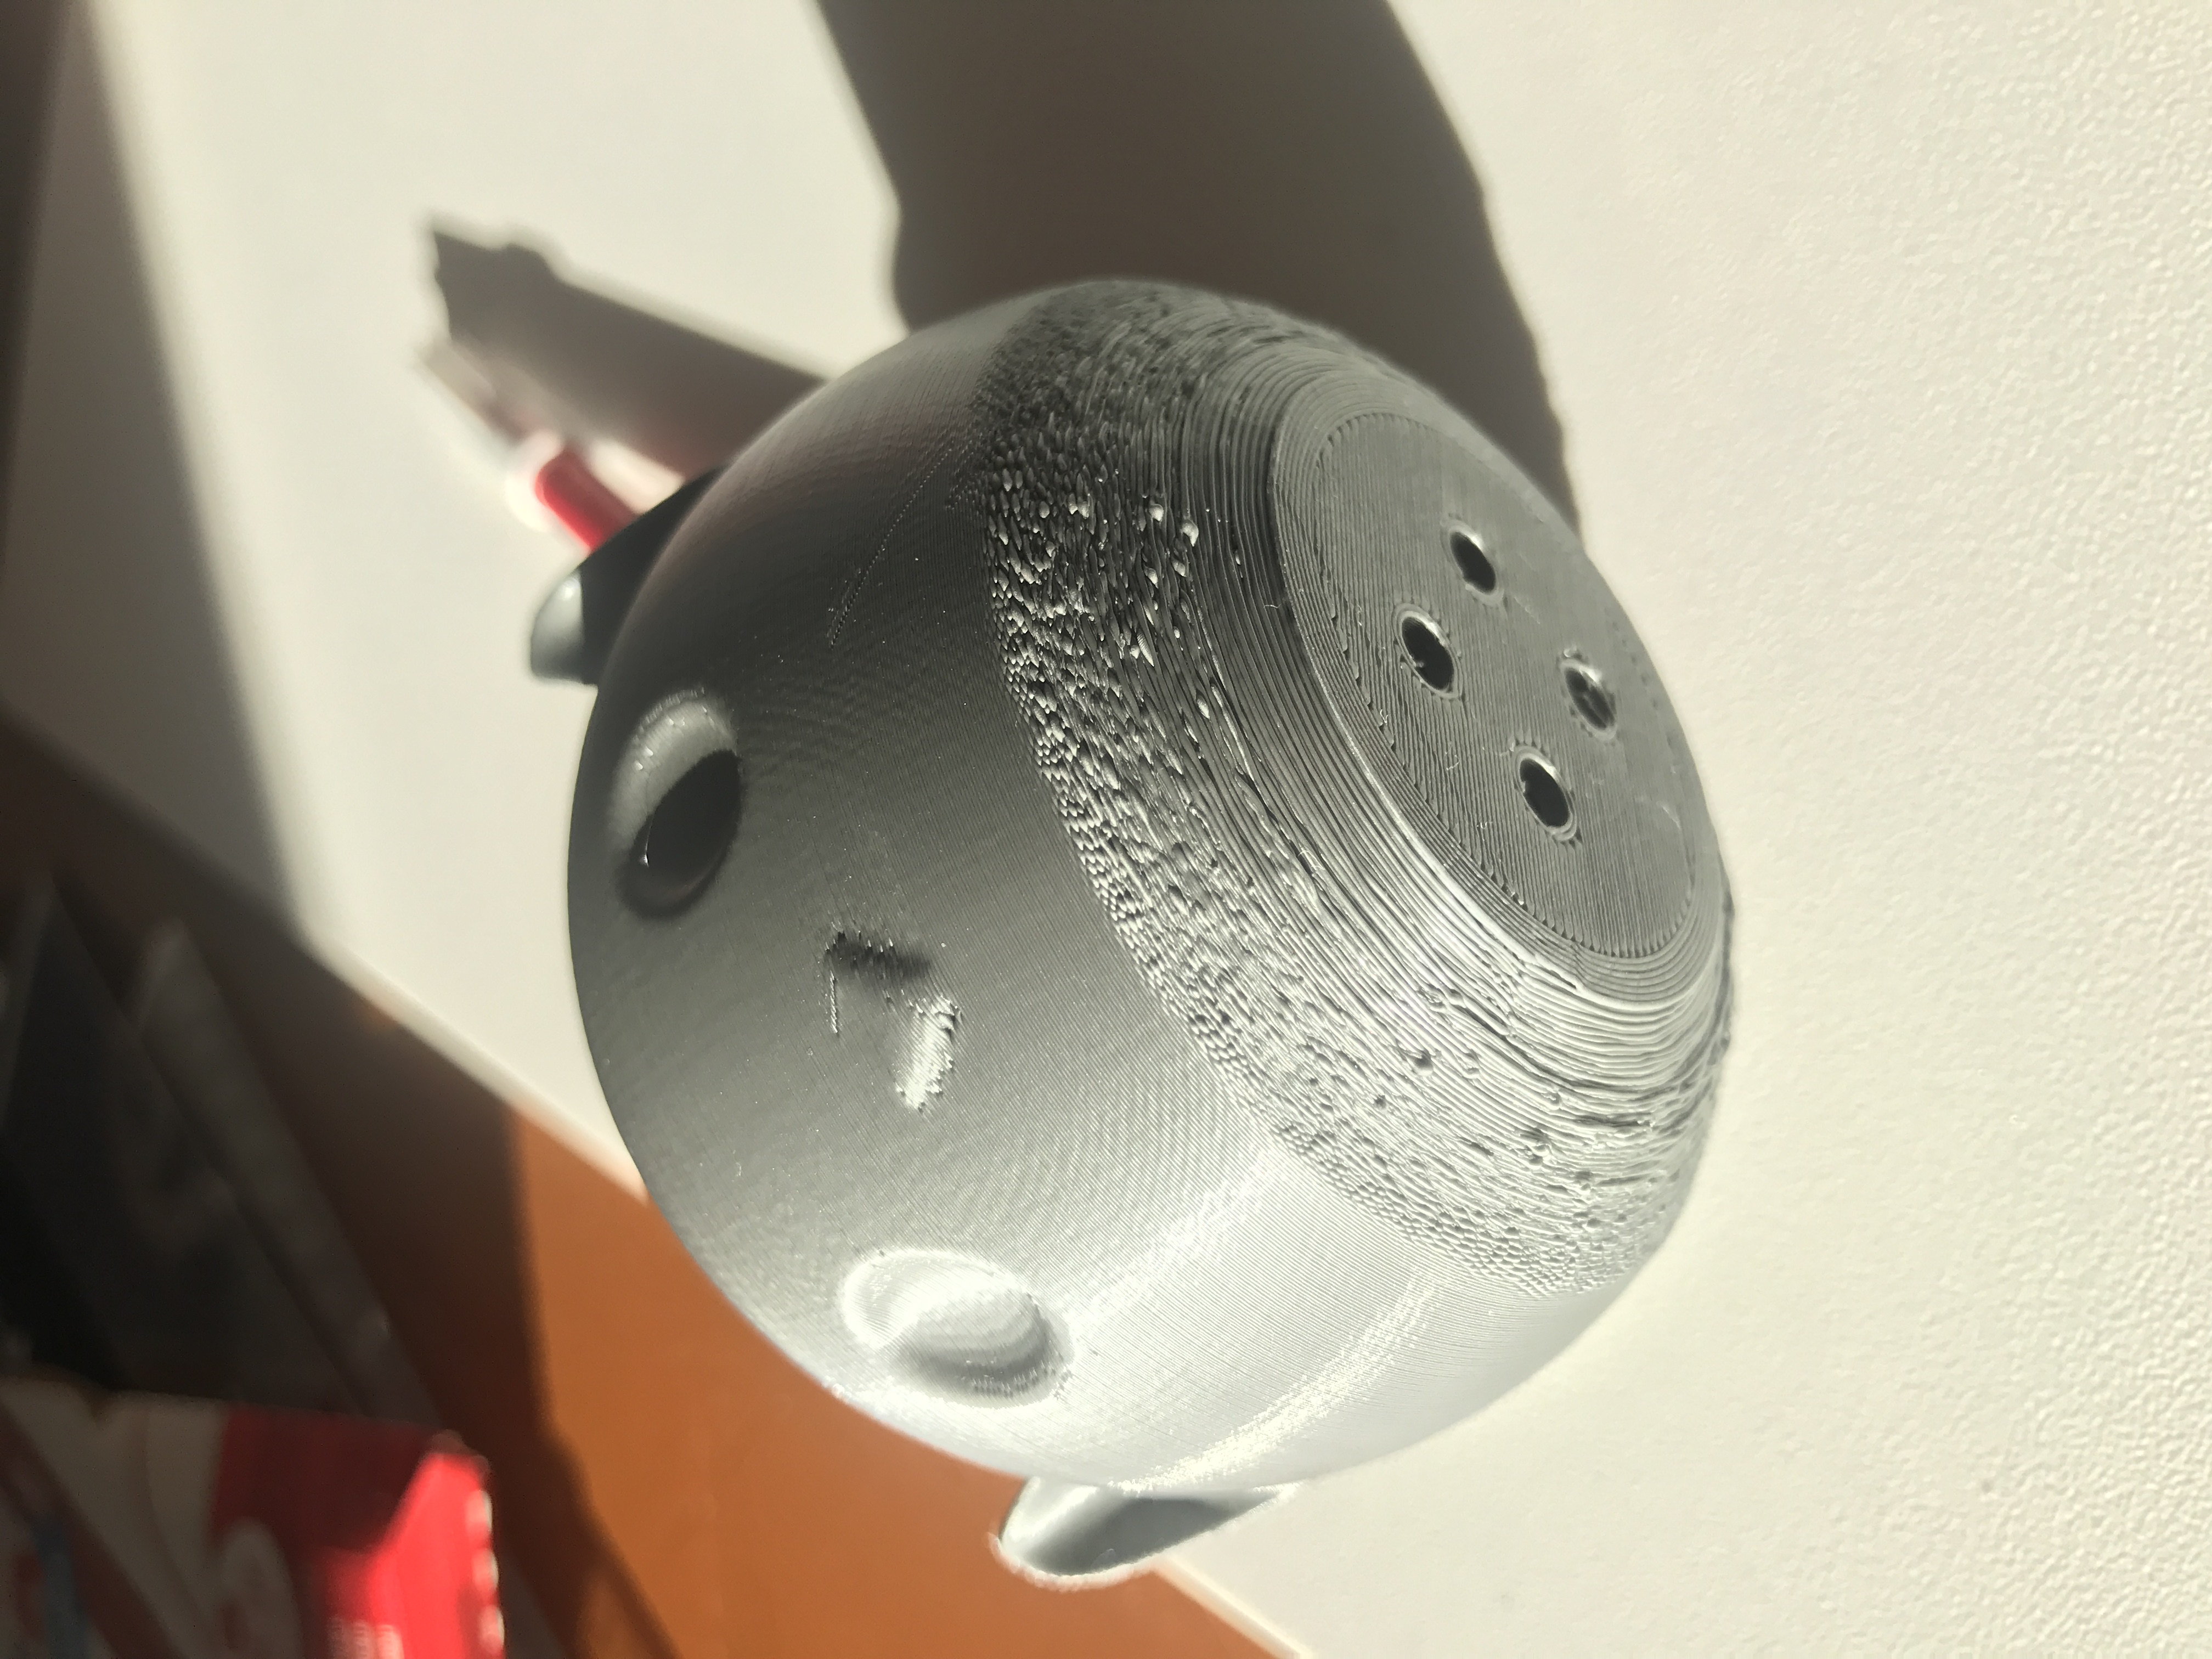
Here are some printed parts.
I really hope someone could point me in the right direction
Re: Artifacts
Top photo shows belt related or other motion ringing. Unavoidable in most cases.
Middle photo shows start-stop gaps. Also pretty much a limit of the art form. You can set Slic3r to use random start points and that might help make the issue less visible.
Bottom photo shows an attempt to print into thin air. 3D printing as done by the Mk3 requires layers to build upon prior layers. Nominally, 45 degrees is the accepted target angle when printing overhangs. The Mk3 is really good, and can often do much better than 45, 60 or so is common. But there are ways to improve overhang printing. Reduce the layer height is the easiest. Slowing down print speed and reducing nozzle temps another.
Welcome to 3D printing.
ps: your layer 1 looks like it needs some adjustment, infill looks a bit sparse, and the extrusions aren't welded.
Re: Artifacts
Thank you for the really detailed analysis. Lots of work to do 🙂 . I'll start to tune my printer ASAP
Re: Artifacts
It just occurred to me you could try tweaking X and Y axis acceleration to help control the ringing; that consistent layer-by-layer wavy pattern on the surface. Limiting it might reduce artifacts.
Re: Artifacts
So, I think I was able to adjust my first layer.
regarding the belts I think they're ok, after calibration I got this results: X 262 Y 280
By the way I'm not satisfied by the print quality. I got better results with my old Ender 3 without so much tweaking.
Don't get me wrong. I got a Prusa for reliability, now I can start a print and forget it till it's done and that's great.
But quality is still a problem.. hope to improve it..
Re: Artifacts
fyi: I'm just an owner of one of Prusa's machines. Nothing to do with them other than that.
The two numbers are rather weak indicators for belt tension. Belts need to be load tested for tension.
As for quality? Well, that's all relative. I've seen some pretty shabby prints coming from much more expensive printers. And I've seen better prints coming from cheaper printers. It all depends on how much time you want to spend optimizing a model for a specific printer. In my limited experience, the i3 Mk3 seems to handle the widest range of print tasks without fuss, yet still produces usable parts. Sure, there are a few parts that have been unkind to the printer, but those parts aren't the printers faults: the models are just difficult to print well.
A sphere - similar to your last example - is one of the most difficult to print models you can find: infinite overhang and microscopic bed adhesion point. Show me an extrusion printer that can do that (without supports) and I'll buy the first round.
Re: Artifacts
So, I think I was able to adjust my first layer.
regarding the belts I think they're ok, after calibration I got this results: X 262 Y 280
By the way I'm not satisfied by the print quality. I got better results with my old Ender 3 without so much tweaking.
Don't get me wrong. I got a Prusa for reliability, now I can start a print and forget it till it's done and that's great.
But quality is still a problem.. hope to improve it..
The most work you need to do is in the slicer, not printer in your examples.
1. The ringing is because of the speed settings. Reduce it to get better results. MK3 is direct extruder with heavier head than Ender 3.
2. Adjust seam position, reduce extruder multiplier, adjust retraction settings to get better looking seam. Try also other slicers. Every slicer handle it something different so you're getting different results for different objects. Sometimes is Slicer A better, sometimes B
3. Use other filament, reduce layer height, play with temperature settings, improve cooling for this first layers
All of your examples are actually standard examples showing limits of FDM printing. You can have it on any printer and you can improve them on any printer without any hardware modifications. But you have to put time in it and understand the root cause of it.
Often linked posts:
Going small with MMU2
Real Multi Material
My prints on Instagram
Re: Artifacts
So, I listened to all your suggestions and I'm having good results.
But one thing I cannot figure out is this (see picture).
I used support, so I didn't expect this results...
I would say that if it was not for this problem, the print would be great ( 8/10) for my standards.
Probably I'm missing something in Slic3r (I've always used Cura)
Re: Artifacts
But one thing I cannot figure out is this (see picture).
I used support, so I didn't expect this results...
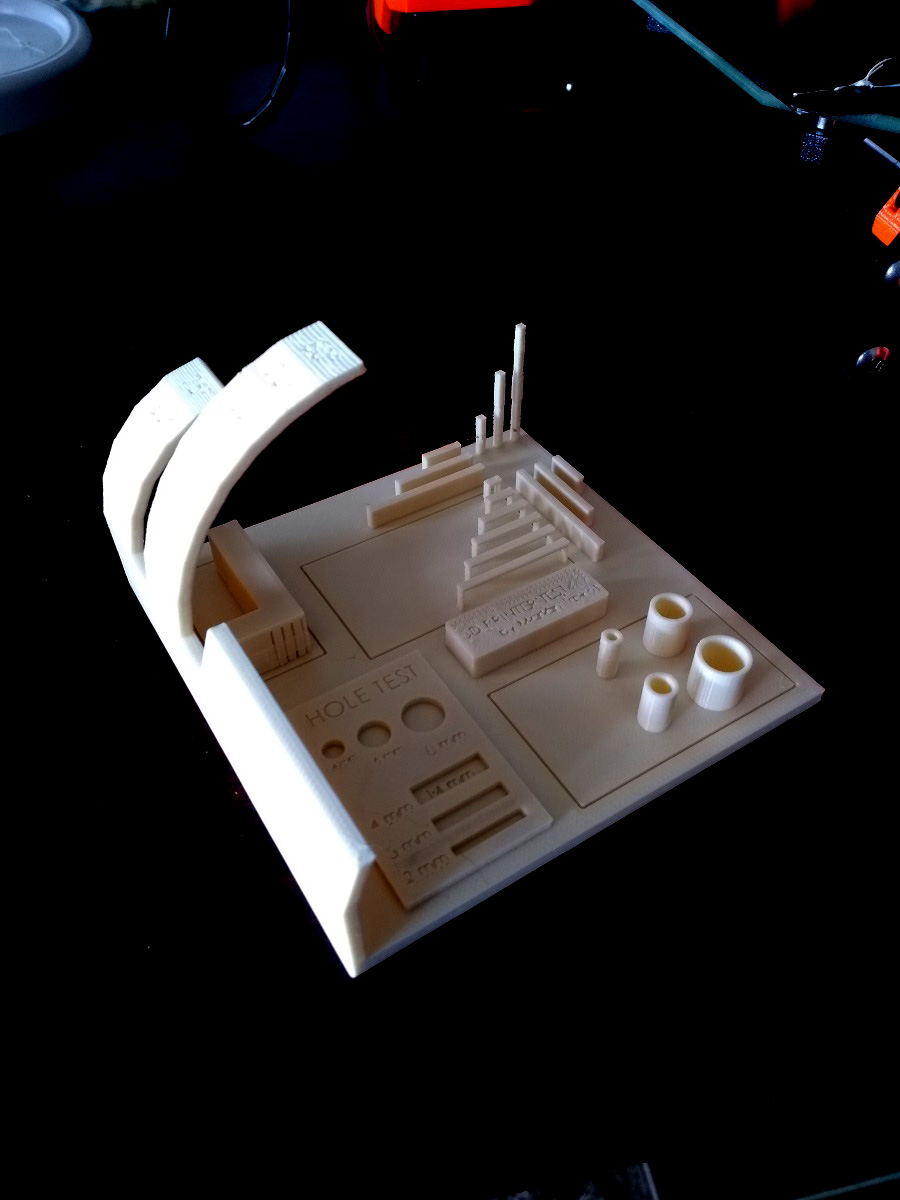
What's the layer height? Try to print overhang test. Something like this:
https://www.thingiverse.com/thing:2442722
Check the preview in the slicer. Most likely your perimeters are building up in the air with this angle and layer height. You can print it better only with soluble support and reducing the gap from object to support to zero.
Often linked posts:
Going small with MMU2
Real Multi Material
My prints on Instagram
Re: Artifacts
Layer Height ...

Re: Artifacts
So, I printed a test file with 0.2 and 0.1 layers height.
0.2 gives the best results, more details, less stringing and less artefacts.
I see ghosting and I'm thinking it could be related to jerk settings but there's no jerk setting in slic3r.
https://imgur.com/a/hkPzoen
Re: Artifacts
So, I printed a test file with 0.2 and 0.1 layers height.
0.2 gives the best results, more details, less stringing and less artefacts.
I see ghosting and I'm thinking it could be related to jerk settings but there's no jerk setting in slic3r.
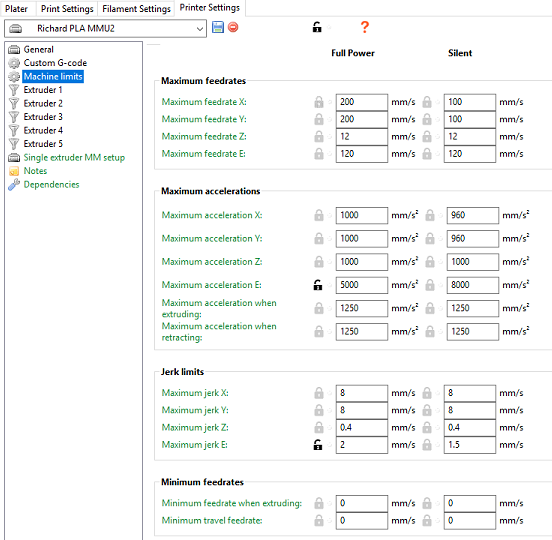
There are jerk settings in Slic3r. They are in Prnter Settings -> Machine Limits
Version 1.41.2
Re: Artifacts
Your part is lifting (warping); so the cal test is invalid.
Increase bed temps. and make sure the bed is clean and try again. 0.2 is NOT better than 0.1 for overhangs.
Re: Artifacts
new test.
0.10mm height. increased bed temperature. similar results.
Re: Artifacts
0.15mm layers - 70 degrees and higher gets a bit raggedy.
Re: Artifacts
Would you mind sharing your settings? Which slicer are you using?