CATastrophic failures printing Adalinda
This is my first post, my first printer too.. I have my printer for about 2 weeks with a few great prints, but most not so good. I'm working through the blocked extruder issues that caused most problems, but I want to ask about these strange results. After a great Prusa and triceratops prints, I tried for Adalinda, she sang a sad song for me:
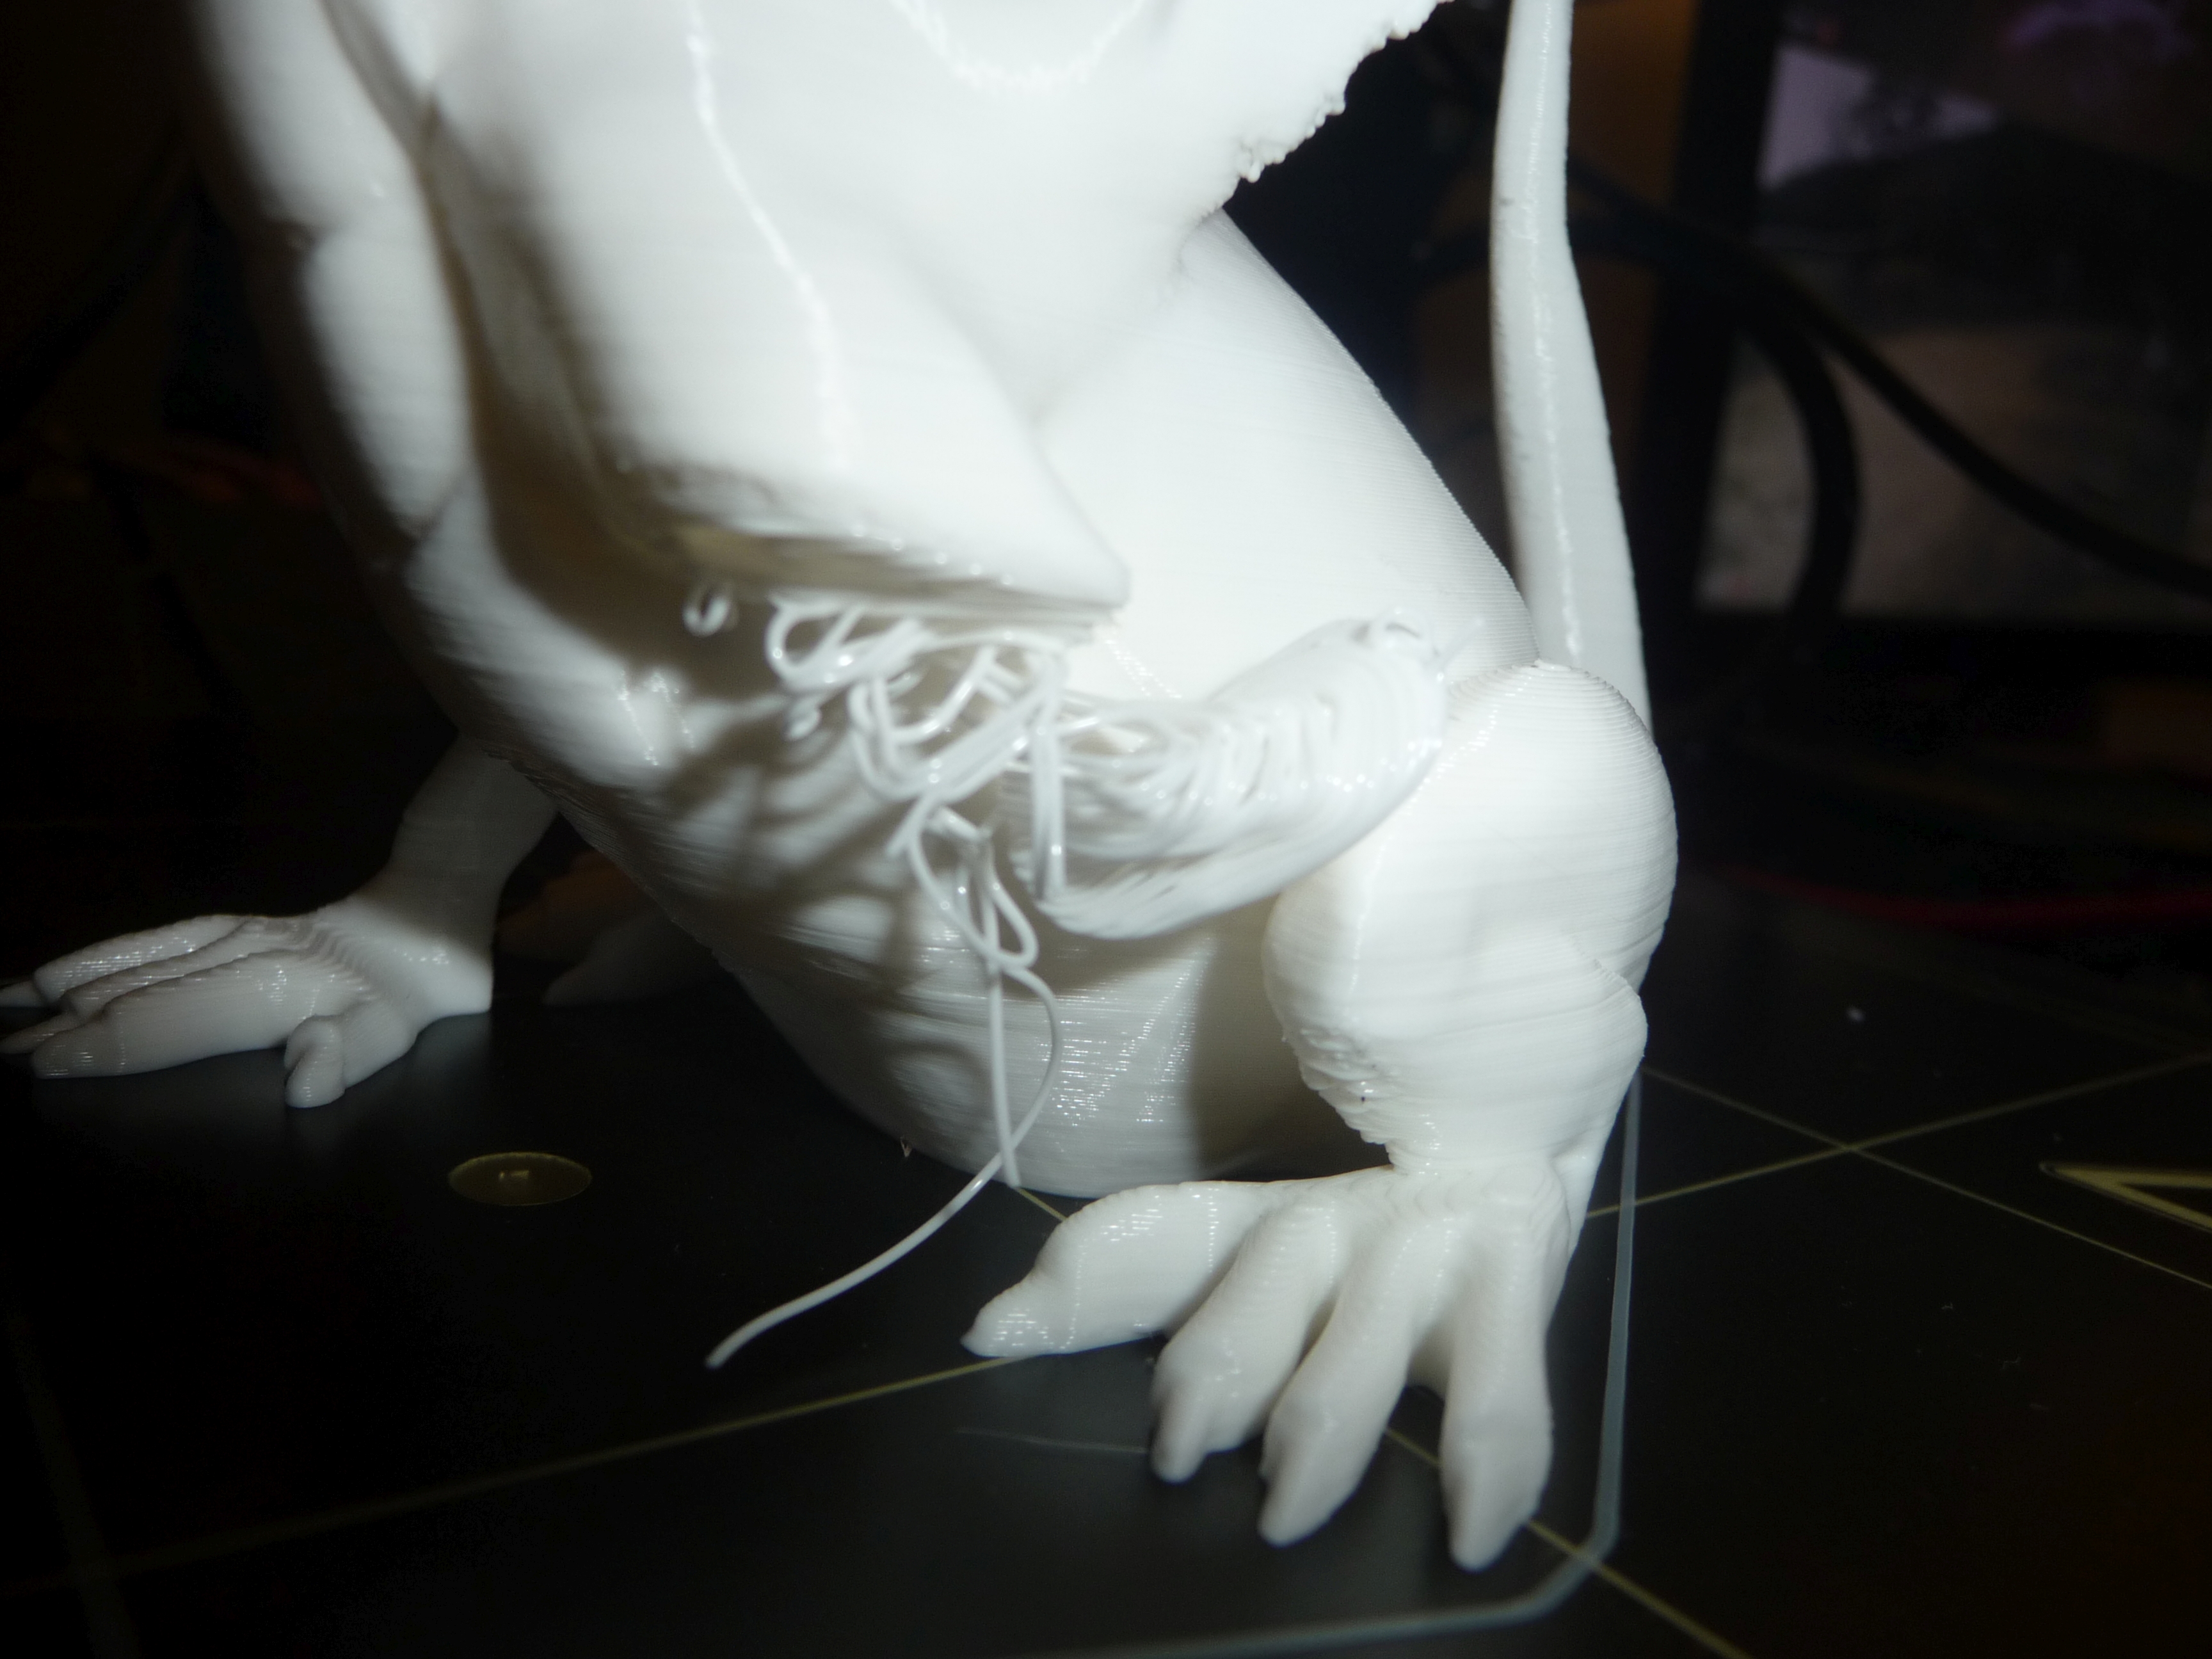
I didn't notice the problem until after it was finished, I looked in on it but not closely, just saw it seemed to be going fine. Most of the print is great. It's weird because the rest of the foot has yet to be found??? And this explains the 'CAT' in the title, I suspected a cat got to it. But then I tried to print with ngen using Slic3r presets without editing, and I got this:
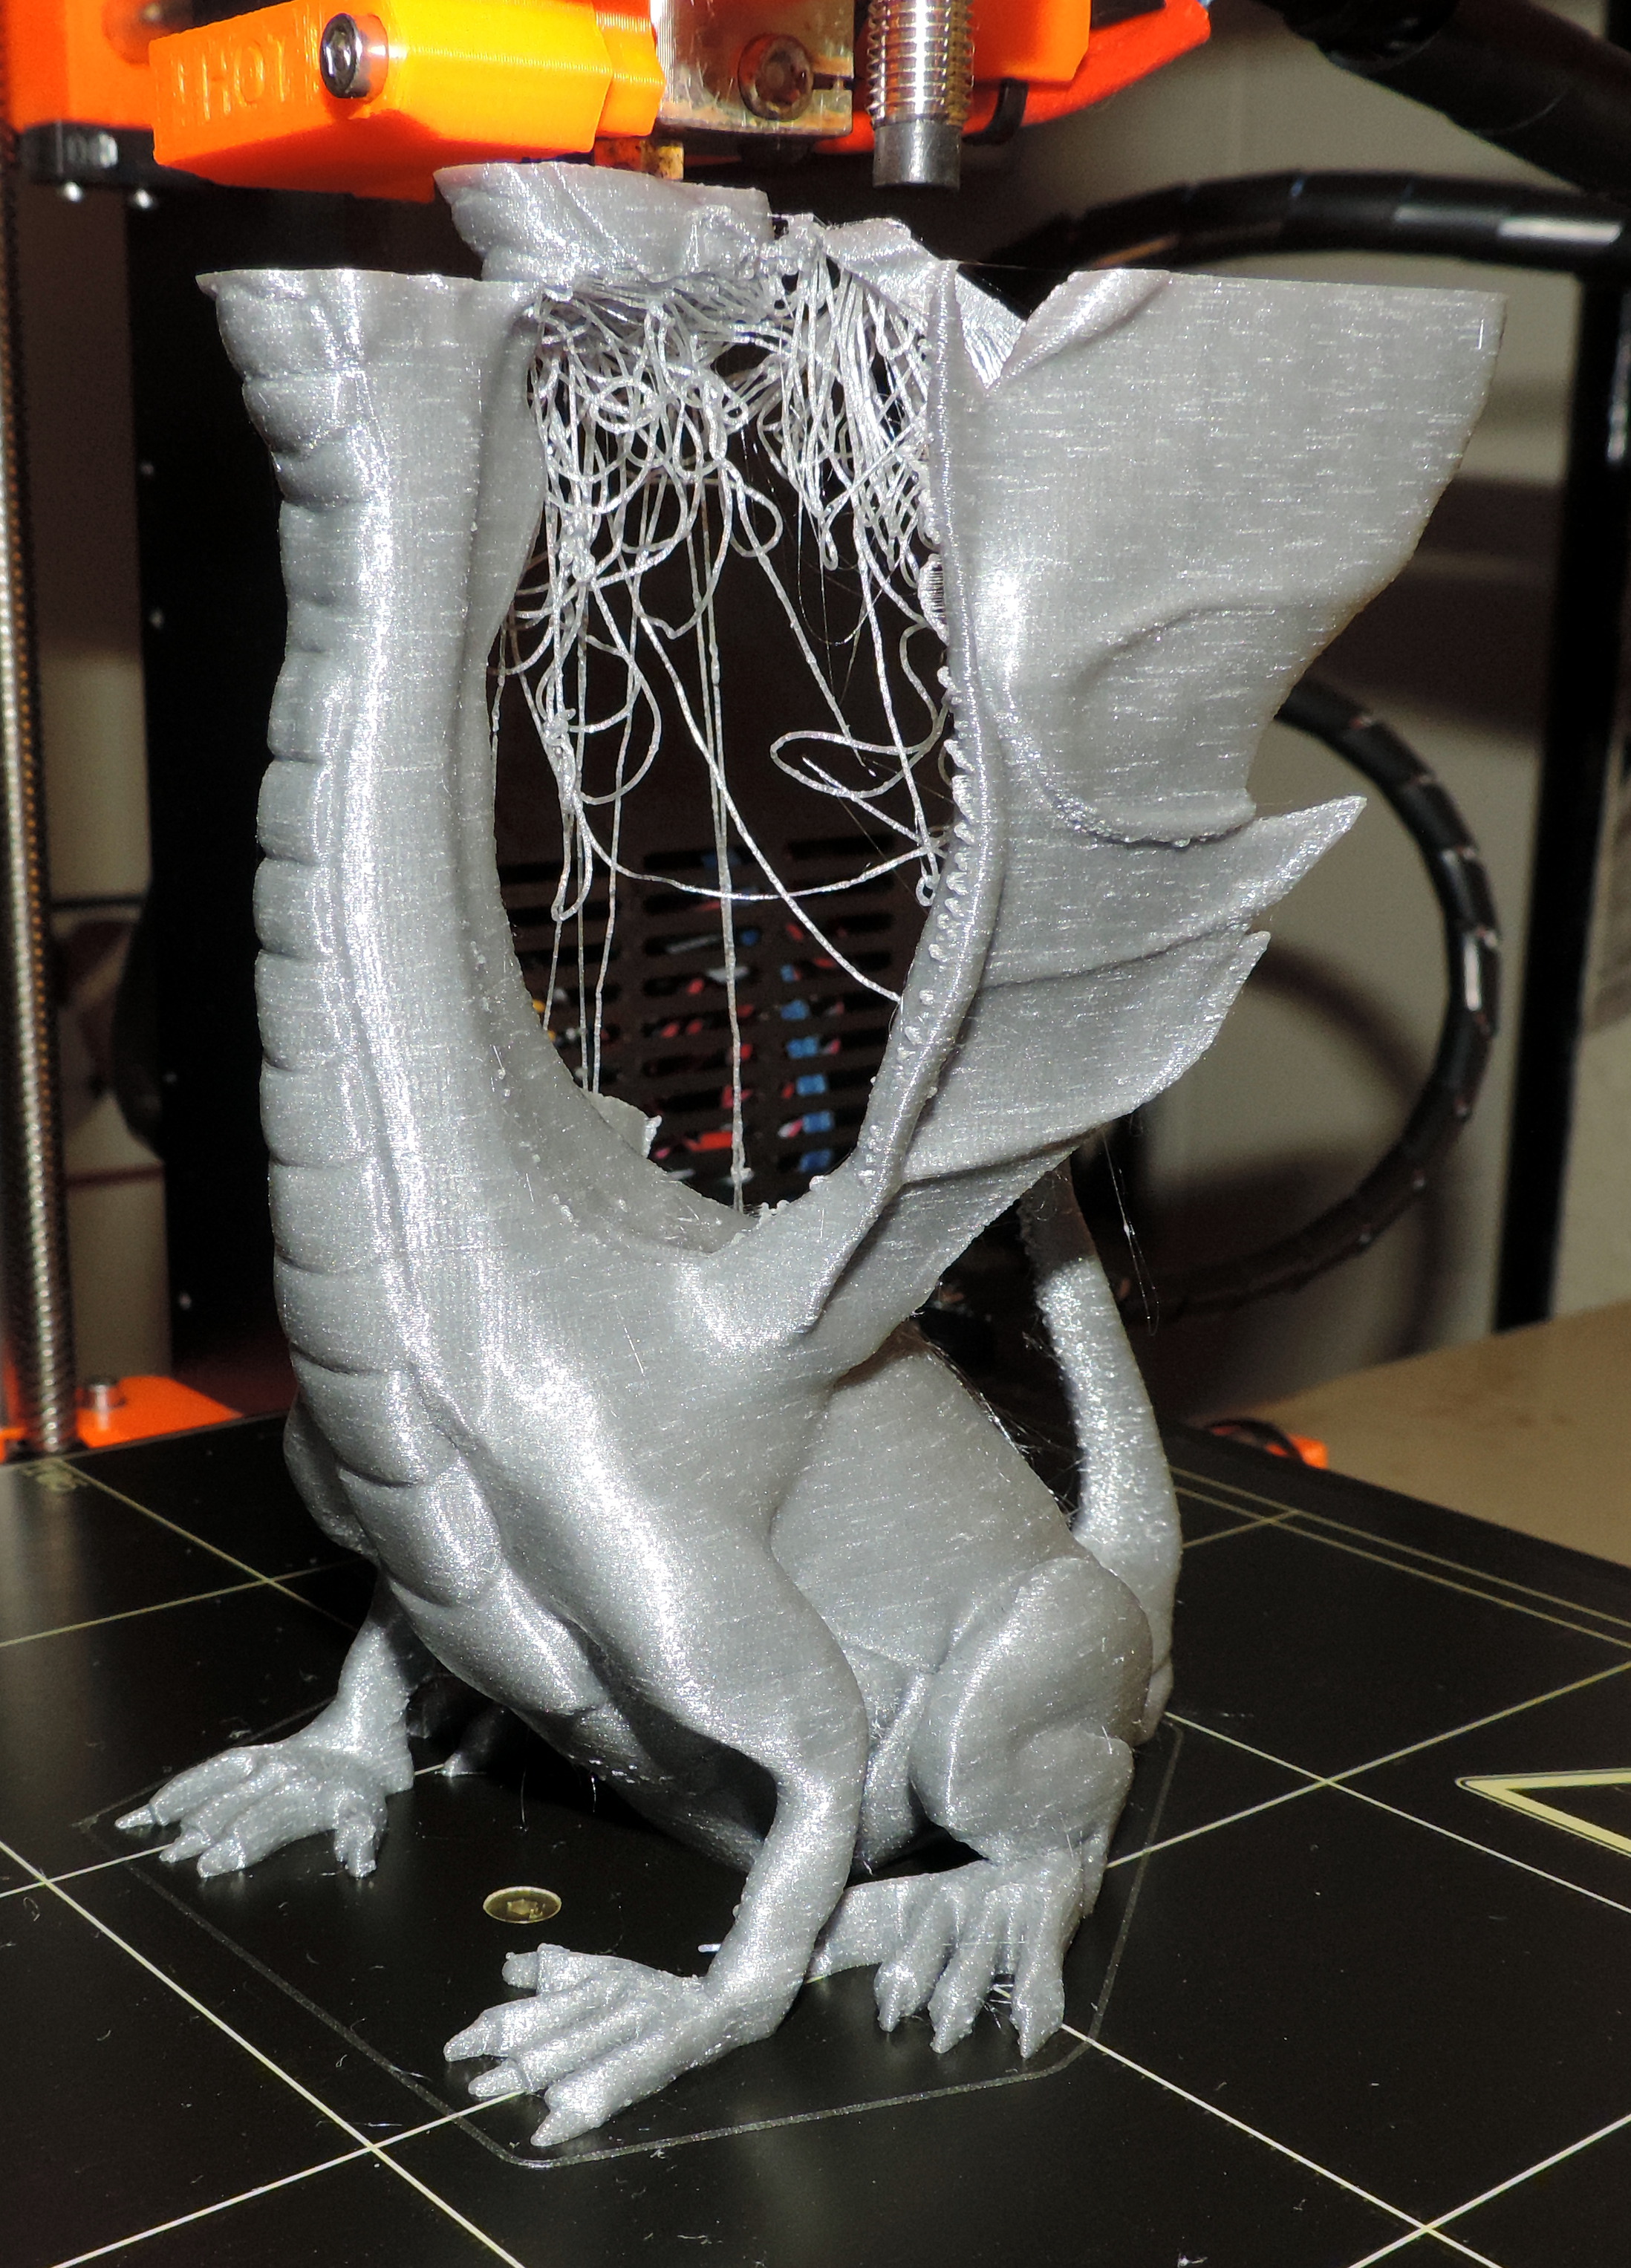
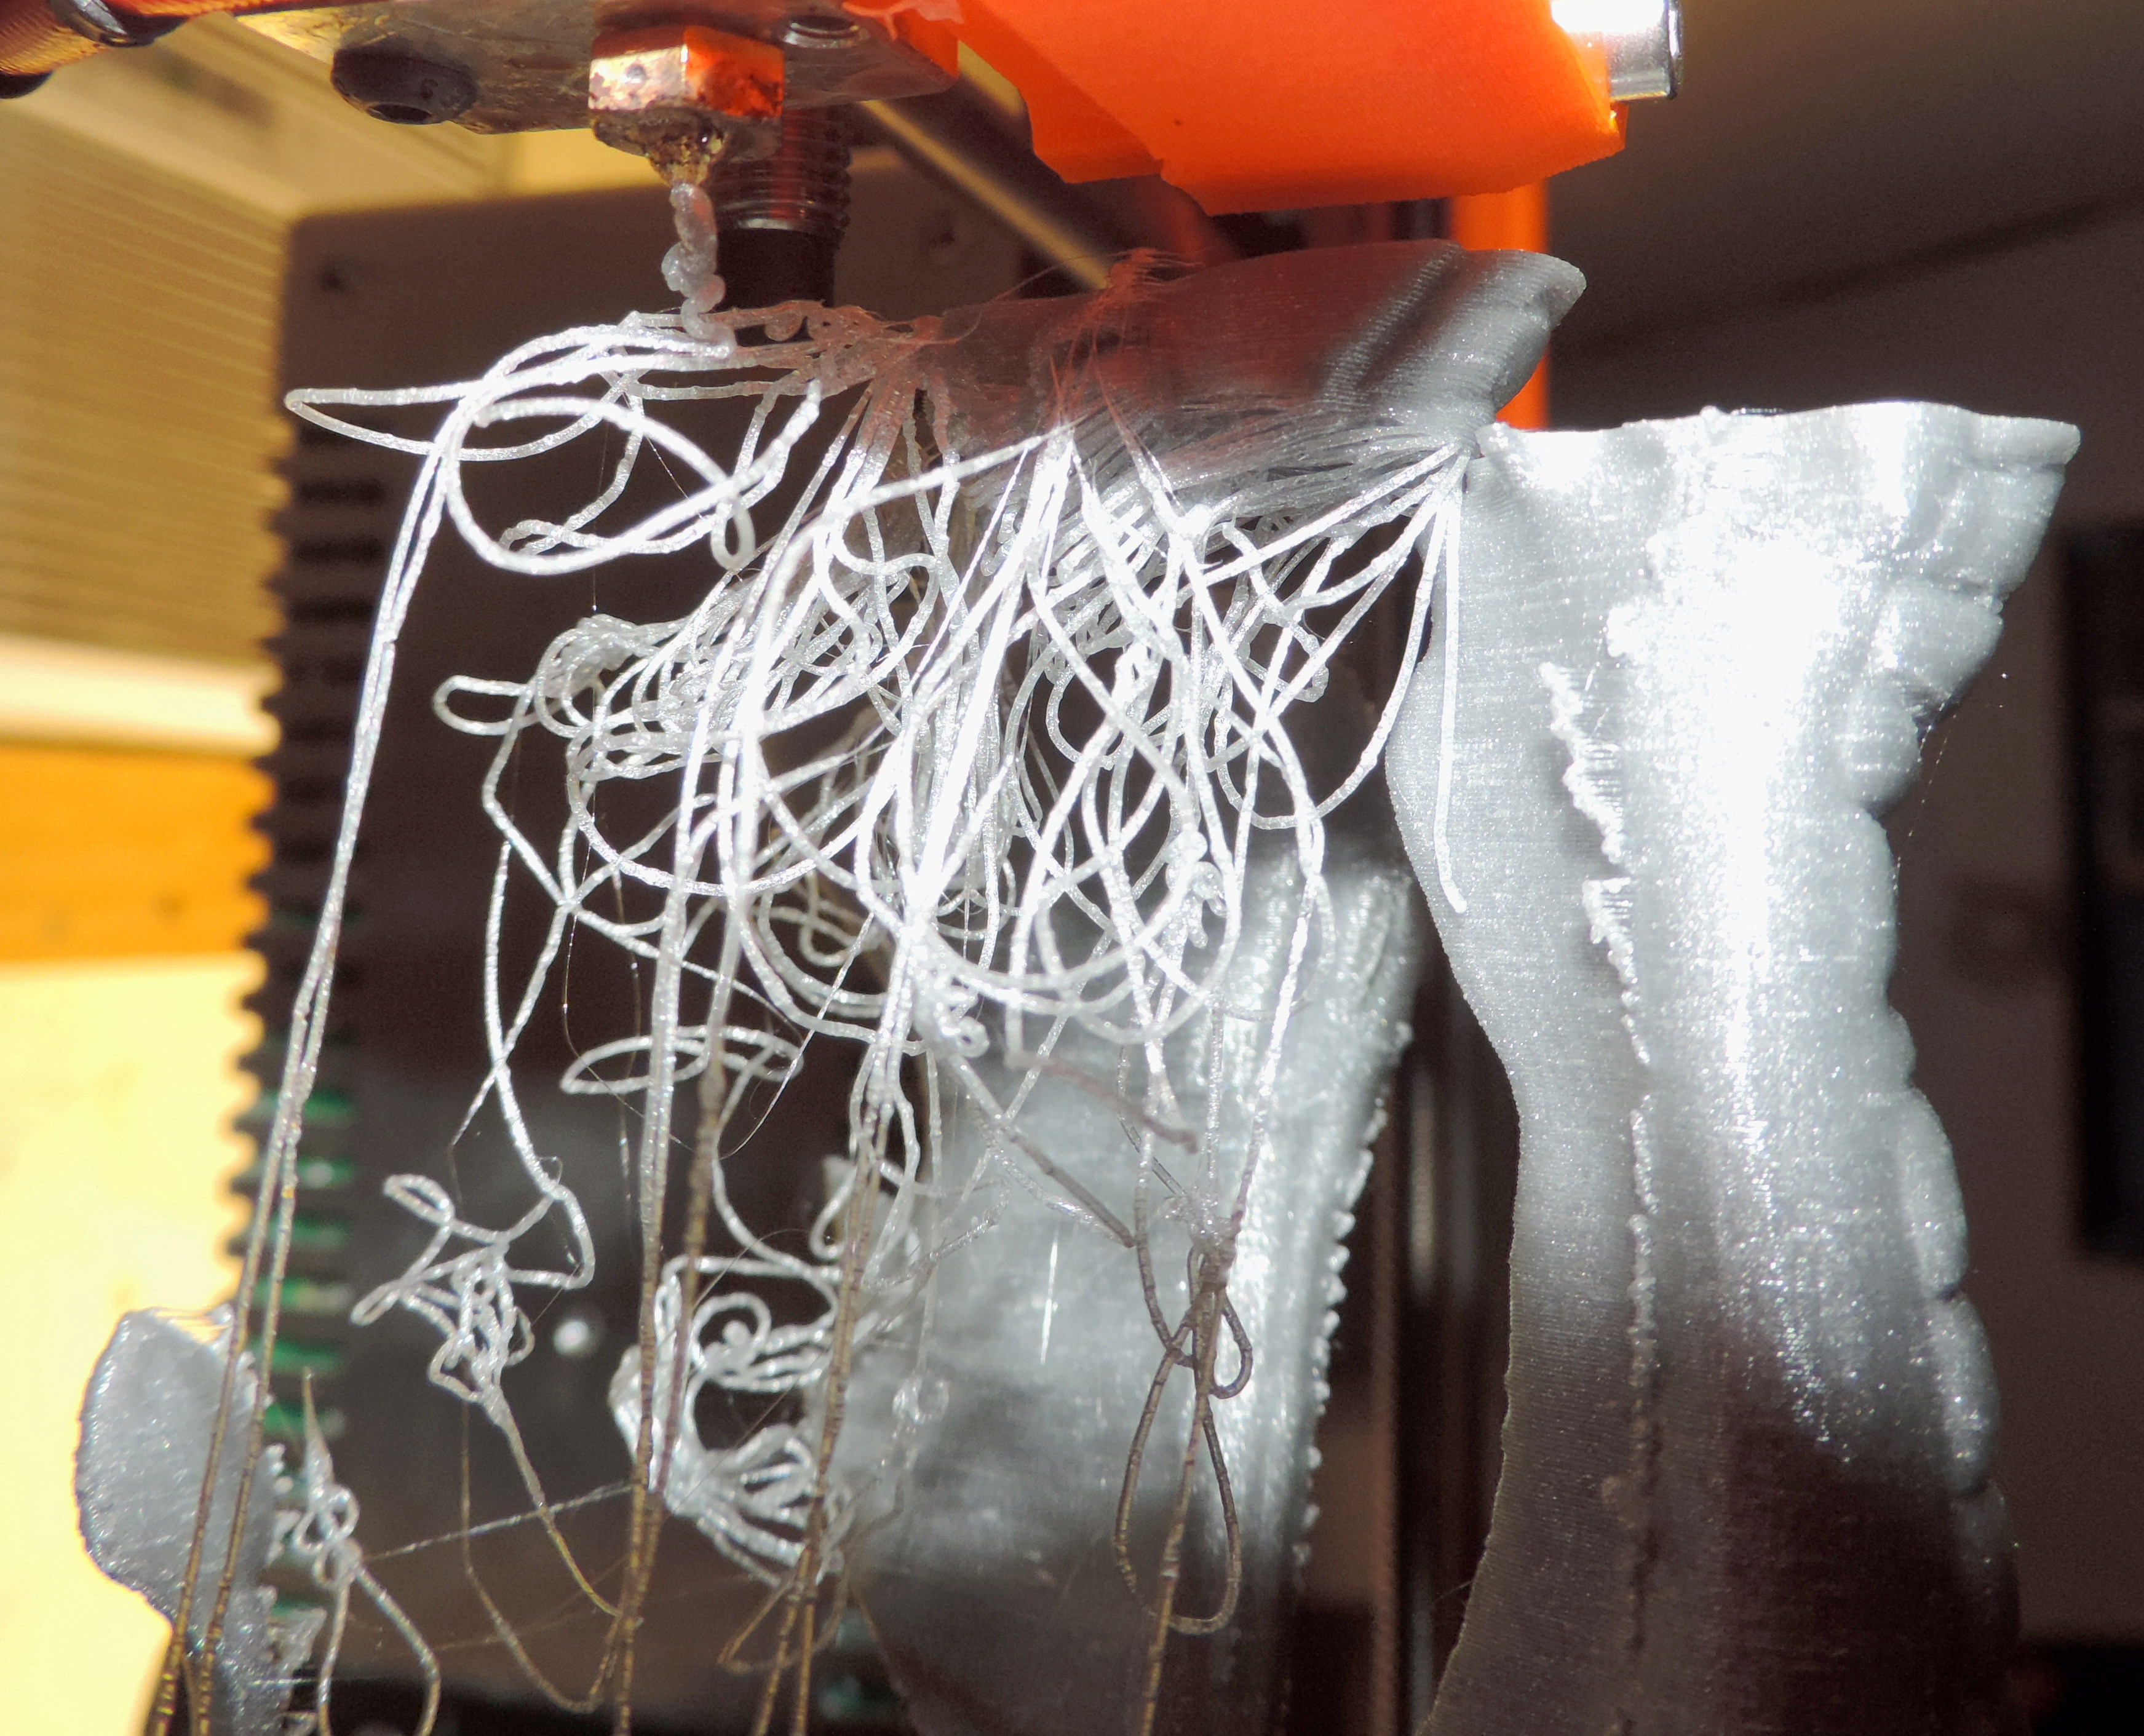
Again, the large offset and missing wing, which was found on the floor, made me think a cat had done something untoward. Might be interesting, more detail of offset:
Later, tried another filament, Planetary Orb PLA, getting another glitched, failed print:

I don't think it's cats doing this, but that raises the question of what is? I've never seen a cat showing any interest in the printer while it's going, started to record the whole print process. There was another offset-glitch without cat intervention, this one I was back to the PrusaPLA:

Breaking the wing and detaching the feet from the bed would require a fair amount of force. As a total initiate to these arcane arts, I am at a loss, and also adalinda-less, there were other attempts but the aforementioned extruder problems screwed those up. Any help would be greatly appreciated.
Re: CATastrophic failures printing Adalinda
Breaking the wing and detaching the feet from the bed would require a fair amount of force. As a total initiate to these arcane arts, I am at a loss, and also adalinda-less, there were other attempts but the aforementioned extruder problems screwed those up. Any help would be greatly appreciated.
As you surmised, I'd agree that something is causing a layer shift. This can happen if something hits your print. One thing to try is the PINDA protector, as show in step 36 of the extruder section of the manual: http://manual.prusa3d.com/Guide/5.+Extruder+Assembly/114
Good luck.
Re: CATastrophic failures printing Adalinda
Robert
A couple of things:
Is the part fan (the fan at the front of the printer) working after the first couple of layers?
Are you printing in Quiet mode or High Power (use the latter for Adalinda)?
Is the bed clean? Use IPA/wipes to remove any greasy fingerprints
Ensure that the probe is about 0.75mm higher than the nozzle.
Peter
Please note: I do not have any affiliation with Prusa Research. Any advices given are offered in good faith. It is your responsibility to ensure that by following my advice you do not suffer or cause injury, damage…
Re: CATastrophic failures printing Adalinda
Breaking the wing and detaching the feet from the bed would require a fair amount of force. As a total initiate to these arcane arts, I am at a loss, and also adalinda-less, there were other attempts but the aforementioned extruder problems screwed those up. Any help would be greatly appreciated.
As you surmised, I'd agree that something is causing a layer shift. This can happen if something hits your print. One thing to try is the PINDA protector, as show in step 36 of the extruder section of the manual: http://manual.prusa3d.com/Guide/5.+Extruder+Assembly/114
Good luck.
Thanks for reply. I planned to do that at some point, now I'll have to wait until I get the printer reassembled, its extruder-guts are spread all over the bed at the moment. It had occurred to me that was what was happening, but it seemed highly unlikely, but I don't really know anything about this stuff so what any of it 'seems' to me is likely irrelevant.
Re: CATastrophic failures printing Adalinda
Robert
A couple of things:
Is the part fan (the fan at the front of the printer) working after the first couple of layers?
Are you printing in Quiet mode or High Power (use the latter for Adalinda)?
Is the bed clean? Use IPA/wipes to remove any greasy fingerprints
Ensure that the probe is about 0.75mm higher than the nozzle.
Peter
Thanks for your input.
The fan I can't swear was working, but it does work. I'll check that.
I think it may have been in quiet mode, I'll make sure next time it's in high.
I do clean the bed every time, either with ISA or window cleaner.
The probe is about 10 meters from the nozzle at the moment. It was probably close to the .75 when some of the prints were made, I was struggling with the z-level calibration so that changed a bit over the time the prints were made.
It seems most likely it had to have been the printer doing the interfering, some combination of the issues you raised here, possibly with help from the extruder problem, I'll make sure to address all the issues you raised, especially the .75mm probe to nozzle height difference. My initial attempts to get that set correctly were laughably pathetic, but I think I got close after numerous tries. I'm still wondering where her foot went from the first attempt, those little pieces can really fly when they pop off.
Re: CATastrophic failures printing Adalinda
Robert
I really would recommend that you use only IPA (or similar) for cleaning the bed; some window cleaners are simply not suitable.
Do not attempt to get the probe fixed in a "perfect" position; you will most likely have calibration issues if you do. Get the probe about 0.75mm higher than the nozzle then use the "Live Z Adjust" to make the final adjustments.
Peter
Please note: I do not have any affiliation with Prusa Research. Any advices given are offered in good faith. It is your responsibility to ensure that by following my advice you do not suffer or cause injury, damage…
Re: CATastrophic failures printing Adalinda
Robert
I really would recommend that you use only IPA (or similar) for cleaning the bed; some window cleaners are simply not suitable.
Do not attempt to get the probe fixed in a "perfect" position; you will most likely have calibration issues if you do. Get the probe about 0.75mm higher than the nozzle then use the "Live Z Adjust" to make the final adjustments.
Peter
Peter,
Thanks again for replying. Windex and other 'blue' window cleaners are basically nothing more than dilute ammonia with blue coloring thrown in to overcharge you. If there are other agents thrown in, then using clear ammonia should probably suffice. The window cleaner option is from Prusa himself in the videos. But, I was already debating myself about buying some good 99% IPA. I don't know what happened with the stuff you get at pharmacy or grocery store, it used to do a decent job at 70% for basic cleaning of glasses etc, but the crap out there now leaves a film, even the 93% stuff doesn't work as well as the 70% from some years ago. 99% is good enough? I don't want to have to get the 99.9 if it isn't necessary. I've seen a few posts discuss this, but I didn't see anything that gave me the idea there was a consensus. Maybe I should just distill my own 199+ proof ethanol, at least it's got other uses, and it's a preferred cleaner for optics.
As to trying to adjust the probe, I wasn't trying for anything like a perfect fit, just shooting for the range such that it wasn't lower than the nozzle and not so high the nozzle dove into the bed. For me, fiddling with that damn thing is extremely annoying. Seeing as how this is the state of my printer at the moment, the probe adjustment is somewhat a minor issue:

Re: CATastrophic failures printing Adalinda
You should submit these to the Facebook group, RepRap Tantrums. Lots more just like them!
Re: CATastrophic failures printing Adalinda
Yeah, there really was no need for that!
I have a problem getting a whole load of things here, and the best the local pharmacy can do is 70% ethanol. That works very well and I have no issues whatsoever in getting a good first layer to stick.
Peter
Please note: I do not have any affiliation with Prusa Research. Any advices given are offered in good faith. It is your responsibility to ensure that by following my advice you do not suffer or cause injury, damage…
Re: CATastrophic failures printing Adalinda
You should submit these to the Facebook group, RepRap Tantrums. Lots more just like them!
Tantrum? Where is that coming from? I don't have a clue what you're getting at.
Re: CATastrophic failures printing Adalinda
I was, just last week, exactly where you are right now trying to get my Mk2 working. I had a blocked hotend (discussed here http://shop.prusa3d.com/forum/original-prusa-i3-mk2-f23/filament-completely-stuck-in-hotend-t1873.html ), which required disassembling and reassembling the entire extruder.
I'm not sure what motivated the disassembly you posted above, but if you're still looking for the problem my advice to you would be to reassemble everything following the manual, and try printing again. I've learned that if your printer calibrates & extrudes properly, then you probably don't have a major assembly issue. I actually had the exact same offset problem when printing the triceratops, and spent a number of hours trying to get the filament to stick to the bed. I was able to solve all my issues by getting my PINDA probe to right around 0.75mm higher than the nozzle. I used a gauge tool I purchased to measure it, but I know you don't have to be that exact. If you want the comfort of a measurement, maybe you could hold a couple business cards stacked flat against the probe and see how it lines up with the nozzle. Are you certain the probe is not bumping the part as it's printing?
Since this is your first printer, I hope you don't mind my saying, but these things do require a great deal of patience. There are lots of variables that can affect how a print will come out. These forums are a great place to learn about these issues and how they relate to our specific printer. Good luck!
Re: CATastrophic failures printing Adalinda
Yeah, there really was no need for that!
I have a problem getting a whole load of things here, and the best the local pharmacy can do is 70% ethanol. That works very well and I have no issues whatsoever in getting a good first layer to stick.
Peter
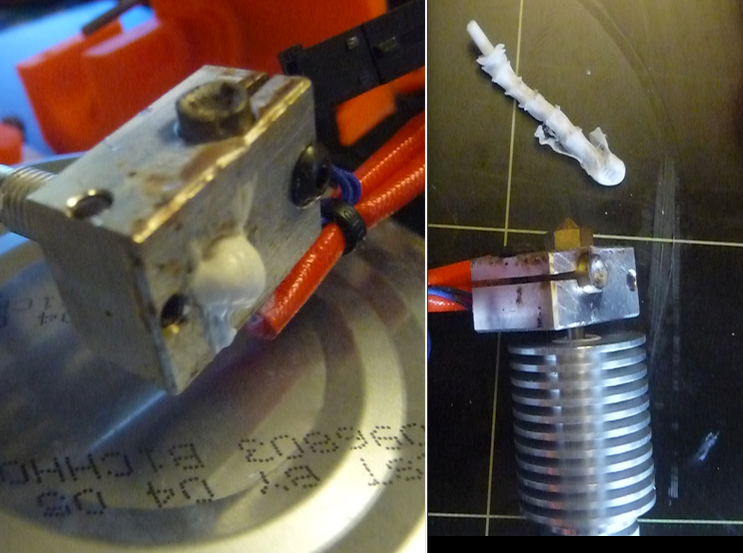
I don't know what there was no need for? Two posts in a row I can't comprehend and I'm worried I'm developing aphasia, did I have a stroke? Maybe you're talking about this disassembly? That isn't the result of the printing errors shown in the pictures, I had to get at the whole heatsink/heatbreak/heater block/nozzle assembly to clear and clean and understand.
As to the alcohol, can you clean glass like a pair of glasses or a window with your 70% without it leaving a film? What I've seen with every bottle I've gotten for I'd say at least 10 years is a residue, a hazy film left after trying to clean with it. I used to work with optics, the company purchased these special bottles of industrial ethanol with a '200 proof' label, kinda like this:
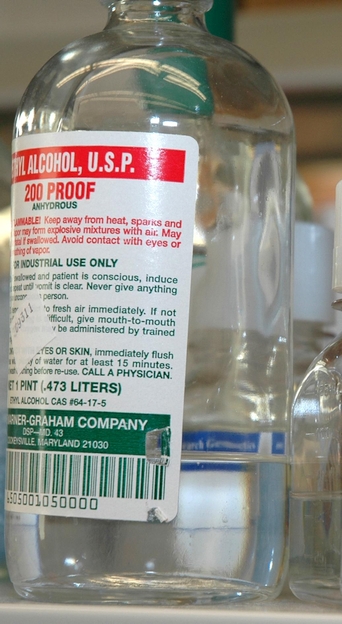
There was something that made it unsafe to drink, but it was pure alcohol, ethanol/ethyl alcohol, the drinking kind, stronger than anything you could get in a liquor store [oh the 190 proof nostalgia that evokes...]:
or from a moonshiner.

Re: CATastrophic failures printing Adalinda
I was, just last week, exactly where you are right now trying to get my Mk2 working. I had a blocked hotend (discussed here http://shop.prusa3d.com/forum/original-prusa-i3-mk2-f23/filament-completely-stuck-in-hotend-t1873.html ), which required disassembling and reassembling the entire extruder.
I'm not sure what motivated the disassembly you posted above, but if you're still looking for the problem my advice to you would be to reassemble everything following the manual, and try printing again. I've learned that if your printer calibrates & extrudes properly, then you probably don't have a major assembly issue. I actually had the exact same offset problem when printing the triceratops, and spent a number of hours trying to get the filament to stick to the bed. I was able to solve all my issues by getting my PINDA probe to right around 0.75mm higher than the nozzle. I used a gauge tool I purchased to measure it, but I know you don't have to be that exact. If you want the comfort of a measurement, maybe you could hold a couple business cards stacked flat against the probe and see how it lines up with the nozzle. Are you certain the probe is not bumping the part as it's printing?
Since this is your first printer, I hope you don't mind my saying, but these things do require a great deal of patience. There are lots of variables that can affect how a print will come out. These forums are a great place to learn about these issues and how they relate to our specific printer. Good luck!
I appreciate the reply. I read that thread and all the other ones I could find on the subject. I kept getting these jams, and thought I had cleared them. I would use Ponterface so I could heat just the heater block and then extrude arbitrary lengths of filament. If it would shoot through a fair amount without getting the clicking from the extruder motor stalling, I figured it was clean enough, but then it would jam again. What I can't understand is why it would often go for a long while printing well and then jam. I printed the castle thing and about the bottom inch or so looks fantastic, then there's about 1/4 inch of very spotty extrusion and about a 1/8 inch good and the rest spotty.

After the last one, I decided I had to disassemble and take a look. There was a good deal of filament in the heater block, so I tired heating to 210, where some filament bulged out a bit, then cooled to about 100 and yanked that out. A good deal came out, with the last bit looking like normal filament almost.
That's obviously stretched out quite a bit. Unfortunately, there was still some in the heatbreak, I had to clean that out also.
The PTFE tube had a slight crown to it, don't know if that's a problem or indicative of one, I cut it off square and re-inserted. On to re-assembling the whole thing, I'm here to take a break, patience isn't one of my fortes, I take breaks so I don't defenestrate stuff that ain't playing nice or have lots of little fiddly bits that drive me crazy pretty quickly. It was actually amazing when I got the printer first assembled and it was square, no XYZ calibration message.
Re: CATastrophic failures printing Adalinda
I would say that there are 2 major issues: 1st layer Adhesion and a bump or something for the layer shift.
The first one requires a decently clean bed (I found that 70% IPA wasn't good enough - I tried the wipes). I've used 99.9% IPA and found that works beautifully for smaller based objects (which would include Alinda). Once the base of the object becomes too long or for specific shapes I'm forced to migrate to glue stick (specifically where I've experience adhesion problems).
In addition to the clean bed with no fingerprints on, the layer height is important - if the bottom layer lines are not merged together then it's too high off the bed in my experience. On the other hand, if the nozzle looks like it's smearing the filament, then it's too low.
Use the z adjustment carefully to get to the perfect height - an adjustment of 0.05mm makes quite a difference.
The second can be related to the Low Power mode - a knock, a bump against a part that's curving upwards or too quick a movement while in Low power can cause the steppers to skip and from that point on everything is ruined.
Re: CATastrophic failures printing Adalinda
The second can be related to the Low Power mode - a knock, a bump against a part that's curving upwards or too quick a movement while in Low power can cause the steppers to skip and from that point on everything is ruined.
It should also be said that the culprit in those cases is not Low Power mode but the curving or warping part. 🙂 Yes, High Power mode maybe overcome it, but if the slicing settings are wrong (causing serious warping, curving or curling), the print will most likely fail regardless the force used. Extruder will either skip steps again or it will kick the object off heatbed.
Re: CATastrophic failures printing Adalinda
I would say that there are 2 major issues: 1st layer Adhesion and a bump or something for the layer shift.
The first one requires a decently clean bed (I found that 70% IPA wasn't good enough - I tried the wipes). I've used 99.9% IPA and found that works beautifully for smaller based objects (which would include Alinda). Once the base of the object becomes too long or for specific shapes I'm forced to migrate to glue stick (specifically where I've experience adhesion problems).
In addition to the clean bed with no fingerprints on, the layer height is important - if the bottom layer lines are not merged together then it's too high off the bed in my experience. On the other hand, if the nozzle looks like it's smearing the filament, then it's too low.
Use the z adjustment carefully to get to the perfect height - an adjustment of 0.05mm makes quite a difference.
The second can be related to the Low Power mode - a knock, a bump against a part that's curving upwards or too quick a movement while in Low power can cause the steppers to skip and from that point on everything is ruined.
Appreciate the info. I don't think adhesion is a problem, all the prints I've done [except 1] were stuck quite well when done, all were PLA except for 2 ngen.
I do clean the bed pretty well, but adjusting the z is probably not good enough, I'm having a problem getting a 'feel' for it, but I think I'm getting close. A hell of a lot better than my first few attempts when I was flailing around with positive offsets, basically hopelessly confused, not seeing any real changes as I spun the dial all over the place wondering why it wasn't looking like all the videos and pix said it should.
Do you think the extra .9 percentage points make a difference over the 99%?
Re: CATastrophic failures printing Adalinda
The second can be related to the Low Power mode - a knock, a bump against a part that's curving upwards or too quick a movement while in Low power can cause the steppers to skip and from that point on everything is ruined.
It should also be said that the culprit in those cases is not Low Power mode but the curving or warping part. 🙂 Yes, High Power mode maybe overcome it, but if the slicing settings are wrong (causing serious warping, curving or curling), the print will most likely fail regardless the force used. Extruder will either skip steps again or it will kick the object off heatbed.
Agreed on the warping and curving of a part. Increasing the speed of a print from the dial (been there, done that) and accidental bumping of the printer while printing can both cause lost steps and failed prints on Low Power mode which would be prevented with High Power (High noise) mode 🙂
Appreciate the info. I don't think adhesion is a problem, all the prints I've done [except 1] were stuck quite well when done, all were PLA except for 2 ngen.
I do clean the bed pretty well, but adjusting the z is probably not good enough, I'm having a problem getting a 'feel' for it, but I think I'm getting close. A hell of a lot better than my first few attempts when I was flailing around with positive offsets, basically hopelessly confused, not seeing any real changes as I spun the dial all over the place wondering why it wasn't looking like all the videos and pix said it should.
Do you think the extra .9 percentage points make a difference over the 99%?
It's difficult to say that the extra .9 makes a difference, all I can really say is that my experience is that 70% was definitely not good enough.
I probably would be looking more at the 1st layer Z height to ensure that is correct, but also switch to high power for this model.
In case this wasn't mentioned in another comment, I'd also suggest that you take a look at making sure the print cooling fan is active after the 2nd layer or so - Adalinda has some heavy overhangs, especially on the belly and if the cooling fan isn't cooling the PLA quickly enough, then the plastic curves upwards and can become something that the nozzle (or PINDA probe) bumps against, losing steps.
Re: CATastrophic failures printing Adalinda
It's difficult to say that the extra .9 makes a difference, all I can really say is that my experience is that 70% was definitely not good enough.
I probably would be looking more at the 1st layer Z height to ensure that is correct, but also switch to high power for this model.
In case this wasn't mentioned in another comment, I'd also suggest that you take a look at making sure the print cooling fan is active after the 2nd layer or so - Adalinda has some heavy overhangs, especially on the belly and if the cooling fan isn't cooling the PLA quickly enough, then the plastic curves upwards and can become something that the nozzle (or PINDA probe) bumps against, losing steps.
And to ***PJR
I just replied in this post: http://shop.prusa3d.com/forum/original-prusa-i3-mk2-f23/tree-frog-print-gone-horribly-wrong--t1909.html#p15080 , where someone was getting prints that looked like some of my results. I'm pretty sure it was the fan. I was so sure it was working, I kept forgetting to actually look! But it checked out fine, connection wise and working with a voltage applied. So I was looking at the 'fan' setting in Settings:Temperature and it was zero after starting a print. I set to 100, and now I'm printing a Benchy and it looks fantastic, about 3/4 done, it's about to bridge over the windows. I can't fathom how that got set to zero, don't remember doing it, maybe some interaction with a program on PC over USB that I was dickinbg with earlier??? It seems that has been turning off the fan for all my prints from early on, I'll know when Ive had time to make a bunch more test prints.
It just did the bridges and they look great, that has to be the problem. The 3 previous attempts at Benchy went south, way way south, about the first 1/4 inch. Anyone know about how this may have happened?
And thanks to anyone telling me to check the fan, it finally got through the mental haze and it looks like that's the solution.
Re: CATastrophic failures printing Adalinda
And to ***PJR
I just replied in this post: http://shop.prusa3d.com/forum/original-prusa-i3-mk2-f23/tree-frog-print-gone-horribly-wrong--t1909.html#p15080 , where someone was getting prints that looked like some of my results. I'm pretty sure it was the fan. I was so sure it was working, I kept forgetting to actually look! But it checked out fine, connection wise and working with a voltage applied. So I was looking at the 'fan' setting in Settings:Temperature and it was zero after starting a print. I set to 100, and now I'm printing a Benchy and it looks fantastic, about 3/4 done, it's about to bridge over the windows. I can't fathom how that got set to zero, don't remember doing it, maybe some interaction with a program on PC over USB that I was dickinbg with earlier??? It seems that has been turning off the fan for all my prints from early on, I'll know when Ive had time to make a bunch more test prints.
It just did the bridges and they look great, that has to be the problem. The 3 previous attempts at Benchy went south, way way south, about the first 1/4 inch. Anyone know about how this may have happened?
And thanks to anyone telling me to check the fan, it finally got through the mental haze and it looks like that's the solution.
I'm glad you seem to have the solution, that's great news!