Printing issues
Good morning all,
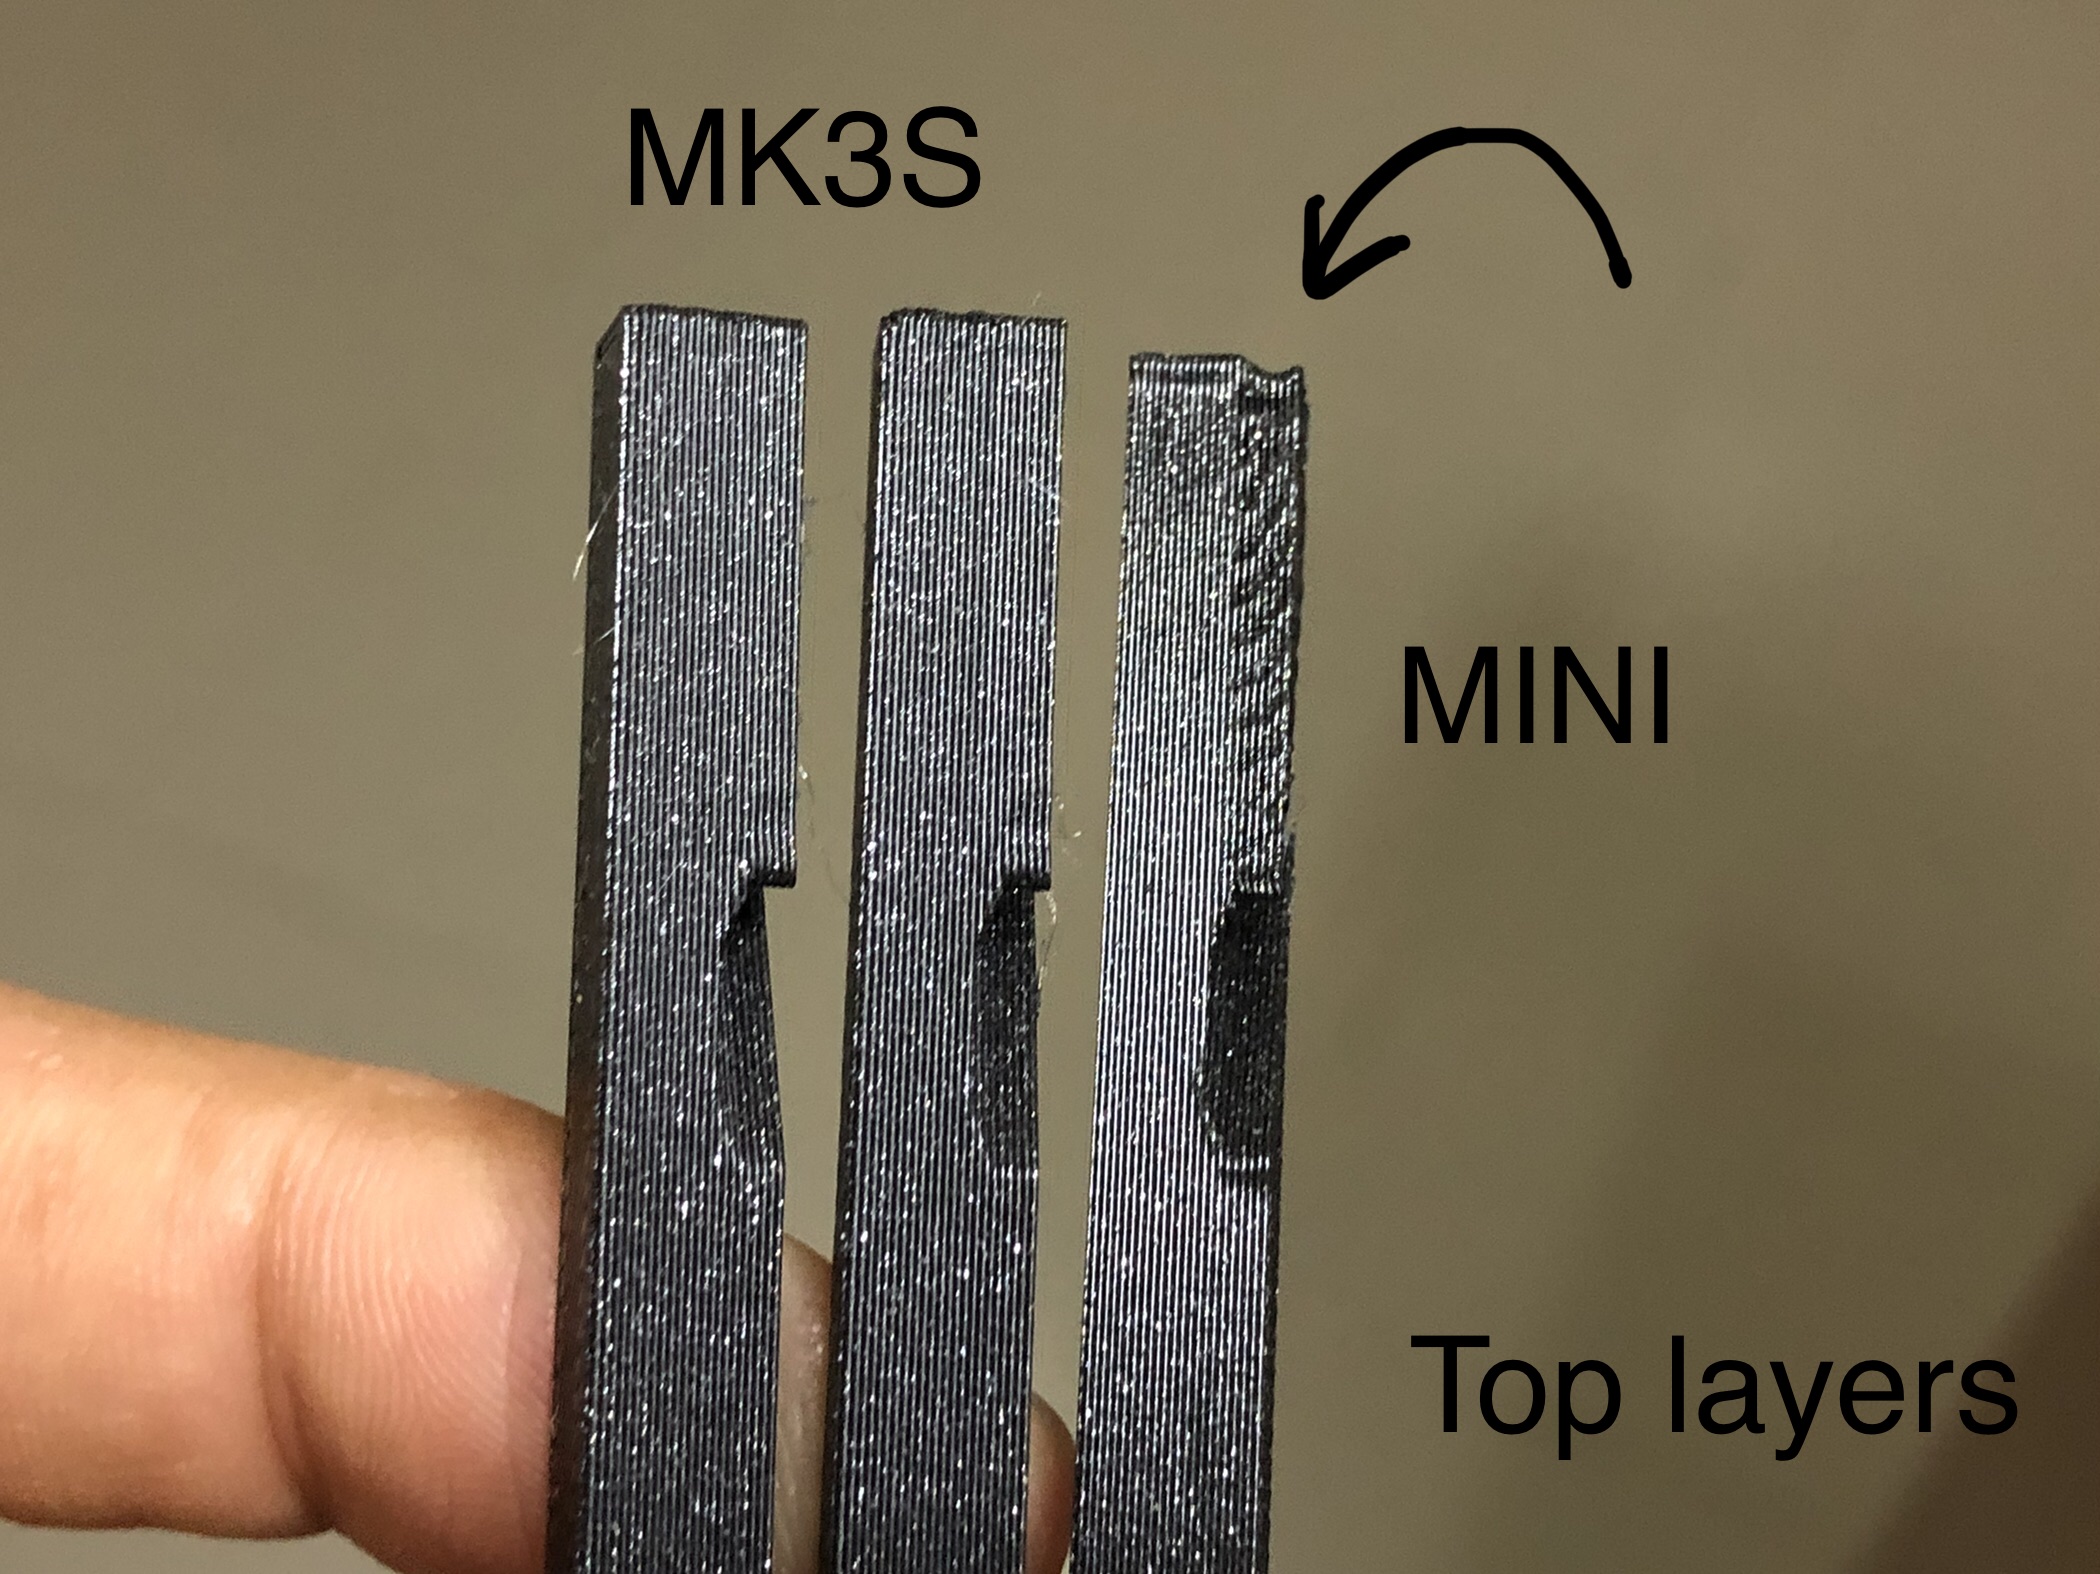
I’m having some small issues with the print quality and accuracy of my MINI for a few months now. All surfaces have this blob around the edges. That, since it happened since day one, i didnt care for much and figured it was just part of the process.
Yesterday i finished assembly on my new MK3S and, i know its not an apples to apples comparison, the print quality shows everything the MINI is lacking on.
i did make the mistake of lubing the z axis thread once but it was barely. Mainly trying to get the stepper to have an easier time given it was hotter than the rest (later found its common)
So how would i go about solving this? Mainly the artifact showing at the top layers of the slim prints. I think replacing the TR nut is in order since the lube could've messed it up. Aside from that i really dont know what else to do “hardware wise” to tighten it up. Ive mostly run PLA in the mini aside from two PETG prints like a year ago.
thanks in advance
slicer
I do not think this is because you lubricated your Z axis. This may be related to the difference in the settings in the slicer.
--------------------
Chuck H
3D Printer Review Blog
Slicer
I do not think this is because you lubricated your Z axis. This may be related to the difference in the settings in the slicer.
Well, i used the default settings on both printers. Likely there will be differences in specs, i just maintained the same infill/layer height specs.
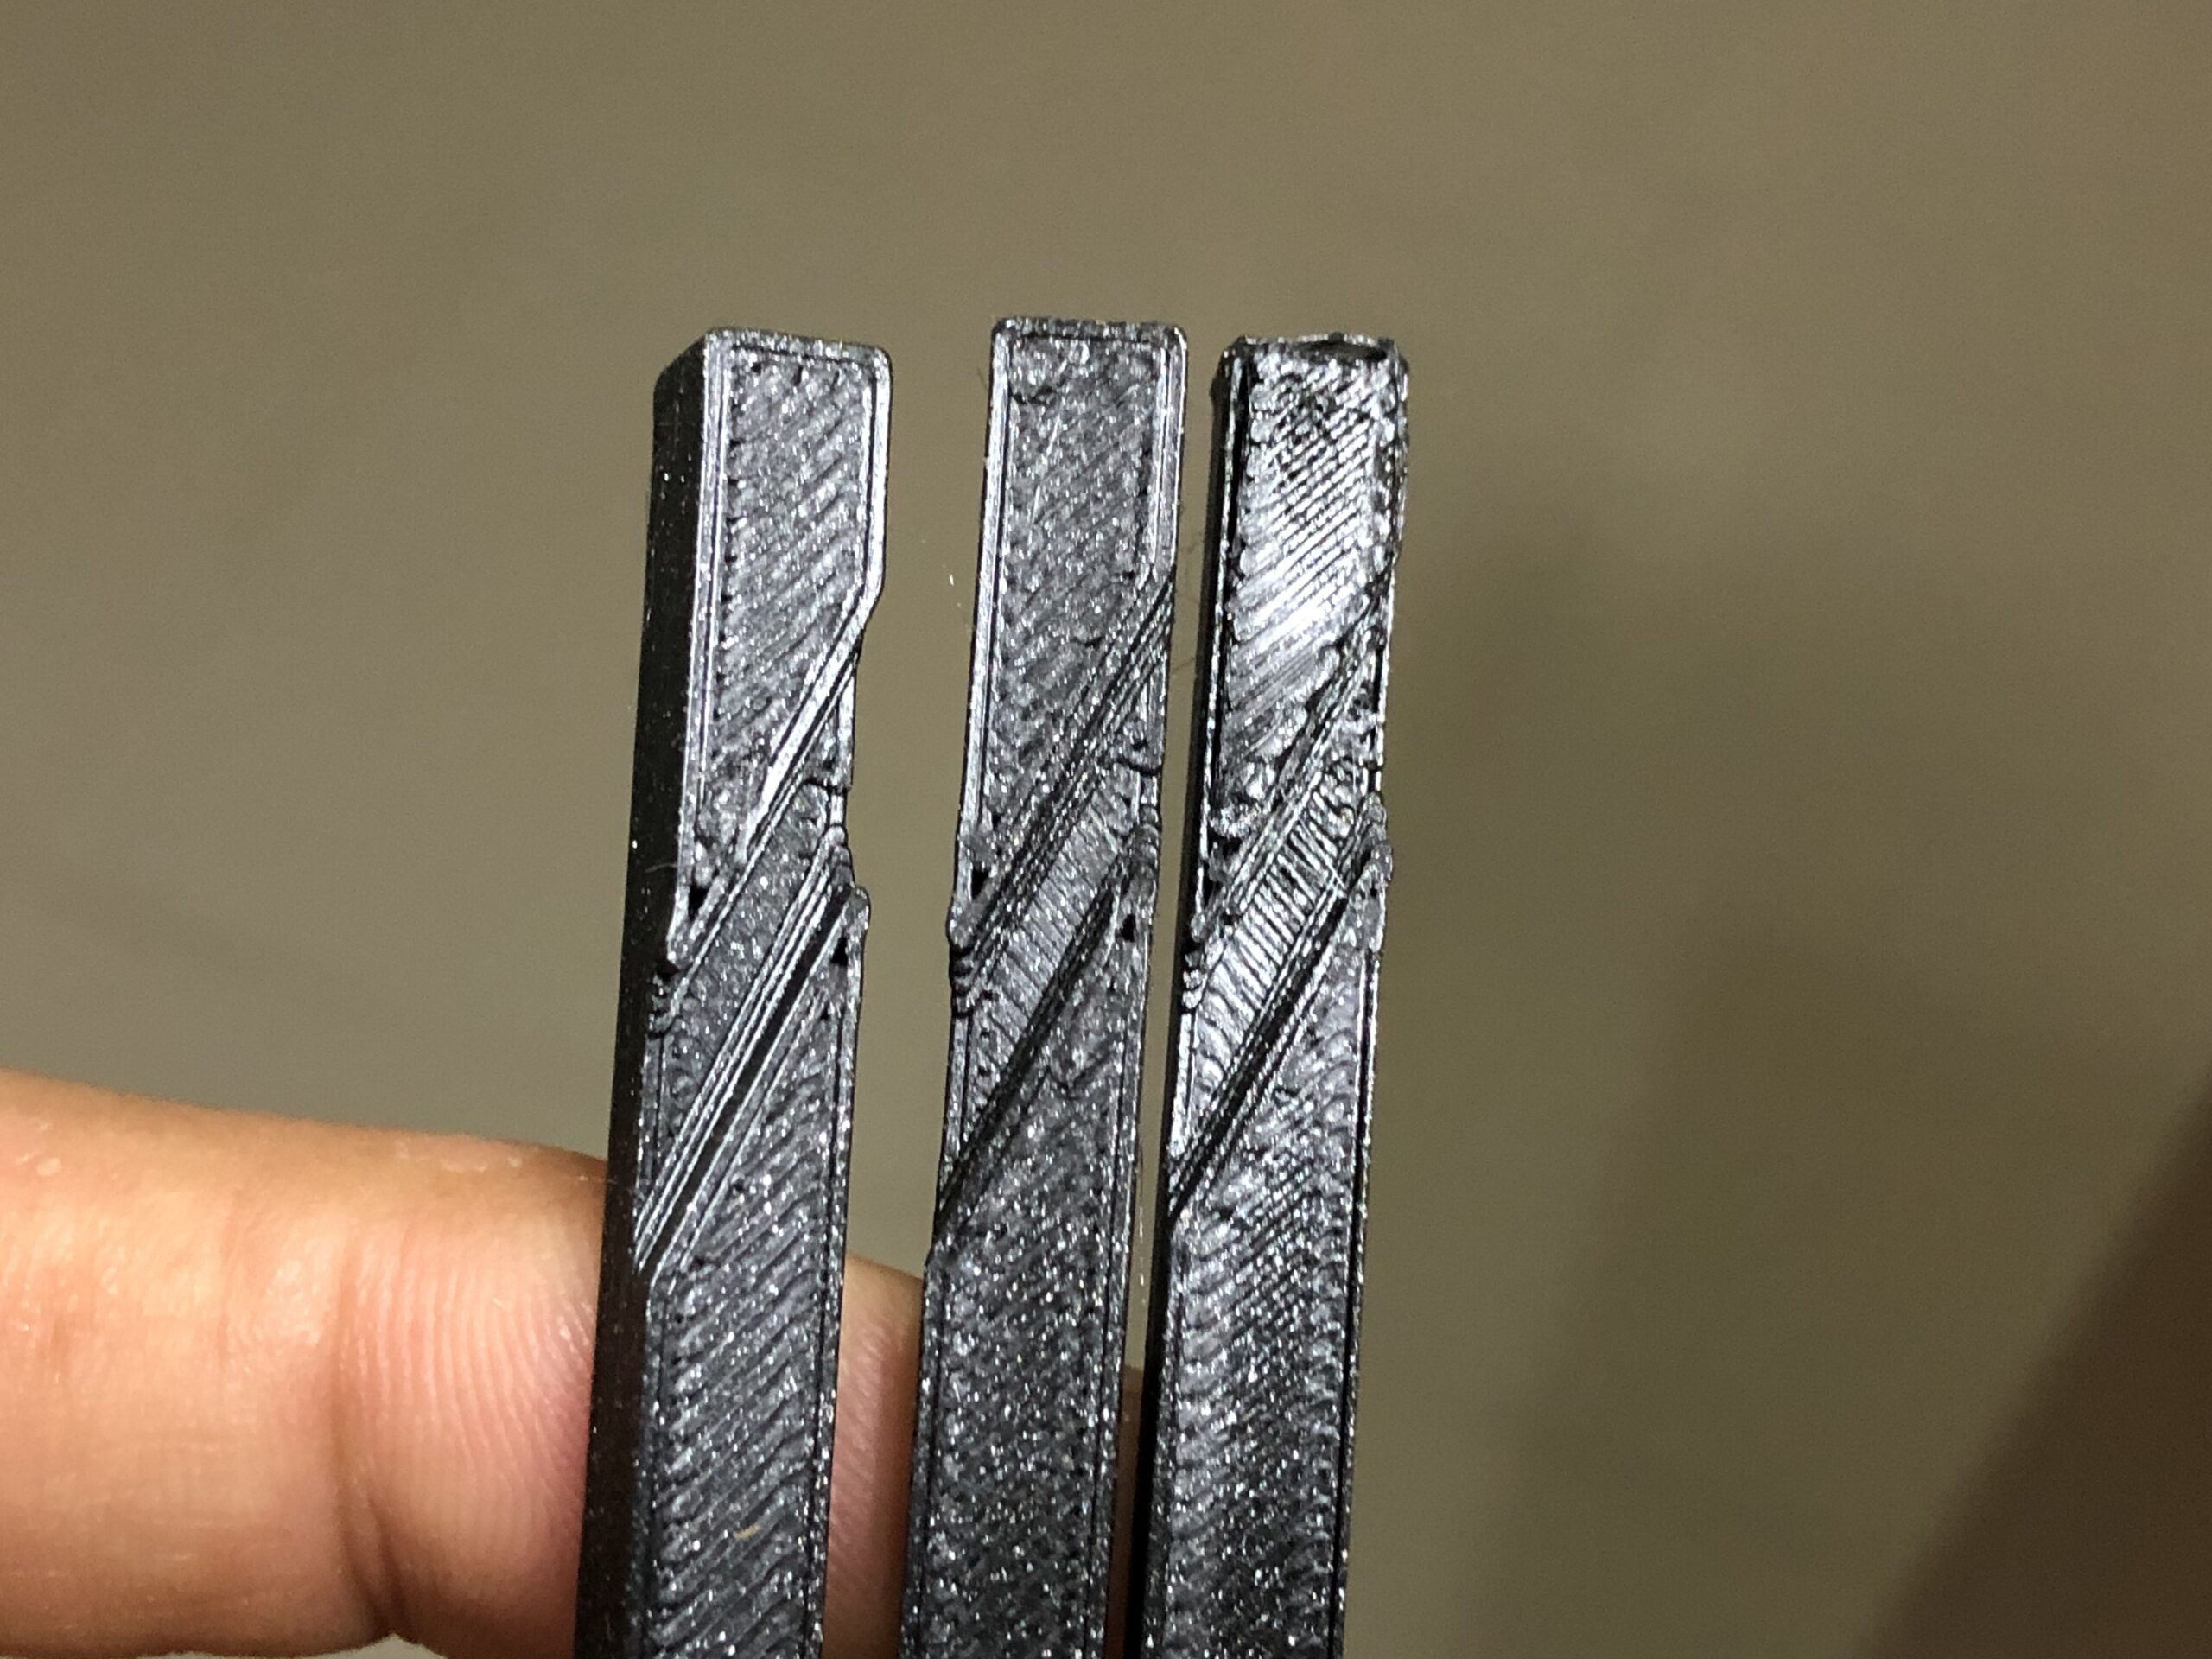
For the corner blobs i got from day one but comparing an old piece from the MINI to it now and i didn't use to get the random pattern on the side of the part (towards the top layers) along with some issues with top layer fill sometimes not touching perimeters.
thats the main reason im steering towards the problem being hardware/calibration related… i didn't use to get these issues (aside from the corners)
i wish i had parts from each software/firmware update though for comparison
Thanks for the reply!
Extruder
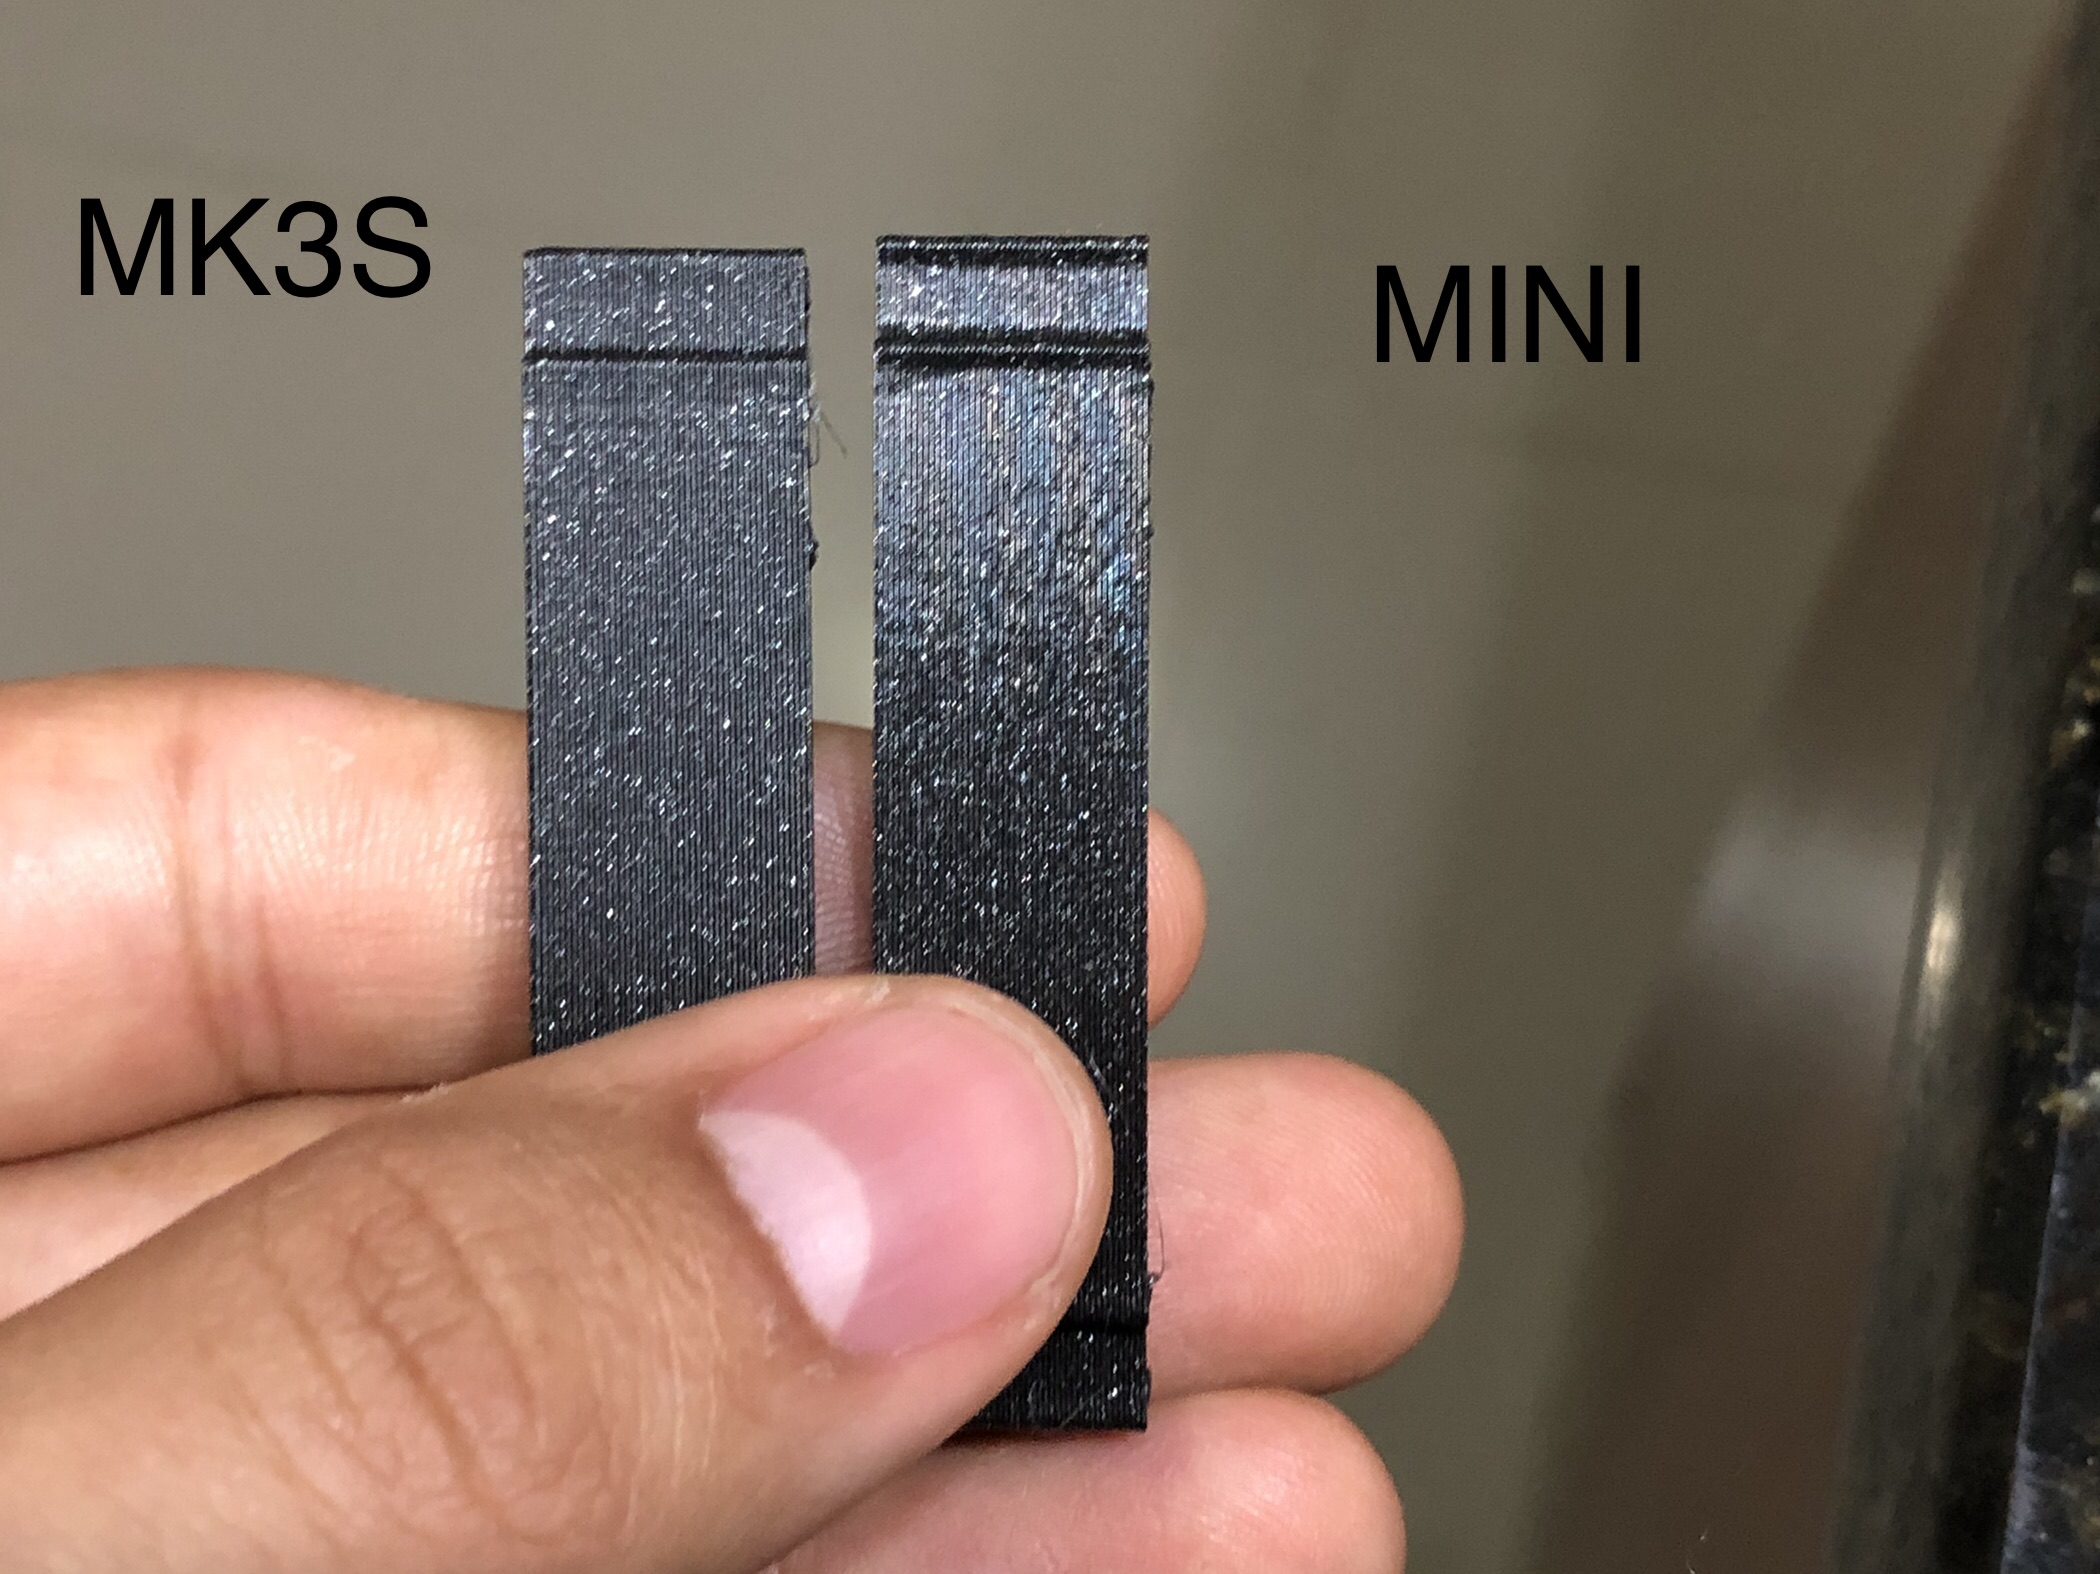
Just noticed these also. Its like its skipping and the beginning of a solid infill it misses some material.
Spitballing here but could it be that the extruder is slipping or having troubles at the start of a path? As if the gears slip a bit before pushing the filament…
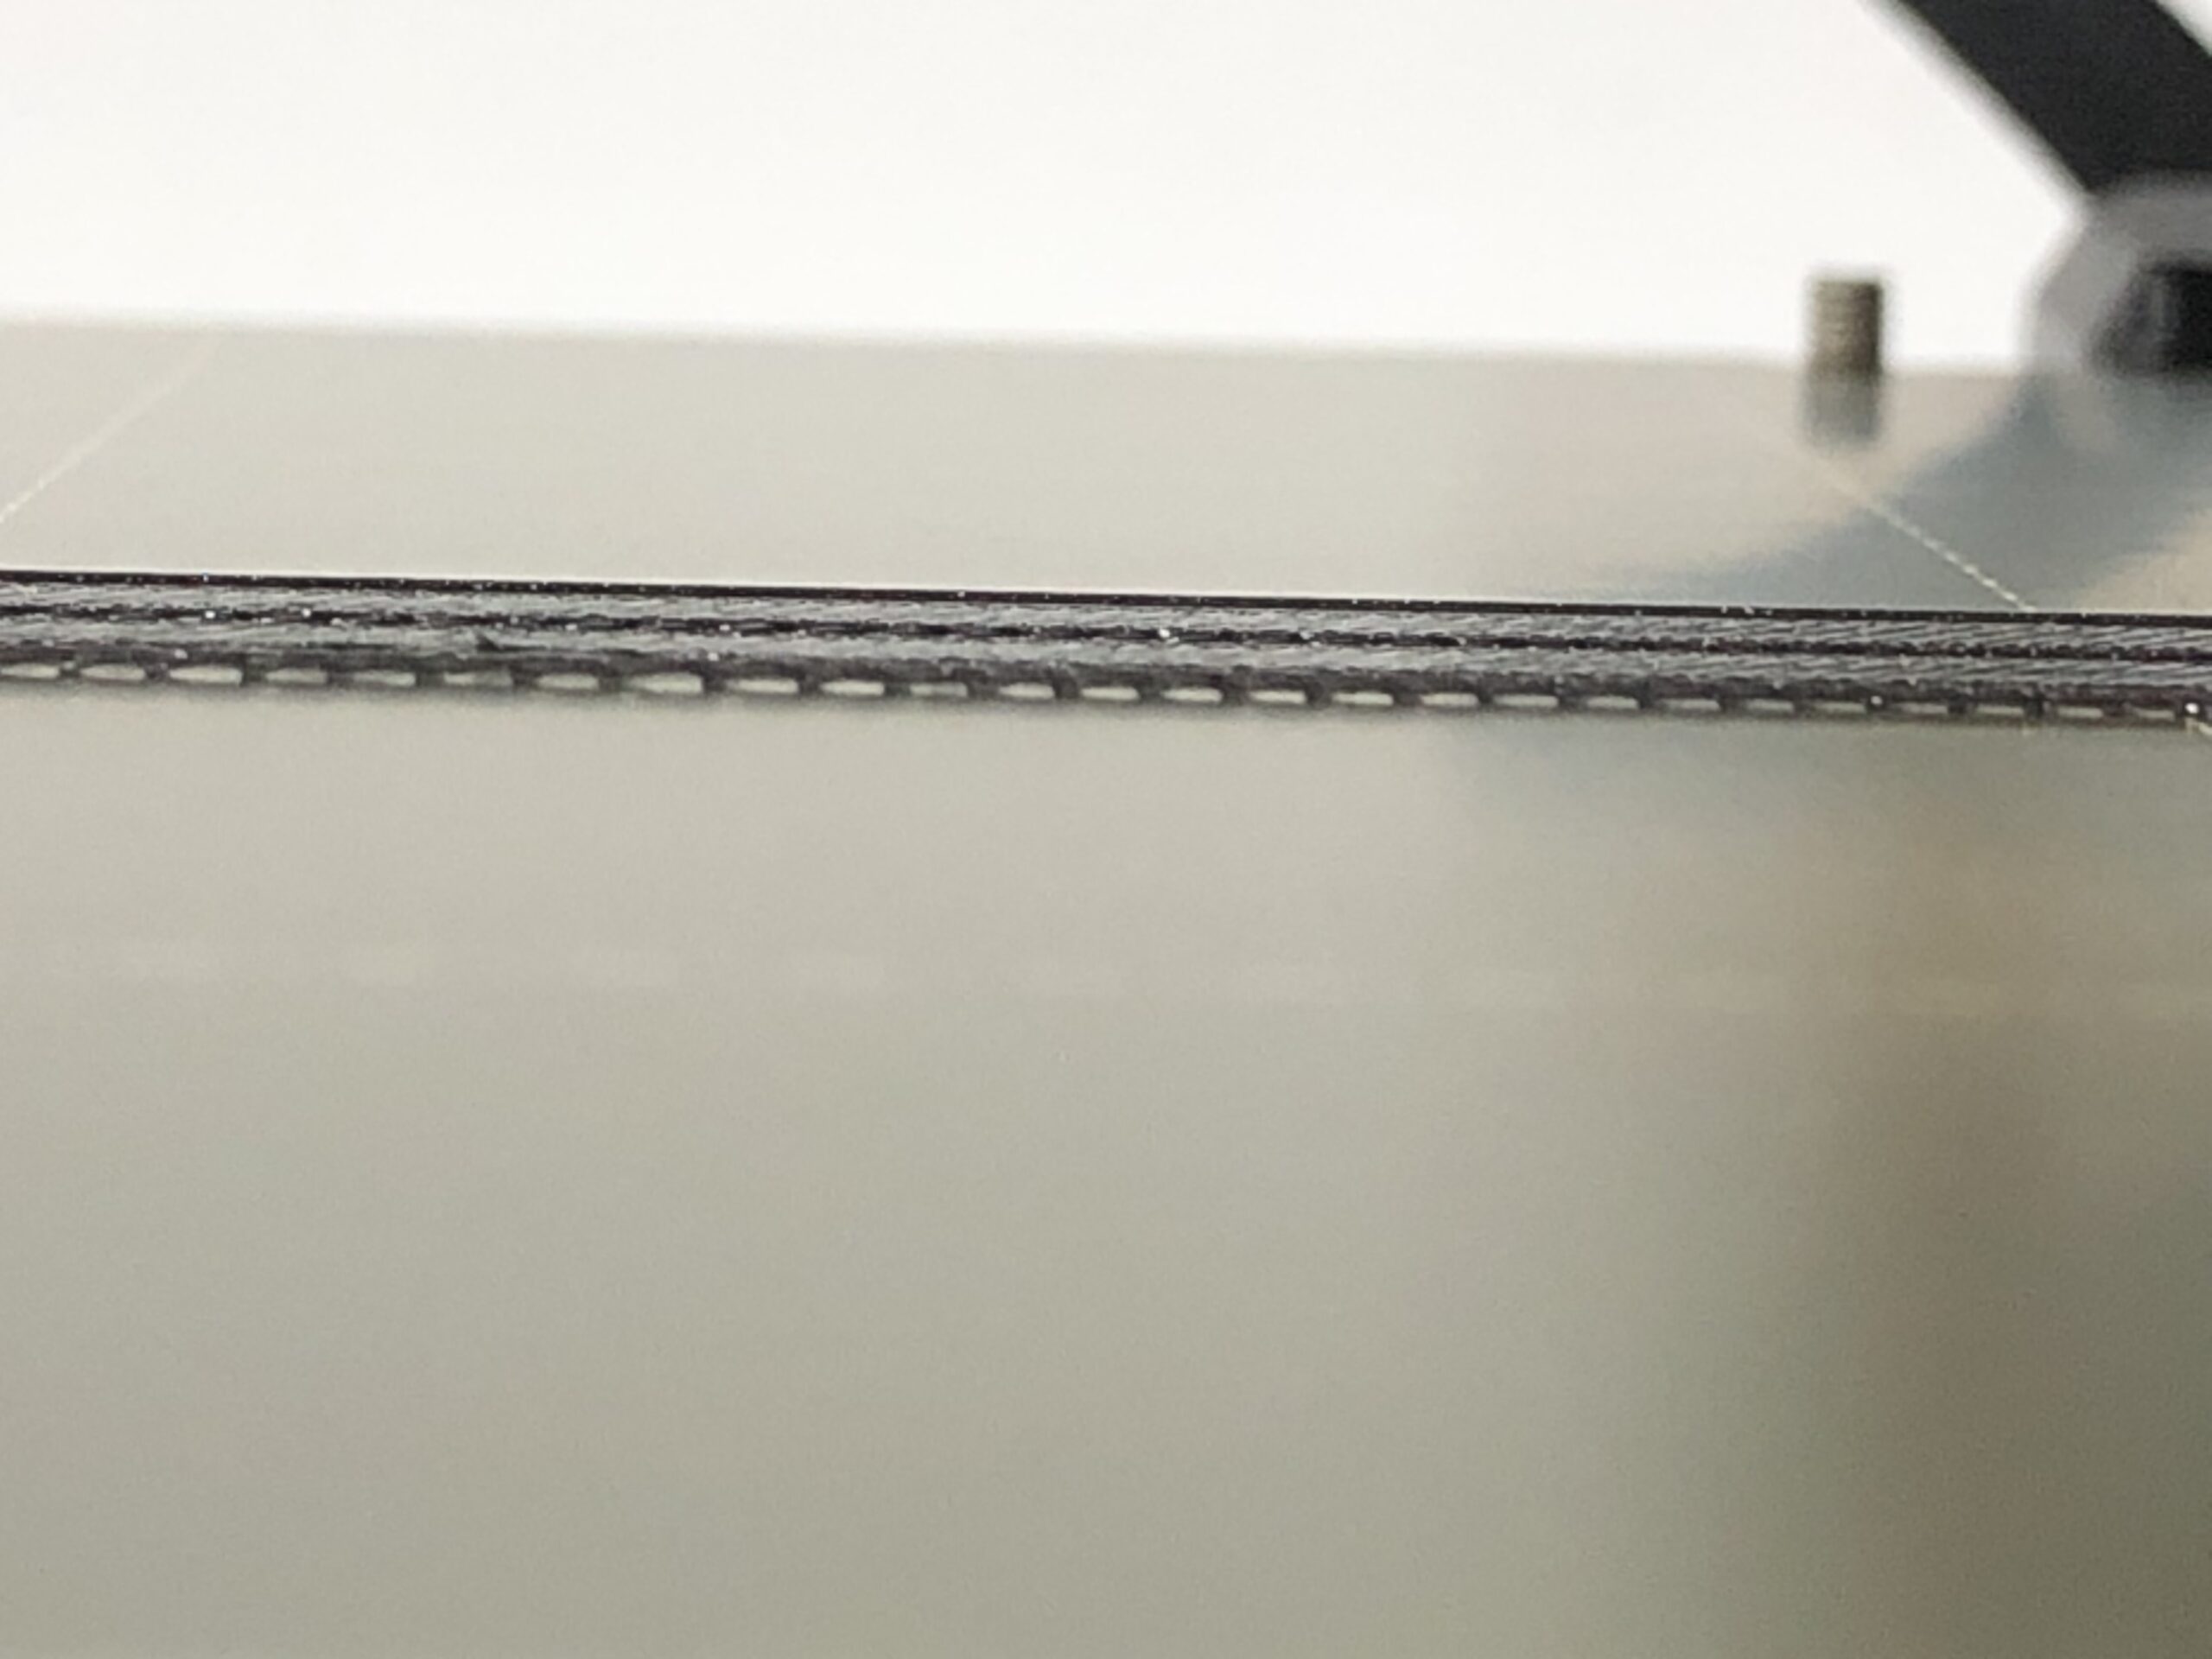
That last picture looks like a dirty print-bed. Try a thorough clean and run your first layer Z calibration.
Cheerio,
Any mods you made to your Mini (eg Bondtech extruder)? In my hands I don't see any discernible difference in print quality between Mini and Mk3S. I agree with @cwbullet that the z axis is not likely to be the culprit.
The last first layer image you showed is interesting. Toward the bottom of the image the lines melt together the way they're supposed to. Toward the top there are gaps in between. I don't how how that model was oriented but I'm wondering about xz skew: https://help.prusa3d.com/en/article/xz-axis-skew-correction-mini_158518
Formerly known on this forum as @fuchsr -- https://foxrun3d.com/
?
That last picture looks like a dirty print-bed. Try a thorough clean and run your first layer Z calibration.
Cheerio,
Yeah, it seems you were right about those last pics. Swapped the sheet for a new one and it was adhering good.
still getting that weird issue on the top of that part though
Skew
Any mods you made to your Mini (eg Bondtech extruder)? In my hands I don't see any discernible difference in print quality between Mini and Mk3S. I agree with @cwbullet that the z axis is not likely to be the culprit.
The last first layer image you showed is interesting. Toward the bottom of the image the lines melt together the way they're supposed to. Toward the top there are gaps in between. I don't how how that model was oriented but I'm wondering about xz skew: https://help.prusa3d.com/en/article/xz-axis-skew-correction-mini_158518
I did have some skew on the x axis (pointing downwards) but i managed to get it better. Have gotten a few blackouts lately and made the mistake of lifting the nozzle while cold and attached to a part. It wasn't more than 0.1mm between the left and right ends though
Weirdly enough, if i orient that “feature” to the right side of the printer it shows the random pattern towards the top layers. If i make it point left then its much better and i barely get an issue.
still, this kinda points to something being wrong which could be fixed before it gets worse.
Seeing this difference in response to orientation seems to suggest xz skew again but if you have checked it out I'm out of ideas short of contacting Prusa Support via their chat.
Okay, one more idea. I had some issue with prints looking odd in one particular location and I finally found the culprit: One tiny speck of filament that somehow had managed to find its way under the sheet and stuck to the heated bed.
Formerly known on this forum as @fuchsr -- https://foxrun3d.com/
Probably unrelated
Seeing this difference in response to orientation seems to suggest xz skew again but if you have checked it out I'm out of ideas short of contacting Prusa Support via their chat.
Okay, one more idea. I had some issue with prints looking odd in one particular location and I finally found the culprit: One tiny speck of filament that somehow had managed to find its way under the sheet and stuck to the heated bed.
Maybe the pei sheet is a little bent from use? But no, just checked the heatbed and nothing.
this is probably unrelated but somewhat at the same time the other issues started happening, top layer infills would sometimes miss perimeters
…
What did Prusa Chat tell you?
We checked all sorts of stuff. He said something hinted xz skew but i had just checked that and it was good.
the x idler was a little loose and it caused a few layer shifts during this whole time I've been trying to figure out the issues but nothing else.
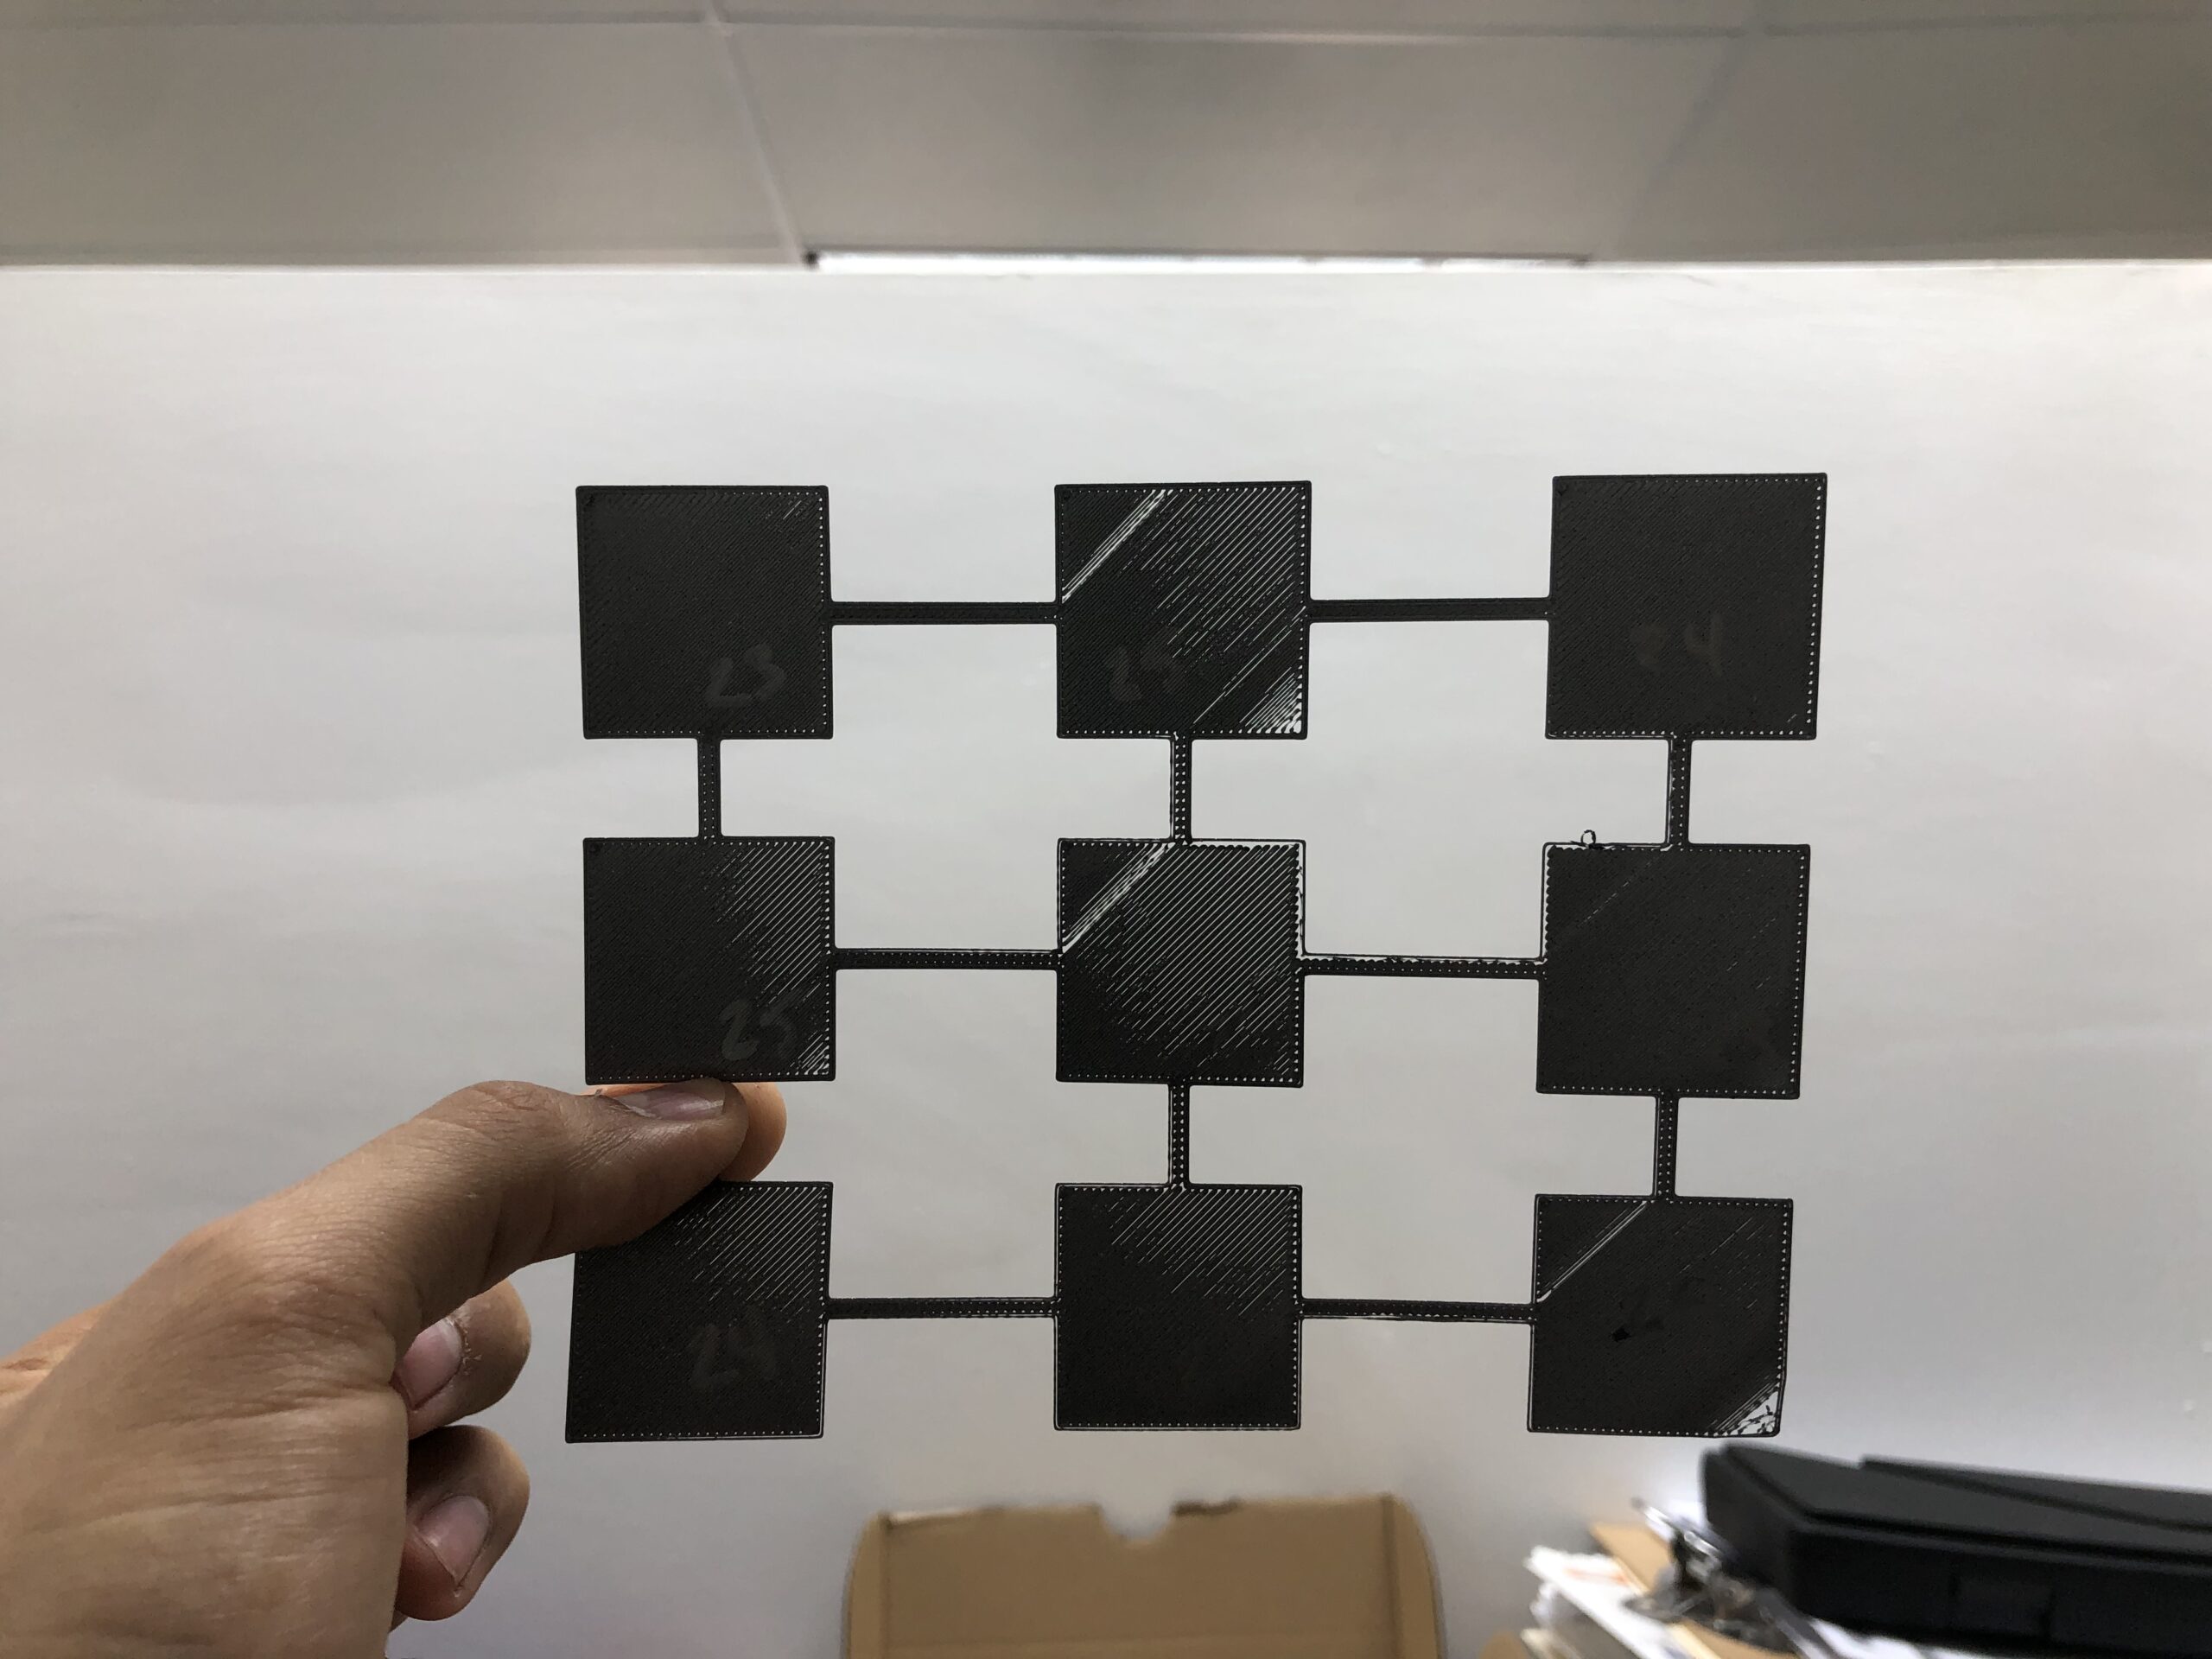
did several z height tests and theres a bunch of weird blanks at the “same” spots even though i switched the spots on the build plate between prints.
Blank patterns do show up at the start of new extrusion lines when headed to the right.
Thinking the culprit was a clogged nozzle i thoroughly cleaned everything. Things improved a bit but nothing major. Only need to get the nozzle swapped but i don't have a replacement here yet.
this is overkill but since i keep seeing the issue when the print head is moving from left to right i wanna put an indicator on it… something suggests the x motor is torquing the assembly and lifting it causing the lack of plastic here and there
3

Deformed Nozzle
The bottom left looks like s dirty bed,
thought the same thing but ive done all but scrub the bed with scotch-brite at this point 🤣 It could very well be dirty but given i printed all three on different spots of the bed kinda points to something else. Also, i just checked the first layer of a "frame" print i often do which consists of 6 rectangular pieces and 3 of them start with a corner missing.
there's a bunch of people seeing the same line width inconsistency between directions and most get fixed by changing nozzles... Forum here
Given I've had one or two bumps with the bed (after blackouts i quickly try to rotate the z screw so the nozzle detaches from the part before it cools off AND I've gone the wrong way more often than id want to admit)... being brass it may have deformed slightly to the point of causing all of these issues.
This may be unrelated but there's an unusual amount of stringing present lately... got better with the through clean and PTFE swap but still. Next up is Nozzle.
there's a bunch of people seeing the same line width inconsistency between directions and most get fixed by changing nozzles... Forum here
Ignore that thread, the poster has a visibly filthy print bed but is resorting to high tech meddling instead of cleaning it.
In your case: Try using the other side of your print sheet. If it's bent the errors should move and if the PEI is at fault the less used side may be better.
Cheerio,
Changes
there's a bunch of people seeing the same line width inconsistency between directions and most get fixed by changing nozzles... Forum here
Ignore that thread, the poster has a visibly filthy print bed but is resorting to high tech meddling instead of cleaning it.
In your case: Try using the other side of your print sheet. If it's bent the errors should move and if the PEI is at fault the less used side may be better.
Cheerio,
Flipped it sunday and its where i messed up the nozzle the worst. Have a neat little divet on the pei sheet. I could try the powder coated one.
Order of mishaps that could’ve lead to this problem (inconsistent lines and weird artifacts showing up)
1. Needing the heatbreak PTFE tube replaced after a year of “abuse”. Tube found slightly shrunk. Cleaned up. Who knows, maybe the paste wore off and it wasnt cooling off properly leading to damage.
2. Fiddling about to solve issues, pressed the nozzle hard on the pei sheet. Perhaps it damaged the nozzle tip. Stringing started to appear… hard.
3. Replaced PTFE tube. Slight improvement in printing and touching perimeters. Heavy stringing. When unloading the filament, the tip of the filament has some weird shmoo… molten PTFE?
waiting on new nozzles, heatbreak, paste and PTFE to dismantle the heatblock clean thoroughly and reassemble.
sorry for the long post and thank you guys for the help so far. Rather frustrating but so far a great learning experience.
Needing the heatbreak PTFE tube replaced after a year of “abuse”.
I find I have to replace PTFE tubes every 2000 - 3000 hours of printing.
Perhaps it damaged the nozzle tip. Stringing started to appear… hard.
It's harder to damage a brass nozzle than you might expect (otoh it's really easy to smash an expensive ruby nozzle.) Inspect the nozzle with a lens - if there is visible scratching then that may cause stringing, other wise stringing is almost always a sign of damp filament.
Cheerio,
…
Needing the heatbreak PTFE tube replaced after a year of “abuse”.
I find I have to replace PTFE tubes every 2000 - 3000 hours of printing.
Perhaps it damaged the nozzle tip. Stringing started to appear… hard.
It's harder to damage a brass nozzle than you might expect (otoh it's really easy to smash an expensive ruby nozzle.) Inspect the nozzle with a lens - if there is visible scratching then that may cause stringing, other wise stringing is almost always a sign of damp filament.
Cheerio,
Honestly thought the tube lasted longer than 17 - 18 weeks.
I’ll check the nozzle, I did swap filament for a new one and no luck with stringing though.
PTFE Tubes
Needing the heatbreak PTFE tube replaced after a year of “abuse”.
I find I have to replace PTFE tubes every 2000 - 3000 hours of printing.
Perhaps it damaged the nozzle tip. Stringing started to appear… hard.
It's harder to damage a brass nozzle than you might expect (otoh it's really easy to smash an expensive ruby nozzle.) Inspect the nozzle with a lens - if there is visible scratching then that may cause stringing, other wise stringing is almost always a sign of damp filament.
Cheerio,
Honestly thought the tube lasted longer than 17 - 18 weeks.
I’ll check the nozzle, I did swap filament for a new one and no luck with stringing though.
I have had them last over a year.
--------------------
Chuck H
3D Printer Review Blog
I have had them last over a year.
I'm guessing that the frequency of filament loading is important here. The abrasion of the new end against the chamfered edge must be significant but if you're running through whole 2kg spools at a time they're probably going to last longer.
Cheerio,