Strange artefacts on a printed surface
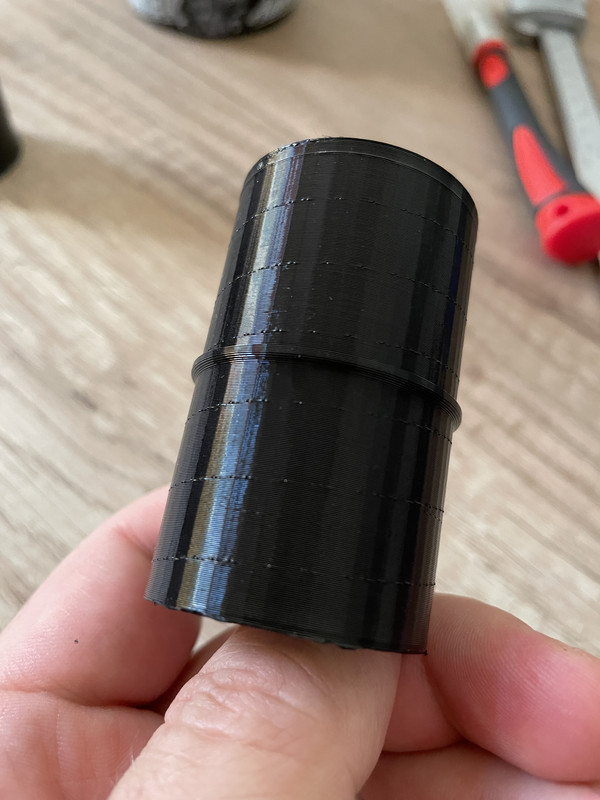
Hello, recently an issue started to appear on my prints. I printed this simple tube to check that and it is clearly visible. It remains even with a different settings as a spiral around the tube here. The strange thing about that is I can clearly see the head/extruder to jerk a bit on each round, leaving a small mark, and that moment is slowly traveling, hence the spiral. I checked the gcode in viewer but it is perfect circles each time as expected. Before I try more combinations, move around the plate etc., isn't that something well known? Some debris in mechanism or something like that..?
RE: Strange artefacts on a printed surface
It's probably your Seam... the size of the seam is largely a factor of retraction and temperature settings
every layer has a start and stop point,
which cause a seam, you can choose various seam placements in prusa slicer, on the layers and perimeters page.
slicers normally try to hide seams in corners, but cylinders don't have many corners, so the seams are always more obvious on cylinders
regards Joan
I try to make safe suggestions,You should understand the context and ensure you are happy that they are safe before attempting to apply my suggestions, what you do, is YOUR responsibility.Location Halifax UK
RE: Strange artefacts on a printed surface
@joantabb
Hi Joan, yeah, sounds about right, unless printing in spiral vase mode there has to be start and end to the layer. And I coincidentally made a lot of round or oval prints lately so that would make sense I didn't notice that before. But shouldn't it be always in the same spot? Then it would be a straight line, real seam actually. I was checking the settings (I never touched the seam settings so far) and it says nearest is default while popup help says it should be aligned. And still, why to move with a print head when starting a new layer? It obviously has to leave a mark.

RE: Strange artefacts on a printed surface
@ren
working on the retraction settings can reduce the visibility of seems
depending on the item, it is sometimes best to use Aligned, or Rear seam... and put the issue where it can't be seen. (this may involve rotating the model on the build plate!)
or use random and hope the pattern is not noticeable
regards Joan
I try to make safe suggestions,You should understand the context and ensure you are happy that they are safe before attempting to apply my suggestions, what you do, is YOUR responsibility.Location Halifax UK
RE: Strange artefacts on a printed surface
The z-seam is unavoidable -- at least with current consumer-grade technologies -- but you can reduce it to where it might be less noticeable. As Joan notes, retraction settings are part of the solution. By default, Prusa printer profiles also do a "wipe" action at the end of each layer immediately before the retraction and z-lift actions. That's no doubt part of the movement you're observing at the end of each layer.
Retraction, z-lift, wipe, and coasting (a feature on other slicers) are all workarounds for stringing. Stringing is aggravated by over extrusion. Reduce the over extrusion and you minimize the stringing and so the need for these workarounds. I've found that by spending a few minutes determining the best extrusion multiplier for each filament makes a huge difference in my print quality. It makes sense that matching your slicer settings to the real-world filament and printer you're using results in more accurate prints. I've got full details here if you're interested.
Since starting to do this regularly, I can get by with the following retraction and related settings (see Printer Settings->Extruder 1->Retraction):
- Retraction length: 0.2-0.4mm
- Lift Z: 0.4mm
- Wipe while retracting: disabled
While still present, the z-seam is far less noticeable:
and miscellaneous other tech projects
He is intelligent, but not experienced. His pattern indicates two dimensional thinking. -- Spock in Star Trek: The Wrath of Khan
RE: Strange artefacts on a printed surface
Hi Bob, I carefully read both the article and the second part, thank you, it was very useful.
First of all, I'm quite lucky user. Most my prints are construction parts, like various adaptors (the one above is for connecting vacuum tube with its tip, both 35mm diameter, would you believe something like that is being sold?! The hover was less than 30 quid tho so no wonder I guess), inner joining parts for furniture manufacturing and similar stuff, so I do not care about the look of the parts much. But I'm very curious about how things work so I like technical and informative posts like this one. As Joan properly identified first, it was z-seam indeed, and now I know what it is and how to handle that, nice! If I ever start to print those dust collectors, how my friend likes to call them (he already printed probably every single spaceship model ever conceived in human mind), I will have knowledge how to achieve a fine quality. There are loads of options in the slicer and it's not that easy to quickly understand one and each, that's why I welcomed that article so much.
I did a few recommended tests, printing and measuring the hollow cubes and during that I found my issue. While I print on Prusa MINI+ with PETG Prusament sliced in Prusa Slicer, I believe the most work on finetuning is already done, as the test confirmed. Anyway, the big reveal in the end and please, try not to laugh at me too much both of you: I made that print above with PETG loaded but PLA settings on the printer. I wouldn't notice that because I use PETG most of the time, just recently I wanted something fancy and sparkling, so I was swapping the filament and messed up the settings. Let this confession of mine serve here as a warning for those who will come around and thank you both for teaching me something new.
RE: Strange artefacts on a printed surface
[...] Anyway, the big reveal in the end and please, try not to laugh at me too much both of you: I made that print above with PETG loaded but PLA settings on the printer.
I have done that as well. I'm surprised it didn't jam up, but at least it was an easy fix.
I accidentally sent a print slice for a 0.40mm nozzle to a printer with a 0.25mm nozzle mounted. It actually printed very well. Every now and then, accidents can be useful!
and miscellaneous other tech projects
He is intelligent, but not experienced. His pattern indicates two dimensional thinking. -- Spock in Star Trek: The Wrath of Khan
