Prusa Mini X and Y -Axis Disassembly/Assembly Guide
Does anyone have a good guide to dismantle the Mini X and Y axis? I plan to lubricate the bearings as well as upgrade the x-axis end cap to the most recent revision. My mini is louder than I would like at the moment and I suspect the bearings could use some lubrication. Correct me if there are other reasons?
During this maintenance, I am going to go ahead and rebuild my extruder (clicking and rusted gears) and upgrade the hotend to the E3D V6 mod.
I appreciate any link or tips to performing this maintenance.
RE: Prusa Mini X and Y -Axis Disassembly/Assembly Guide
Does anyone have a good guide to dismantle the Mini X and Y axis? I plan to lubricate the bearings as well as upgrade the x-axis end cap to the most recent revision. My mini is louder than I would like at the moment and I suspect the bearings could use some lubrication. Correct me if there are other reasons?
During this maintenance, I am going to go ahead and rebuild my extruder (clicking and rusted gears) and upgrade the hotend to the E3D V6 mod.
I appreciate any link or tips to performing this maintenance.
A video explains more than many words. Maybe this is helpful for disassembly:
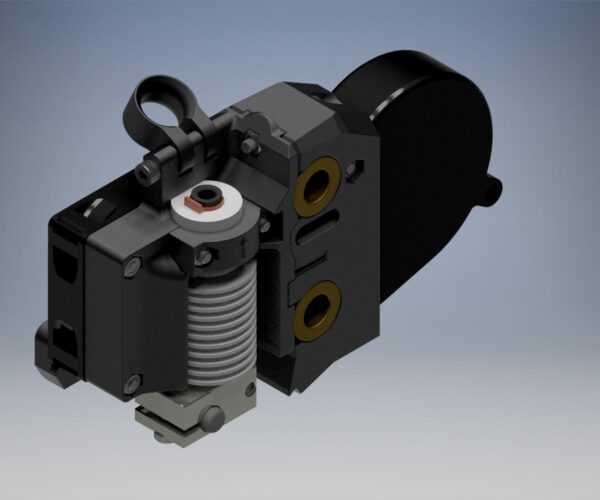
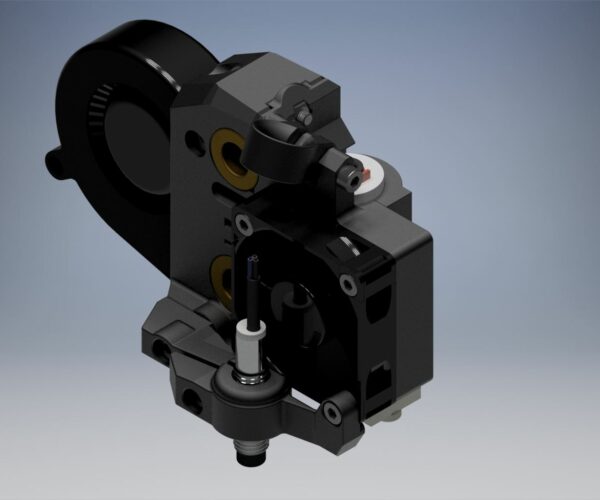
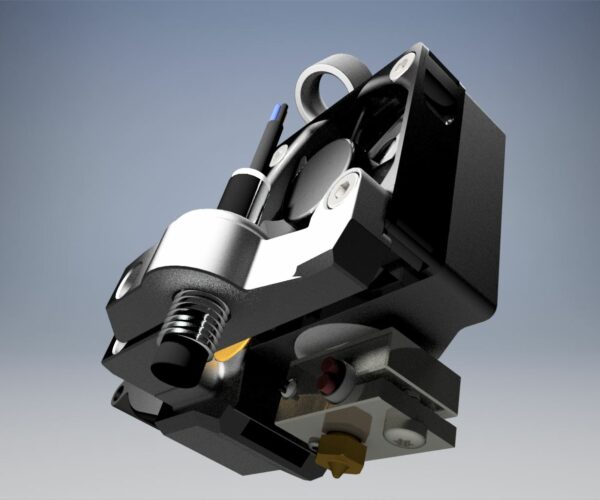
I have equipped my Mini with an E3D V6 hotend:
I will publish this in the Prusa prints.
Statt zu klagen, dass wir nicht alles haben, was wir wollen, sollten wir lieber dankbar sein, dass wir nicht alles bekommen, was wir verdienen.
RE: Prusa Mini X and Y -Axis Disassembly/Assembly Guide
https://www.prusaprinters.org/prints/42554-original-prusa-mini-e3d-v6-hotend
Statt zu klagen, dass wir nicht alles haben, was wir wollen, sollten wir lieber dankbar sein, dass wir nicht alles bekommen, was wir verdienen.
RE: Prusa Mini X and Y -Axis Disassembly/Assembly Guide
@karl-herbert
Thanks Karl. I like your E3D V6 mod. I printed a similar version. I like several of the features on yours better, but unfortunately my printer is down so I will use what I have for now anyways.
Thanks for the video as well. I will check it out.
RE: Prusa Mini X and Y -Axis Disassembly/Assembly Guide
@karl-herbert
I got a few questions about that v6
RE: Prusa Mini X and Y -Axis Disassembly/Assembly Guide
@nerolit
What questions do you have?
Statt zu klagen, dass wir nicht alles haben, was wir wollen, sollten wir lieber dankbar sein, dass wir nicht alles bekommen, was wir verdienen.
RE: Prusa Mini X and Y -Axis Disassembly/Assembly Guide
I am not sure if I can post this here since this is for ... not original Prusa MINI, but I used these videos when doing complete change of my MINI to white:
RE: Prusa Mini X and Y -Axis Disassembly/Assembly Guide
@karl-herbert
Is it a fullmetal v6?
If yes - then how it works with the mini? Retraction issues? Stringing?
Is the stock mini heatblock combatible with v6? I'd like to use V6 heatsink and heatbreak
What PTFE tube did you use? What lenght?
How long you were using that ?
I was not convinced with these v6 versions of mini until you showed the weight..its literally the same..
RE: Prusa Mini X and Y -Axis Disassembly/Assembly Guide
@nerolit
- Yes genuine ED3V6 all metal hotend with Prusa E3D heatbreak - exactly the same as the MK3. I print with it on the MK3 at temperatures up to 400 degrees C. (PEEK - PT100 mod.).
- I have been using this hotend for about 1 month and have printed PLA, PETG, XT-CF20 and ASA with it. Retraction values have to be adjusted to the filament material. So far I did not have any blockages or similar problems, provided the print parameters are correct.
- The PTFE tube is approx. 5cm longer than the original Mini PTFE, because it is inserted approx. 4cm into the hotend until it reaches the heatbreak. The orange clip secures the PTFE tube.
- the heatbreak is MK3 designed, heatsink side M7x1, heating block side M6x1. The Mini heating block also has a M6x1 thread, but you have to check if the length fits with the built-in nozzle. I did not test this because I have a lot of MK3 spare parts and used them.
E3D heatbreak:
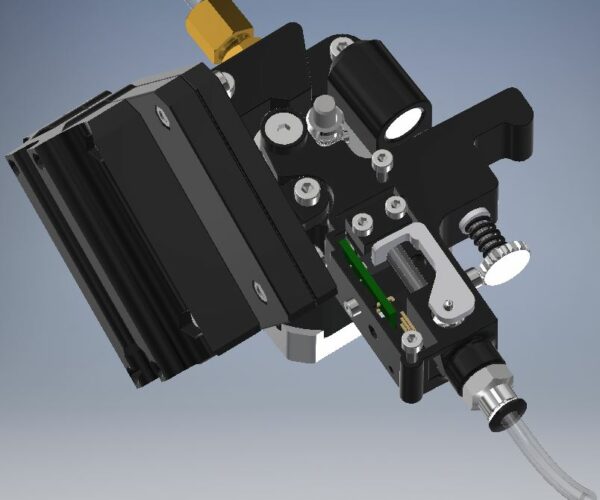
Finally, I have to mention that I also use another extruder - homemade:
I have not tested how it works with the original Mini Extruder, but it should not be a problem if the extruder is well adjusted.
Statt zu klagen, dass wir nicht alles haben, was wir wollen, sollten wir lieber dankbar sein, dass wir nicht alles bekommen, was wir verdienen.
RE: Prusa Mini X and Y -Axis Disassembly/Assembly Guide
@karl-herbert
thanks for reply!
How much retraction do you have? So I could have a point of reference vs stock mini.
Have you adjusted the PID ?
I have a used prusa alll metal heatbreak with trianglelab copy of V6 heatsink , I'm thinking about giving it a try - I just need to order new PTFE
RE: Prusa Mini X and Y -Axis Disassembly/Assembly Guide
@karl-herbert
hanks for reply!
How much retraction and speeds do you have? So I could have a point of reference vs stock mini.
Have you adjusted the PID ?
I have a used prusa alll metal heatbreak with trianglelab copy of V6 heatsink , I'm thinking about giving it a try - I just need to order capricorn PTFE for it.
RE: Prusa Mini X and Y -Axis Disassembly/Assembly Guide
@karl-herbert
Hi Karl, First I want to thank you for your contribution in this forum. I find your input in many topics and always appreciate your insight. I have now upgraded to the V6 hotend and am performing some PID tuning.
I found this reply from you in another forum:
2) send the following commands via pronterface or octoprint terminal or gcodefile to printer:
M106 S127 (fan)
M303 E0 S235 C5 (read pid); E0 = extruder nr.; C5 -> the temperatures are controlled 5 times up and down and e.g. the following values are then output:
Recv: #define DEFAULT_Kp 26.45
Recv: #define DEFAULT_Ki 2.22
Recv: #define DEFAULT_Kd 78.81
3.) Enter the received values with :
M301 E0 P26.45 I2.22 D78.81 and
4) Save permanently with M500.
So my questions are:
1) For M106 S127, what speed does that set the fan at and which fan exactly? (nozzle or hotend?) The standard PrusaSlicer has a fan setting of 30%-50%
2) I ran the above code and the M500 does not permanently save to the printer. That said, in Prusaslicer, do I just need to add the M301 line into the start gcode section or does it also require the M500?
RE: Prusa Mini X and Y -Axis Disassembly/Assembly Guide
Here is my current start gcode for reference. Where do I place the PID line of code or does it matter? (I really am not sure what this code is for, why it needs to be at the start gcode section, and if order matters)
G90 ; use absolute coordinates
M83 ; extruder relative mode
M104 S170 ; set extruder temp for bed leveling
M140 S[first_layer_bed_temperature] ; set bed temp
M109 R170 ; wait for bed leveling temp
M190 S[first_layer_bed_temperature] ; wait for bed temp
G28 ; home all without mesh bed level
G29 ; mesh bed leveling
M104 S[first_layer_temperature] ; set extruder temp
G92 E0.0
G1 Y-2.0 X179 F2400
G1 Z3 F720
M109 S[first_layer_temperature] ; wait for extruder temp

; intro line
G1 X170 F1000
G1 Z0.2 F720
G1 X110.0 E8.0 F900
G1 X40.0 E10.0 F700
G92 E0.0

M221 S95 ; set flow
RE: Prusa Mini X and Y -Axis Disassembly/Assembly Guide
@outlawecho
With M106 only the nozzle fan can be controlled. Please note that these are binary values between 0 and 255. In the slicer this is given mostly in percent, so you have to convert here. For example, the binary value 127 in the slicer means 50%, 51 -> 20% etc.
You can convert it like this: Binary 200 = 200/255*100 = 78%
You can insert the M301 at the very beginning of the start code - without the M500, as this seems to have no effect anyway. The M500 function is locked for many functions, unlike the MK3. You can change this, but then you lose the warranty for the printer board.
https://hackaday.com/tag/prusa-mini/
Statt zu klagen, dass wir nicht alles haben, was wir wollen, sollten wir lieber dankbar sein, dass wir nicht alles bekommen, was wir verdienen.
RE: Prusa Mini X and Y -Axis Disassembly/Assembly Guide
@karl-herbert
So what retraction do you use? Do you have more stringing ? Less?


