Linear advance for the MINI
Hello everybody !
Beware: this is for advanced users, and you probably don't need it if you're
satisfied with your print quality using the default nozzle and settings.
Short story:
I have written a script (python) to help to calibrate the linear advance
for the MINI. See https://marlinfw.org/docs/features/lin_advance.html if you
don't know what linear advance (LA) is.
The section that should be edited in the script is indicated inside it.
When run, the script will generate the gcode into the file (by default)
'LA15_calibration_pattern_for_MINI.gcode'
The script has only be tested on Linux, but should work out of the box on
other platforms since it is python. Dependencies are written inside it.
See now the calibration procedure below to know how to use the script.
Long story:
I had to print a lot of parts, but the standard 0.4mm nozzle was too slow, so
I switched to a 0.6mm nozzle. However, the quality of the prints was not as
expected, with quite visible seams, bulges in the corners, etc...
I tried to play with the slicer settings, but nothing was good enough, and the
answer seemed to be the LA settings.
I tried the online pattern generators but probably have not dialed the correct
settings and almost damage my steel sheet.
Since the principle is quite simple, I wrote my own pattern generator which
produces a gcode similar to the one produced by prusaslicer (=safe for the
MINI), with some features:
- the retraction length is computed for each K factor in order to respect
the total length written in the parameters and avoid partial clogs.
Check the output of the script: an error message will show if a problem
is detected.
- there is a thumbnail showing the K factors printed, so you don't have to
remember them.
- the gcode can be opened in prusaslicer.
Some thoughts (about retractions) from what I have understood:
The linear advance is used to keep a constant pressure in the nozzle: this
will avoid leaks & over/under extrusion during prints.
It is important to know the retraction length to use without LA. Indeed,
when LA is activated, it will retract the filament during the deceleration
phase to reduce the pressure in the nozzle. This amount of retraction depends
on the speed and the K factor: it can become quite significant for high
values, and if a retraction occurs after that, it can lead to a partial clog
(too much filament retracted in total).
The script computes the retraction to use in order to keep the total retraction
length equal to the retraction without LA (the RETRACT_LENGTH variable).
So, once the best K factor to use is found, search its value into the gcode
produced: the LA retraction used at high speed is written in a comment.
Subtract this value from the retraction length without LA to get the new
retraction length to use. If everything is well calibrated, there will be no
strings or leaks, even if this length seems small. Use a little longer length
if you have strings, but stay below the default 3.2mm for the total length.
If the maximum speed used is lower than the one used in the calibration,
modify the value in script and run it again to get the correct retraction length.
Example:
I am using 2.4mm without LA, and print as 60mm/s at max speed. The
corresponding LA retraction is around 1mm, so I should use 2.4-1=1.4mm for
the retraction. After some test prints, I prefer to use 1.6mm, leading to
a total retraction of 2.6mm at 60mm/s.
Calibration procedure:
Be sure you have already calibrated before:
- the extruder steps
- the extrusion multiplier
- the nozzle temperature
- the retraction length *without* linear advance.
1) Create a pattern from K=0 to K=0.5 by step of 0.1: the "quite good" K
factor will be easy to see.
2) Create a pattern by steps of 0.01 around the previous value. This time, the
best K factor can be hard to tell. Focus on the second speed transition:
when the overextrusion has disappeared, the value should be good.
3) Adjust your retraction length according to the K factor and maximum print
speed! (See above)
4) Test print time! The print should have almost perfect corners, and the seams
should be acceptable.
The K factor has to be calibrated for each layer height you used. This will
also lead to different retraction lengths: I am using the lower one and
everything works fine.
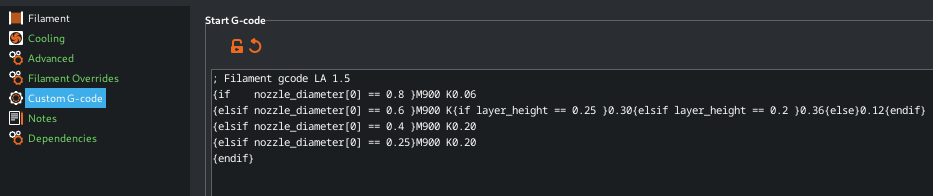
I will attach below a screenshot of what my filament custom gcode looks like
for the moment, with only two calibrations done.
After this calibration, my prints look good: the corners are sharp enough, the
seams are acceptable, and even invisible when hidden in an internal corner.
And as a side effect, my nozzle is not leaking anymore at the end of the print!
(at least for most of them)
Happy printing!
Since the best K factor can be quite different than the one in the stock
profile, it should be nice to share some settings for comparison and reference:
- the ptfe tube: original | capricorn | capricorn XS
- the nozzle:
- the layer height:
- the print temperature:
- the filament brand/type:
- the retraction length:
- the K factor:
Here are mine:
- the ptfe tube: capricorn XS
- the nozzle: brass 0.6mm
- the layer height: 0.25mm
- the print temperature: 195°C
- the filament brand/type: Velleman Vertex / PLA
- the retraction length: 1.6mm
- the K factor: 0.30
- the ptfe tube: capricorn XS
- the nozzle: brass 0.6mm
- the layer height: 0.20mm
- the print temperature: 195°C
- the filament brand/type: Velleman Vertex / PLA
- the retraction length: 1.6mm
- the K factor: 0.36
RE: Linear advance for the MINI
Nice one.
But I hope and think, the upcoming 4.4 FW with "Arachne" algorithm will help you with your 0.6 mm nozzle.
It looks promising for exactly that case, from what alpha/beta users tell.
RE: Linear advance for the MINI
I've printed a lot with the 0.6 mm nozzle using these settings, arachne and pressure equalizer. I'm now more than happy with the print quality.
I've recently switched back to the 0.4 mm nozzle for more detailed prints. It's so slow! I've also done this K factor calibration, just to check the default settings (since the print quality was quite good), and the results were surprising: the best value is the double of the default setting! I guess that a lower temperature leads to more viscosity, and therefore more pressure to extrude the filament. The default print quality was quite good, but now it is even better, with sharper corners, and the retraction length is even shorter!
Here the settings for reference:
- the ptfe tube: capricorn XS
- the nozzle: copper plated 0.4 mm
- the layer height: 0.2 mm
- the print temperature: 195°C
- the filament brand/type: Velleman Vertex / PLA
- the retraction length: 1.5 mm
- the K factor: 0.41
- the ptfe tube: capricorn XS
- the nozzle: copper plated 0.4 mm
- the layer height: 0.15 mm
- the print temperature: 195°C
- the filament brand/type: Velleman Vertex / PLA
- the retraction length: 1.5 mm
- the K factor: 0.48
RE: Linear advance for the MINI
Back to a 0.4mm nozzle, with prusament. The K factor is almost the same for a wide range of settings:
- the ptfe tube: capricorn XS
- the nozzle: e3d brass 0.4 mm
- the layer height: 0.15 mm / 0.20 mm
- the print temperature: 200°C to 215°C
- the filament brand/type: Prusament mystic brown
- the retraction length: 1 mm
- the K factor: 0.36
RE: Linear advance for the MINI
I have been looking for a while on the operation of the Marlin k-factor generator Prusa Edition and how to get the code to actually work. I have downloaded the files however it does not generate a GCODE. I opened an inspector window and each java script file the html tries to open has errors.
Has anyone been able to successfully generate a GCODE for the Mini+ using PETG filament?
RE: Linear advance for the MINI
Has anyone been able to successfully generate a GCODE for the Mini+ using PETG filament?
You can try my python script (see the end of the first post): it can generate a gcode for any filament. Simply update all the parameters (temperatures, retraction settings, speed, nozzle, etc...) to match your needs (look at the correct values in prusaslicer), then run the script.
The gcode produced is not as fancy as the marlin one, but it does the job and the bed is easier to clean. You can also check it in prusaslicer beforehand.
I suggest to use two versions: the first from K=0 to K=0.6 by 0.05 steps, and the second by 0.02 steps around the better K factor.
RE: Linear advance for the MINI
I was able to download the script files and everything from git however once I enter all of my values and I click the generate GCODE, nothing happens.
RE: Linear advance for the MINI
I was able to download the script files and everything from git however once I enter all of my values and I click the generate GCODE, nothing happens.
Just to be sure: I was not talking about these files. I had not any success using the online tools (and almost damage my print sheet with them), so I've written the python script.
If you manage to calibrate your K factor using any of these methods, please share the results. Good luck!
RE: Linear advance for the MINI
I was actually able to use theMarlin version online to get a proper GCODE file. I was able to see that one Mini+ was a 0.4 and the other was 0.8. Ran the test again and saw the same results.
RE: Linear advance for the MINI
I've been printing a lot using PETG recently. My settings are in the same range as yours Chris :
- the ptfe tube: capricorn XS
- the nozzle: e3d copper plated 0.4 mm
- the layer height: 0.20 mm
- the print temperature: 240°C
- the filament brand/type: Prusament galaxy black/ PETG
- the retraction length: 2 mm
- the K factor: 0.55
Chris, do you have an idea why the K factor is that different between your two minis (hotend assembly, filament brand, etc...)?
RE: Linear advance for the MINI
That is a great question. I now have 4x Mini+ and I have used the "Teaching Tech" guide except for the linear advance from "Marlin" with the same spool of filament moved from machine to machine (eSUN PETG Black). Two of the machines are at a K factor of 0.40, one is at 0.80 and the last is at 0.62. I have to believe that the idler tension or even a slight deviation in PID values could have a play in this.
If anyone else has this deviation please let us know. Also if you have a better explanation I am all ears.
RE: Linear advance for the MINI
Hi @alsteiner
how do you set it up "the retraction length *without* linear advance"?
Hello everybody !

Beware: this is for advanced users, and you probably don't need it if you're
satisfied with your print quality using the default nozzle and settings.

Short story:
I have written a script (python) to help to calibrate the linear advance
for the MINI. See  https://marlinfw.org/docs/features/lin_advance.html  if you
don't know what linear advance (LA) is.
The section that should be edited in the script is indicated inside it.
When run, the script will generate the gcode into the file (by default)
'LA15_calibration_pattern_for_MINI.gcode'
The script has only be tested on Linux, but should work out of the box on
other platforms since it is python. Dependencies are written inside it.
See now the calibration procedure below to know how to use the script.

Long story:
I had to print a lot of parts, but the standard 0.4mm nozzle was too slow, so
I switched to a 0.6mm nozzle. However, the quality of the prints was not as
expected, with quite visible seams, bulges in the corners, etc...
I tried to play with the slicer settings, but nothing was good enough, and the
answer seemed to be the LA settings.
I tried the online pattern generators but probably have not dialed the correct
settings and almost damage my steel sheet.
Since the principle is quite simple, I wrote my own pattern generator which
produces a gcode similar to the one produced by prusaslicer (=safe for the
MINI), with some features:
	- the retraction length is computed for each K factor in order to respect
	  the total length written in the parameters and avoid partial clogs.
	  Check the output of the script: an error message will show if a problem
	  is detected.
	- there is a thumbnail showing the K factors printed, so you don't have to
	  remember them.
	- the gcode can be opened in prusaslicer.

Some thoughts (about retractions) from what I have understood:
The linear advance is used to keep a constant pressure in the nozzle: this
will avoid leaks & over/under extrusion during prints.
It is important to know the retraction length to use without LA. Indeed,
when LA is activated, it will retract the filament during the deceleration
phase to reduce the pressure in the nozzle. This amount of retraction depends
on the speed and the K factor: it can become quite significant for high
values, and if a retraction occurs after that, it can lead to a partial clog
(too much filament retracted in total).
The script computes the retraction to use in order to keep the total retraction
length equal to the retraction without LA (the RETRACT_LENGTH variable).
So, once the best K factor to use is found, search its value into the gcode
produced: the LA retraction used at high speed is written in a comment.
Subtract this value from the retraction length without LA to get the new
retraction length to use. If everything is well calibrated, there will be no
strings or leaks, even if this length seems small. Use a little longer length
if you have strings, but stay below the default 3.2mm for the total length.
If the maximum speed used is lower than the one used in the calibration,
modify the value in script and run it again to get the correct retraction length.
Example:
	I am using 2.4mm without LA, and print as 60mm/s at max speed. The
	corresponding LA retraction is around 1mm, so I should use 2.4-1=1.4mm for
	the retraction. After some test prints, I prefer to use 1.6mm, leading to
	a total retraction of 2.6mm at 60mm/s.


Calibration procedure:
Be sure you have already calibrated before:
	- the extruder steps
	- the extrusion multiplier
	- the nozzle temperature
	- the retraction length *without* linear advance.

1) Create a pattern from K=0 to K=0.5 by step of 0.1: the "quite good" K
   factor will be easy to see.
2) Create a pattern by steps of 0.01 around the previous value. This time, the
   best K factor can be hard to tell. Focus on the second speed transition:
   when the overextrusion has disappeared, the value should be good.
3) Adjust your retraction length according to the K factor and maximum print
   speed! (See above)
4) Test print time! The print should have almost perfect corners, and the seams
   should be acceptable.

The K factor has to be calibrated for each layer height you used. This will
also lead to different retraction lengths: I am using the lower one and
everything works fine.
I will attach below a screenshot of what my filament custom gcode looks like
for the moment, with only two calibrations done.

After this calibration, my prints look good: the corners are sharp enough, the
seams are acceptable, and even invisible when hidden in an internal corner.
And as a side effect, my nozzle is not leaking anymore at the end of the print!
(at least for most of them)

Happy printing!

Since the best K factor can be quite different than the one in the stock
profile, it should be nice to share some settings for comparison and reference:
	- the ptfe tube: original | capricorn | capricorn XS
	- the nozzle:
	- the layer height:
	- the print temperature:
	- the filament brand/type:
	- the retraction length:
	- the K factor:


Here are mine:
    - the ptfe tube:            capricorn XS
    - the nozzle:               brass 0.6mm
    - the layer height:         0.25mm
    - the print temperature:    195°C
    - the filament brand/type:  Velleman Vertex / PLA
    - the retraction length:    1.6mm
    - the K factor:             0.30

    - the ptfe tube:            capricorn XS
    - the nozzle:               brass 0.6mm
    - the layer height:         0.20mm
    - the print temperature:    195°C
    - the filament brand/type:  Velleman Vertex / PLA
    - the retraction length:    1.6mm
    - the K factor:             0.36
RE: Linear advance for the MINI
how do you set it up "the retraction length *without* linear advance"?
What I meant here is the retraction length using the default LA settings. The retraction length in prusaslicer is 3.2mm for the MINI, but it can be reduced a lot.
After having printing a lot of (dried) PETG, I can say that a retraction length of 2mm is safe for me even for a LA value as high as 0.6!
If you want to use my script to calibrate the LA, I suggest that:
- Calibrate first the extruder steps
- Use a retraction length of 3mm in the script, if you don't have a lower working value
- After the LA calibration, try using a retraction length of 2mm. It's been a safe 'work for all' value for all my filaments, even if I can go lower for some. I don't think anymore that it's necessary to tune more this value (except for the fun).
- Print dry! A dried filament really ease your printing life.
RE: Linear advance for the MINI
I'm running stock setup. I tried LA calibration which gave me best results around 0.6. But once I try this value in a real print, there is always underextrusion where the infill touches perimeter. I suppose the high LA value cause that extrusion is overcompensated where the nozzle changes direction during printing infill. I tried lower the LA to 0.4, which helps, but there is still a small gap (missing filament) at infill start. But with 0.4 there are already visible bulges at edges.
Print configuration: Prusament PETG, 0.2 Quality, Nozzle nozzle 0.4. filament dryed (yesterday).
I'm trying fixing PETG printing for weeks already but still no luck. I do not understand what is going wrong with my Mini. Drying filament helped a bit, but not entirely.
RE: Linear advance for the MINI
there is always underextrusion where the infill touches perimeter.
When you look in the preview, there are some gaps there. There is the 'infill/perimeters overlap' setting in prusaslicer to compensate for that.
I also had some underextrusion at the start of infill. You can make it better by using the `pressure equalizer' settings in prusaslicer (I've set both values to 2) and monotonic lines for the visible infill (bottom/top infill).
On my MINI, the origin of problem was in the assembly of the hotend: the heatbreak ptfe was tightened too much, and the filament required an excess of pressure to start moving. It is easy to check: unload the filament, clean using a cold pull, and introduce the filament manually: it should go all the way down smoothly. If it is not the case, beware! I do not suggest to touch the hotend assembly: it can be tricky, frustrating, time and nerve consuming, etc... but it's a bliss when it is well tuned.
Also, I think that using a tighter ptfe tube (capricorn XS) helps a lot for LA, since the filament reacts faster in the hotend when the extruder moves.
RE: Linear advance for the MINI
Also, I think that using a tighter ptfe tube (capricorn XS) helps a lot for LA, since the filament reacts faster in the hotend when the extruder moves.
Great that you have mentioned it. I suspect that the original bowden tube is even wider than 2mm, as it feels more loose than the other one from extruder to filament sensor. I'm also thinking about buying Capricorn.
I had the same problem with factory assembled PTFE . Meanwile I have already replaced the PTFE tube 3 times. Last time I did a cold pull it seemed to be fine.
It looks like I have no other option but to try replacing parts without the knowledge, what is the root cause. Which I really hate 🙁
RE: Linear advance for the MINI
How did your journey continue/end, @radim-3? Did you eventually reach a sophisticating print quality with PETG on the mini?
RE: Linear advance for the MINI
I'm a little bit confused what speed actually put into script? My highest printing speed is 80mm/s for infills but perimeters run at 40mm/s, should we tune LA for perimeters only or everything?
RE: Linear advance for the MINI
Just calibrated the K Factor on my mini with this process, with input shaper enabled, and it works great. I'm essentially using the standard input shaper 0.2mm layer height speed print settings. I hadn't seen Linear advance values with input shaper enabled, so I thought I would share the K factor I am using. I think it could be tuned a little more if I wanted but the print quality is already good enough.
- the ptfe tube: stock mini ptfe tube
- the nozzle: stock brass nozzle
- the layer height: 0.20 mm
- the print temperature: 215°C
- the filament brand/type: BASF Ultrafuse PLA
- the retraction length: 2.5 mm
- the K factor: 0.27