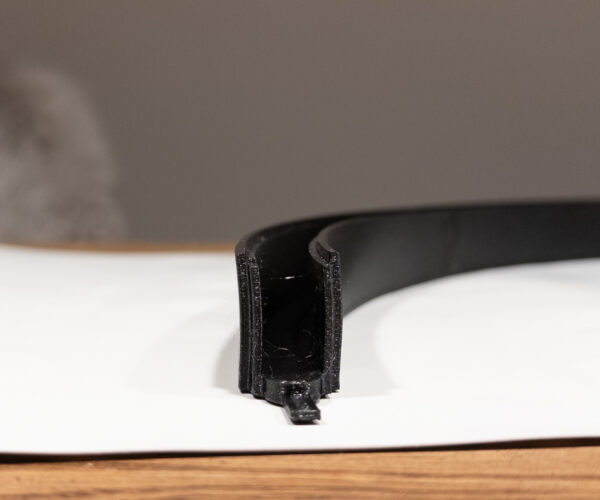
Curved / concave thin walls with this model and PETG. How to fix?
Hi everyone,
this is the first time I see a problem like this with my printer (Mini+, Prusament PETG).
The print is a segment for a ring that should become a hanging ring lamp using an LED strip.
The side walls are thin, but not extremely (4mm).
Not sure why they bent to the side in a curved manner.
I used Prusament PETG on my Mini+ with 0.2mm layer height.
Beside perimeters and bottom / top layer count the settings are pretty standard.
I print in the basement, which is around 12-15°C / 53-50°F I guess.
Could that be a problem?
The bottom of the print is completely flat, the look in the photo with the front part hovering in the air is just because of the mat below the print.
Or could it because of print speed / geometry / orientation?
I also attached the m3f file in case this helps.
Thanks a lot in advance. 🙂
Best Answer by Diem:
Your print settings look OK, you might try printing slower but it won't correct much.
The geometry of the part means that as each layer cools and contracts it distorts slightly towards the inside of the curve ... then the next layer is placed in the correct position which is now slightly outside the line of the cooled layer - and it cools and contracts in turn - repeated for each layer. The result is the gentle distortion that you see.
For small areas of distortion the general advice is to raise the temperature of the print bed, perhaps use an enclosure and slow down the print.
However, for whole print distortion it is usually better to calibrate the design: Measure the distortion, invert the values and apply them to the original CAD ... then the contractions will serve to 'correct' the designed shape to the intended one. Try to keep the calibrations parametric, that way different values for different materials will be easier to implement in the future.
Cheerio,
File missing. Did you zip it before attaching?
Cheerio,
RE: Curved / concave thin walls with this model and PETG. How to fix?
Thanks a lot for the hint. Didn't notice, that the file was missing. 😉
RE:
And just to make it clear: its not about the curve in x/y axes, this is a part of a large ring.
It's about the curved walls in z-direction, which should be straight.
Your print settings look OK, you might try printing slower but it won't correct much.
The geometry of the part means that as each layer cools and contracts it distorts slightly towards the inside of the curve ... then the next layer is placed in the correct position which is now slightly outside the line of the cooled layer - and it cools and contracts in turn - repeated for each layer. The result is the gentle distortion that you see.
For small areas of distortion the general advice is to raise the temperature of the print bed, perhaps use an enclosure and slow down the print.
However, for whole print distortion it is usually better to calibrate the design: Measure the distortion, invert the values and apply them to the original CAD ... then the contractions will serve to 'correct' the designed shape to the intended one. Try to keep the calibrations parametric, that way different values for different materials will be easier to implement in the future.
Cheerio,
RE: Curved / concave thin walls with this model and PETG. How to fix?
Thanks a lot for this comments so far. 🙂
The explanation sounds logical, and slowing down won't fix the cool-down and temperature offset of the layers.
So I might try the suggestion of an enclosure and higher bed temperature first.
Then, with these optimal settings as a starting point I can add modifications to the model.
Just have to see how I easily "bend" a whole body in Fusion. 😉
RE:
Thank you so much for this idea.
I created a sketch to counteract the bending of the print.
Then I used sweeping to add / subtract it from the outher shell over the whole sides of the part.
The result is superb!
It took me 3 tries until the sides where perfect, but as I have to print, glue, sand, fill, prime and paint 16 of this parts together to a double-sided LED ring lamp,
this will save me a lot work in the post processing (sanding and filling) of the part.
Today I really learned something!
Thank you sir. 🫡


