Printing and removing a 3D-printed mould without damaging ABS
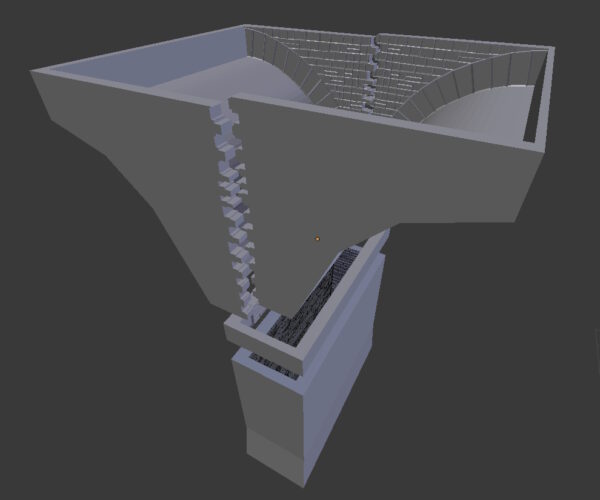
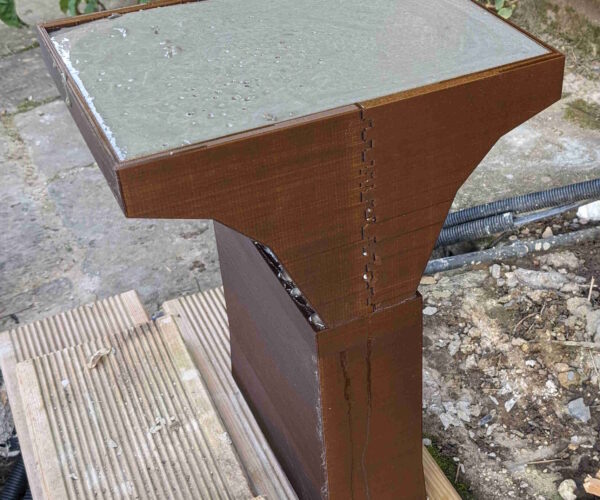
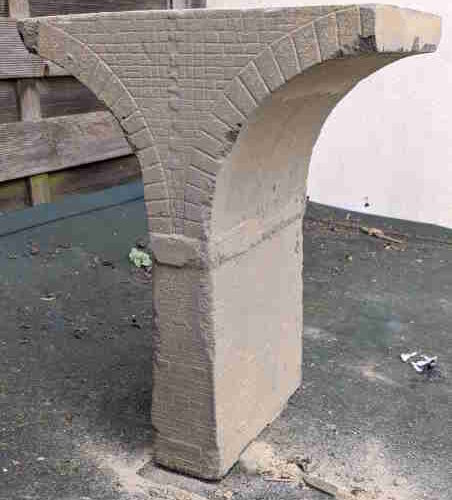
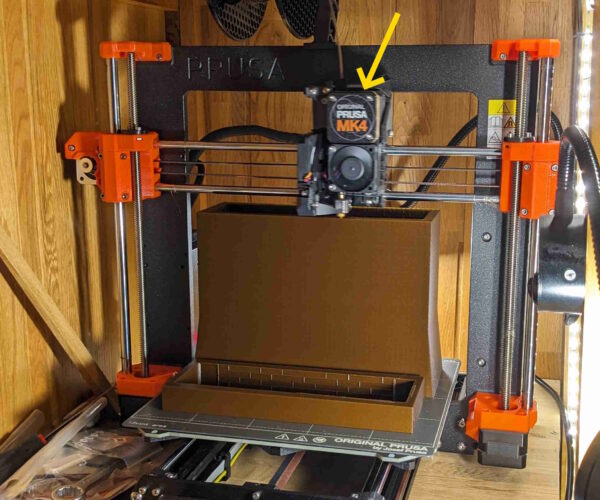
I am experimenting with printing large moulds, made up of several parts, into which I pour a liquid grout to form a bridge support for an outdoor model railway. I am currently using PLA and this works fine, the mould is sufficiently strong/rigid to hold the 14 kg of grout, EXCEPT that the removal of the mould afterward tends to damage the part, no matter how careful I am. I am currently softening the PLA with a blow-torch but that is quite logistically difficult and somewhat haphazard, but there remains a lot of damage, as you can see from the last picture below.
I was considering solvents of some form but my current plan (subject to change, of course) is to support the bridge uprights on a 3D-printed ABS base that will form an under-water joint with the pond liner that lies beneath, and all of the solvents that might work would dissolve the ABS rather more than the PLA.
Can anyone suggest a material that I could 3D print the moulds from that would be (a) sufficiently rigid and (b) dissolve/weaken in something that would not also damage the ABS?
RE: Printing and removing a 3D-printed mould without damaging ABS
Traditionally when moulding things like that you use a flexible inner rubber type material and then have a rigid jacket that supports the inner flexible mould. This usually has keys so everything lines up correctly.
Why not do the same with a 3d printed solution ? Use a flexible tpu based filament as the inner and then your rigid pla as the jacket. That way you can remove the outer and peel the flexible inner off the moulded part. Bonus is if it was the right tpu material it will probably be reusable for at least several pours.
Interesting project. You have several options to mix and match.
Surface detail, including layer lines, may be causing mechanical gripping. This can be smoothed with either or both of a surface laquer and a release agent (eg. 'butter' the mould with grease.)
Vacuum grip can be broken with few fine holes - not drilled, use a hot needle.
It's always worth incorporating draft in any mould if possible; a very slight taper so that as each area frees and shifts slightly it doesn't reseal.
Instead of heating you can try cooling - put the whole into a refrigerator overnight - not a freezer, and get it close to but not below freezing; then when you take it out, the mould on the outside warms first and may expand enough to ease release.
Make the mould parts with joins at the corners wherever possible to reduce the number of captive pockets.
Or, probably the best but trickiest. If you have multimaterial capabilities, make a PLA jacket with a fine-detail TPU liner so that you first remove the jacket then peel away the flexible inner.
Cheerio,
RE:
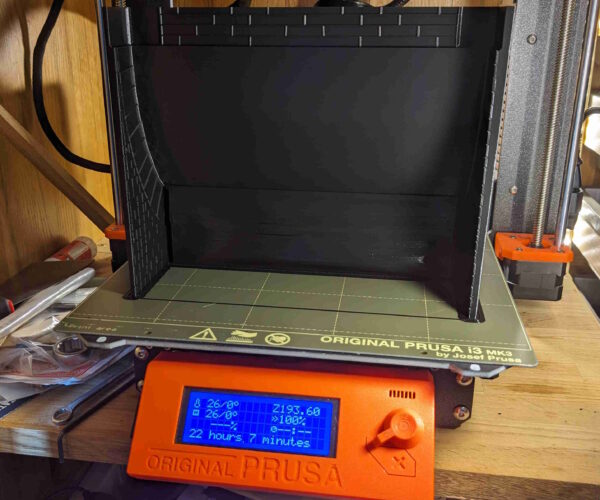
@Neophyl: interesting, I've never tried printing with TPU. Each of the major elements that make up the completed mould is about 200 mm in its longest dimension, the upper halves printed upside-down, the base printed vertically, see pictures below: do you think TPU would work in such large prints?
RE:
@Diem: I used a silicon release agent in the example shown, which I think helped. The problem with the design is that the bridge support, in real life, flares the wrong way (narrowing near the top of the pedestal), which doesn't help.
> If you have multimaterial capabilities, make a PLA jacket with a fine-detail TPU liner so that you first remove the jacket then peel away the flexible inner.
Ah, yes, that would be interesting, hadn't twigged that multi-material was the way to support TPU. Unfortunately I don't have multi-material, yet anyway, and having just bought a new MK4 (after trashing the print head on my MK3) my pockets aren't as full as they might be.
The other thing on my mind is that there are 10 of these that form the final (partly curved) viaduct. I had been assuming I would form the entire mould of all 10, in situ, and then do the pour: this way I can tie everything together with rebar and into the rest of the layout, hence the issue with the ABS parts that would be sitting beneath each column. However, that would also be highly risky: one breach, one accident, and I've got a _lot_ of quick-setting grout in the wrong place.
So I'm wondering if I should mould each section separately, adding inserts for where the vertical and horizontal rebar would lie. Then the proximity of ABS (and a butyl rubber liner) wouldn't be a concern, I could print in PBV and use alcohol to flow-away the mould material. I could still tie everything in with the rebar and a final flow of grout once all 10 segments are positioned perfectly in place.
RE: Printing and removing a 3D-printed mould without damaging ABS
@Diem: I like the idea of putting it in the fridge :-).
RE: Printing and removing a 3D-printed mould without damaging ABS
Hi
One option might be PVA soluble filament. Once you've cast your model and it's set, pop the whole thing (mould and model) in a bucket of water.
Soluble filament is quite expensive. To try and save on cost, you could perhaps try doing just a PVA liner within a PLA mould (along the lines of others' suggestions of a TPU liner). I guess it might take a while for the think wall of PVA (between the PLA outer and the set grout) to dissolve, though you might speed it up using a thin stick to poke at the PVA as it softens.
And if your model tapers the 'wrong' way, I suppose your liner would need to be thick enough such that the space created by it dissolving is big enough to get your model out of.
Good luck!
I am experimenting with printing large moulds, made up of several parts, into which I pour a liquid grout to form a bridge support for an outdoor model railway. I am currently using PLA and this works fine, the mould is sufficiently strong/rigid to hold the 14 kg of grout, EXCEPT that the removal of the mould afterward tends to damage the part, no matter how careful I am. I am currently softening the PLA with a blow-torch but that is quite logistically difficult and somewhat haphazard, but there remains a lot of damage, as you can see from the last picture below.
I was considering solvents of some form but my current plan (subject to change, of course) is to support the bridge uprights on a 3D-printed ABS base that will form an under-water joint with the pond liner that lies beneath, and all of the solvents that might work would dissolve the ABS rather more than the PLA.
Can anyone suggest a material that I could 3D print the moulds from that would be (a) sufficiently rigid and (b) dissolve/weaken in something that would not also damage the ABS?
RE: Printing and removing a 3D-printed mould without damaging ABS
I have had success printing molds for casting plaster. Using TPU for the molds and vaseline as a release agent. The TPU molds have extra material and fill on the outside. To keep them stiff when being poured into and it's flexible enough to get off.
