My tips for PETG on textured plate. Beware Generic PETG settings.
After months of printing PETG I think I have printing it close to perfectly on the Prusa i3 mk3 with a textured PEI plate.
I recently started printing the first layer at 240c instead of the default Prusaslicer Generic PETG setting of 230c. This seems to have helped the parts sticking to the textured sheet tremendously.
I can now print reliably on what was a useless side of my textured sheet, nothing stuck. I think most of my problems in the past with PETG was due to printing the first layer at 230c and doing other things to get parts to stick better. I feel like an old newbie.
Prusa's Prusament PETG filament settings seem to be fine.
Here is my list for good other than Prusament PETG prints on the textured PEI sheet:
1. First layer and after at 240c
2. Bed temp 85c first layer, 90c after that
3. First layer at 10mm/s print speed, 40mm/s after (I may try faster than a 10mm/s first layer, probably not more than 20mm/s)
4. Correct first layer height, should be smooth, not furry, as soon as you get fur back off 0.025mm
5. Don't be afraid of brims or using helpers. When you add helpers add them as parts, do not just import stl's, so they merge with the main part.
6. Get a E3D V6 nickel plated copper nozzle so the PETG does not stick to the nozzle. Do not brass brush, use strips of corrugated cardboard to wipe. I'm still not sure about the longevity of the nickel plating.
These settings work great with Duramic and Overture filament.
Just my 2 cents. 😀
RE: My tips for PETG on textured plate. Beware Generic PETG settings.
Reserved
RE: My tips for PETG on textured plate. Beware Generic PETG settings.
Reserved
RE: My tips for PETG on textured plate. Beware Generic PETG settings.
LOL. I shouldn't have reserved posts, forgot you can't edit after a couple minutes. 🙄
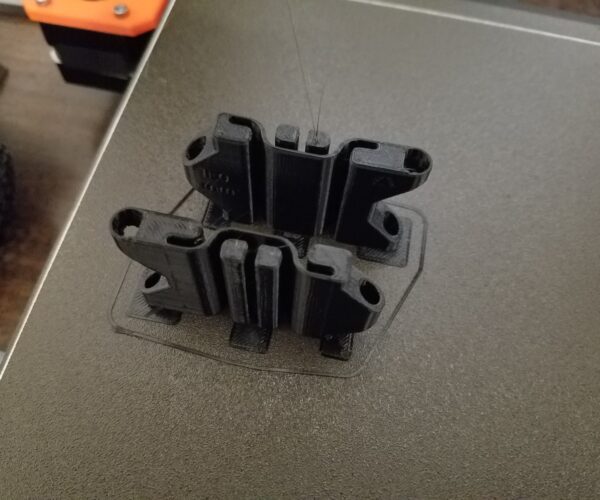
These are belt links, 58mm long, 34mm tall, note the helpers and that they are smooth on top, a good first layer:
RE: My tips for PETG on textured plate. Beware Generic PETG settings.
On a bit of a tangent, Overture black printed at 240c has more of a matte finish compared to the glossy finish of Prusament black printed at 250c.
Hatchbox black printed at 240c is glossy and indistinguishable to me from Prusament black printed at 250c.
I have not printed Hatchbox with a first layer of 240c yet.
RE: My tips for PETG on textured plate. Beware Generic PETG settings.
I've done a lot of PETg prints, with Prusament, Hatchbox, Overture and some others. I have yet to find a need to adjust anything from the defaults in PS on either the smooth or textured sheets.
RE: My tips for PETG on textured plate. Beware Generic PETG settings.
@jsw
In general, yes, but a small tweak can reduce stringing on some printers.
--------------------
Chuck H
3D Printer Review Blog
RE: My tips for PETG on textured plate. Beware Generic PETG settings.
I've done a lot of PETg prints, with Prusament, Hatchbox, Overture and some others. I have yet to find a need to adjust anything from the defaults in PS on either the smooth or textured sheets.
Thanks jsw. I trust everything Prusa, so I never changed the Prusaslicer Generic PETG default first layer temp until recently. I imagine a lot of Prusa users are hesitant to change the defaults too.
I've read some somewhat drastic steps on this Prusa forum for getting parts to stick to the textured plate, sanding or scouring the plate with steel wool. 😳
Usual disclaimer: Your mileage may vary. These are MY settings at this moment in time. 🙂
RE: My tips for PETG on textured plate. Beware Generic PETG settings.
I believe cwbullet suggested the tip I mentioned of using corrugated carboard strips to clean the nozzle. 🙂
I believe he also suggested, and I will recommend for the textured plate: Switch to 7x7 mesh bed leveling to get a more accurate level.
RE: My tips for PETG on textured plate. Beware Generic PETG settings.
@mjlewis37
I have suggested it in the past, but I was not the first. It is a great way to clean your nozzles.
--------------------
Chuck H
3D Printer Review Blog

