Lots of initial trouble
Got my Mk3s+ today and am having issues. Not my first 3D printer and I was able to get my first one (Qidi X One) years ago up and making decent prints in about 30 minutes. Very, very few failures over the years using glass bed and hairspray. Not so today.
First issue was a calibration error. During the setup routine's 9 point Z axis check it would get to point 7 and throw "some sort of error" (direct quote) and "enforcing z calibration". Said to reboot printer, upon which it would do the same thing all over again. So, I ran the entire calibration wizard from the ground up... took like 12 minutes. I also did the first layer calibration. The Z check issue went away. Good to go, right? Not.
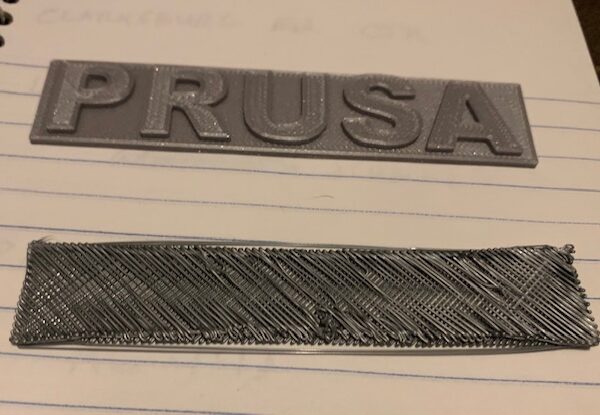
So, I go to print the test files that came with the supplied SD card, the one that was supposedly printed on it as delivered with the perimeter wall and PRUSA badge. No dice. Using the supplied PLA and the smooth PEI sheet nothing would stick except the lead in bead. So, I washed the plate with Dawn and water and tried again. Same thing. Then I installed the satin PEI plate I had also purchased, redid the first layer calibration and tried again. Same thing. The perimeter strip would go loose first, then the PRUSA badge. You could see the ends coming up first causing the piece to bow before it came totally loose. Yes, the extruder and bed were operating at the temps specified in the PRUSA test file.
This PEI is going to be a learning curve, it seems. Perhaps I'll try some glue stick, which the PEI was supposedly supposed to get us away from, at least for PLA. Call me skeptical but I am beginning to believe the test print that came on the PEI sheet with my machine wasn't actually printed on my machine. It looked more like an injection molded commercial piece, not the mess that I am getting.
Not throwing in the towel yet. I'll try some glue stick and try one of my own designs sliced in the Prusa slicer. But this is definitely NOT what I expected.
Don't use the glue stick.
Run a first layer Z calibration and show us the result *on the print sheet*
Cheerio,
RE: Lots of initial trouble
Will do. I learnt the glue stick is more of a release agent than an adhesive with PEI. That made it worse. So, I cleaned the smooth plate again including a final wipe with 90% isopropyl. I also swapped in a different roll of PLA, this a year old Hatchbox blue. This did better but just printing the PRUSA badge, one end bowed up at 50% complete and then came off. Still way better than it did with the Silver Prusa.
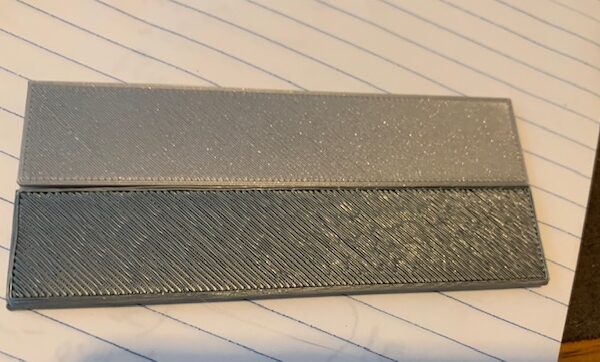
I moved the printer to a more confined location to minimize drafts and am running the badge again. That didn't help. See the photo below at 38% complete, both ends bowing up. See also the photo showing the PRUSA badge that came on my printer that was ostensibly the test print. Alongside what I get when I try it with the included PRUSA filament. That's as far as it got.
We know you have adhesion issues.
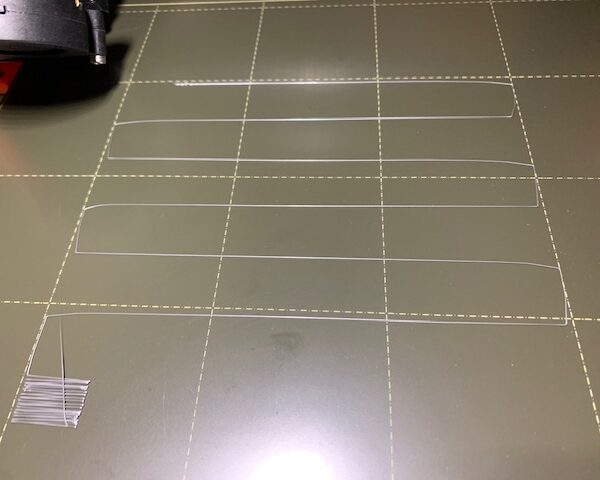
Run a first layer Z calibration and show us the result *on the print sheet*
Cheerio,
RE: Lots of initial trouble
Can you post an image of the square in your first layer calibration?
Got my Mk3s+ today and am having issues. Not my first 3D printer and I was able to get my first one (Qidi X One) years ago up and making decent prints in about 30 minutes. Very, very few failures over the years using glass bed and hairspray. Not so today.
First issue was a calibration error. During the setup routine's 9 point Z axis check it would get to point 7 and throw "some sort of error" (direct quote) and "enforcing z calibration". Said to reboot printer, upon which it would do the same thing all over again. So, I ran the entire calibration wizard from the ground up... took like 12 minutes. I also did the first layer calibration. The Z check issue went away. Good to go, right? Not.
So, I go to print the test files that came with the supplied SD card, the one that was supposedly printed on it as delivered with the perimeter wall and PRUSA badge. No dice. Using the supplied PLA and the smooth PEI sheet nothing would stick except the lead in bead. So, I washed the plate with Dawn and water and tried again. Same thing. Then I installed the satin PEI plate I had also purchased, redid the first layer calibration and tried again. Same thing. The perimeter strip would go loose first, then the PRUSA badge. You could see the ends coming up first causing the piece to bow before it came totally loose. Yes, the extruder and bed were operating at the temps specified in the PRUSA test file.
This PEI is going to be a learning curve, it seems. Perhaps I'll try some glue stick, which the PEI was supposedly supposed to get us away from, at least for PLA. Call me skeptical but I am beginning to believe the test print that came on the PEI sheet with my machine wasn't actually printed on my machine. It looked more like an injection molded commercial piece, not the mess that I am getting.
Not throwing in the towel yet. I'll try some glue stick and try one of my own designs sliced in the Prusa slicer. But this is definitely NOT what I expected.
--------------------
Chuck H
3D Printer Review Blog
RE: Lots of initial trouble
I did but it is awaiting moderation. Sheesh.
RE: Lots of initial trouble
From the pictures I place my bets on the nozzle being too high aka Live Z not low enough, which seems to be one of the most common issues for new users of the Prusa.
To properly adjust my first layer (Live Z calibration), I use the built-in first layer calibration wizard in steps of -0.100 until I get a good zig zag pattern with the corners sticking and a reasonably looking square. I then switch to this calibration strip https://www.printables.com/model/105404 for fine-tuning in steps of -0.020 or even -0.010. The larger format makes it easier to read the results, compared to the in-built wizard, plus you can try up to 8 different Live Z settings in one print. It's a variation of this method https://forum.prusa3d.com/forum/original-prusa-i3-mk3s-mk3-assembly-and-first-prints-troubleshooting/life-adjust-z-my-way/ .
A good Live Z should be somewhere around -1.00. But absolute values mean nothing, they depend on printer and sheet. A Live Z in the -1 range simply gives you enough wiggle room up and down, to adjust for different sheets and filaments. If you get close to -2.0 I would reposition the PINDA higher. This gadget may help you get into the proper range: https://www.printables.com/model/57192.
Between a good cleaning of the sheet as you have done and proper Live Z calibration, there should be absolutely no need for glue stick for PLA on a PEI sheet.
Formerly known on this forum as @fuchsr -- https://foxrun3d.com/
RE: Lots of initial trouble
I was thinking the same thing, too high. But I also thought this was supposed to be automatic and I don't understand how to force it lower or how to move the PINDA. I'll read your links to try to learn. I would also love to understand how they supposedly got that perfect initial test print. Looks to me like they faked it. So much for the touted "ready to go out of the box". Give me back my platter thumb wheels, dammit! I guess I should have bought the kit version since I need to do all this work just to have a functioning printer. Maybe. Hopefully.
RE: Lots of initial trouble
OK, I found the Live Z adjustment. Trying -0.1.
You can go a lot lower.
Point a torch at your build plate at a low angle. Start the calibration and wind fast (around 1 rev / second) until the extruded thread begins to flatten. Dial back until the flattening is *just* visible and let the calibration complete. Show us the result.
Cheerio,
RE:
After initial -0.1 I went incrementally by 0.2 and corners looked better at -0.5. So, I went to -0.7 and tried to print the Prusa badge again, and success! Adhesion also was sufficient. Looking at the back of the piece it seems like it could be lower still as the outer shell is not near as smooth as the one that came with my printer or like I am familiar with my other printers. I dialed the Z to -0.9 and am trying one of my models which looks to have had a really good start.
Thanks for all the tips, folks. Good to have a printer with such a knowledgeable and helpful community. I am so glad I don't need to send this back.
RE:
I was thinking the same thing, too high. But I also thought this was supposed to be automatic and I don't understand how to force it lower or how to move the PINDA. I'll read your links to try to learn. I would also love to understand how they supposedly got that perfect initial test print. Looks to me like they faked it. So much for the touted "ready to go out of the box". Give me back my platter thumb wheels, dammit! I guess I should have bought the kit version since I need to do all this work just to have a functioning printer. Maybe. Hopefully.
Well, it does work out of the box, but it needs calibration. The first error you got was probably something sticking between the bed and the PEI sheet.
Reading the manual (preferably online) does help a lot. Following the tips in this very thread will do so as well. What's the point in complaining if you do not follow the advice given? Read the posts again, do as Diem said, take a picture of the square again and post it. Or compare to the pictures in this doc: https://help.prusa3d.com/article/first-layer-calibration-i3_112364
Try to understand the difference between mesh bed leveling (automatic, done before every print) and first layer calibration (done manually and required only once before you start to print ANYTHING else - required again for new sheet, changes on the hot end, wear of nozzle)
Edit: never mind, looks like you got it done...
If at first you don't succeed, skydiving is not for you.
Find out why this is pinned in the general section!
RE: Lots of initial trouble
Happy to hear this! Also remember that should you ever try different sheets or swap nozzles you should redo your live z calibration.
Formerly known on this forum as @fuchsr -- https://foxrun3d.com/
RE: Lots of initial trouble
I assumed that. What is the general delta between the smooth and satin? Those are the sheets I have. I assume that the satin sheet with its texture might be slightly thicker so would like less negative correction. I understand there may be some differences in individual sheets due to manufacturing tolerances, but I bet there is a pretty standard delta that would work.
Happy to hear this! Also remember that should you ever try different sheets or swap nozzles you should redo your live z calibration.
RE: Lots of initial trouble
Only complaint is that this was supposed to come fully calibrated and had a supposed print on the bed to show that. When in fact it was not even close enough to do a successful print of something that had already been supposedly printed. We worked through it, but a real newbie with less experience or knowledge would be up shitz creek. I assume those are also people these are being marketed to.
RE:
That's how I am used to setting up my printers with manual adjusters. How do you make this manual Z adjustment you mention during the calibration process? I'll run it again later and see if I can figure that out.
"You can go a lot lower.
Point a torch at your build plate at a low angle. Start the calibration and wind fast (around 1 rev / second) until the extruded thread begins to flatten. Dial back until the flattening is *just* visible and let the calibration complete. Show us the result.
Cheerio,"
RE: Lots of initial trouble
The satin sheet is about 0.4 mm **thinner** than the smooth sheet so live z would be about 0.4 more negative.
Formerly known on this forum as @fuchsr -- https://foxrun3d.com/
You can save your different sheet profiles under the Sheet entry in the LCD menu.
Cheerio,


