Skirt around print issue
Hello,
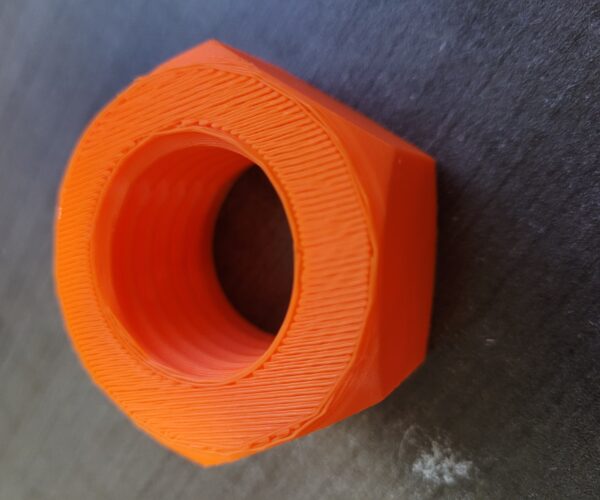
I am having an issue with the skirt around my prints. It looks like that one side of the skirt is not sticking down on the heat bed. It happened on my first print of a Benchy, which was successful in the print (except for that section) it just printed over that bit of plastic and in the end it seemed to be like 2 layers maybe? It was on the bottom so hardly noticeable and looks good to me. So as you can see in the picture attached, I am printing the nut which came with the USB stick and again it looks like it might cause a minor error in the finish of that face.
I would love to know what is causing this, could it be that the head just needs to be lowered some more? The finish on my benchy feels great and this print from the eye looks like it will be smooth finish too. Also for the record, benchy was my first print and this nut will be my second on the printer.
RE: Skirt around print issue
Right, so after completing the print I've provided more pictures of it completed with the completed side shown face up and the stands are still shown so does this mean that it's not low enough?
RE: Skirt around print issue
please show us the bottom of a print.
Cheerio,
RE: Skirt around print issue
Yep, still nowhere near low enough. Those strands need to merge together into a solid sheet.
RE: Skirt around print issue
Thanks everyone.
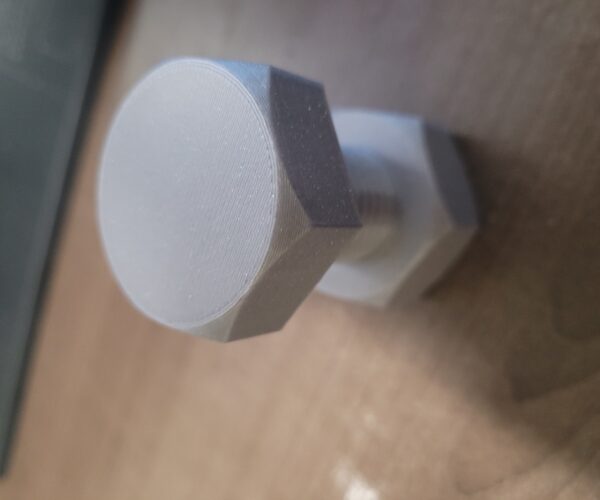
I decided to do a new calibration test and essentially cranked it further to the left. It was already at -.900 and ended up at -1.300. I wanted to try and see how good the precision on this was and downloaded a nut and bolt. Here is the result. I am not sure if it was because of the gcode that prusa slicer did but here is the result with 20% infill. The first layer came out so much smoother but the nut wont thread on the bolt any further than what you see here and this was after about an hour of back and forth twisting the nut on the threads thinking it was a stuck spot. So could it be that I have the nozzle TOO low now? Just as an fyi these two were printed at the same time on the same print.
Thanks for any help and insight that is provided on this.
RE: Skirt around print issue
The first layer looks fine, as the whole print. It is definitely not too low. If the parts not fit together, it will be most probably by the design. I believe there should be a bigger space between so the parts a bit more loose. If the screw thread is precisely cut out into the nut, it will be hard to manipulate. You could sand it a little bit and use some grease. But better design is usually better choice.
RE: Skirt around print issue
No your first layer height will only really effect it at the start of the print, so you can deburr the fist few layers. You are now looking at your printers/filament combination tolerances. With parts that fit together like that the designers will usually design with a tolerance in mind. Thats the gap between parts Milos mentioned. The problem with that is that different printers and even different filaments on the same printer need to be calibrated for flow. Even a slight amount of over extrusion will reduce any tolerance gap and make things difficult. Its why even after dialing in your height you should still calibrate for your filament if these sorts of precision are important for you.
Back when I got my mk3 I downloaded a couple of the tolerance tests Basic things like a 4mm cylinder and then various holes that were 4, 4.1, 4.2, 4.3 etc. You print and then see which hole the post fits in nicely. That way you can see what sorts of leeway you need to design in when making stuff for yourself. Of course if you release the design then someone else who's printer doesn't have quite as good a tolerance will then have trouble printing it.
I regularly use M3 screws in my designs, if I want a nice fit for the screw so that it will fit in the hole I have to use 3.2mm in for example (as holes are generally slightly undersized when printed anyway). That is on my Mk3. If I tried to print the same design on my cr10 then I have to design in 3.4mm holes as its tolerance is not as good.
RE: Skirt around print issue
Anyway, you could make an extrusion calibration. It is fast and easy and definitely you will not make things worse. But I think it will not be an issue. Your print looks pretty good. In case of under extrusion or over extrusion I would expect some visible issues, at least at the first/last layer and perimeters. Yours looks OK.
This is a calibration rutine I harvested from this forum years ago. Do not remember from whom, so credits goes to unknown author 😉
Even if you will not re-calibrate, you can easily crosscheck how you stand now.
1. Heatup and load filament
2. Mark filament with marker 150mm above the extruder
3. Open GCODE terminal (Pronterface, Octoprint, etc.)
4. Reset extruder position by command G92E0
5. Send command to extrude 100mm of filament G1E100F30 (wait minute or two to finish)
6. Measure the remaining distance from the top of the extruder to the original mark, calculate real filament used (150 - measured value = extruded filament in mm)
7. 100 = extruder is calibrated, <100 means underextruding, >100 overextruding
8. You can add extrusion multiplicator to the Slicer filamment settings.
9. Or continue with modification the step units in printer.
10. Send command M503 to get the stored value. Find line with M92, read the value for E. (E130.00 or similar).
11. Calculate new step value as current E value * 100 / meassured filement in mm.
12. Store new value by command M92 E140 (where 140 is the newly calculated value).
13. Save to eeprom by command M500
14. You can reapeat steps 4. - 7. to check the calibrations is done fine.
15. 1mm is not an issue, keep it easy 😉
Milos


