Calibration cube prints 80% and then is pulled away from the steel sheet on my Prusa MINI+
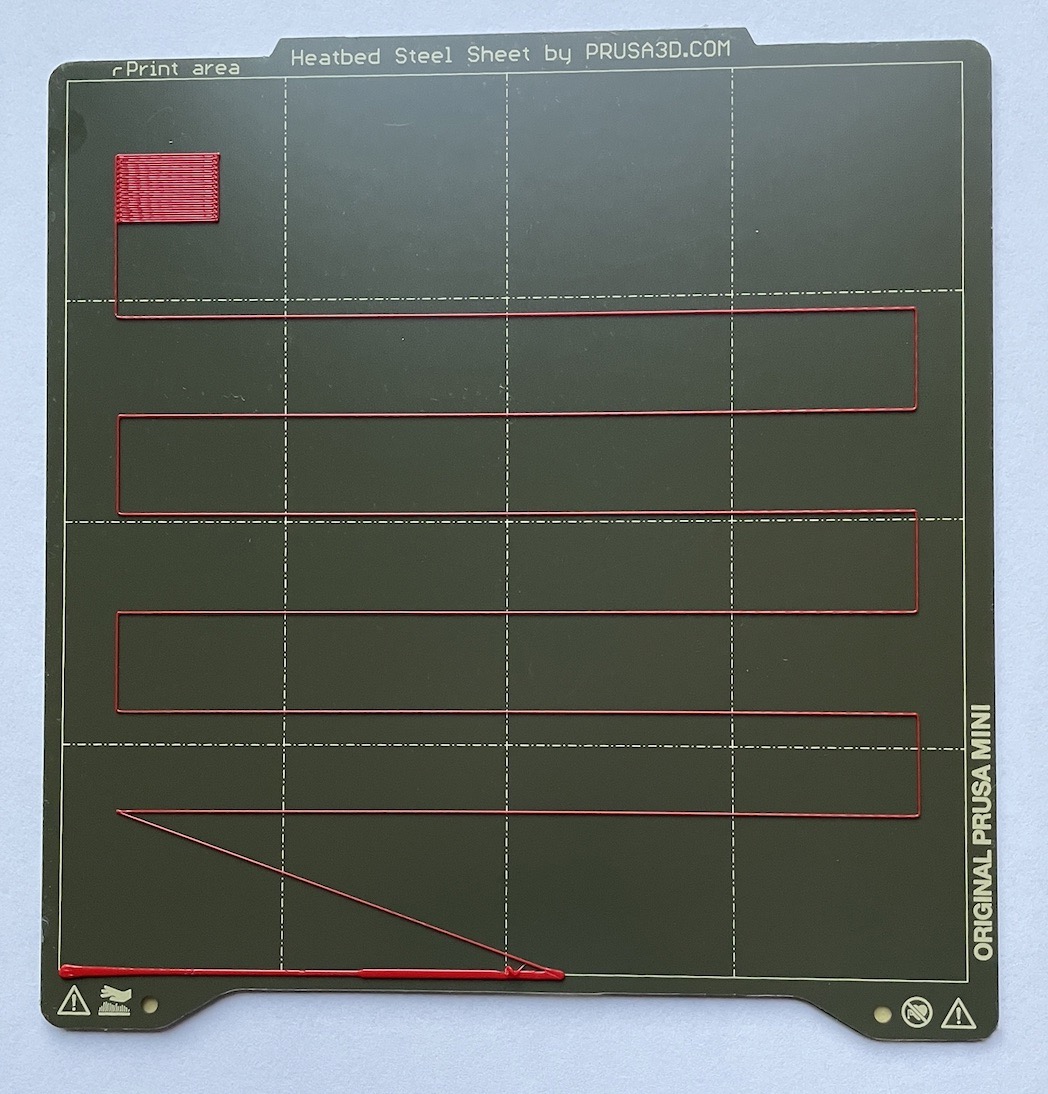
I have done a nice first layer calibration.
Then I printed the PRUSA logo. Ok.
![]()
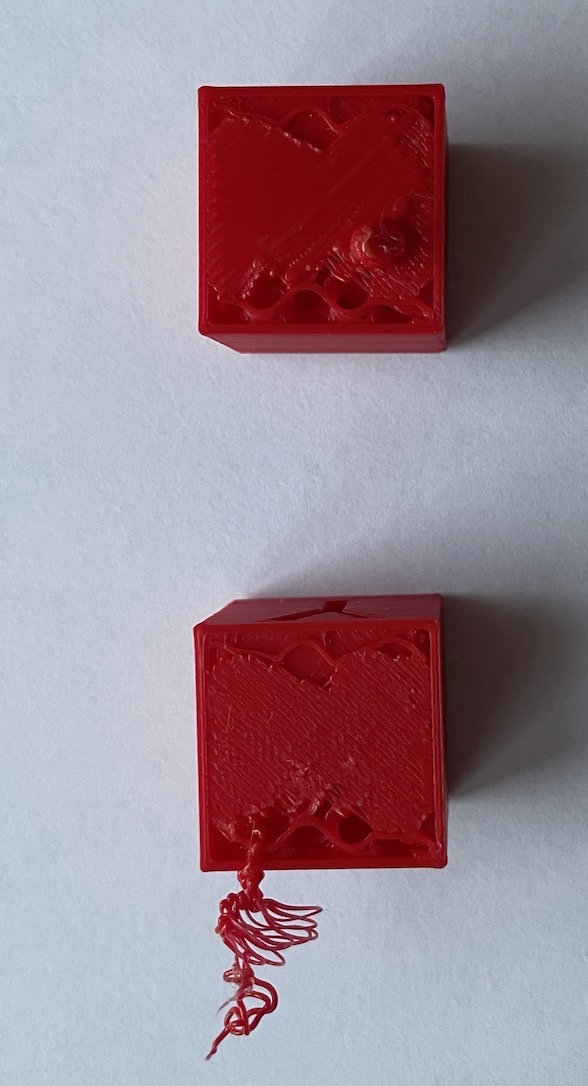
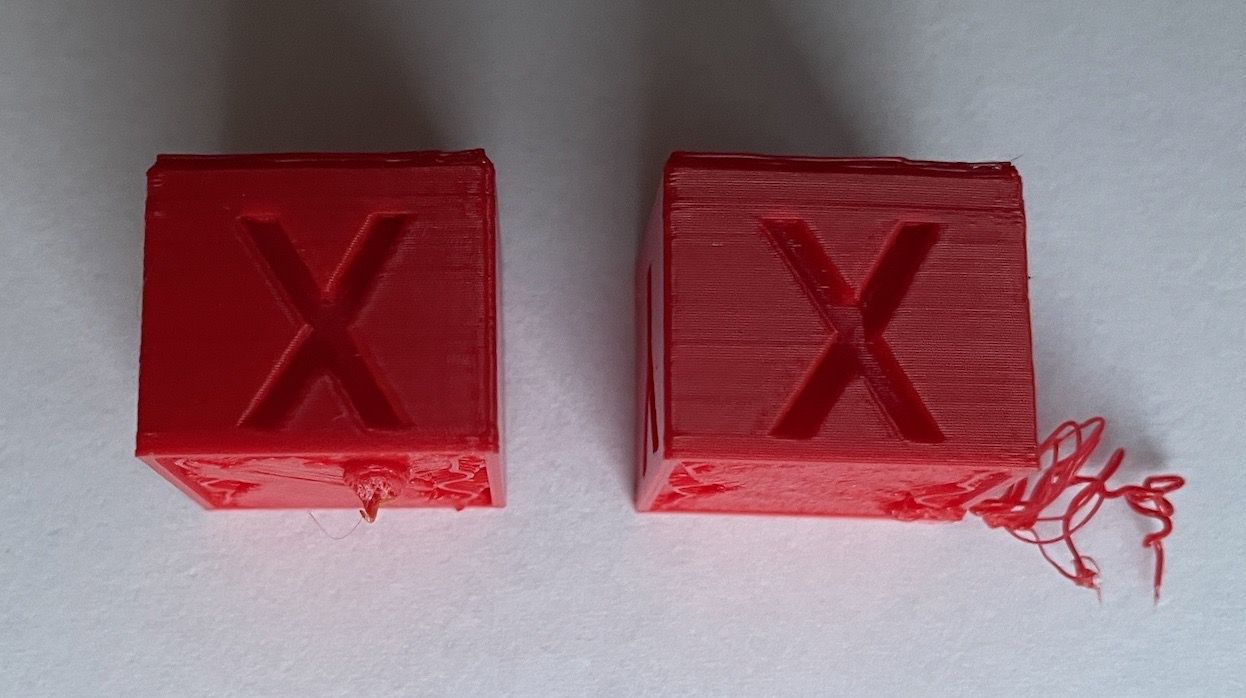
Then I tried twice to print a calibration cube. Each time the calibration cube almost finished and then pulled away from the Prusa MINI+ steel sheet.
I tried redoing it with a glue stick. Didn't work.
I tried cleaning the steel sheet with soap and hot water. Didn't work.
What should I try next?
Than you.
RE: Calibration cube prints 80% and then is pulled away from the steel sheet on my Prusa MINI+
It's hard to tell from the photo, but the little square in the top left of your calibration photo, is it solid or can you pull the strands apart? If you can pull apart the strands you need to go a little lower, say 0.050 to 0.100. If they're OK then I'd go back to bed cleanliness, you may have hard water which may be leaving a coating on the bed, get some 91% isopropol alcohol, pour a puddle say the size of a quarter on the middle of a cold bed and wipe it around with a micro fiber cloth and try again. If that doesn't work check your filament, are you using a good quality filament? Are your temperature settings correct for it? Your cubes have other problems than adhesion, you have some distortion and some banding. Also in the future take picture of your cubes with the Y side up so we know which is top and which is bottom.
Cheers
-Bob
Prusa I3 Mk2 kit upgraded to Mk2.5s, Ender3 with many mods, Prusa Mini kit with Bondtech heat break, Prusa I3 Mk3s+ kit
You can go lower on your first layer, more squish.
The Prusa Logo is designed to be a very forgiving print, a check that the basic operation is sound. You passed.
The sides of your cube are rough but reasonable for a freshly set-up printer, good enough for the first month as the machine runs in and you go through the early familiarisation...revisit later on.
Don't use glue stick with PLA. If you use it with PETG as a release agent dilute it by spreading with a wet kitchen towel. It's better to use Windex or cheap own-brand window cleaner with PETG, save the gluestick for Flex and PC Blend.
Keep the print-sheet clean. HOT water and dishwashing detergent (Dawn/Fairy).
Cheerio,
RE: Calibration cube prints 80% and then is pulled away from the steel sheet on my Prusa MINI+
I have had some similar problems. I know everyone's calibration number is going to be a little different, but I'm curious if anyone can give a working window range - not the number, but how big a target we have to get the first layer right? I made some initial adjustments, and thought my first layer was too low, so I brought it up what I knew was too much, and started walking it back down. Now I'm almost back to where I started, and I still think I'm too high.
Is the working window .050? is it .020? Smaller?
If the offset exceeds 2mm it's time to adjust the SuperPINDA, step 16 on:
https://help.prusa3d.com/en/guide/how-to-replace-superpinda-mini-mini_179912
Cheerio,
RE: Calibration cube prints 80% and then is pulled away from the steel sheet on my Prusa MINI+
If the offset exceeds 2mm it's time to adjust the SuperPINDA, step 16 on:
https://help.prusa3d.com/en/guide/how-to-replace-superpinda-mini-mini_179912
Cheerio,
That's a start. I did follow those steps, and feel like I have the first layer calibration correct now with it just over 1mm (-1.050) What I'm wondering is, if -1.050 is the center or sweet spot, what would the upper and lower working limits be on this setup? -1.045 to -1.055? Maybe I'm being too abstract about this, but I like numbers like this, it can help me understand if I need to continue to adjust (is -1.052 better?) or if it's so narrow that working is working and anything else doesn't work.
RE: Calibration cube prints 80% and then is pulled away from the steel sheet on my Prusa MINI+
If the offset exceeds 2mm it's time to adjust the SuperPINDA, step 16 on:
https://help.prusa3d.com/en/guide/how-to-replace-superpinda-mini-mini_179912
Cheerio,
This is super helpful! Thanks for the info (even though I'm not the OP). May have to do this with my Mini+ even though I got the "assembled" version. I'm already at -1.75 and it still too high.
RE: Calibration cube prints 80% and then is pulled away from the steel sheet on my Prusa MINI+
You're thinking about how the PINDA works incorrectly. The offset value is just a number, nothing more, it doesn't matter if it's 1.75, 2.50, or 3.25 it's only purpose is to guide you while you dial in your first layer.
The PINDA MUST be above the nozzle by some value to insure it doesn't come into contact with your object being printed. Prusa recommends that it be 2mm above the nozzle to get that clearance, but it doesn't have to be that exact, it could be 1.85 or 2.2 and still be OK. So long as it won't come into contact with the print is the main thing that matters.
By having the PINDA about 2mm above the nozzle you know that you have about 2mm to work with as you lower the nozzle towards the bed. The calibration print supplied with your printer is how you dial in the correct z-offset, essentially you need to get the nozzle about 0.2mm above the surface of the bed to get a good first layer squish. Now matter how good your PINDA, or MINDA is there will be some variation from one to another, a variation that's likely to exceed the 0.2mm that you're trying to dial in, which is why you can't just physically set the PINDA and then lower it by some value and be done, you need to use the calibration print to get where you need to go.
The first part of the calibration is to get straight lines and sharp corners, that's what the first 6 parallel lines are for, when you start you just dial down the z-offset until you get 6 straight parallel lines and nice sharp 90 degree angles. It may take a pass or two until you reach this point. Once you have that done it comes down to the little filled in box at the end, the box needs to be nice and rectangular with all the strands that fill the box in merging with the lines to either side of it to make a complete sheet. This is when you pay attention to the value of your z-offset, you need to dial this in slowly to get it right. I usually change the z-offset by 0.025 or 0.050 until I get it right. If I've gone too low and I've got over squish then I raise is up by 0.25 or 0.050 at a time until I get it right. It can take me 3 or 4 calibration prints until I'm satisfied.
Once I'm dialed in I don't care that much what the z-offset number is as it no longer matters, 1.750, 2.500, or 3.250, it doesn't matter as long as each time I use my printer the first layer remains consistent. There may be some distance, 4mm, 5mm, or more where the PINDA loses accuracy and is no longer reliable, but as long as I'm not at that point I don't care, we know somewhere in the neighborhood of 2mm above the nozzle the PINDA is accurate so as long as we're in that neighborhood we don't care. The only reason to physically adjust the PINDA is if you've made mechanical change to the print head such as changing the PTFE or replacing the nozzle or heat break. Then it becomes necessary to re-set the relationship between the nozzle and probe. Whatever value you have for your offset, so long as you're getting a reliable first layer you're fine regardless of what that number is.
Cheers
-Bob
Prusa I3 Mk2 kit upgraded to Mk2.5s, Ender3 with many mods, Prusa Mini kit with Bondtech heat break, Prusa I3 Mk3s+ kit
RE: Calibration cube prints 80% and then is pulled away from the steel sheet on my Prusa MINI+
Thanks for the added info, I will definitely keep that in mind. I really do appreciate all the help the community gives since I'm brand new to 3d printing and am by no means a "tech expert", so I'm nearly a clean slate. Been reading up a lot both here and other forums and everyone has been really helpful!
RE: Calibration cube prints 80% and then is pulled away from the steel sheet on my Prusa MINI+
So, on the chance this is to me - I understand all of what you said on some level but thank you for the detailed response. We are drilling down to the answer I'm looking for.
You mention using .025 to .050 increments to adjust. If you are getting squish, and adjust up .050 is there a chance it's then too high and you don't have enough contact between passes in the last box? That's the gist of what I'm getting at - how big is the window were we can expect it to work? Is it .025 or .075 or what?
For background, I've been handloading ammunition since my youth, and many measurements for that are made in the thousandth of an inch, and you're given some window + or - so many thousandths. Because I realize that the actual Z offset number is completely unimportant, all I'm looking for is the window. How many thousands of tolerance exist between not enough squish to run the lines together and too much squish?
You're thinking about how the PINDA works incorrectly. The offset value is just a number, nothing more, it doesn't matter if it's 1.75, 2.50, or 3.25 it's only purpose is to guide you while you dial in your first layer.
The PINDA MUST be above the nozzle by some value to insure it doesn't come into contact with your object being printed. Prusa recommends that it be 2mm above the nozzle to get that clearance, but it doesn't have to be that exact, it could be 1.85 or 2.2 and still be OK. So long as it won't come into contact with the print is the main thing that matters.
By having the PINDA about 2mm above the nozzle you know that you have about 2mm to work with as you lower the nozzle towards the bed. The calibration print supplied with your printer is how you dial in the correct z-offset, essentially you need to get the nozzle about 0.2mm above the surface of the bed to get a good first layer squish. Now matter how good your PINDA, or MINDA is there will be some variation from one to another, a variation that's likely to exceed the 0.2mm that you're trying to dial in, which is why you can't just physically set the PINDA and then lower it by some value and be done, you need to use the calibration print to get where you need to go.
The first part of the calibration is to get straight lines and sharp corners, that's what the first 6 parallel lines are for, when you start you just dial down the z-offset until you get 6 straight parallel lines and nice sharp 90 degree angles. It may take a pass or two until you reach this point. Once you have that done it comes down to the little filled in box at the end, the box needs to be nice and rectangular with all the strands that fill the box in merging with the lines to either side of it to make a complete sheet. This is when you pay attention to the value of your z-offset, you need to dial this in slowly to get it right. I usually change the z-offset by 0.025 or 0.050 until I get it right. If I've gone too low and I've got over squish then I raise is up by 0.25 or 0.050 at a time until I get it right. It can take me 3 or 4 calibration prints until I'm satisfied.
Once I'm dialed in I don't care that much what the z-offset number is as it no longer matters, 1.750, 2.500, or 3.250, it doesn't matter as long as each time I use my printer the first layer remains consistent. There may be some distance, 4mm, 5mm, or more where the PINDA loses accuracy and is no longer reliable, but as long as I'm not at that point I don't care, we know somewhere in the neighborhood of 2mm above the nozzle the PINDA is accurate so as long as we're in that neighborhood we don't care. The only reason to physically adjust the PINDA is if you've made mechanical change to the print head such as changing the PTFE or replacing the nozzle or heat break. Then it becomes necessary to re-set the relationship between the nozzle and probe. Whatever value you have for your offset, so long as you're getting a reliable first layer you're fine regardless of what that number is.
Cheers
-Bob
RE:
You mention using .025 to .050 increments to adjust. If you are getting squish, and adjust up .050 is there a chance it's then too high and you don't have enough contact between passes in the last box? That's the gist of what I'm getting at - how big is the window were we can expect it to work? Is it .025 or .075 or what?
The goal is all about that last little rectangle at the end and how you can make it a nice smooth flat sheet instead of a bunch of parallel lines or a sheet with ridges between the lines. Don't expect to get it perfect on your first calibration print, it'll likely take several passes. When I start my first print I'll have to move it hundreds at a time, but on my second, third and beyond, as I get close, I'll take it down 0.050, if I'm still too high I'll take it down another 0.050, eventually I'll either like what I see or realize I overshot it and raise it 0.025.
The calibration wizard will ask if you want to do it again, I usually say no so I can move the bed and more easily remove the print to examine it. When I restart it'll ask if I want to use the settings in the machine or start over, keep the settings, you got that far so go from there. Eventually it'll be a perfect sheet and I'm done.
Cheers
-Bob
Prusa I3 Mk2 kit upgraded to Mk2.5s, Ender3 with many mods, Prusa Mini kit with Bondtech heat break, Prusa I3 Mk3s+ kit
RE: Calibration cube prints 80% and then is pulled away from the steel sheet on my Prusa MINI+
Understood. Thank you VERY much for taking the time to break that down.
You mention using .025 to .050 increments to adjust. If you are getting squish, and adjust up .050 is there a chance it's then too high and you don't have enough contact between passes in the last box? That's the gist of what I'm getting at - how big is the window were we can expect it to work? Is it .025 or .075 or what?
The goal is all about that last little rectangle at the end and how you can make it a nice smooth flat sheet instead of a bunch of parallel lines or a sheet with ridges between the lines. Don't expect to get it perfect on your first calibration print, it'll likely take several passes. When I start my first print I'll have to move it hundreds at a time, but on my second, third and beyond, as I get close, I'll take it down 0.050, if I'm still too high I'll take it down another 0.050, eventually I'll either like what I see or realize I overshot it and raise it 0.025.
The calibration wizard will ask if you want to do it again, I usually say no so I can move the bed and more easily remove the print to examine it. When I restart it'll ask if I want to use the settings in the machine or start over, keep the settings, you got that far so go from there. Eventually it'll be a perfect sheet and I'm done.
Cheers
-Bob
There are no 'correct' numbers, there isn't really a correct window, or rather, it depends on the filament in use. Expect the value to change over time as your nozzle wears.
If you are unsure, show us a picture of your first layer calibration print.
Cheerio,