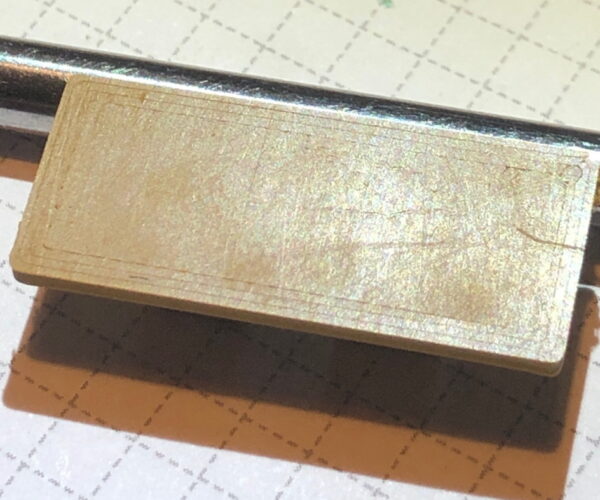
Bottom layers at edges are messed up
Hello,
This is my second print and the bottom layers are messed up again as seen in the picture. Other than that, the bottom layer is neatly printed (I guess), just the edges are wrong. In my opinion, the nozzle is low enough.
Thanks for your help!
Best Answer by Neophyl:
If that bottom picture is of your bottom layer then it is totally not correct. You are way off. A bottom layer printed on one of the smooth sheets should look like this -
A smooth unbroken layer that picks up every detail of your print sheet (the one pictured was printed on a sheet that's over 5 years old so has a fair few imperfections in it now). Yours looks like its either way too close resulting in wavy first layers or way too high. Its hard to tell from the pic but my guess would be way too high so the nozzle needs to go much closer to the platter.
Also it looks like your models edges are using a fillet. Fillet edges in effect start as a complete overhang before transitioning to a more gradual slope. As such they never print well as they require support initially. When they start on the print bed they are too close for support to be placed under them even if you enable supports so always print badly. 3d printed models when printed like that orientation should be designed to use a chamfer instead. Its common on better designs to start a fillet as a 45 degree chamfer and then transition to the more rounded fillet part way up. This site has a useful infographic on it - https://netofeverything.blogspot.com/2020/01/a-poster-of-cad-design-tips-for.html
Of course for better feedback it would help to attach your prusa slicer project file to a reply here. Use File>Save Project as to save a 3mf. The 3mf will contain your model(s) but more importantly all the settings you are using. With it we can get a better understanding of what you are trying to do.
To attach the 3mf to the post though it MUST be zipped up as the forum only allows a very limited selection of file types. If you don't it will just not be there when you click reply.
RE: Bottom layers at edges are messed up
If that bottom picture is of your bottom layer then it is totally not correct. You are way off. A bottom layer printed on one of the smooth sheets should look like this -
A smooth unbroken layer that picks up every detail of your print sheet (the one pictured was printed on a sheet that's over 5 years old so has a fair few imperfections in it now). Yours looks like its either way too close resulting in wavy first layers or way too high. Its hard to tell from the pic but my guess would be way too high so the nozzle needs to go much closer to the platter.
Also it looks like your models edges are using a fillet. Fillet edges in effect start as a complete overhang before transitioning to a more gradual slope. As such they never print well as they require support initially. When they start on the print bed they are too close for support to be placed under them even if you enable supports so always print badly. 3d printed models when printed like that orientation should be designed to use a chamfer instead. Its common on better designs to start a fillet as a 45 degree chamfer and then transition to the more rounded fillet part way up. This site has a useful infographic on it - https://netofeverything.blogspot.com/2020/01/a-poster-of-cad-design-tips-for.html
Of course for better feedback it would help to attach your prusa slicer project file to a reply here. Use File>Save Project as to save a 3mf. The 3mf will contain your model(s) but more importantly all the settings you are using. With it we can get a better understanding of what you are trying to do.
To attach the 3mf to the post though it MUST be zipped up as the forum only allows a very limited selection of file types. If you don't it will just not be there when you click reply.
RE: Bottom layers at edges are messed up
Thank you! I adjusted the nozzle even lower, it rests at 2.000 now but it seems to be working! My calibration sample rectangle definitely looks smoother than it did before.
If you have gotten to -2.0 you should readjust the sensor to bring the adjustment range down.
https://help.prusa3d.com/guide/height-adjustment-of-m-i-n-d-a-superpinda-sensor-mini-_154547
Then redo the first layer calibration, which will be completely different, but hopefully in the -1 range leaving you some room.
Regards,
Mark
RE: Bottom layers at edges are messed up
I had done is using a credit card. The -2.0 height is already after this adjustment. It's working ok right now, so I'll leave it as it is for now.
RE:
You mean 2.000 or -2.000? Either way it is better to readjust the sensor as @mark -3 wrote so it is closer to 0.0 value
See my GitHub and printables.com for some 3d stuff that you may like.
RE: Bottom layers at edges are messed up
You mean 2.000 or -2.000? Either way it is better to readjust the sensor as @mark -3 wrote so it is closer to 0.0 value
I'm pretty sure live Z goes from 0 to -2, so setting the sensor so it is in the -1 range gives you room to work in both directions.
Regards,
Mark
RE:
hm yeah, I guess that what I meant, but failed to express it better, what I meant was the middle of the assumed range, in case of 0 to -2.0 it will be -1.0.
I thought positive values were also possible... but never noticed that 🙂
See my GitHub and printables.com for some 3d stuff that you may like.


