prusaslicer 2.9.0 alpha1 - how to use scarf seam
Hi Dears,
Are you using the new feature ?
Do you know what is the benefits and interests of the new parameters :
- scarf joint placement
- scarf joint only on smooth
- scarf start height
- scarf joint around entire perimeter
- scarf joint length
- max scarf joint segment
- scarf joint on inner perimeters
- external perimeter first
and the possible influence of arachne generation
So far I have made a test on my MK3S with prusament PETG and standard prusa .2 quality profile for a simple cylinder with aligned seams, active scarf everywhere and keelping the other parameters defaults
The standard seam is now replaced by 2 smaller seams
Thanks for your help
RE: prusaslicer 2.9.0 alpha1 - how to use scarf seam
If you want to read about the supposed benefits then theres the original post requesting the devs implement it on the prusa githubn at https://github.com/prusa3d/PrusaSlicer/issues/11621
Its the next 'big thing' and as other slicers have it then Prusa seems to also have to have it to 'keep up'.
I did some tests with it in pla on my Neptune 3 Max when the alpha was released and personally I wont be using it. My printers settings are pretty well dialled in and the seam on my MK3 is minimal in the first place and my Neptune 3 has slightly more noticeable seams (but still not as bad as many I've seen pictured). That's why I decided to test it on the Max.
It made minimal difference to me except as you point out I now have 2 seams instead on 1. I tried various distances etc (not tried the whole perimeter) on various cylinders and also a dome shape. And like you I tried both Arachne and Classic perimeters. As I was using white filament which is difficult to photograph I didn't bother with pics, my main method was using touch on the seam. You can much more easily feel the effects than see them (at least with a properly tuned printer anyway).
I'm sure for some printers who's owners haven't got them dialled in nicely that it might make a difference but to me its not made any positive difference.
The Seam Gap Distance setting on the other hand I found to be more useful. That allowed me to tune the seam better and I did notice a small improvement when I dropped it 5% making the perimeter end closer to the start. My max can have a slight seam gap , especially at higher speeds. By moving it closer I have reduced that quite nicely. Making it negative (-5%)resulted in a slightly larger bump on the seam as expected as the end and start overlap at that point. Which is why I settled on +5%.
RE: prusaslicer 2.9.0 alpha1 - how to use scarf seam
Version 2.9.0 alpha1 is the first time I have ever loaded a pre-release slicer version. I have been eagerly waiting for scarf seams to remove the dark seam holes that show up on light beige filament.
I set the seam position to random and use the default settings for everything else. The difference is amazing.
RE: prusaslicer 2.9.0 alpha1 - how to use scarf seam
Still got my printed test parts. Although as mentioned in white so difficult to photograph.
Of the following 2 cylinders can you tell which is the scarf seam ? One is 2.9a with no scarf seam and the other is with a 10mm spacing scarf seam. The small black marks on the tops indicate where the seams are.
RE: prusaslicer 2.9.0 alpha1 - how to use scarf seam
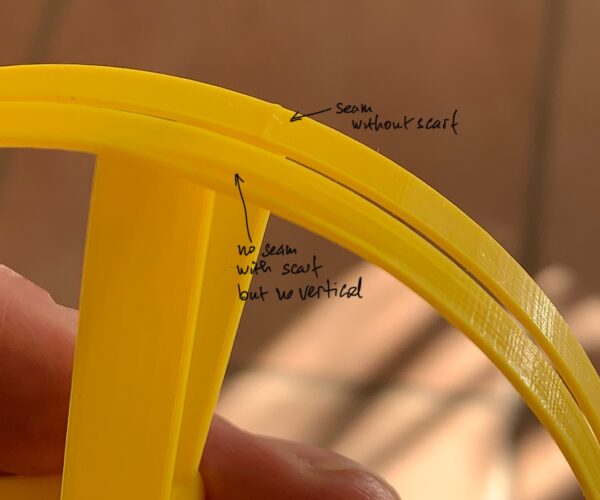
Another experiment on my side regarding seams on a light flying wing with 2 perimeters and .15 layer on prusament PLA and default profile on MK3S:
Without scarf, good print but obviously a small seam
With scarf, no seam but the vertical side is not vertical anymore with big deformation around the cylinder
I am still trying to understand the new parameters for the seam scarf !


