How to add a larger brim to the bottom of organic supports
Have a couple of models which require supports and a brim to hold the bed tight; tight until they hit about 50mm high. At that point one or another of the supports will break free at the base because the models are top heavy. Have tried going up and down in the brim size from 4-16 in PrusaSlicer v2.7.4 (win64), but that has no effect on the base size of the organic supports. Have increased and decreased most all of the organic support parameters (now returned to defaults) and thought resolution might be found in Branch Diameter or Branch Diameter with Double Walls - no joy. The brim around the support bases does not change in size.
Can anyone point me to a way to increase the brim size at the base of an organic support? If the size of the surrounding skirt is increased is it possible to manually mark where the base of a given support is to be located - or a way to manually indicate the base of a support to be located outside the skirt?
I'm convinced that if a couple/few supports could be located much like 'outriggers' further away from the main print area it would provide the support needed to complete the print.
Thank you!
RE: How to add a larger brim to the bottom of organic supports
First a remark. That it holds up to 50 mm and not more, sounds not good. The adhesion of the first layer must be not OK. I can print upto 20cm high objects with a foot of 2x2cm with just a brim and 1 support at about 1/2 of height. So I would check that first layer to be sure, it really sticks as it should.
Then to the brim.
- place a couple of tiny flat cylinders/squares just 1 x 1 mm 0,2mm high (just like the layerheight). create 1 and others as extra instances. place them below and around your object, where you think the supports will be.
- set mode to export
- right click the tiny object, scroll way down, click add settings and check brimtype and size
- now you can check that this tiny object has it's own brim. (independent of your choices for brims/supports for the main object).
- slice and see what happens, if needed you can add more brim (or also change the size of the brim).
We will do what we have always done. We will find hope in the impossible.
RE: How to add a larger brim to the bottom of organic supports
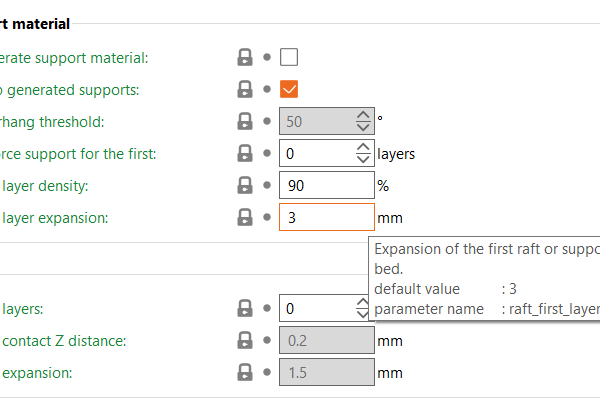
Or alternately you could use the built in proper setting for it already. It is an expert level setting so you must be in expert mode to see it.
It is located in Print Settings>Support Material>Support Material>First Layer Expansion. By default on a lot of profiles it is set to 3mm.
I will agree that your bed adhesion sounds poor if the size of the default means its coming loose. I'd look at sorting that out first. Otherwise you are just adding a band aid to the underlying problem
RE: How to add a larger brim to the bottom of organic supports
Thank you to both of you. I unexpectedly learned of the 'add a disk' method about 4am this morning and plan on using it today. The first layer expansion I could have sworn I already tried, obviously not.
And you are both right about the adhesion being the core cause. After a rest it will get better. Never had a printer as perfectly trammed as this one is right now and intend to enjoy it.
Much appreciation to you both.
RE: How to add a larger brim to the bottom of organic supports
I know this topic is 6 months old now.
Thank you so much!
I was experimenting a bit and got frustrated as the fist layer support brims were just interrupted by the brim of the actual object.
Adjusting first layer expansion does fix exactly what my problem was. I'm actually feeling a bit stupid for not searching for this problem earlier as at this point someone far smarter than me must have had the same problem and solved it already.

