[Guide] Config PrusaSlicer to send/print to Octoprint on button press, including PROPER limited API permissions and key
Here's a guide on how to setup PrusaSlicer to send g-code and/or print to Octoprint. This guide shows how to properly set it up using an application key and a custom user, rather than the not security conscious global API key.
Short TLDR version: Under Access Control create a user with only 3 permissions (clear out operator default group first). Permissions needed are Status, File Upload, Print. Under Application Keys, select user and generate key. In PrusaSlicer printer settings, edit physical printer and enter the info. Optional but recommended: Set PrusaSlicer to autogenerate thumbnails of each gcode file to view in Octoprint! See step 21
Long excruciatingly detailed version:
Step 1: Goto the normal URL for your octoprint and login to octoprint with the normal admin account (if you only know one account to login, use that one)
Step 2: Click on Settings icon (little wrench shape at the top of the page)
Step 3: Click Access Control on left
Step 5: Pick a username, in this example its PrusaSlicer).
Step 6: Type in a complex password. Maybe even generate a nice 16 character one from https://passwordsgenerator.net/ Then put that password in. No need to remember or record it.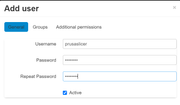
Step 7: Click on Groups tab and clear the default checkmark on Operator permission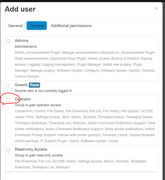
Step 8: click on Additional Permissions tab.
Step 9: Put a checkmark on 3 permissions. Status (so the PrusaSlicer can complete the test verify successfully), File Upload (so PrusaSlicer can upload the gcode files), and optionally Print (if you want PrusaSlicer to be able to start a print after upload. If you don't ever intend to do this you can skip the Print permission).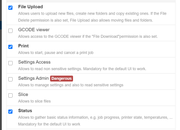
Step 10: Click Confirm lower part of dialog box to create user. It should show no groups and 3 permissions, as in this screenshot.
Step 11: Click Application Keys on left.
Step 12: Under Manually Generate an Application key, click on dropdown next to User. Select user just created (example PrusaSlicer). Fill in anything for Application Identifier (example PrusaSlicerApp), and click Generate.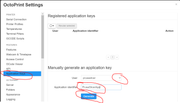
Step 13: A dialog will popup with an freshly generated application key. Click the copy button there then click close.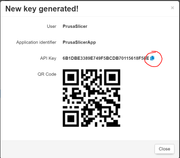
Step 14: Click Save on the octoprint config dialog.
Step 15: Open up PrusaSlicer.
Step 16: Click Printer Settings.
Step 17: Select your printer in dropdown if you have multiple (or your preferred custom preset if you have one). Then click the little gear icon (the Add Physical Printer button).
Step 18: Put a name in for the printer (example Octoprint), verify OctoPrint is selected for Host Type, fill in the hostname or IP you use to access the octoprint (such as octoprint.local). Then finally paste in the Application API key you copied from step 13.
Step 19: Click the Test button next to hostname/IP. This should show a success dialog if the steps above are done correctly. [If you have special network settings such as a proxy, hovering over the hostname field will give more info how to do that. If you don't know what this means, it probably doesn't apply to you so ignore this italics part.]
Step 20: You'll see your printer now has a new name with a star next to it. That means it's not saved, go save it by clicking on the little disk button circled in screenshot.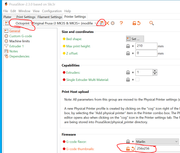
Step 21: Optional but highly recommended. While on the Printer Settings page, fill in a thumbnail size next to G-Code Thumbnails option, such as 256x256 (any other square size should work too). Then install the PrusaSlicer Thumbnails plugin. 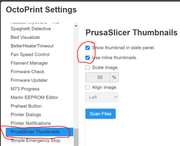
This will allow you to see preview thumbnails of each gcode file in octoprint! Basically what the mini does, but inside octoprint. 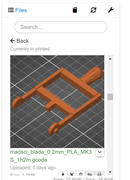
Step 22: Now after you slice something, you'll see a new button appear next to the Export G Code. This new button will upload your g-code to your Octoprint! You can also mark the checkbox to start automatically printing it after you upload it, without having to even open octoprint to start a print. Just be careful because PrusaSlicer will save the state of that button for the next slice, and you may not be prepared to start printing a new item!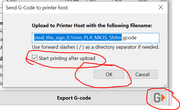
RE: [Guide] Config PrusaSlicer to send/print to Octoprint on button press, including PROPER limited API permissions and key
Thanks much for this guide. Well done.
Some constructive additions/feedback...
- The default OctoPrint install has the server webUI at port 5000. I found that I needed the port specification when configuring the Physical Printer in step 18, such as "192.168.0.80:5000". Without a port specification the default in port 80, I assume.
- When setting up the thumbnails in step 21, one must be in Expert mode in order to see the G-code thumbnails field.
- I suspect that the PrusaSlicer Thumbnails plugin has been renamed Slicer Thumbnails.
Original Prusa MINI with Silicone bed leveling mod, YZ alignment bracket, Heatbed cable guide, Octoprint, Wyze IP camera, Capricorn Boden tube, Kasa smart socket
RE:
Thanks much for this guide. Well done.
Some constructive additions/feedback...
- The default OctoPrint install has the server webUI at port 5000. I found that I needed the port specification when configuring the Physical Printer in step 18, such as "192.168.0.80:5000". Without a port specification the default in port 80, I assume.
- When setting up the thumbnails in step 21, one must be in Expert mode in order to see the G-code thumbnails field.
- I suspect that the PrusaSlicer Thumbnails plugin has been renamed Slicer Thumbnails.
Great feedback! Sadly, as best I can tell I can't edit it to correct it anymore. I think they have a time limited edit?
Ironically I was visiting this page because of a .ini corruption issue and had to lookup how to redo these steps. Found this as the 3rd google hit for: prusaslicer export to octoprint
Mine is better than the first 2 links, the prusa one is very vague and the all3dp one uses the global key which is not a very good security practice.
RE: [Guide] Config PrusaSlicer to send/print to Octoprint on button press, including PROPER limited API permissions and key
I have a octoprint outside the local network. I connect to it via octoeverywhere which works great.
But I struggle to set it up in PrusaSlice so that I can sent g-code directly to Octoprint.
I am lacking network knowhow. Any advice on how to set this up and needed settings in PrusaSlicer?
Same here.
Does anyone know if it is even possible to connect from Slicer from an outside network?
@William: thanks a lot for the guide though! much appreciated!
i'm also curious for tryin out the thumbnails now, never thought of that!
RE: [Guide] Config PrusaSlicer to send/print to Octoprint on button press, including PROPER limited API permissions and key
Ok, hold your horses, i just figured it out!
You have to give access in octoeverywhere for the Prusa Slicer App!
this is how:
-> go to octoeverywhere.com (maybe have to log in to your account if you're not in yet)
-> in the dashboard scroll down and click "setup app"
-> on the bottom "All Other Apps - Setup" : put in the app name and choose printer!
-> octoeverywhere creates a special link for that app (for us: Slicer)
-> copy the link and use that one in the Prusa Slicer app as described above
happyhappyjoyjoy!
RE: [Guide] Config PrusaSlicer to send/print to Octoprint on button press, including PROPER limited API permissions and key
Hallo @rumplkatz
Thank you for the hint. That was the missing piece. Now everything works as expected.
cheers
RE: [Guide] Config PrusaSlicer to send/print to Octoprint on button press, including PROPER limited API permissions and key
Ok, hold your horses, i just figured it out!
You have to give access in octoeverywhere for the Prusa Slicer App!
this is how:
-> go to octoeverywhere.com (maybe have to log in to your account if you're not in yet)
-> in the dashboard scroll down and click "setup app"
-> on the bottom "All Other Apps - Setup" : put in the app name and choose printer!
-> octoeverywhere creates a special link for that app (for us: Slicer)
-> copy the link and use that one in the Prusa Slicer app as described above
To be clear -- it looks like this is currently only available for OctoEverywhere supporters.
RE: [Guide] Config PrusaSlicer to send/print to Octoprint on button press, including PROPER limited API permissions and key
You can also set up a WireGuard connection to another network and then you can access the printer like in your local network. The other network needs a WireGuard server and you need a WireGuard client on your computer. No third party cloud services involved.
