RE: Help me get my core one printing! *assembly issue
Is that a shadow or is it broken?

This looks like a shadow, because you can't just break out a bar in a duralumin part. That requires a lot of strength and it would be a job even with the part clamped in a vice.
RE: Help me get my core one printing! *assembly issue
This looks like a shadow, because you can't just break out a bar in a duralumin part. That requires a lot of strength and it would be a job even with the part clamped in a vice.
You're right. It could only be a manufacturing defect. I've looked at all the photos, and this one in particular, at least 20 times. I'm curious to see what the problem turns out to be.
RE: Help me get my core one printing! *assembly issue
Thanks for the suggestion! I just finished folloowing it. I am planning on rebuilding VERY slowly and updating as I go here. Expect LOTS of posts today.
This is the only part of the upgrade from my MK4S to CoreOne that was not good. I had the same problem the belts kept slipping out.
Here is how I did it.
Slacken off the left and right screws that tighten the belts completely.
You can even open them out so the blocks fall out.
Now the belts are totally slack, but thereaded through the puleys still, its time to put the belt ends in place. With no tension on the belts this part is simple. Please see the manual for how to thread the belts there.
Then put the blocks left and right back. Tighten the belts manually till they feel about right.
Now the belt end won't come out of the block anymore
You can then run the new belt tightening procedure. This stroboscope software for the belts is pure genius. It works.
Not sure why Prusa di not use this method. Once I did this, it took a few minutes to get the belts set up correctly.
RE: Help me get my core one printing! *assembly issue

![]()
![]()
![]()


This looks like a shadow, because you can't just break out a bar in a duralumin part. That requires a lot of strength and it would be a job even with the part clamped in a vice.
You're right. It could only be a manufacturing defect. I've looked at all the photos, and this one in particular, at least 20 times. I'm curious to see what the problem turns out to be.
RE: Help me get my core one printing! *assembly issue
Does everything look okay? Are the black screws the same length as the originals?
RE: Help me get my core one printing! *assembly issue
yes same length. built it back up and ran calibration test. Belt has NOT slipped however, it will not pass y axis calibration. No warning, just not passing.
Does everything look okay? Are the black screws the same length as the originals?
RE: Help me get my core one printing! *assembly issue
yes same length. built it back up and ran calibration test. Belt has NOT slipped however, it will not pass y axis calibration. No warning, just not passing.
Does everything look okay? Are the black screws the same length as the originals?
Y calibration is failing because either the belt tension is uneven and the gantry is skewed or the filament sensor cable is in the way. If you move it manually along the Y axis, does it move freely? Make sure there is nothing snagging. If not, then completely loosen the belts and then follow this guide exactly: Adjusting belt tension especially the section on "Quick Gantry Alignment"
RE: Help me get my core one printing! *assembly issue
Have you already used the belt tuning wizard to properly tension the belts? Perhaps the gantry is slightly bent after all that activity. You can see this if you pull the Y-axis towards you and it doesn't hit both sides simultaneously at the front. Unfortunately, I have to stop now; it's 2:30 in the morning. But congratulations anyway.
RE: Help me get my core one printing! *assembly issue
I haven't gotten that far yet. I have never made it past y axis calibration without it failing or the belt slipping out.
Have you already used the belt tuning wizard to properly tension the belts? Perhaps the gantry is slightly bent after all that activity. You can see this if you pull the Y-axis towards you and it doesn't hit both sides simultaneously at the front. Unfortunately, I have to stop now; it's 2:30 in the morning. But congratulations anyway.
RE: Help me get my core one printing! *assembly issue
And you're not listening to advice again! Aligning the portal to the right angle and correctly setting the belt tension must be done before you try to do any calibrations! Align the portal and set the belt tension before you do anything else! The procedure has already been described here by my predecessors. By the way, you can move the upper left belt back two notches so that the end of the belt does not protrude under the metal carrier. Otherwise, the belts are installed correctly and cannot slip.
RE: Help me get my core one printing! *assembly issue
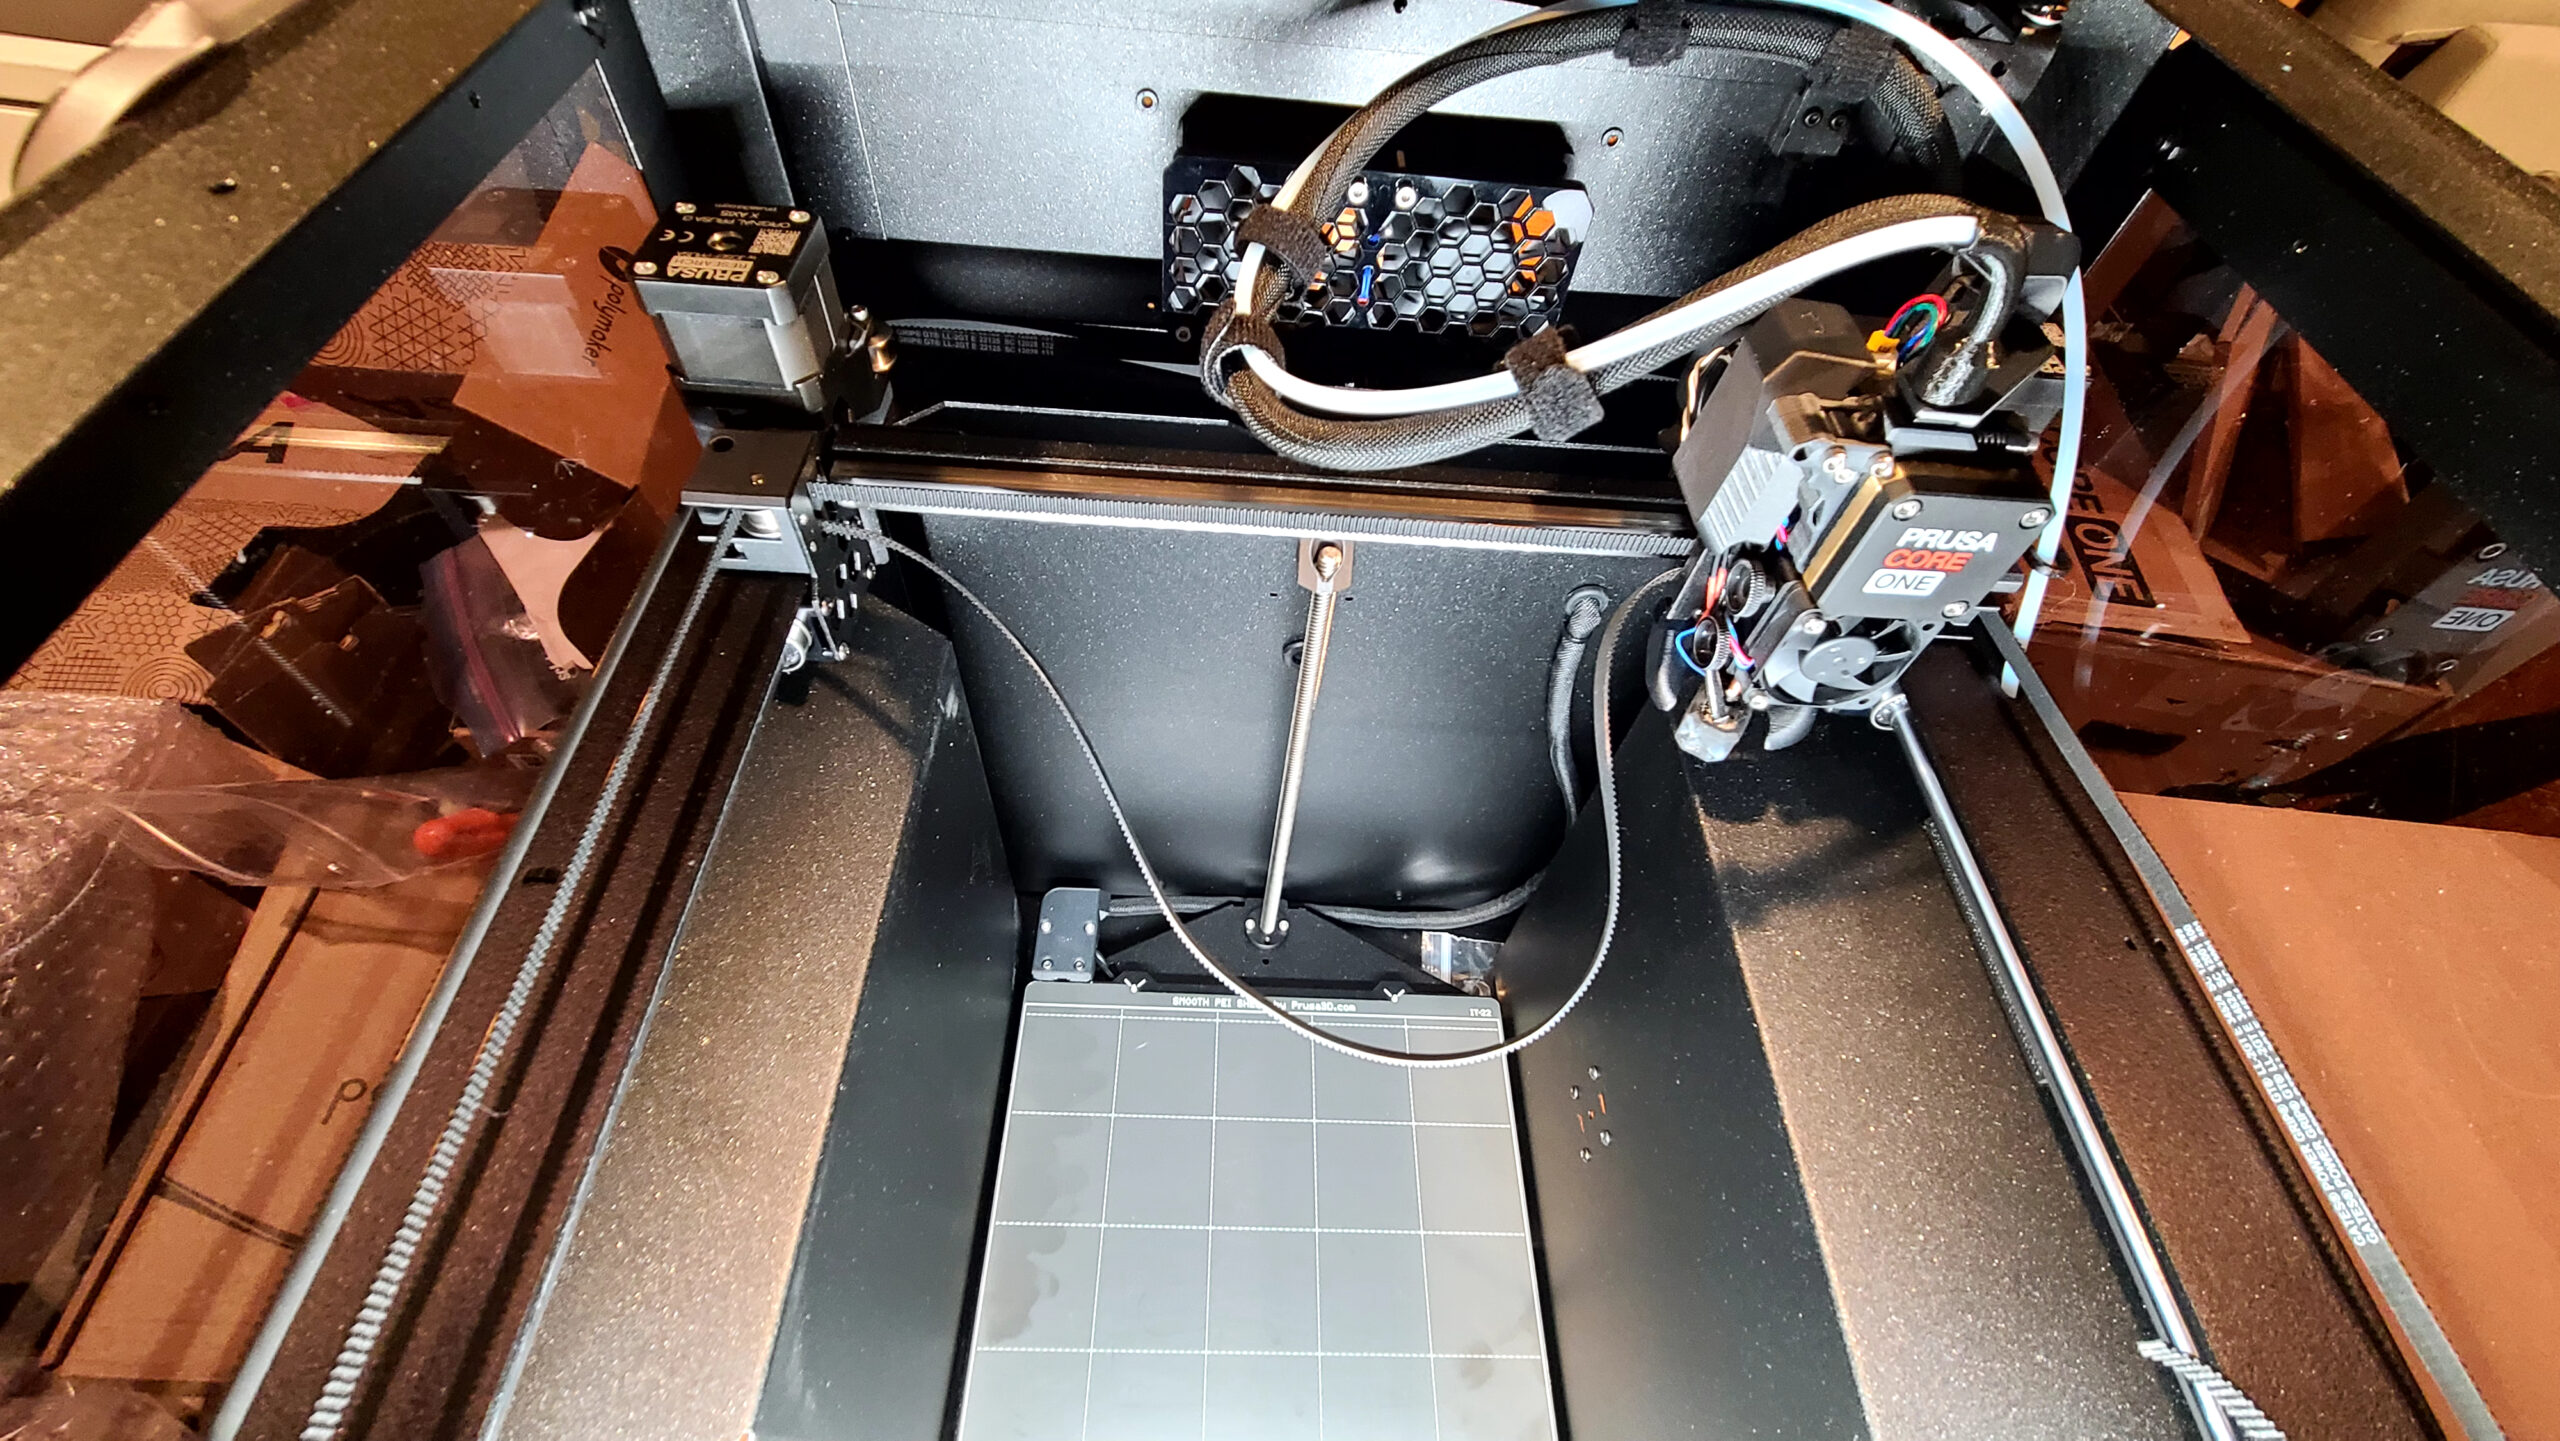
@soulbladeofdawn -- in the photos which show the state after you attach the mounting plate to the X bearing, I can see the ends of the upper belt on the left and right side. (Short ends of the smooth back side of the belt sticking out beyond the mounting plate.) But I cannot see the corresponding ends of the lower belt. Are these still inserted deeply enough, such that several teeth can interlock with the incoming belt? Or did they slip out while you were positioning the mounting plate?
RE: Help me get my core one printing! *assembly issue
Go here and read it all. Been there, got all the T-shirts. Sorry, the copy and paste of the link is not working.
RE: Core One owners regretting their purchase? Y-Axis Failure
Lessons Learned on Y-Axis self-test fail.
I now have green checks across the board! Thanks to those with constructive input.
Being that this was a problem that drug out and many had input on, as I resolved the orientation of the gantry pulleys.
I did a review and recap of things learned. When I managed IT helpdesks, I called this a postmortem autopsy, because they killed us to resolve. Hopefully, those that should review this list…will. Much was learned other than what the problem and fix was. To recap, no matter what I did, I could not get the Y-Axis test to pass. I could print things that did not approach the edges of the sheet. If I did, I got terrible layer shifts. All things here and from chat indicated a failure somewhere that was impacting the Y-Axis system. I felt from the beginning that it was probably something I had done wrong.
After hours on chat with Prusa support and repeated "check the belt tension" suggestions, I had trouble convincing them it was not the belt tension. I spent hours disassembling and reassembling the Nextruder in attempts to locate the problem and fix it. But I grew weary of the "check the belt tension" stock answer from all the multiple chats on this problem. Multiple tries, and multiple photos did not reveal a solution. A couple of days ago I used the axis move functions to watch the extreme movements of the nextruder.
I saw something that made me feel more like an assembly problem. But before I broke down the XY assembly and spent more hours reassembling, I posted a photo of the suspect issue. I was advised, correctly, that the orientation of the pulley system on the right side of the gantry was incorrect. I disassembled the gantry pulleys, re-ran the belts and put it back together. Y-axis passed!
The point of this long report here is for others’ benefit. Some of the symptoms I had were not odd, but together, they turned out to point to something other than a belt tension issue. I never had problems getting the acoustic tuner to work. Now let me list all the problems/symptoms I ran into during assembly that seemed to point to this pulley orientation problem. Some may feel these systems had nothing to do with my problem, but guess what, they all went away.
PROBLEM(S) #1. I struggled for hours assembling the belts onto the holder that attaches to the gantry. To me, they were just not long enough by a few millimeters. After assembly. The belts would pull out during tensioning.
Things I tried - I could not get the belts tensioned without them pulling free of the holder. Hours and hours of breaking down the nextruder and reinstalling, to no avail. I bought a roll of the correct belt material off Amazon to make longer belts and then trim. Worked fine to resolve the assembly problem, HOWEVER, support kept pointing to the third-party belt material as a possible problem with Y-axis (which I doubted). I got the information from Prusa that the XL belts are the same but 70CM longer and three times the price. I ordered 2 and replaced the 3rd party the other night and reassembled just so Prusa support would not say that was the problem. New MK belts installed and trimmed tuned properly, not solving the Y-Axis test failure. I guess that possibly eliminated the question of the 3rd party materials since I now had OG Prusa belts. It was after this that I spent hours moving the bed, gantry, and watching. Then I posted a photo and we found the problem.
LESSONS LEARNED #1 - It now appears that when someone is struggling with the belts just "Not being long enough" it is/may be a symptom of a pulley orientation. Sounds like having the pulley improperly installed, though it still prints, shortens the belts a few millimeters of usable length. But that is enough to cause installation and tunning frustrations. After orienting the pulleys properly, the OG belts will install now with the "4 or 5" teeth sticking out. Whereas before, I could barely get 3 and they would pull out.
Also, when the installation frustrations is taken together with belts pulling out and seeming too short, it could/may point to the pulley orientation being off. Also, the fact I only got edge and layer shifts when printing to the sheet edges seems to point to this same problem if taken together with the other 2 or 3 symptoms/problems.
PROBLEM #2. Being constantly told it was a belt tension problem and/or more or less being told I didn't know what I was doing. Seems I do. In this same train of problem solving, once the Belt Tuning Wizard came out, support seemed to think that was the cure-all for all ills. I could not get the tuning wizard to show me my belts “vibrating.” I felt that it was a white LED issue because mine were not very bright. Then I was told by Prusa support 3 times by 3 different people that the white LEDS had nothing to do with how the belt tuning wizard works. Seems they do not understand how a stroboscopic system works. FYI - The word stroboscopic means flashing light used to study motions. And this strobing solution is very old tech used on direct drive turntables 40 years ago. I had told support at one point, and posted here, that with my LEDs, I had to wait until evening for my room to be dark enough for me to attempt to utilize the strobing system. I was told by one poster here I was full of BS because I should be able to see the strobing with the lights on. That is a correct assessment...if my white LEDs were working properly, which they now are. In addition, the ever so slightly reduced length of the belts due to the pulley mis-orientation seems to impact the accuracy of the stroboscopic wizard. The visible “movement” of the resonant wave was only very slight. Reviewing my HAM radio knowledge, I now understand the impact of the few millimeters of belt length may have been dramatically impacting the vibration effect. I worked on the white LEDs so they show better now, and with the adjusted pulley, the belt tuning wizard works fine in all night, though seems to indicate 1 or 2 Hz tighter than the acoustic tuner, after fixing the pulley and the LEDS.
LESSONS LEARNED on #2. - Don't assume someone else is full of BS just because something that works on your machine doesn't work on mine and think you know all when you are not working on my machine. I had a secondary problem with the LEDS I was not pursuing because I am able to use the cell phone app fine. Saying something like this will never give you any credibility in support.
Also, once I told support the 5th to 10th time, the belts are tuned fine, it is time to move on. When the obvious solution is tried and fails repeatedly, it doesn't mean the person on the other end of the phone is incompetent or unable to follow instructions and help in the problem. I know this from nearly 40 years of online, telephone, and onsite IT support. You have to assume that if it can be assembled, installed, or done wrong and come close to working, it can be done.
When the obvious solutions are not resolving the problem and they do 95% of the time, it is time to back up and look for Murphy. During my years of computer tech support, I solved many problems that the standard solution "always" worked, but didn’t, by taking a computer completely apart and just putting it back together again. That was where I was before another person caught it with my Core One.
Also, when the stock answer does not resolve a problem, you must look for other problems you feel may not be related. Granted, you usually, and hopefully, learn by resolving the same or similar problem before. Hence, group discussion and documentation of problems are a must within a support organization.
Let us hope, that those supplying support are capable of a few things:
A system that tracks problems and solutions that is searchable. And a system that can be reviewed and retrieved based on a customer ID (or some common denominator) that will show you what 9 other techs have already tried. This keeps both the tech and the customer from wasting their time.
Also, a tracking system that shows time spent on new or recurring problems. That feedback will help with training technicians, modifying documentation and/or products to reduce calls on the same problem. This works wonders in holding down support costs to the company. Been there, managed it, got the T-shirt.
Not thinking/assuming that the right answer is always the only solution. Remember Murphy. If the obvious answer is not working, repeating the solution 20 times will not change the outcome. Remember the definition of “insanity.”
Understand how your product works and if you don’t learn. If a customer tells you that you may be incorrect, guess what, you may be wrong or lack understanding. Sometimes the customer is smarter than the support tech.
OVERAL LESSONS LEARNED FROM THIS and Suggestions to help others.
During assembly of the belts on the gantry/holder, here are some tips I discovered after numerous assemblies and breakdowns.
Pull the belts almost tight on the plate that attaches to the gantry. Not completely tight. ALSO, where it says loosen belt tensioners to help with installation, my suggestion, do not loosen the tensioners to the point the frame of that holds the actually pulley extends past the edge of the pulley holder, not the pulley itself. If you do and you pull the belts tight then screw down the plate, you may run into the problem of being unable to square the gantry contact because it is bumping against the pulley bracket, not the bracket holding the pulley assembly. If this happens, you get the joy of disassembling the nextruder and adjusting the belts. You can tell I did this...several times.
And this leads me to another strong suggestion. BEFORE you attached the full nextruder assemble to the bracket that you pull the belts through and then screw down, do a preliminary belt tensioning test. No reason you can’t at this point and it will save the joy of breaking down the nextruder to reposition the belts. Go ahead and check the gantry square, check its contact, and tune withing a few Hz. After I started doing this, my adjustments for the final belt tension were minimal.
PROBLEM #3. Early layer shifts - This was my secondary problem once I tried to print something that went from edge to edge of the plate (The MMU Community box). This drove me nuts. And guess what Prusa supports solution was--Use the fabulous cure all Belt Tuning Wizard to make sure your belt tension is correct. Even though I said, It is, It is, It is, we couldn’t get passed the only solution being tuning the belts. I have tuned the belts so many times now, I can nearly do it by ear within 2 or 3 Hz.
LESSONS LEARNED on #3. - Seems to be that early layer shifting and repeated failures to print from edge to edge (and the pattern tests usually passed), could indicate the pulley orientation problem, IF it is taken together with the other symptoms. Layer shifting can have numerous other causes, OTHER THAN BELT TENSION. Here, I am taking the problem together with the other problems.
Another lesson learned during all my assembly and reassembly of the nextruder looking for solutions - Suddenly having filament grinding issues and head banging. Though, not sure how the head banging goes with this. If you suddenly get filament being chewed up after working on the nextruder and/or the gears...make sure the tiny thin washer is still between the gears and the motor mount! Yes, I did this a few times. Amazon has them by the dozens cheap. Also, make sure you replaced the tube the idler arms rides on and the grub screw in it is tight. Yes, I lost the tube once, and no, you can’t get them off Amazon, or anywhere else I think.
The only easy solution if you misplace it is to buy a $13 MK parts kit from Prusa, plus shipping. You can't get just the tube from them. I managed to cut some brass tubing and make one...serious PITA.
I know that the searches for problems looks at titles and hopefully the body. But here are words and phrases that should be a part of this problem search.
Y-axis self-test fails
Belt tension fails
Core One belts seem to be short
Core One belts pull out of holder
Early layer shifts
First or second layer shift
Cannot print to edge of plate
These three symptoms/problems taken together – Y-axis test fails - Early layer shifts – Belts seem to short and pull out.
Some possible solutions to prevent this compound problem
In the instructions on assembling the XY assembly. Keep the photo and instructions information orientation constant for Front and Back.
Since some of these parts are ambidextrous (may not be a good thing) document/photograph correct assembly and orientation if there is potential problem of incorrect orientation, dur to parts orientation not being unique and ambidextrous. The cost savings of printing one part instead of two may be less than the cost of support issues. Track and find out. Support cost money and so does customer frustration
I am not fully faulting Prusa support here. The 24/7 support availability awesome, but this industry is relatively new and growing pains are inevitable with product development and support. And you are putting a highly technical product in Murphy’s hands. I did this type of support and managed the same during the early days of computers for nearly 20 years. Murphy is more of an expert than any of us will ever be!
I developed a database system that analyzed problems and retrieved possible solutions based on similar problems. This was before SQL and AI. The solution retrieval system we developed was available by calling into a server and looking up your symptoms after our regular hours and on weekends. Sounds simple, but this years before the internet. Some of the products we manufactured in those early days allowed the addition of a number terminals on a server. No Networks like Novel in those days. Unix only and serial terminals. Downtime on the a meant someone’s company was down! We sold international so the development of an afterhours system that supplied the same information we used internal for after hours on dialup was an industry leader in those days.
Support costs a lot of money and if the tools are not used to track problems, time on problems, analysis of problems, and training solutions, or not making changes to product, documentation, or other, the support cost to reduce support issues and costs, it can turn into no repeat customers due to frustration. Online/phone support is a hard job, and failing to analyze support issues adds more hard costs as well as costs in sales. Been there, done that, got the T-shirt(s)! Retired after 40 years of it. Don’t miss it at all!
Extra HAM (and eggs some say) Radio - N4MCC
RE: Help me get my core one printing! *assembly issue
And? Is the printer printing now?
RE: Help me get my core one printing! *assembly issue
Still not printing. Spent the entire weekend working with support. Support seems to think it is due to belt not being the exact same number of notches on the belt. Some progress has been made, as the belt seems to not be slipping out of the holder anymore. Y axis still consistently fails.
I have a busy life, so weekends are pretty much the only times i have to work on the printer, and even those weekends are often busy. So far the plan is to work on it this Sunday.
I saw a long post on here that looks similar to my issues so going to see if their solution works for me too.
RE: Help me get my core one printing! *assembly issue
hint on belts: It is trivially easy to attach them to the head in exactly the position you intend if you take out the tensioning pulley temporarily so the belt is slack.
RE:
[...] Support seems to think it is due to belt not being the exact same number of notches on the belt.
[...] Y axis still consistently fails.
It is not important that the same number of teeth is clamped on each of the belt ends. As long as the belts don't slip out, and you can adjust the tensions to the target values, that part is fine.
I take it that you have adjusted the gantry and tensioned the belts following this guide, right? It is important that you first (without any belt tension) ensure that the X gantry touches the left and right front end stops at the same time. Then tension the belts, but always do it symmetrically. Then use the stroboscopic belt tuning wizard in firmware 6.4.0 which will walk you through the fine-tuning.
If the Y axis calibration fails: With the motors powered off, does the gantry move smoothly along the whole Y axis when you push it by hand? One of the most common (and unexpected) issues is that the cable to the filament sensor on the right side panel is bending inwards a bit and obstructing the movement of the linear bearing along the Y rod.
RE: Help me get my core one printing! *assembly issue
I am making sure there are exactly the same regardless.
"It is important that you first (without any belt tension) ensure that the X gantry touches the left and right front end stops at the same time. "
Some questions: when there is no tension the belt wheels on the tensioners hold the gantry back a bit, so if I push the gantry forward it gets stopped by the wheel. If I add a bit of pressure, it will still hit the tension assembly. Is this normal or does it suggest something is wrong? When there is tension and the wheel is pulled back, this issue goes away since the wheel moves deeper into the assembly.
"If the Y axis calibration fails: With the motors powered off, does the gantry move smoothly along the whole Y axis when you push it by hand? One of the most common (and unexpected) issues is that the cable to the filament sensor on the right side panel is bending inwards a bit and obstructing the movement of the linear bearing along the Y rod. "
it moves fairly smoothly with a tiny amount of resistance (which feels normal to me).
Finally: a question- is it possible to run the built in printer tension wizard without having first attached the nextruder etc.? I am speaking of just the belts attached to the belt holder. I think ensuring belts are properly set up would be much easeir if I could dial them in BEFORE attaching everything that I would need to remove.
[...] Support seems to think it is due to belt not being the exact same number of notches on the belt.
[...] Y axis still consistently fails.
It is not important that the same number of teeth is clamped on each of the belt ends. As long as the belts don't slip out, and you can adjust the tensions to the target values, that part is fine.
I take it that you have adjusted the gantry and tensioned the belts following this guide, right? It is important that you first (without any belt tension) ensure that the X gantry touches the left and right front end stops at the same time. Then tension the belts, but always do it symmetrically. Then use the stroboscopic belt tuning wizard in firmware 6.4.0 which will walk you through the fine-tuning.
If the Y axis calibration fails: With the motors powered off, does the gantry move smoothly along the whole Y axis when you push it by hand? One of the most common (and unexpected) issues is that the cable to the filament sensor on the right side panel is bending inwards a bit and obstructing the movement of the linear bearing along the Y rod.