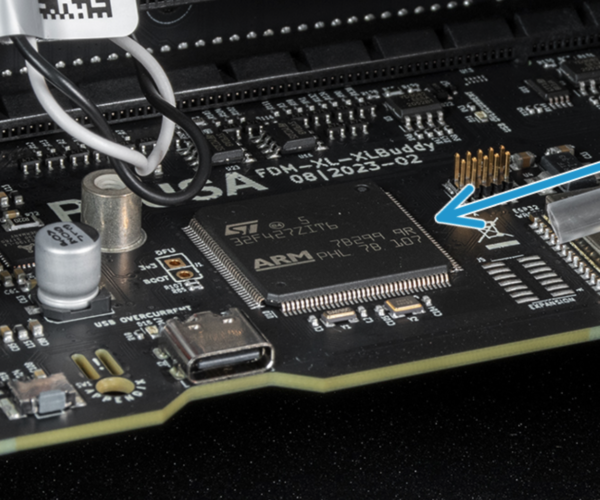
XL (apparent) XLBuddy board failure
So today I fired up my XL 5-tool to start a print I had prepared. Printer started to 'home' but the carriage was moving strangely. (Instead of moving to the left-front corner, it moved diagonally to the right until it hit the limit and began to shudder loudly with belts jumping teeth until I hit Reset.)
I did a number of checks but didn't find anything amiss. Nothing I tried helped. Using Control menu and tried moving X and Y but only got diagonal movement. That's when I noticed the left side XY motor was not moving.
So onto Prusa Chat. It was only a '10 minute' wait (which turned into 15-20) before I got 'Max'. I 'told' him my symptoms and he asked me to swap the two cables for the XY motors. Not possible, they won't reach across the width of the board. He then had we swap XY with Z on each side of the controller board. Now moving 'Z' gave me X motion of the carriage (both 'XY' motors rotating). That proved motors were good and the cables were good.
He asked me to send him a video of both modes (normal and swapped cables) and showing the movement (and non-movement) of the XY motors which I did.
Bottom line, he's requesting I be sent a new Buddy board (the bottom one) under warranty.
So, I don't really have a cause, but the solution seems like the right one. Very pleased with response. Sure, it shouldn't have happened but 'it' does. Fix it and go on.
I'll update this thread when I have them.
RE: XL (apparent) XLBuddy board failure
Are the XL Buddy boards running hot? I see people designing new covers for the electronics box modified with cooling fans.
Looking at my failed XL Buddy board is see the stepper driver chips have no heat sinks, etc. (Something I see on many other printer controller boards). There are a pair of mounting posts straddling the driver chips, are they intended for holding a heat sink against those chips? (Mine had nothing there.)
RE: XL (apparent) XLBuddy board failure
Photo I meant to include...
XLBuddy board replaced!
I received my replacement XLBuddy board this afternoon. (Excellent service... Chatted Tuesday PM, replacement shipped out Wednesday AM, and DHL got it to me Friday afternoon.) Plugged it in, re-ran the tests and calibrations and I'm back in business!
There was no paperwork in the box, just the XLBuddy board in bubble wrap. No indication Prusa is interested in my returning the failed board to them.
RE: XL (apparent) XLBuddy board failure
I received my replacement XLBuddy board this afternoon. (Excellent service... Chatted Tuesday PM, replacement shipped out Wednesday AM, and DHL got it to me Friday afternoon.) Plugged it in, re-ran the tests and calibrations and I'm back in business!
There was no paperwork in the box, just the XLBuddy board in bubble wrap. No indication Prusa is interested in my returning the failed board to them.
Norally u don't have to send broken stuff back they don't really care
Please help me out by downloading a model it's free and easy but really helps me out https://www.printables.com/@Hello_474427/models
RE: XL (apparent) XLBuddy board failure
The Mk3 was packed with cables, never had an issue, the Mk4, way less cables, no fans, still no issues (that ive seen), however both have a single head, the motors on the XL are way larger, soooo maybe a hear issue
Many Thanks
RE: XL (apparent) XLBuddy board failure
The ARM in the Raspberry PI has no heat sink and they have ramped that up to 8 cores from memory now (it also has the RAM in it), heat did create issues in the Pi but that was more the voltage regulator would start to float the voltage which would then ear SD memory cards, not crash the CPU
Many Thanks
RE: XL (apparent) XLBuddy board failure
There is also the possibility that there is too much resistance in the core-xy mechanics. Try lowering the belt tensions a little. When I switched on my XL for the first time it also did this diagonal erratic movement before bailing out with an y axis homing error. According to the belt-tuner it was spot on. Yet the error did not go away until I lowered the belt tension towards min limit. After the printer had run for a few hours, I could retighten the belts towards nominal tension.
If you unscrew the belt tensioners you can move x and y by hand and check whether they run smooth and with low friction. Same with the idlers. If you pull the belts around the pulleys into a small loop, you can let the printer make its initial movements or move an axis via menu and observe whether the core-xy steppers rotate as expected.
