My first 5 days with my two extruder XL
I figured I would write some thoughts about my first most-of-a-week with my XL, with the hopes that it will help someone else in early troubleshooting, assembly, or help refine the design/directions somewhat. I've had a MK3S for about 5 years now and have made thousands of parts on it, but I haven't built a printer since then, and there's a good bit of tech that's happened in the meantime (texture bed shortages were when I picked my last one up, so I still used glue stick to hold down everything.)
I got my printer on a Tuesday in the US, after completing my preorder the Thursday evening prior. I was sort of expecting to have to wait a month or two with the preorder fulfillment claims of "by May", but they shipped as soon as they could and DHL did their job (though I did get hit with the import duty.) I didn't have time to actually unbox anything Tuesday, so Wednesday was my designated build day.
Getting it unpacked, everything seemed to be present, easy enough to spot, and secure in transit. Even got the XL size Haribo (1 kg!). My dual head model shipped with the 0.4mm nozzles and the 5.1.2 firmware, as well as injection molded spool holders, the center mount wifi antenna, and the nozzle cleaning piece preattached to the toolhead docks. I used the online assembly manual available at the time (February 7, 2024.)
My first little hiccup and suggestion come in the early assembly - when attaching the vertical extrusions to the base. I like the little torque wrench tool that's included - a clever and useful design - but the narrow size of the extrusion slot and the thickness of the plastic of the tool make it a pretty tight squeeze to get at the M4 bolt head, and since the torque needed is actually fairly high and you need several full turns with the wrench on because of the way the parts press together, I actually managed to slightly round the allen wrench's edges and make it difficult for the tool to be fully engaged in attaching the extrusions to the base (early on). I've got another allen wrench made with tighter tolerances and from better steel, so I could get it together, but I think there's some room for improvement here: either including a second allen wrench as a spare, or better yet, sourcing and including M4 bolts with deeper head sockets. Even 1mm deeper would mean a lot more engagement with the sides of the tool and a lot clearer seating in the bolt, so you're less likely to apply force to the wrench when it's a little at an angle and then ruin the edges of the tool. Better still, deeper bolts would just be a drop in part replacement without interfering with anything else. It's also worth mentioning that a torque measurement for the bolts would be great too - if someone wears their supplied tool out, no other allen key is going to flex the same way so the printed torque wrench won't be a good measure - just having the number means someone with access to proper tools (or power tools for quicker assembly) can do it without the printed one.
In any case, assembly continued. Cable routing was a little finicky, but held in place when you got it, and the technique of getting both ends of the extrusion cover and then pressing in the middle was a good one - I just wished I caught it before marring the end of one of the front ones. Oh well. I was surprised at the attention to the ground between metal parts, and I wonder where the emphasis came from (a requirement in industrial environments?), but it was easy to do, feels quite secure, and is probably a structural addition to the side panels too.
When I got to putting the back on, I ran into some inconsistencies with the directions. Notably, the cables for the right side (left side when working on the back) LEDs was not attached (no mention of attaching it in the directions and the cable is physically behind the LCD cable in the images, so it was tough to tell whether it should have been in the loom for that side initially), and the cable I eventually found out was for the filament sensor was just sort of hanging there and had no indication of where it was supposed to be going through (the hole in the plastic corner piece for the metal cover on the right side.) It wasn't going to mess up the build, but in both cases I ended up having to come back and redo steps once I actually understood what was supposed to be happening, and for directions which really consistently walk you through the details, this omission seems like an oversight.
At this point I realized that the Haribo steps may actually not be consistent with the version of the parts I got - when shipped the 1 kg bag of standard size bears instead of the tub of large size bears, a single one was a little on the lean side for the calories expended in building the printer.
When I got to attaching the docks, I had a couple more little oddities. Apparently one of my toolheads had a twist in the flat plastic cable anchor piece, not apparent as a problem when preparing the extruder, but when I actually mounted the dock, it bent back on itself in a strange way and I needed to open the orange clips along the way to get the twist. When mounting the extruder dock, it was clear enough how to do it and how to tighten it to the point of not moving.... but this wasn't actually enough. The very small lip on the dock that fits in the center of the profile to make it aligned correctly isn't deep enough to really feel locked-in when first mounted, and there may be some amount of settling that the parts do, so while I watched the video and mounted the docks as tight as I could get the screw, both of them needed to be realigned and retightened after attempting (and failing) the docking calibration. By eye, the docks seem to be seated properly just slightly past 12 o'clock (looking from the back) so they are not completely vertical, and I got another quarter turn at least of tightening down on both docks after a few toolhead docking impacts. They're secure now and the calibration hasn't been moving, but having to do that docking calibration half a dozen times before the first print was an annoyance, for sure. I think a tiny bit more protrusion of the lip that goes into the extrusion slot on the dock would make the feeling of being aligned a little better defined and may help with reducing error in this step.
The docks I got had the nozzle seals installed, so I ignored the installation and adjustment steps, but it wasn't as clear as other sections that the versioning meant for you to skip the adjustment.
A side note with the U.Fl antenna cable connector - I found it annoying to attach and have broken one of them on a board before - the answer is to not use your finger. Get a flathead screwdriver or something and press on the connector with the flat side with your finger, it seats much more easily.
Once it was assembled, I got to calibrating, and while I followed the online instructions, it definitely felt like following what was on screen was the important part, and I ended up missing some details because of that. I had to redo the dock position several times after tightening the dock bolts (mentioned above) and ran into issues in the calibration pin steps because the on screen info was pretty sparse - the pin had not yet been mentioned in the manual, and while it is certainly in the online manual steps, I was neither sure what part or what to do with it at first glance from the instructions on the screen. I eventually figured it out - not hard to realize what's going on once the toolhead is probing it - but perhaps clearer instructions on the LCD (or just an extra point to read it in the manual the first time) would have saved me a few minutes of attempts.
Then it was ready, right? I figured I would start with the presliced stuff, so I started with the first layer test. 144 mesh bed calibration points for a 30 minute print is...... wow. I can appreciate the thoroughness, and have noticed that for prints that don't use the whole bed only the part in use gets probed... maybe there's still a way to reduce the length of this step. Maybe the full 144 the first time, then just every other point on the grid to check vs. the stored calibration and only redoing all of them if enough bowing is measured vs that first one. I think I had a toolhead change issue on this first print, tightened the dock, ran the dock calibration, and tried again, finally getting a print. I was also pretty surprised that it took 12.5 minutes to fully warm up, home, calibrate, and soak to start before the printing actually began... in the same way as the bed leveling, it's a very hefty overhead for a smaller duration print, and maybe there's a way to do some consolidation of heating steps or similar to reduce this.
The first print had very noticeable layer shifting, in no small part because of 25 Y axis crashes and at least one manual resume. I looked up the issue, found the belt tensioning guide (and neat tool), and redid the tensioning on my belts. Both were too tight from the factory, and honestly, getting the tension is going to be important for maintenance going forward, so personally, I would have liked to have seen belt tensioning as part of the build steps and just have you check it before the printer's first print. I had crash detection on and set to low sensitivity.
I made some adjustments, got it to the green zone in the tool but still had the occasional slip on the Y axis (mostly when the toolhead was moving quickly, diagonally, in the front right quadrant of the bed.) I eventually tightened it something like a quarter turn from the center of the green on the app and from pretty close to matching pitch when strummed, and while it wasn't at this point in my testing, I've had several prints now with no crashing at all.
On the third attempt, the first layer test print came out with no layer shifting, so I figured I would start with something more substantial - the planetary gear demo. I loaded it up and went for a walk around the neighborhood. Half an hour into the print, I came back to the sound of extruder motor skips and what looked like several layers worth of one filament just not coming out. I was using two Prusa PLAs, the one still working was the original pre-prusament spool of silver PLA from my MK3S and the one that had jammed was the Prusament that shipped with the printer.
I started looking up how the extruder was put together to try and see what was wrong - reloading didn't help, there was worn off filament on the side that had been through the extruder gear, and even with higher heat and the idler off, I couldn't manually force any through. I got on the text support line and waited something like 45 minutes to get connected, but the person I eventually spoke with seemed to know what was going on, went through a bunch of steps to make sure it wasn't other things, and then advised me to pull the hotend for further inspection. A few hours went by, I had time to actually do it, did so, and got back on the line with tech support - it was clear there was filament jammed in the heatbreak tube that didn't seem possible to push through.
As I've got some equipment for soldering handy, the eventual course of action was to heat the hotend assembly sufficiently to try and get the filament through, then I cold pulled it using nylon. It took quite a bit of heat and time, but eventually I got it out, and could see through to the nozzle hole from the tube end of the nozzle, but as soon as I pushed PLA into it, I felt considerable resistance only 20-30mm into the tube. At their advice I put it back on the extruder to check again, but as before I got extruder skips and no extrusion (and apprently I undertorqued the grub screw, since the extruder skipping actually produced visible shaking of the nozzle tip.) It was clear there was something catching on the side of the nozzle's heatbreak tube and dragging on the filament sufficiently to make it stick. I took some pictures and a third support agent sent a replacement along my way. In one of those last pictures for the support chat, I spotted a tiny, barely visible triangular dent in the lower ring of the heatbreak (the slight dimple to the right of the brass sleeve in the picture), and I'll bet that was the cause, probably originally dented when the grub screw was tightened down at the factory.
The next day, since the troubleshooting went late into the night, I decided I would at least test the single extruder abilities of the printer, since I had things to print and at least several days of wait on the part. I loaded up PET to the second extruder using the filament menu and got a temperature error that reset the system - not because of the extruder being used, but because I had removed the whole hotend from the first toolhead. It progressed alright, though, and I sliced up my first GCode for the new machine. I was already familiar with Prusaslicer and had my own filament profiles to use for the brand I wanted to use, so I put it on the USB stick and got going. I wanted to do things over wifi and PrusaLink, but couldn't get it working in the short term because of the limitation that the printer doesn't like 5GHz band wifi networks. While I understand it's probably a price premium, on a $2500 machine and for the convenience of not having to use legacy connection settings on your router, a wifi module that could speak current generation wifi would have been nice.
In any case, I started the print, it seemed to go well enough (I think close to 12 minutes again to the start of actual printing), and eventually got through the print by the next morning, but there were a number of crashes along the way. They were the same Y axis crashes I had seen earlier, but for some reason, when it would crash, recover, and rehome, it would then just stop progressing. The printer main screen would return to the one with three buttons and it would say the print was ending but that the nozzle was still heating, and you could not use the jog wheel to navigate to the center or left button, you could only click on stop. If you clicked stop, you could cancel or undo (the jog wheel was working), but you couldn't actually get the print to start again. My hacky solution was to force a power panic by switching off the power supply... and this worked and verified that the power panic seems to be pretty robust. In all, I probably had 3-4 power off resets required because the printer had a Y axis crash, properly recovered and rehomed, and then just didn't want to print for whatever reason. When finished, I had some layer shifting on the lower portion (the final quarter turn of belt tightening happened after this print, solving this issue, but I hadn't gotten there yet by this point), but it came out well. The textured bed meant good adhesion and then release using PET without anything on it, the dimensions were accurate, and the surface finish was more consistent than on the MK3S (also a bit shinier with some fine strings, I wonder if these extruders are just a couple degrees hotter than the MK3S that has had years to drift since it was last calibrated.)
I made some revisions to the print (for a project) and went to print it again, expecting most of the same but now with the belt tension good, and I got about an hour in before a full red screen emergency stop....... for thermal runaway protection? Without changing anything, and knowing that the extruder was operating correctly when it stopped, I reprinted it..... and it completed, without issue, and looked basically perfect. There was no thermal runaway. What happened is that the -25C or whatever the printer was reading from the unconnected thermistor on toolhead 1 (totally unused in the print) triggered the emergency stop (which didn't even lower the bed, so it just parked the hot, working hotend into the print.) It hasn't errored like that since (and probably won't since reattaching the thermistor,) but this is probably a good indicator that the printer firmware needs a bit more per-toolhead compartmentalization of checks. Both this and likely the filament load error restart above could have been prevented if the temperature checking for the toolheads were limited to the ones actually used in the print. It would also be helpful on the error screen for it to tell you which toolhead had the problem (if you have 5, it could be tough to spot) and even better, what the temperature reading/fault trigger was.
Today rolls around and the replacement nozzle arrives (a day ahead of schedule). I place it in, run the calibration pin cal, come up with an error, tighten the grub screw slightly, get past the error, get an error on the second toolhead's calibration (presumably the filament on the outside of some of it), and eventually get back to the point of trying the presliced planetary gear model. It prints without a hitch, and the assembly spins freely right off the print bed (though that one seam on the outside doesn't look the greatest :p)
So next up, I get to properly test multimaterial functionality. Probably first some PET parts with PLA support, then something with flexible and standard filament, and then hopefully using some old (but dry) PVA filament as a soluble support. I really was doubting the reliability and maturity of the platform in those first couple of days, but since those early teething issues and the replacement nozzle, it's behaving a lot more like a printer that I can depend on and which I'd like to replace the MK3S as my go-to.
I'd like to see those clarifications and updates made to the assembly guide, including a step to check belt tension by default and a little more explanation of the calibration pin on the on screen directions on the printer itself. A couple of minor part changes should make assembly a little easier and a lot easier to get right (deeper M4 screw heads, a slightly larger ledge on the part of the dock that goes into the channel in the extrusion for alignment). And at least for my unit, maybe a little more QC on the nextruders, since I had one come through with an (albeit slightly) overtightened hotend grub screw and the twist in the flat plastic support for the umbilical. A future electronics revision with 5GHz wifi support would be welcome, too, and a little more compartmentalization between toolheads for error checking as well as a little more detail on the error encountered (which toolhead, what value was bad, etc.) would be a welcome improvement to the firmware. The issue with a crash locking up the print menu also really just seems like a bug. Personally speaking, I'd also love an indicator of the Z axis height during the print on the main print display - the percentage alone doesn't quite do it for me, and a clearer indicator of toolhead temperature when parked but preheated on the bottom left of the front panel - little things to get some extra info to the user. I also hope google picks up on "prusa xl" as its own search term... in googling potential solutions, very often it would just omit the XL part and feed you info for fixing your Mini or MK4.
That was a lot, but hopefully it was useful.
RE: My first 5 days with my two extruder XL
Thank you for the detailed feedback. I am about to assembly mine.
Happy printing!
RE: My first 5 days with my two extruder XL
Nice write-up. I just went through a single to 5 toolhead upgrade and thankfully things went more smoothly
Personally speaking, I'd also love an indicator of the Z axis height during the print on the main print display - the percentage alone doesn't quite do it for me, and a clearer indicator of toolhead temperature when parked but preheated on the bottom left of the front panel
I don't find that print display particularly useful so I just switch back to the main display, and I put Z height and rotating temps for all extruders in the footer through the LCD menu.
Formerly known on this forum as @fuchsr -- https://foxrun3d.com/
RE: My first 5 days with my two extruder XL
Thanks for the tip! I didn't realize it was configurable in the menu. In the last few days I've been trying some multimaterial prints in the PETG parts with PLA supports configuration. The first one went pretty well, some good parts even with a tough print and some remarkable looking support material that held its shape and released cleanly. Then I swapped to a new PLA and had nothing stick for several prints.... I also had an odd issue where the slicer apparently told layers beyond the first to go to PLA temperatures and not PETG temperatures (I think it was set right, there was a warning of bed temperature mismatch, but I would assume you would ALWAYS want the bed to be at the higher temperature if there are multiple in contact with it), but with that GCODE I could manually set the temp after the first layer and get no bowing of the PETG parts, and I haven't seen the same issue since.
With a third PLA, I'm getting some sticking, but some failures with PETG sticking to the hotend and eventually gumming things up. I've tried reducing the contact distance, decreasing the interface loop spacing, and I think the adjustment I really need is a percentage speed decrease for that first layer that sits on the topmost support interface layer, but I have yet to be able to find it in prusaslicer. If it's not a feature, it's definitely an addition I'd look for. I've also watched it print that first layer on the PLA support and have the acceleration of a toolhead move to another part pull up the last tail of the PETG while moving away. Gives me an idea - maybe I need to try and just turn up the part cooling fan.
I'm probably more than 500 toolchanges since the last post (maybe a few more than that still) and haven't had a failure, the docks indeed seem to be well mounted. I'm seeing a little of first layer problems (the layer on extruder 2 seems a little too squished, and on some filaments its more obvious looking), and I think I need to do a load cell calibration? Maybe I'll try redoing the calibration pin too, but I've got to figure out if I can clean the PETG off the nozzle well enough for it to pass the circularization (?) test.
I hear just a tiny bit of a rattle-y noise in some specific movements now and by the sound, maybe it's the bearings in one linear rail carriage? I don't know if it's significant, and it doesn't happen often, but it is louder than other movements.
Finally, a note from assembly that I forgot about: nice choice in connectors. Those ivory colored rectangular connectors lock securely and clearly, are easy to attach, and have a release lever which also doesn't require much force. I hadn't seen them before, but they seem like a nice design and choice to use. I also appreciate how compact and well lain out the toolheads are - the stuff you may need to work on is easily accessible with few screws involved, but there's really a lot crammed into each toolhead. They aren't particularly lookers, but they seem to be very functional and designed with maintenance and troubleshooting ease as pretty high on the list of requirements.
RE:
The heated bed temperature thing just happened again, and no parts came off until 10 hours into the print, so that time is just lost.
Definitely a bug using full release 2.7.1. When printing filaments with different heated bed temperatures, the slicer should not change to a lower temperature than the one for the filament requiring more heat after the first layer. With PETG (80C) in toolhead 1 and PLA (60C) in toolhead 2 with correct filament settings, I *sometimes* get the first layer at 80C and remaining layers at 60C even though both filaments are in contact with the bed, and every time this has happened, the PETG parts have started to warp and lift off, causing the print to fail. This needs to be fixed.
RE: My first 5 days with my two extruder XL
The heated bed temperature thing just happened again, and no parts came off until 10 hours into the print, so that time is just lost.
Definitely a bug using full release 2.7.1. When printing filaments with different heated bed temperatures, the slicer should not change to a lower temperature than the one for the filament requiring more heat after the first layer. With PETG (80C) in toolhead 1 and PLA (60C) in toolhead 2 with correct filament settings, I *sometimes* get the first layer at 80C and remaining layers at 60C even though both filaments are in contact with the bed, and every time this has happened, the PETG parts have started to warp and lift off, causing the print to fail. This needs to be fixed.
A workaround is to create a profile for the filament with the lower bed temperature, and make it a higher temperature. Call it PLA 85C or whatever. Then use it as a support filament. Kind of crude but I found it to work well enough.
What brand of PLA did you find worked well as a support for PETG? What didn't work?
RE: My first 5 days with my two extruder XL
Yeah, I've just been setting the bed temperature manually after the first layer and it's been fast enough to work.
So far I've tried three, all older spools (at least a year) that have been stored in a relatively dry environment. All three using Overture 3D PETG as the filament for the parts.
First one was old Prusa (pre Prusament) filament that came with my MK3S in metallic grey - worked well with stock Prusament settings and the final result was basically as good as old single filament support settings on the MK3S
Second was FilaCube Ivory White, prusament temp was too high, so dropped it down to 215C and couldn't get a successful print with it, though I've still got a little left
Third was some CC3D Silk Silver PLA, and it seems to stick reasonably, but I've been tweaking the settings and the model to try and get better results. I think it will work, but that last 10 hours in print was going to be the best check of it, and is now 15 hours out from being redone with the heatbed at the right setting 🙃
I think I've got some Sunlu, Overture 3d, and HobbyKing partial spools that will be first up for subsequent attempts, but hopefully I can find something that sticks pretty consistently and isn't expensive. Also submitted it as a bug report on the github, with a feature request for a percentage speed reduction for the first layer that sits on top of a dissimilar support material - will probably make a big difference in getting those materials that stick but not super well to play nice with each other.
RE: My first 5 days with my two extruder XL
A workaround is to create a profile for the filament with the lower bed temperature, and make it a higher temperature. Call it PLA 85C or whatever. Then use it as a support filament. Kind of crude but I found it to work well enough.
This works. What doesn't work is just set the bed temperature higher for PLA, then slice. Strange and a very stupid oversight.
You can choose support/infill/perimeter extruders, why not just add a "bed temp extruder"?
You used to be able to modify filament settings for a print without having to explicitly save them; PS would just auto generate "[filename](modified)" name for each modified filament in your 3mf if it didn't match an explicitly saved filament profile. At some point somebody changed/broke something and now you have to explicitly save filaments or you might not get what you expect.
XL-5T, MK3S MMU3 || Printing with multiple nozzle-sizes: Official Guide, Unofficial(old) || PrusaSlicer Fork || Other advanced slicer tactics || TPU || HF Nozzles
RE: My first 5 days with my two extruder XL
It is a massive oversight. If you can mix filaments it makes zero sense to change the bed temp on every toolchange. Next time I need this I'll just write a script to replace it in the gcode, but what a pain...
RE:
I go into filament settings, change the bed temp for extruder 1 to 70 degrees, then switch to extruder 2, click Keep when prompted, repeat for other extruders, that seems to set the bed temp for all extruders.
Formerly known on this forum as @fuchsr -- https://foxrun3d.com/
RE: My first 5 days with my two extruder XL
A dozen or two failed prints later, I have some good results. I tried HobbyKing green PLA (a few years old) with very little adhesion, then 3D Solutech Aqua Blue PLA with very little adhesion, then Monoprice High Gloss Blue Green PLA with some adhesion and then Galaxy Black Prusament with some adhesion as well.
In both of the some adhesion filaments, you could feel a little stick with the first layer, but then the solid infill would rip up somewhat at the border with the perimeters, and this usually would either tear the piece off or gum up the nozzle head and cause problems elsewhere.
With stock speeds and accelerations, I could not get any of my remaining filament to work, even decreasing the contact distance to zero and the loop spacing to zero (with 3 interface layers), so I started slowing it down, first the acceleration of moves and solid infill, then the speed of the solid infill too.... and I got some results.
I managed to print pretty reasonable quality parts with a pretty difficult model to print using both the Prusament and Monoprice as the support material. And while the adhesion was enough to stick the parts down (though I may be seeing just a slight bit more warping on long linear edges), it released easy enough for the PLA support material to come completely away from the part in a single piece! Pic included because seeing is believing.
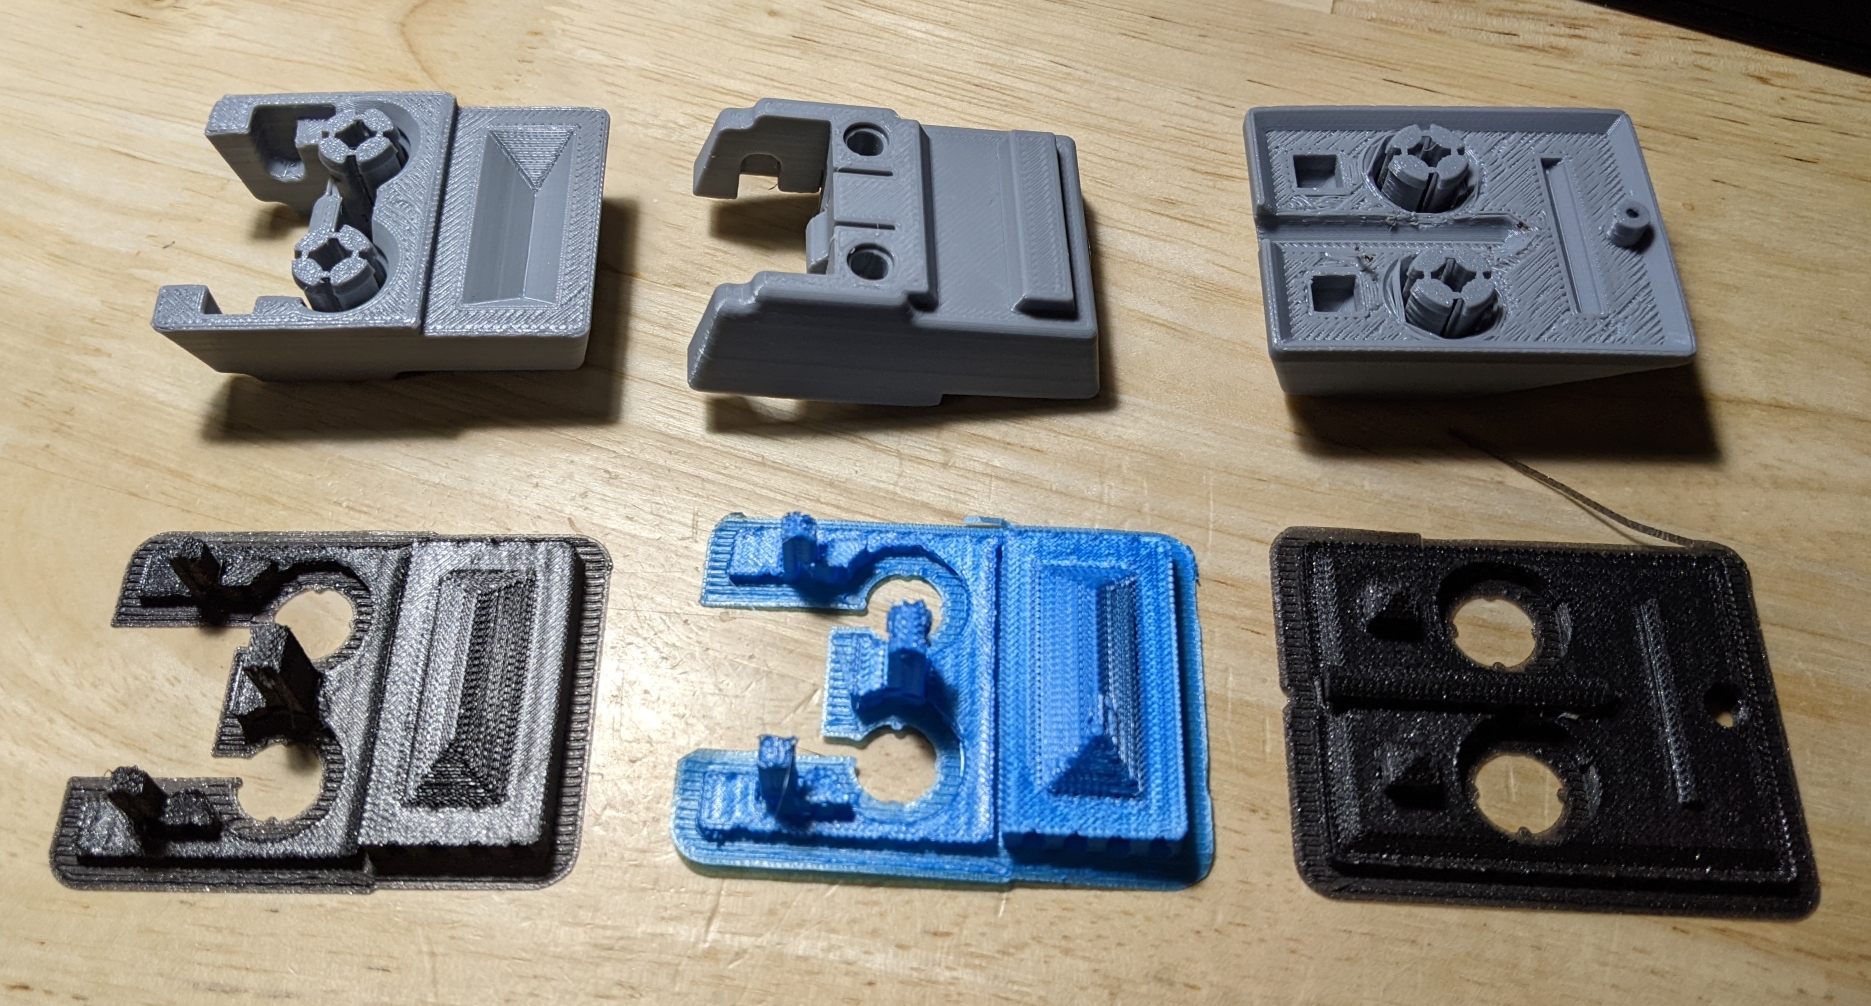
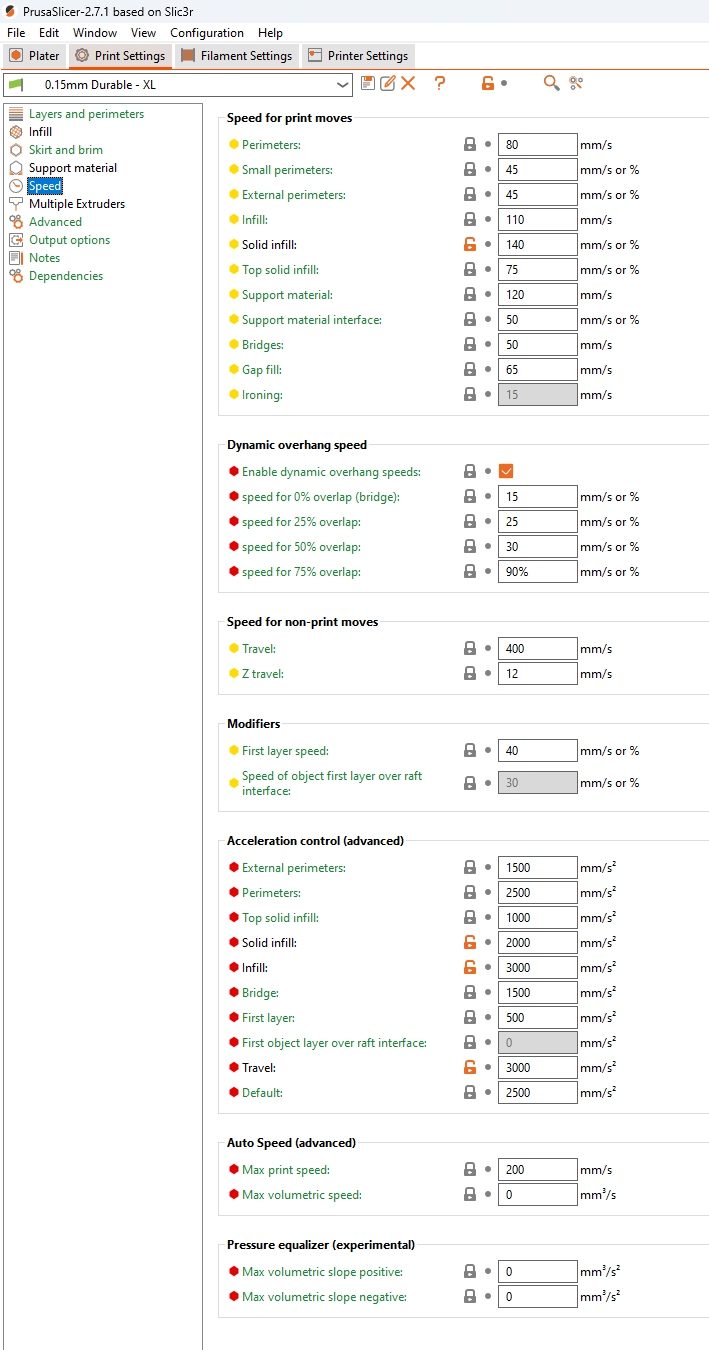
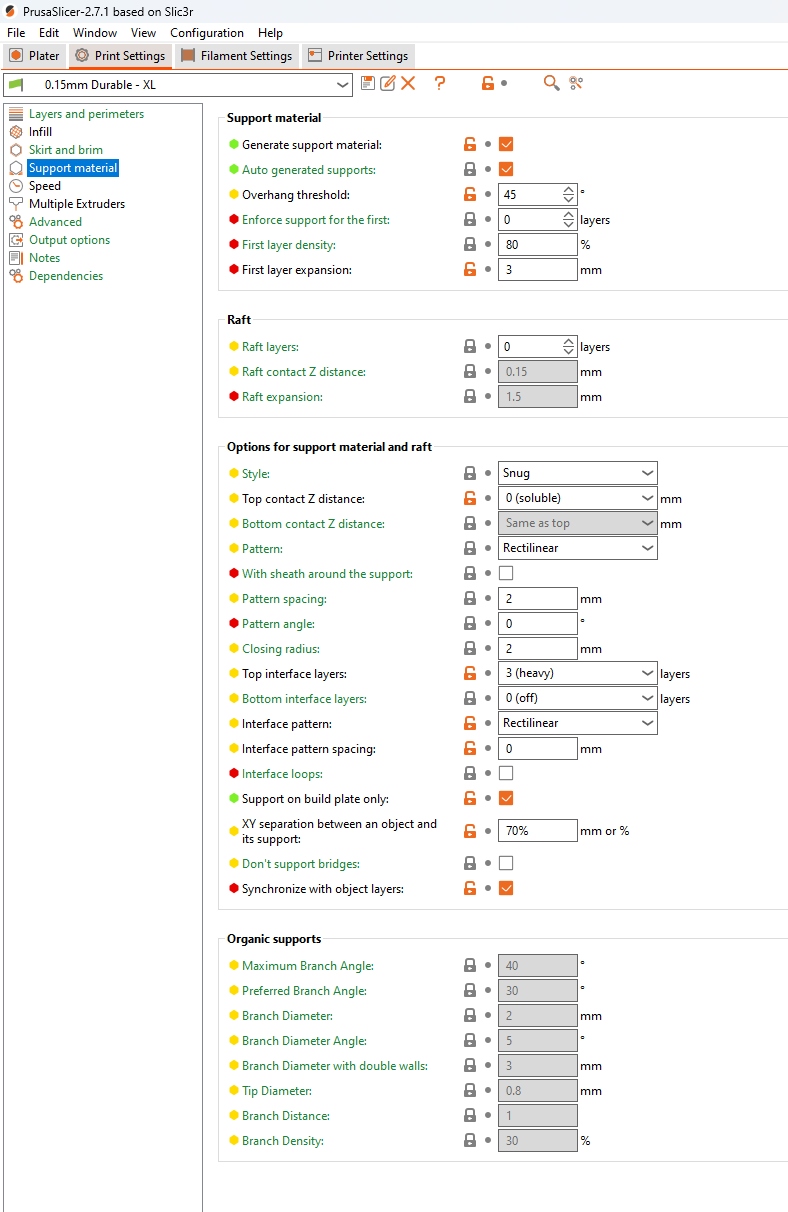
I've also attached images of my PrusaSlicer settings to get these supports to stick well enough to the PETG parts. These slowdowns make a ~15.5 hour print into an 18 hour print, so it is notably slower, but the ease of post processing is really something, and since the old Prusa filament could actually get a working part in my first attempt (no speed reduction), there may be PLAs that stick better than the ones I've tried out there. Also worth mentioning that if PrusaSlicer allows a setting to slow the first layer deposited on a support interface, this 2.5 hour time increase could probably reduced to 10 minutes or less. Would love to make it happen.
I think next up for my testing is PETG and TPU to see if I can make some flexible joints, but I've got some 3d modeling to do before that's happening.
RE: My first 5 days with my two extruder XL
I made a few experiments with TPU 98A and PETG and found it sticks together like crazy. There might be no need to interlock the parts. PLA + TPU 98A sticks, but peels off so easily that I'm sure you could use PLA supports for TPU with zero contact distance.
RE: My first 5 days with my two extruder XL
When did you place your pre-order if you don't mind me asking?
I figured I would write some thoughts about my first most-of-a-week with my XL, with the hopes that it will help someone else in early troubleshooting, assembly, or help refine the design/directions somewhat. I've had a MK3S for about 5 years now and have made thousands of parts on it, but I haven't built a printer since then, and there's a good bit of tech that's happened in the meantime (texture bed shortages were when I picked my last one up, so I still used glue stick to hold down everything.)
I got my printer on a Tuesday in the US, after completing my preorder the Thursday evening prior. I was sort of expecting to have to wait a month or two with the preorder fulfillment claims of "by May", but they shipped as soon as they could and DHL did their job (though I did get hit with the import duty.) I didn't have time to actually unbox anything Tuesday, so Wednesday was my designated build day.
Getting it unpacked, everything seemed to be present, easy enough to spot, and secure in transit. Even got the XL size Haribo (1 kg!). My dual head model shipped with the 0.4mm nozzles and the 5.1.2 firmware, as well as injection molded spool holders, the center mount wifi antenna, and the nozzle cleaning piece preattached to the toolhead docks. I used the online assembly manual available at the time (February 7, 2024.)
My first little hiccup and suggestion come in the early assembly - when attaching the vertical extrusions to the base. I like the little torque wrench tool that's included - a clever and useful design - but the narrow size of the extrusion slot and the thickness of the plastic of the tool make it a pretty tight squeeze to get at the M4 bolt head, and since the torque needed is actually fairly high and you need several full turns with the wrench on because of the way the parts press together, I actually managed to slightly round the allen wrench's edges and make it difficult for the tool to be fully engaged in attaching the extrusions to the base (early on). I've got another allen wrench made with tighter tolerances and from better steel, so I could get it together, but I think there's some room for improvement here: either including a second allen wrench as a spare, or better yet, sourcing and including M4 bolts with deeper head sockets. Even 1mm deeper would mean a lot more engagement with the sides of the tool and a lot clearer seating in the bolt, so you're less likely to apply force to the wrench when it's a little at an angle and then ruin the edges of the tool. Better still, deeper bolts would just be a drop in part replacement without interfering with anything else. It's also worth mentioning that a torque measurement for the bolts would be great too - if someone wears their supplied tool out, no other allen key is going to flex the same way so the printed torque wrench won't be a good measure - just having the number means someone with access to proper tools (or power tools for quicker assembly) can do it without the printed one.
In any case, assembly continued. Cable routing was a little finicky, but held in place when you got it, and the technique of getting both ends of the extrusion cover and then pressing in the middle was a good one - I just wished I caught it before marring the end of one of the front ones. Oh well. I was surprised at the attention to the ground between metal parts, and I wonder where the emphasis came from (a requirement in industrial environments?), but it was easy to do, feels quite secure, and is probably a structural addition to the side panels too.
When I got to putting the back on, I ran into some inconsistencies with the directions. Notably, the cables for the right side (left side when working on the back) LEDs was not attached (no mention of attaching it in the directions and the cable is physically behind the LCD cable in the images, so it was tough to tell whether it should have been in the loom for that side initially), and the cable I eventually found out was for the filament sensor was just sort of hanging there and had no indication of where it was supposed to be going through (the hole in the plastic corner piece for the metal cover on the right side.) It wasn't going to mess up the build, but in both cases I ended up having to come back and redo steps once I actually understood what was supposed to be happening, and for directions which really consistently walk you through the details, this omission seems like an oversight.
At this point I realized that the Haribo steps may actually not be consistent with the version of the parts I got - when shipped the 1 kg bag of standard size bears instead of the tub of large size bears, a single one was a little on the lean side for the calories expended in building the printer.
When I got to attaching the docks, I had a couple more little oddities. Apparently one of my toolheads had a twist in the flat plastic cable anchor piece, not apparent as a problem when preparing the extruder, but when I actually mounted the dock, it bent back on itself in a strange way and I needed to open the orange clips along the way to get the twist. When mounting the extruder dock, it was clear enough how to do it and how to tighten it to the point of not moving.... but this wasn't actually enough. The very small lip on the dock that fits in the center of the profile to make it aligned correctly isn't deep enough to really feel locked-in when first mounted, and there may be some amount of settling that the parts do, so while I watched the video and mounted the docks as tight as I could get the screw, both of them needed to be realigned and retightened after attempting (and failing) the docking calibration. By eye, the docks seem to be seated properly just slightly past 12 o'clock (looking from the back) so they are not completely vertical, and I got another quarter turn at least of tightening down on both docks after a few toolhead docking impacts. They're secure now and the calibration hasn't been moving, but having to do that docking calibration half a dozen times before the first print was an annoyance, for sure. I think a tiny bit more protrusion of the lip that goes into the extrusion slot on the dock would make the feeling of being aligned a little better defined and may help with reducing error in this step.
The docks I got had the nozzle seals installed, so I ignored the installation and adjustment steps, but it wasn't as clear as other sections that the versioning meant for you to skip the adjustment.
A side note with the U.Fl antenna cable connector - I found it annoying to attach and have broken one of them on a board before - the answer is to not use your finger. Get a flathead screwdriver or something and press on the connector with the flat side with your finger, it seats much more easily.
Once it was assembled, I got to calibrating, and while I followed the online instructions, it definitely felt like following what was on screen was the important part, and I ended up missing some details because of that. I had to redo the dock position several times after tightening the dock bolts (mentioned above) and ran into issues in the calibration pin steps because the on screen info was pretty sparse - the pin had not yet been mentioned in the manual, and while it is certainly in the online manual steps, I was neither sure what part or what to do with it at first glance from the instructions on the screen. I eventually figured it out - not hard to realize what's going on once the toolhead is probing it - but perhaps clearer instructions on the LCD (or just an extra point to read it in the manual the first time) would have saved me a few minutes of attempts.
Then it was ready, right? I figured I would start with the presliced stuff, so I started with the first layer test. 144 mesh bed calibration points for a 30 minute print is...... wow. I can appreciate the thoroughness, and have noticed that for prints that don't use the whole bed only the part in use gets probed... maybe there's still a way to reduce the length of this step. Maybe the full 144 the first time, then just every other point on the grid to check vs. the stored calibration and only redoing all of them if enough bowing is measured vs that first one. I think I had a toolhead change issue on this first print, tightened the dock, ran the dock calibration, and tried again, finally getting a print. I was also pretty surprised that it took 12.5 minutes to fully warm up, home, calibrate, and soak to start before the printing actually began... in the same way as the bed leveling, it's a very hefty overhead for a smaller duration print, and maybe there's a way to do some consolidation of heating steps or similar to reduce this.
The first print had very noticeable layer shifting, in no small part because of 25 Y axis crashes and at least one manual resume. I looked up the issue, found the belt tensioning guide (and neat tool), and redid the tensioning on my belts. Both were too tight from the factory, and honestly, getting the tension is going to be important for maintenance going forward, so personally, I would have liked to have seen belt tensioning as part of the build steps and just have you check it before the printer's first print. I had crash detection on and set to low sensitivity.
I made some adjustments, got it to the green zone in the tool but still had the occasional slip on the Y axis (mostly when the toolhead was moving quickly, diagonally, in the front right quadrant of the bed.) I eventually tightened it something like a quarter turn from the center of the green on the app and from pretty close to matching pitch when strummed, and while it wasn't at this point in my testing, I've had several prints now with no crashing at all.
On the third attempt, the first layer test print came out with no layer shifting, so I figured I would start with something more substantial - the planetary gear demo. I loaded it up and went for a walk around the neighborhood. Half an hour into the print, I came back to the sound of extruder motor skips and what looked like several layers worth of one filament just not coming out. I was using two Prusa PLAs, the one still working was the original pre-prusament spool of silver PLA from my MK3S and the one that had jammed was the Prusament that shipped with the printer.
I started looking up how the extruder was put together to try and see what was wrong - reloading didn't help, there was worn off filament on the side that had been through the extruder gear, and even with higher heat and the idler off, I couldn't manually force any through. I got on the text support line and waited something like 45 minutes to get connected, but the person I eventually spoke with seemed to know what was going on, went through a bunch of steps to make sure it wasn't other things, and then advised me to pull the hotend for further inspection. A few hours went by, I had time to actually do it, did so, and got back on the line with tech support - it was clear there was filament jammed in the heatbreak tube that didn't seem possible to push through.
As I've got some equipment for soldering handy, the eventual course of action was to heat the hotend assembly sufficiently to try and get the filament through, then I cold pulled it using nylon. It took quite a bit of heat and time, but eventually I got it out, and could see through to the nozzle hole from the tube end of the nozzle, but as soon as I pushed PLA into it, I felt considerable resistance only 20-30mm into the tube. At their advice I put it back on the extruder to check again, but as before I got extruder skips and no extrusion (and apprently I undertorqued the grub screw, since the extruder skipping actually produced visible shaking of the nozzle tip.) It was clear there was something catching on the side of the nozzle's heatbreak tube and dragging on the filament sufficiently to make it stick. I took some pictures and a third support agent sent a replacement along my way. In one of those last pictures for the support chat, I spotted a tiny, barely visible triangular dent in the lower ring of the heatbreak (the slight dimple to the right of the brass sleeve in the picture), and I'll bet that was the cause, probably originally dented when the grub screw was tightened down at the factory.
The next day, since the troubleshooting went late into the night, I decided I would at least test the single extruder abilities of the printer, since I had things to print and at least several days of wait on the part. I loaded up PET to the second extruder using the filament menu and got a temperature error that reset the system - not because of the extruder being used, but because I had removed the whole hotend from the first toolhead. It progressed alright, though, and I sliced up my first GCode for the new machine. I was already familiar with Prusaslicer and had my own filament profiles to use for the brand I wanted to use, so I put it on the USB stick and got going. I wanted to do things over wifi and PrusaLink, but couldn't get it working in the short term because of the limitation that the printer doesn't like 5GHz band wifi networks. While I understand it's probably a price premium, on a $2500 machine and for the convenience of not having to use legacy connection settings on your router, a wifi module that could speak current generation wifi would have been nice.
In any case, I started the print, it seemed to go well enough (I think close to 12 minutes again to the start of actual printing), and eventually got through the print by the next morning, but there were a number of crashes along the way. They were the same Y axis crashes I had seen earlier, but for some reason, when it would crash, recover, and rehome, it would then just stop progressing. The printer main screen would return to the one with three buttons and it would say the print was ending but that the nozzle was still heating, and you could not use the jog wheel to navigate to the center or left button, you could only click on stop. If you clicked stop, you could cancel or undo (the jog wheel was working), but you couldn't actually get the print to start again. My hacky solution was to force a power panic by switching off the power supply... and this worked and verified that the power panic seems to be pretty robust. In all, I probably had 3-4 power off resets required because the printer had a Y axis crash, properly recovered and rehomed, and then just didn't want to print for whatever reason. When finished, I had some layer shifting on the lower portion (the final quarter turn of belt tightening happened after this print, solving this issue, but I hadn't gotten there yet by this point), but it came out well. The textured bed meant good adhesion and then release using PET without anything on it, the dimensions were accurate, and the surface finish was more consistent than on the MK3S (also a bit shinier with some fine strings, I wonder if these extruders are just a couple degrees hotter than the MK3S that has had years to drift since it was last calibrated.)
I made some revisions to the print (for a project) and went to print it again, expecting most of the same but now with the belt tension good, and I got about an hour in before a full red screen emergency stop....... for thermal runaway protection? Without changing anything, and knowing that the extruder was operating correctly when it stopped, I reprinted it..... and it completed, without issue, and looked basically perfect. There was no thermal runaway. What happened is that the -25C or whatever the printer was reading from the unconnected thermistor on toolhead 1 (totally unused in the print) triggered the emergency stop (which didn't even lower the bed, so it just parked the hot, working hotend into the print.) It hasn't errored like that since (and probably won't since reattaching the thermistor,) but this is probably a good indicator that the printer firmware needs a bit more per-toolhead compartmentalization of checks. Both this and likely the filament load error restart above could have been prevented if the temperature checking for the toolheads were limited to the ones actually used in the print. It would also be helpful on the error screen for it to tell you which toolhead had the problem (if you have 5, it could be tough to spot) and even better, what the temperature reading/fault trigger was.
Today rolls around and the replacement nozzle arrives (a day ahead of schedule). I place it in, run the calibration pin cal, come up with an error, tighten the grub screw slightly, get past the error, get an error on the second toolhead's calibration (presumably the filament on the outside of some of it), and eventually get back to the point of trying the presliced planetary gear model. It prints without a hitch, and the assembly spins freely right off the print bed (though that one seam on the outside doesn't look the greatest :p)
So next up, I get to properly test multimaterial functionality. Probably first some PET parts with PLA support, then something with flexible and standard filament, and then hopefully using some old (but dry) PVA filament as a soluble support. I really was doubting the reliability and maturity of the platform in those first couple of days, but since those early teething issues and the replacement nozzle, it's behaving a lot more like a printer that I can depend on and which I'd like to replace the MK3S as my go-to.
I'd like to see those clarifications and updates made to the assembly guide, including a step to check belt tension by default and a little more explanation of the calibration pin on the on screen directions on the printer itself. A couple of minor part changes should make assembly a little easier and a lot easier to get right (deeper M4 screw heads, a slightly larger ledge on the part of the dock that goes into the channel in the extrusion for alignment). And at least for my unit, maybe a little more QC on the nextruders, since I had one come through with an (albeit slightly) overtightened hotend grub screw and the twist in the flat plastic support for the umbilical. A future electronics revision with 5GHz wifi support would be welcome, too, and a little more compartmentalization between toolheads for error checking as well as a little more detail on the error encountered (which toolhead, what value was bad, etc.) would be a welcome improvement to the firmware. The issue with a crash locking up the print menu also really just seems like a bug. Personally speaking, I'd also love an indicator of the Z axis height during the print on the main print display - the percentage alone doesn't quite do it for me, and a clearer indicator of toolhead temperature when parked but preheated on the bottom left of the front panel - little things to get some extra info to the user. I also hope google picks up on "prusa xl" as its own search term... in googling potential solutions, very often it would just omit the XL part and feed you info for fixing your Mini or MK4.
That was a lot, but hopefully it was useful.
RE: My first 5 days with my two extruder XL
February 4, 2022. The preorder actually came up right at the end of last year, but I was traveling a the beginning of the year so I held off until February.