SL1S First Print!
Just got my first print off of the SL1S / CW1S! worked out beautifully, printed the Prusa-drum test print in exactly one hour and the quality looks great!
Trying out the tower now, I'm getting kind of a weird "hammering" type sound when the tilt starts, then it drops down very slowly, rises back up, and exposes the next layer. Seems to only happen for the first few layers, then goes away. Wonder if it's trying to ease the separation or something? Happened once with the drum test print, but a lot more with the tower test. I'll have to continue playing with that, it sounds like a gear slipping or something, really weird. Print came out great!

Hmm...
Second print, attempting the pre-sliced tower file, was a mixed bag. The tower printed reasonably well, was *extremely* difficult to detach from the platform, and the printing appears to have dealt irreparable damage to my FEP foil on only the second print, it appears to be a large stretch-mark of some kind. Perhaps the default setting is a bit long on the first-layer exposures for the more powerful LED array on the SL1S? I suspect I now have a better idea what that "hammering" sound was during the initial layers, as there's a visible distorted segment completely up the side of the tower that matches up just about perfectly with the crease pulled in the foil. I suspect it over-cooked it slightly, and was having problems tilting the vat away from the print, causing the noises I was hearing. Little bit disappointing, given that these were supposed to be the "ready to go, runs perfect" files.
On the upside, the vat does not appear to have leaked a drop, anywhere, of any kind, nor did the resin appear to be making any progress toward moving under the flange on the vat.

Onward!
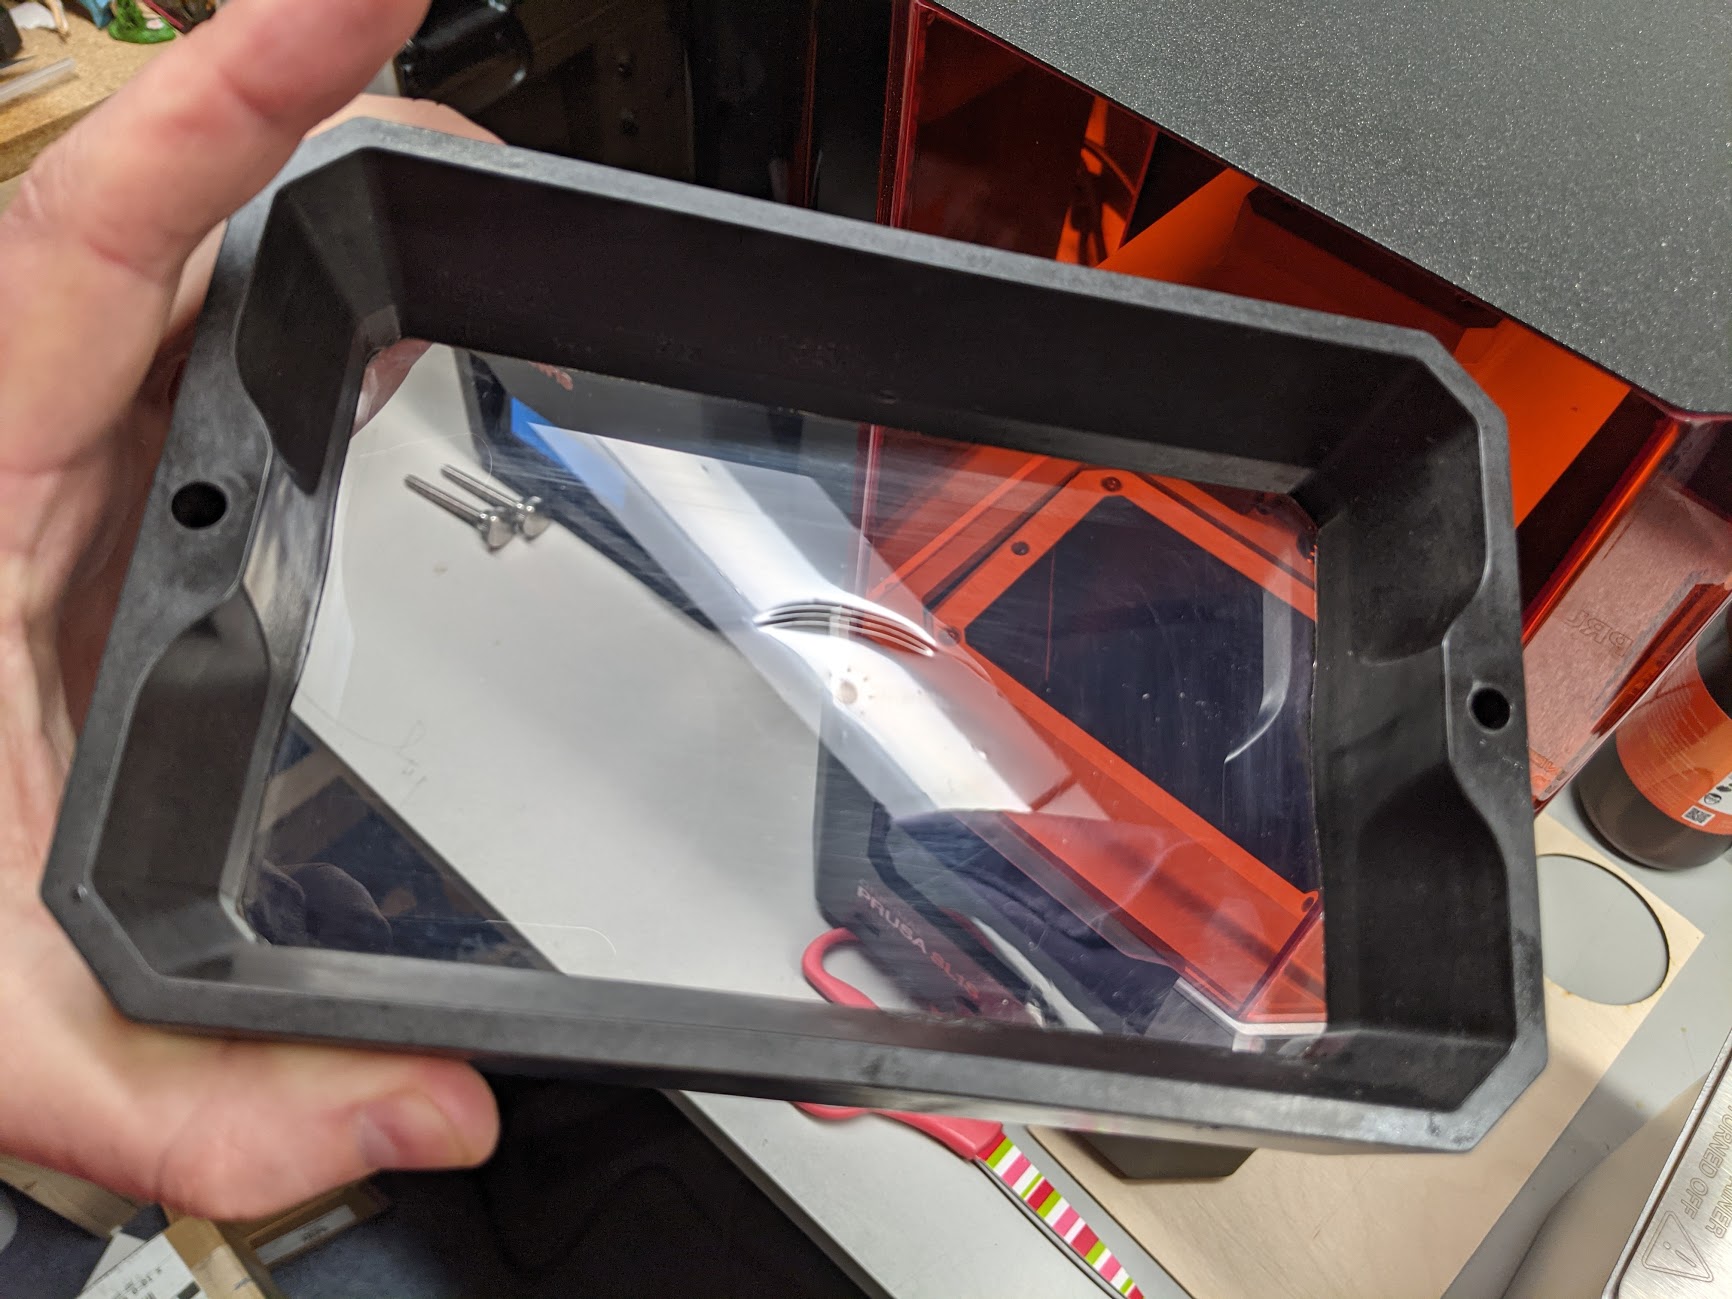
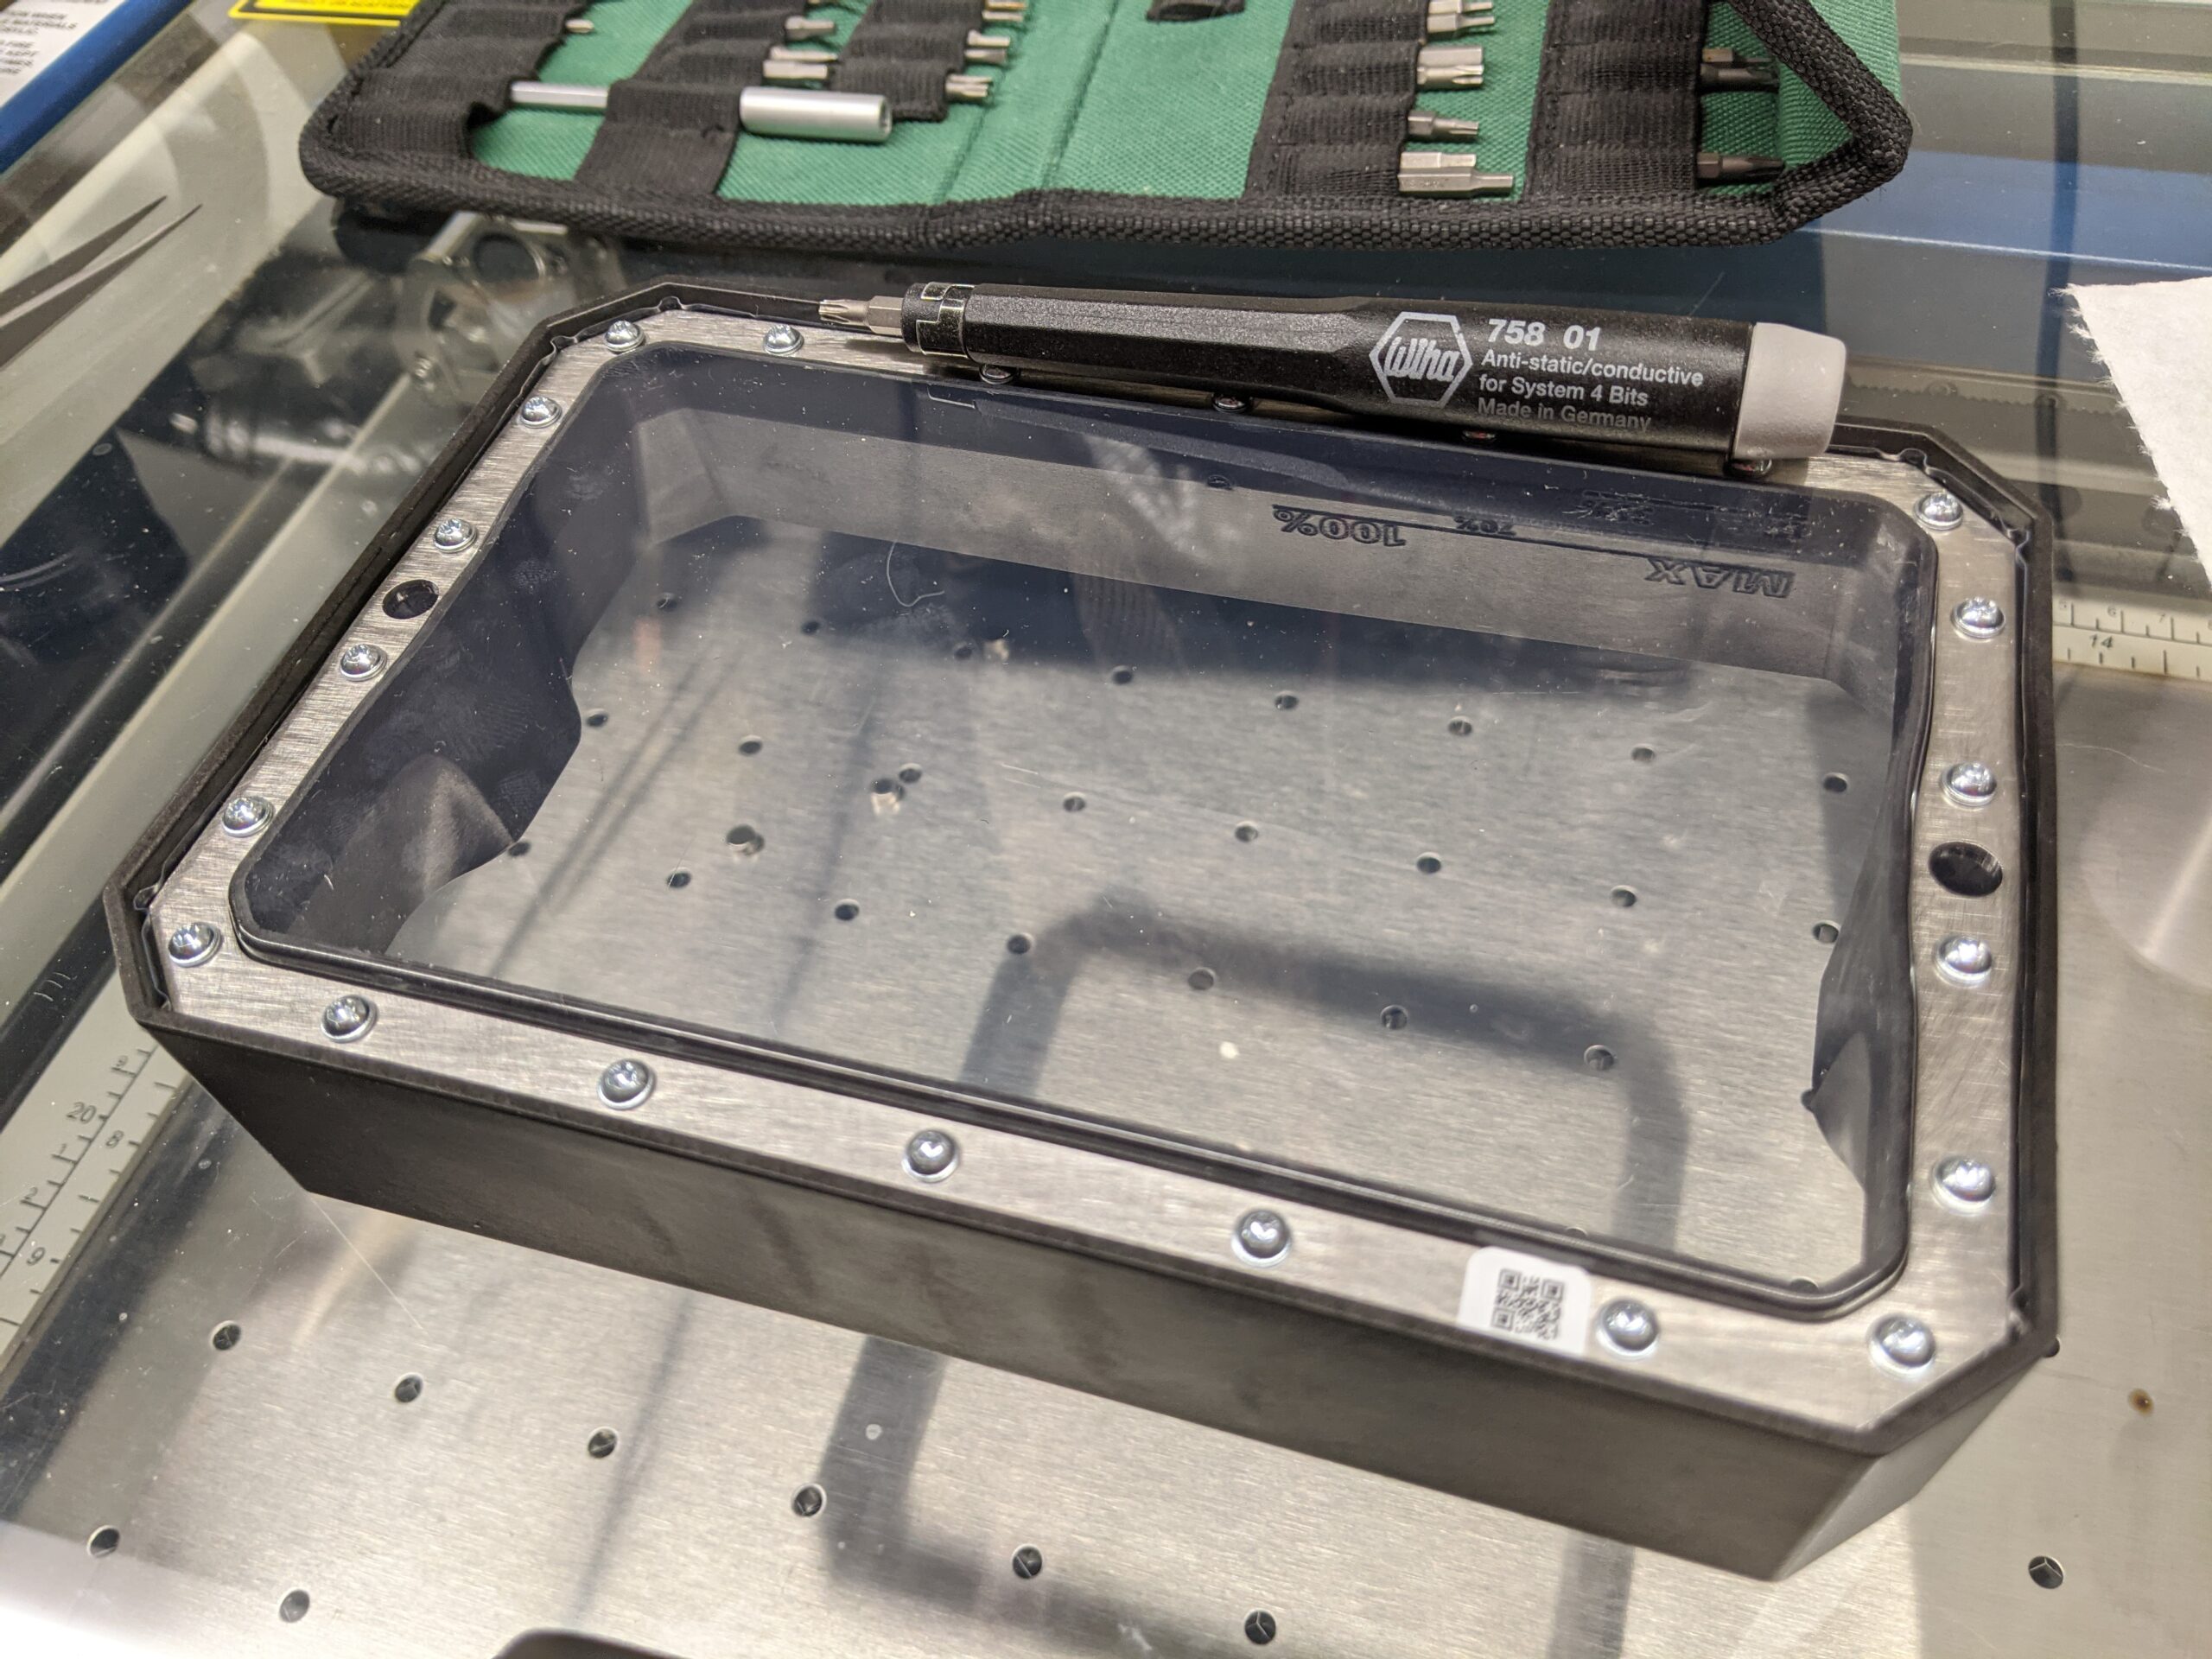
So, after talking with Prusa support, they suspect my calibration might have been a bit off. I'm not entirely sure about that, but I've swapped the FEP foil and I'm running a four-hour water test, then I'm gonna give it another shot. This tank is an *exercise* to change the foil on, it fits together beautifully, but those little wood screws fit the plastic tank really, really tight. The included torx driver was insufficient, I couldn't keep it from hopping on the screw heads, so I swapped to my Wiha precision driver that worked, but was marginal for applying enough torque.
Waiting out the water test, and I'm going to give it another shot!
You might have been able to print fine with that stretched bit, but better safe than sorry. I've had a similar mar on my FEP since shortly after I installed it, but 30 or so prints later and it's never been a problem.
The FEP retainer looks the same as the old tank and I agree about using the included wrench. I use my own driver instead. Are they still doing the precut FEPs where the holes are cut but not removed? The static charge on the FEP made those discs a PITA so now I just use cheap no name FEPs off Amazon. Poking the holes and trimming the edge is much less annoying in my opinion😄
Better!
The FEP foils I've got in the package have the holes both cut out and removed, with the hold-down screws un-punched, as before. Really easy to work with, just pushed the screws through the hold-down ring and the holes in the foil, then put it onto the basin and snugged everything down in three rotations. First one just to set it and get everything aligned, make sure the screws were threaded properly, second round to about halfway, third snugged it up tight.
I won't complain to see the end of those discs🤣
Success!
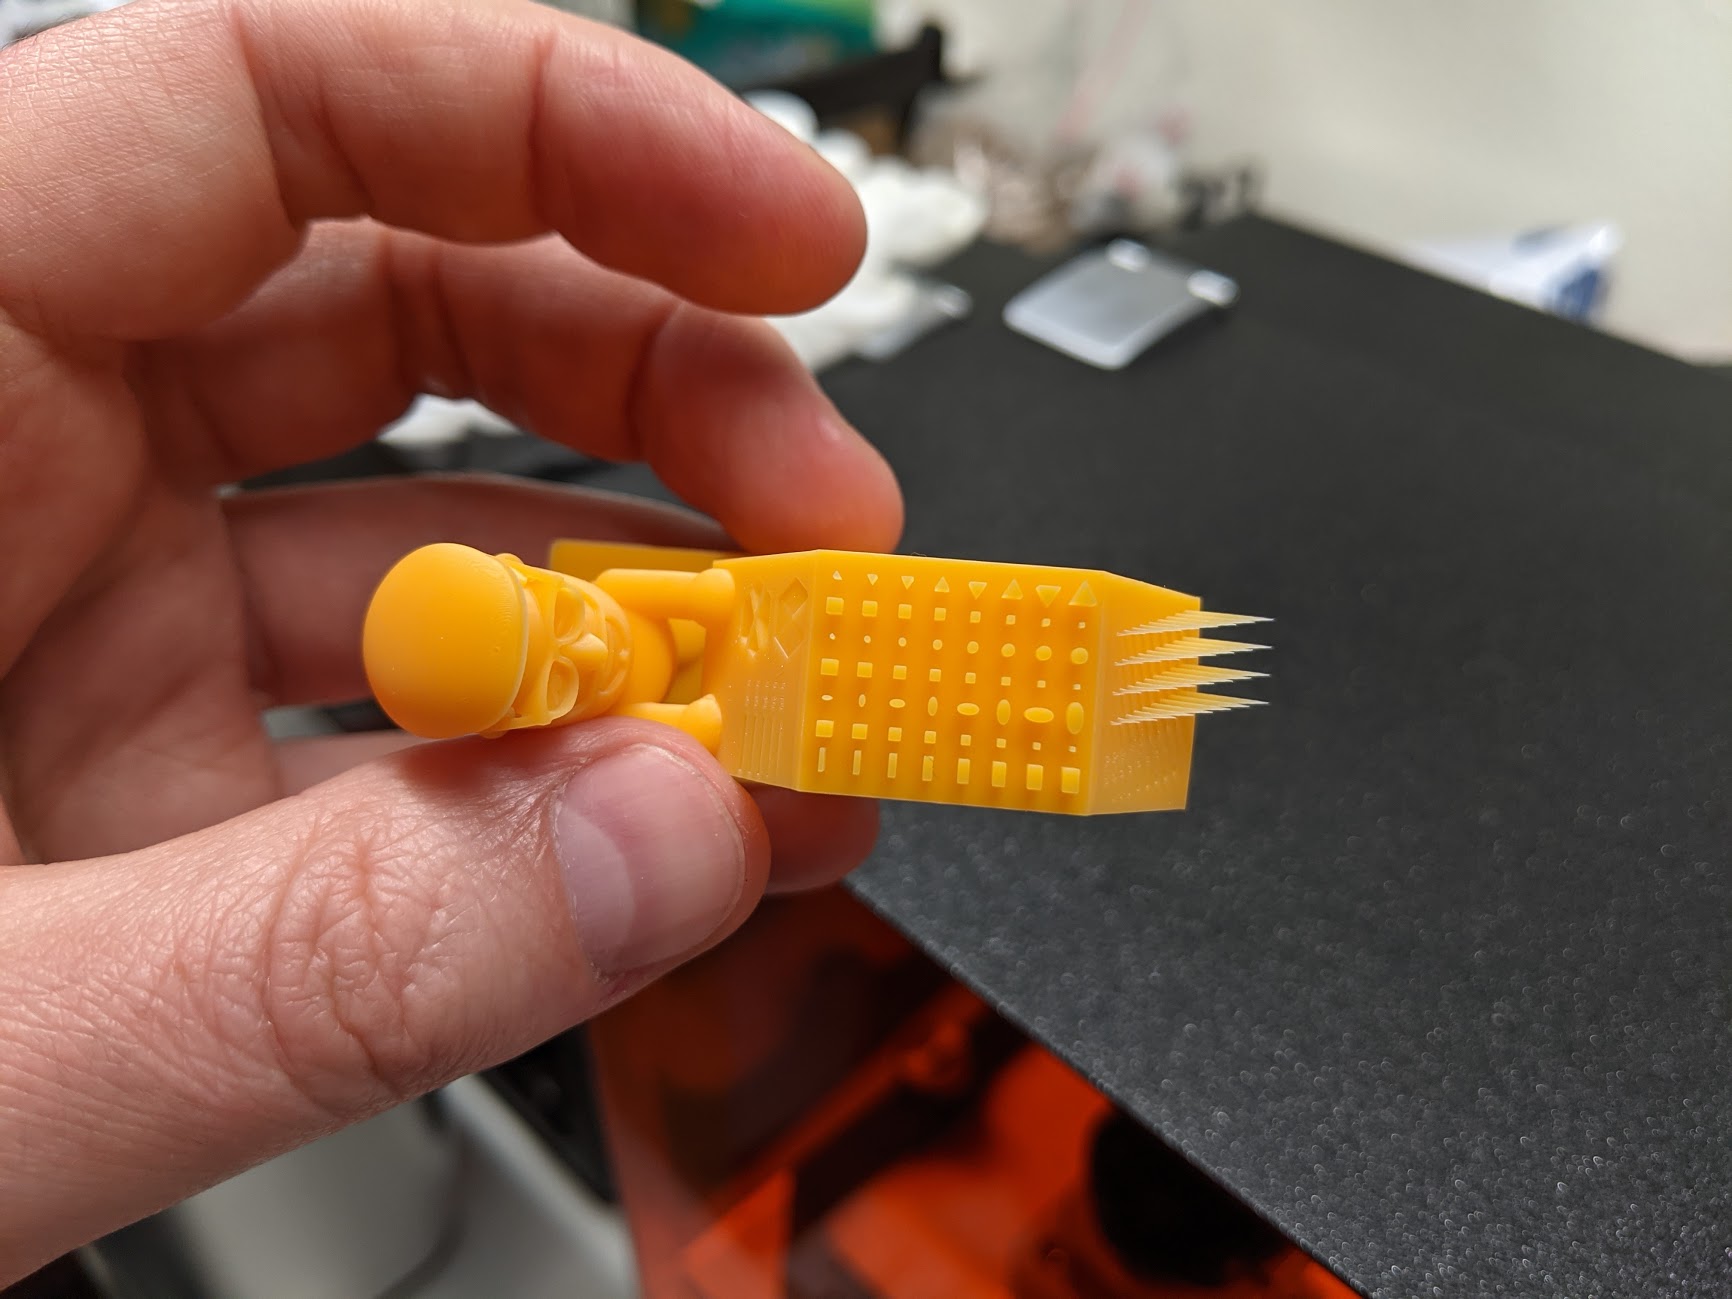
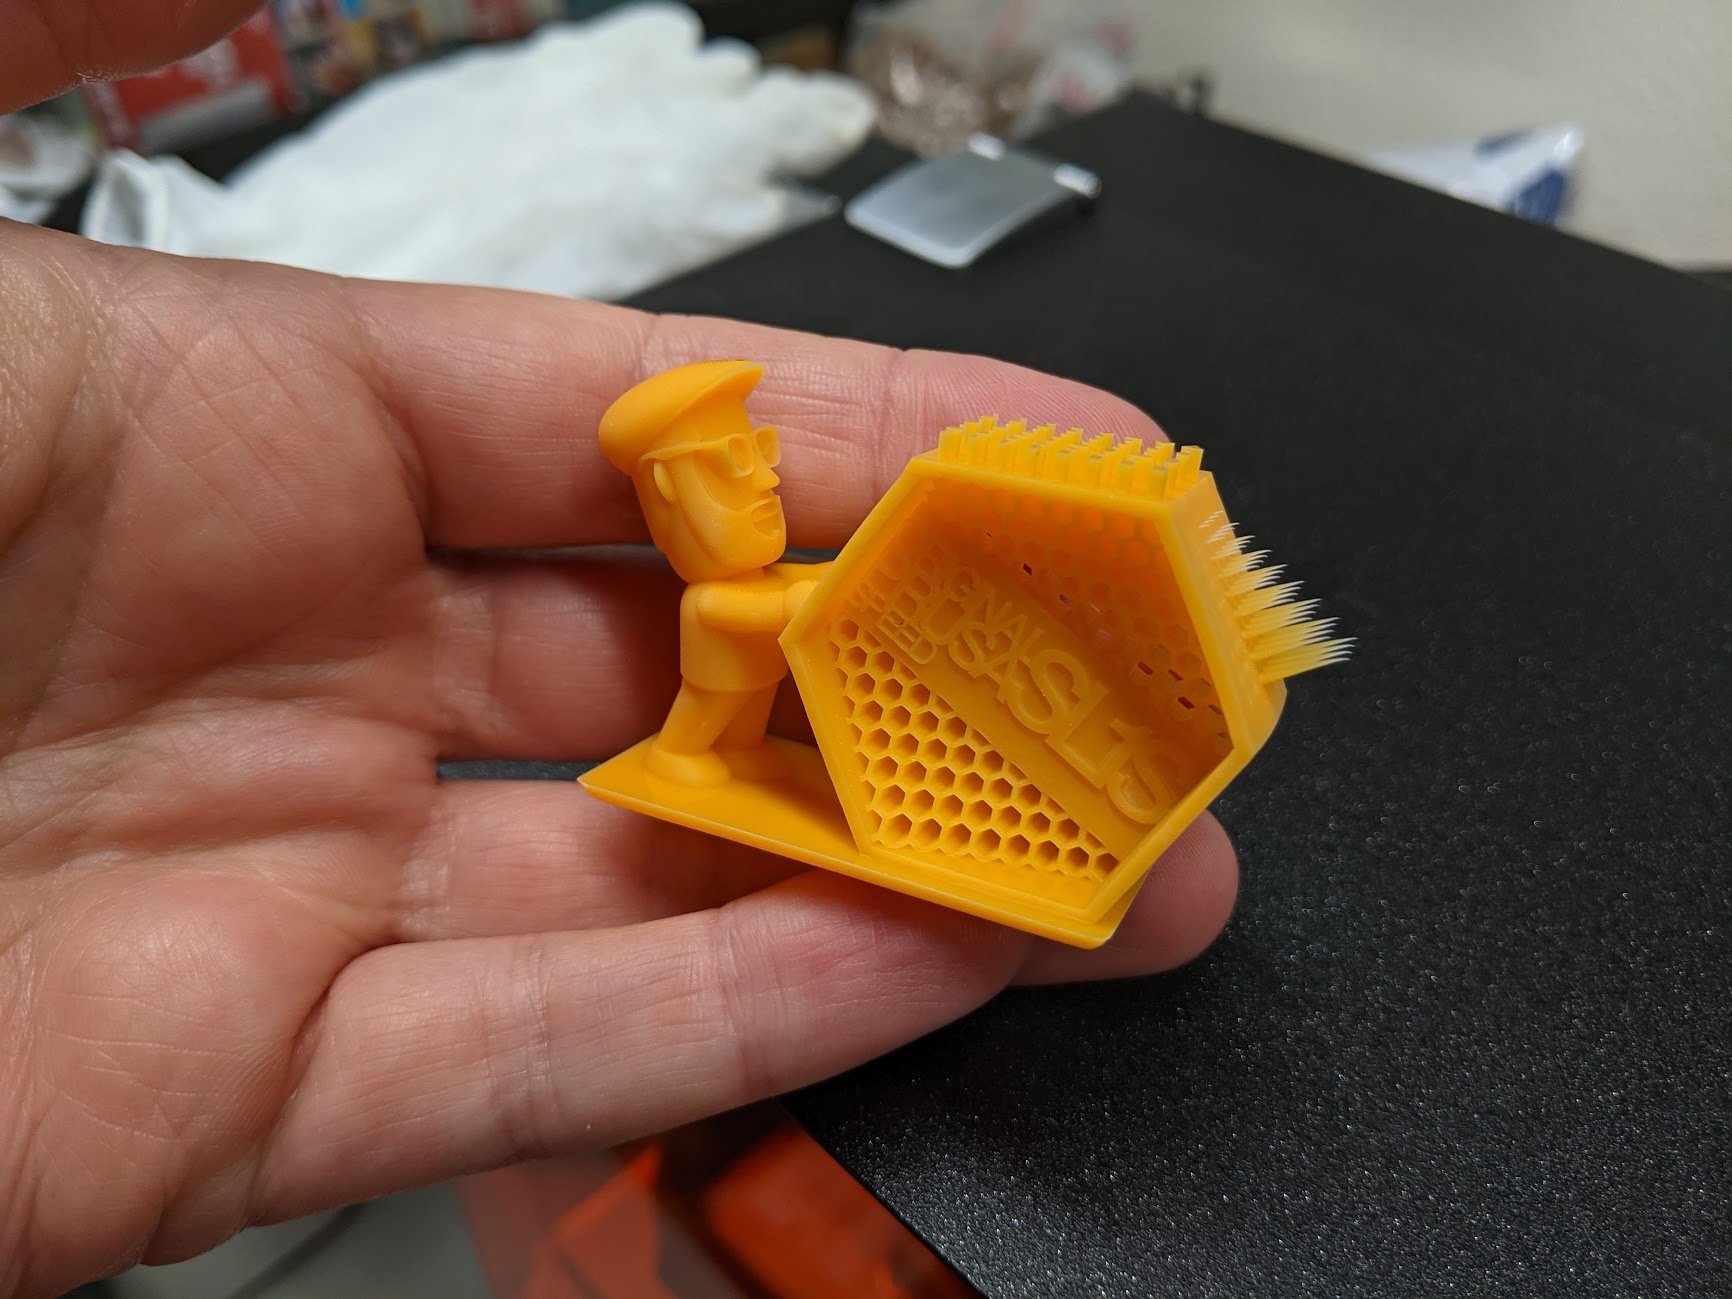
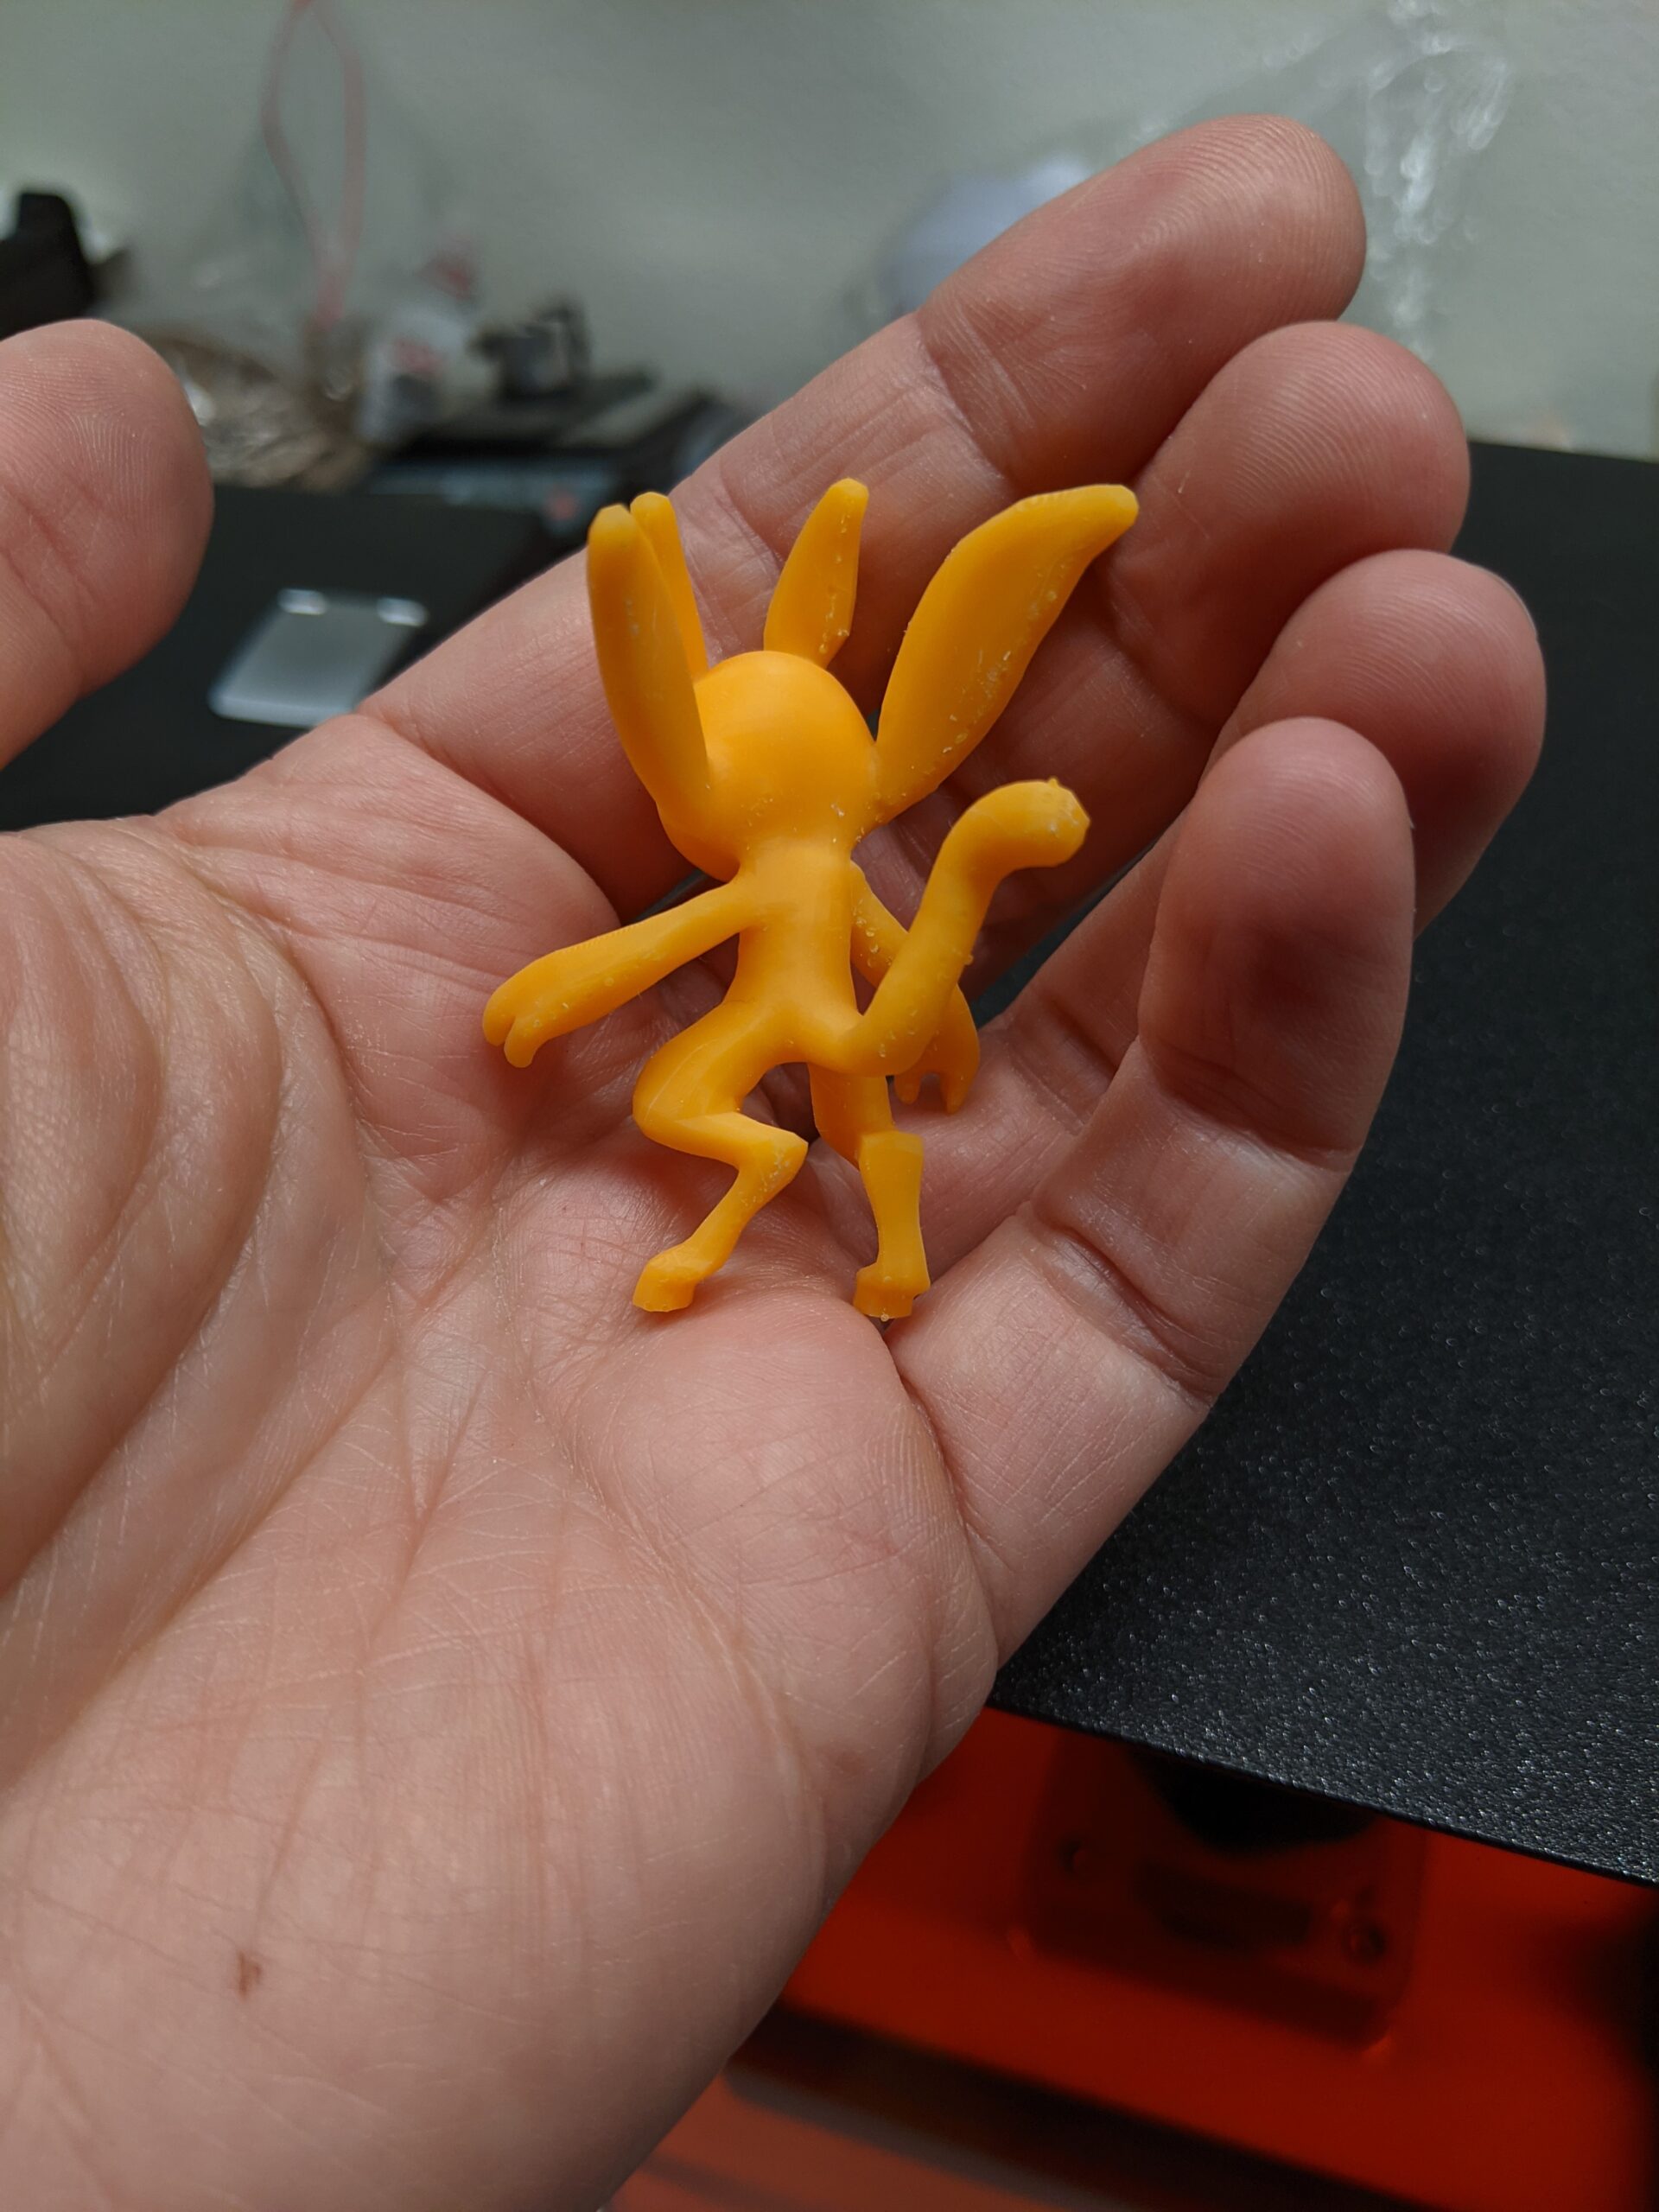
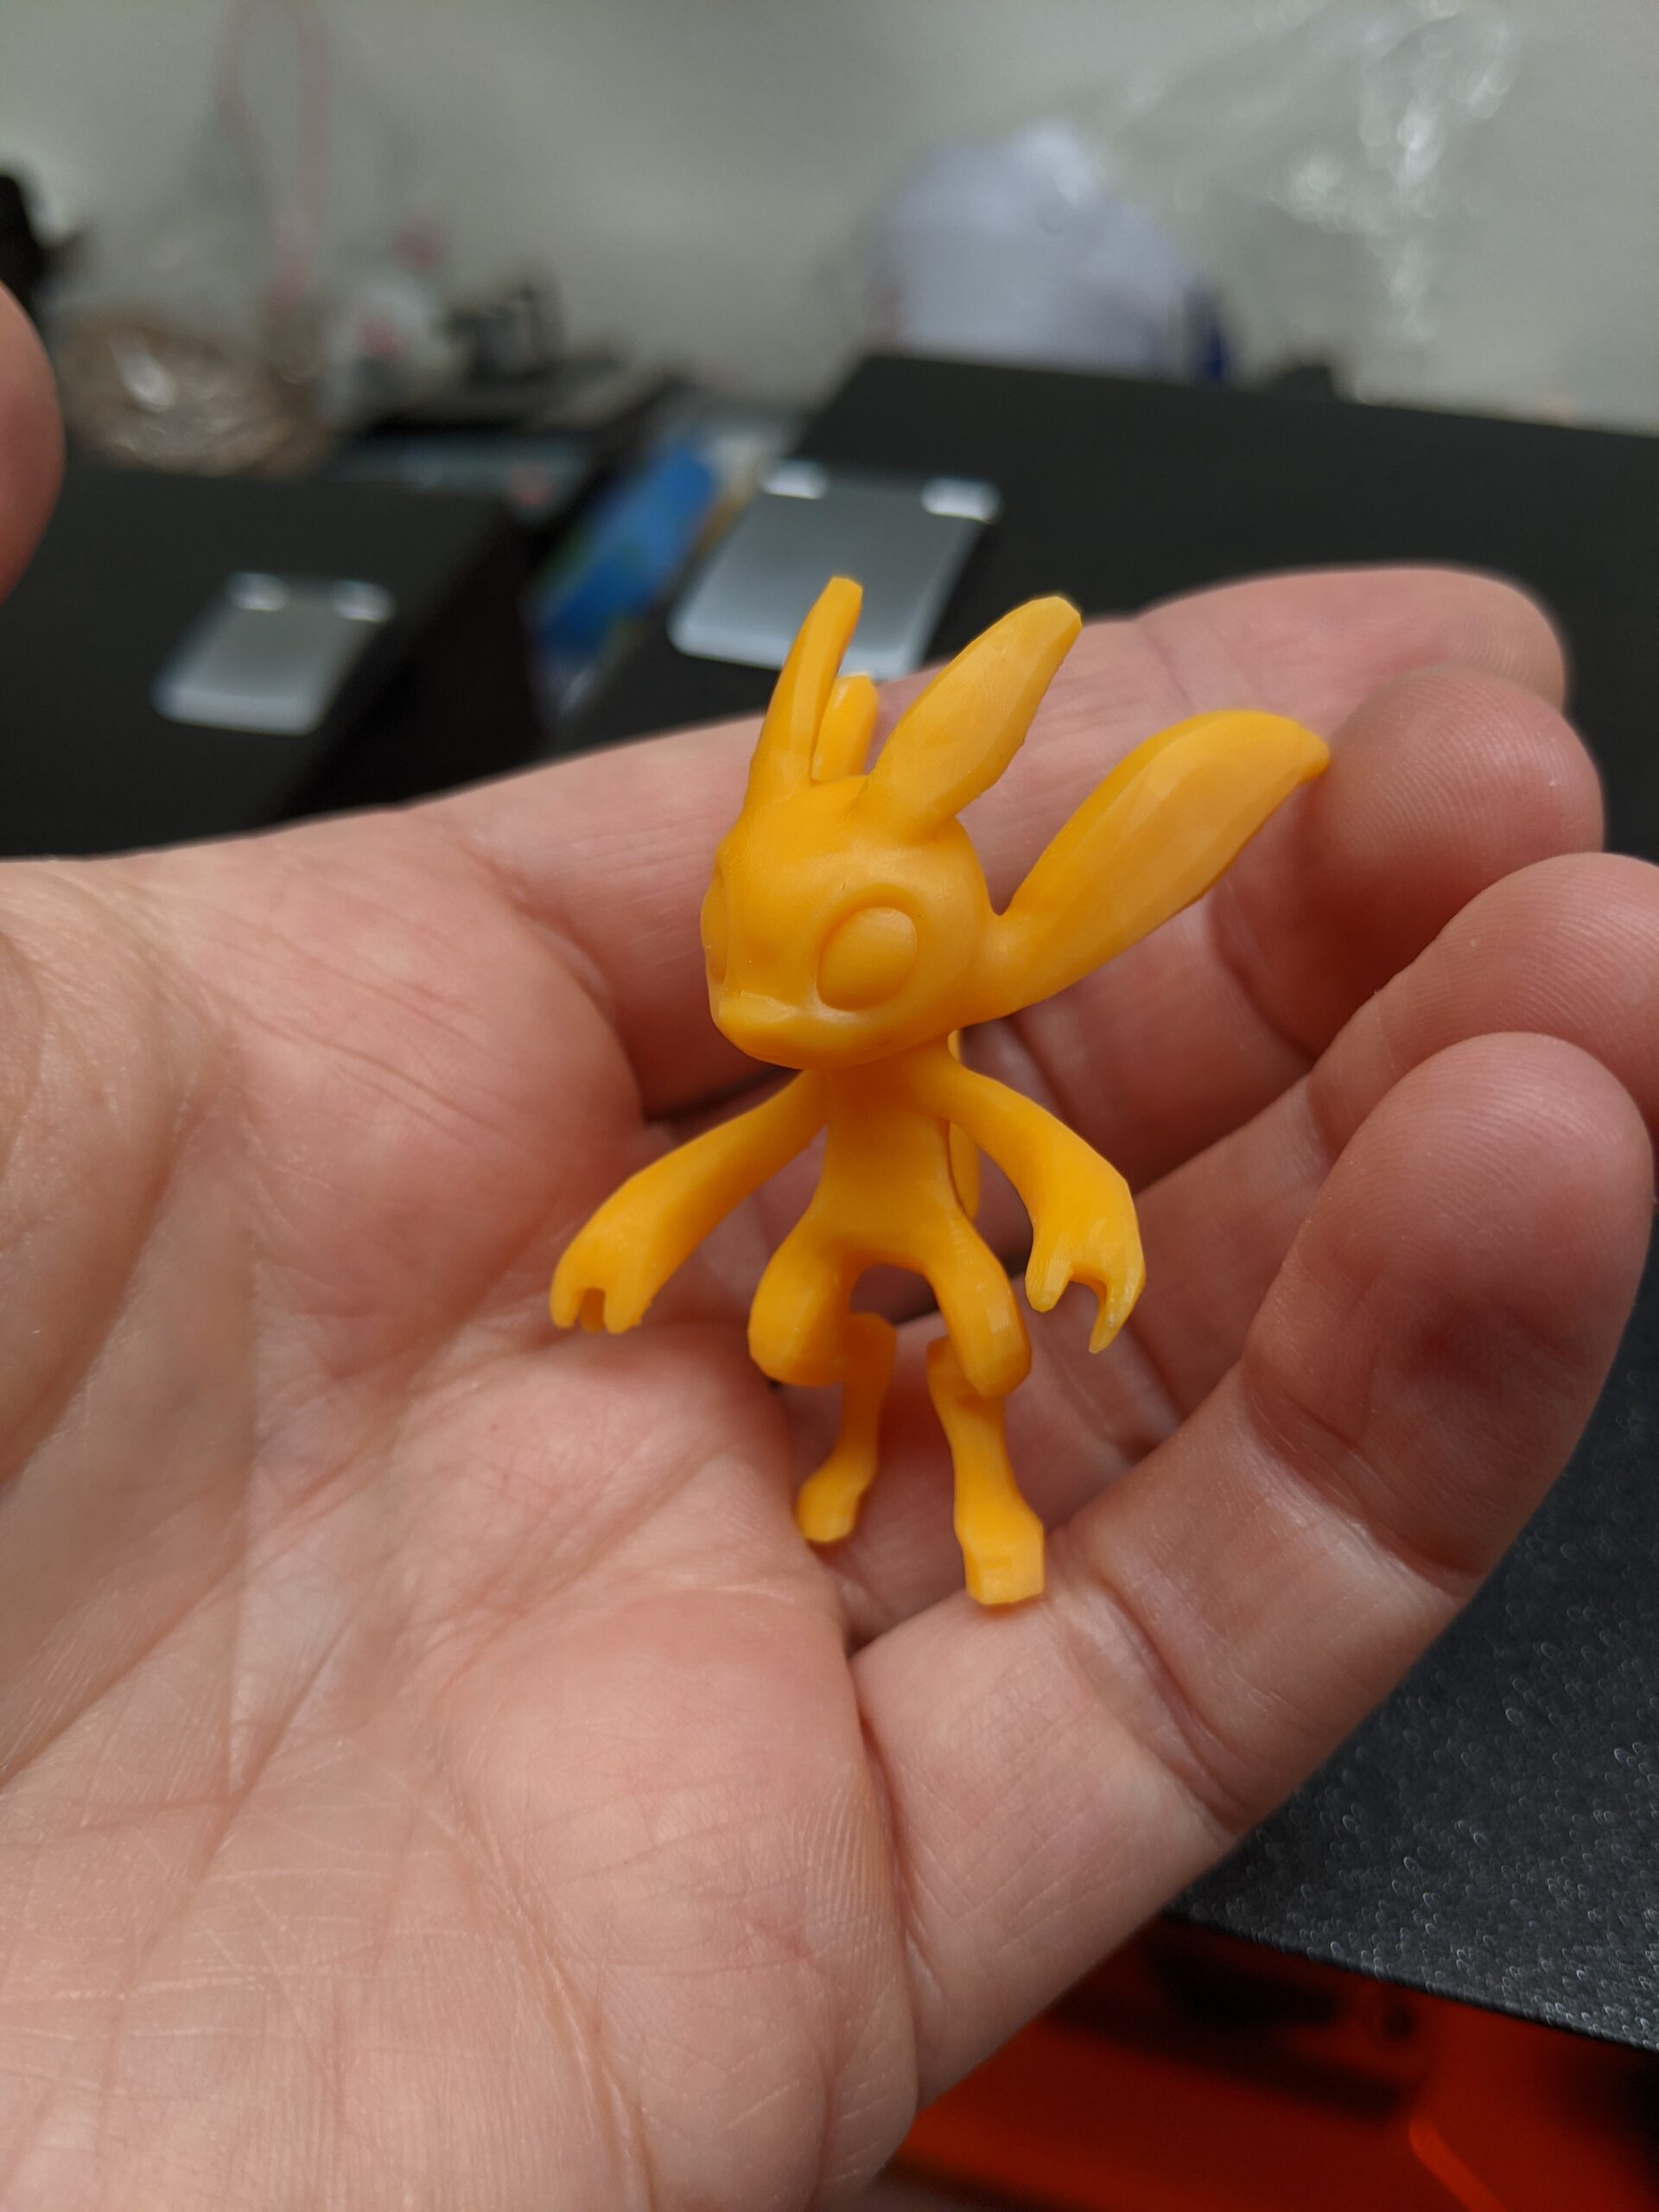
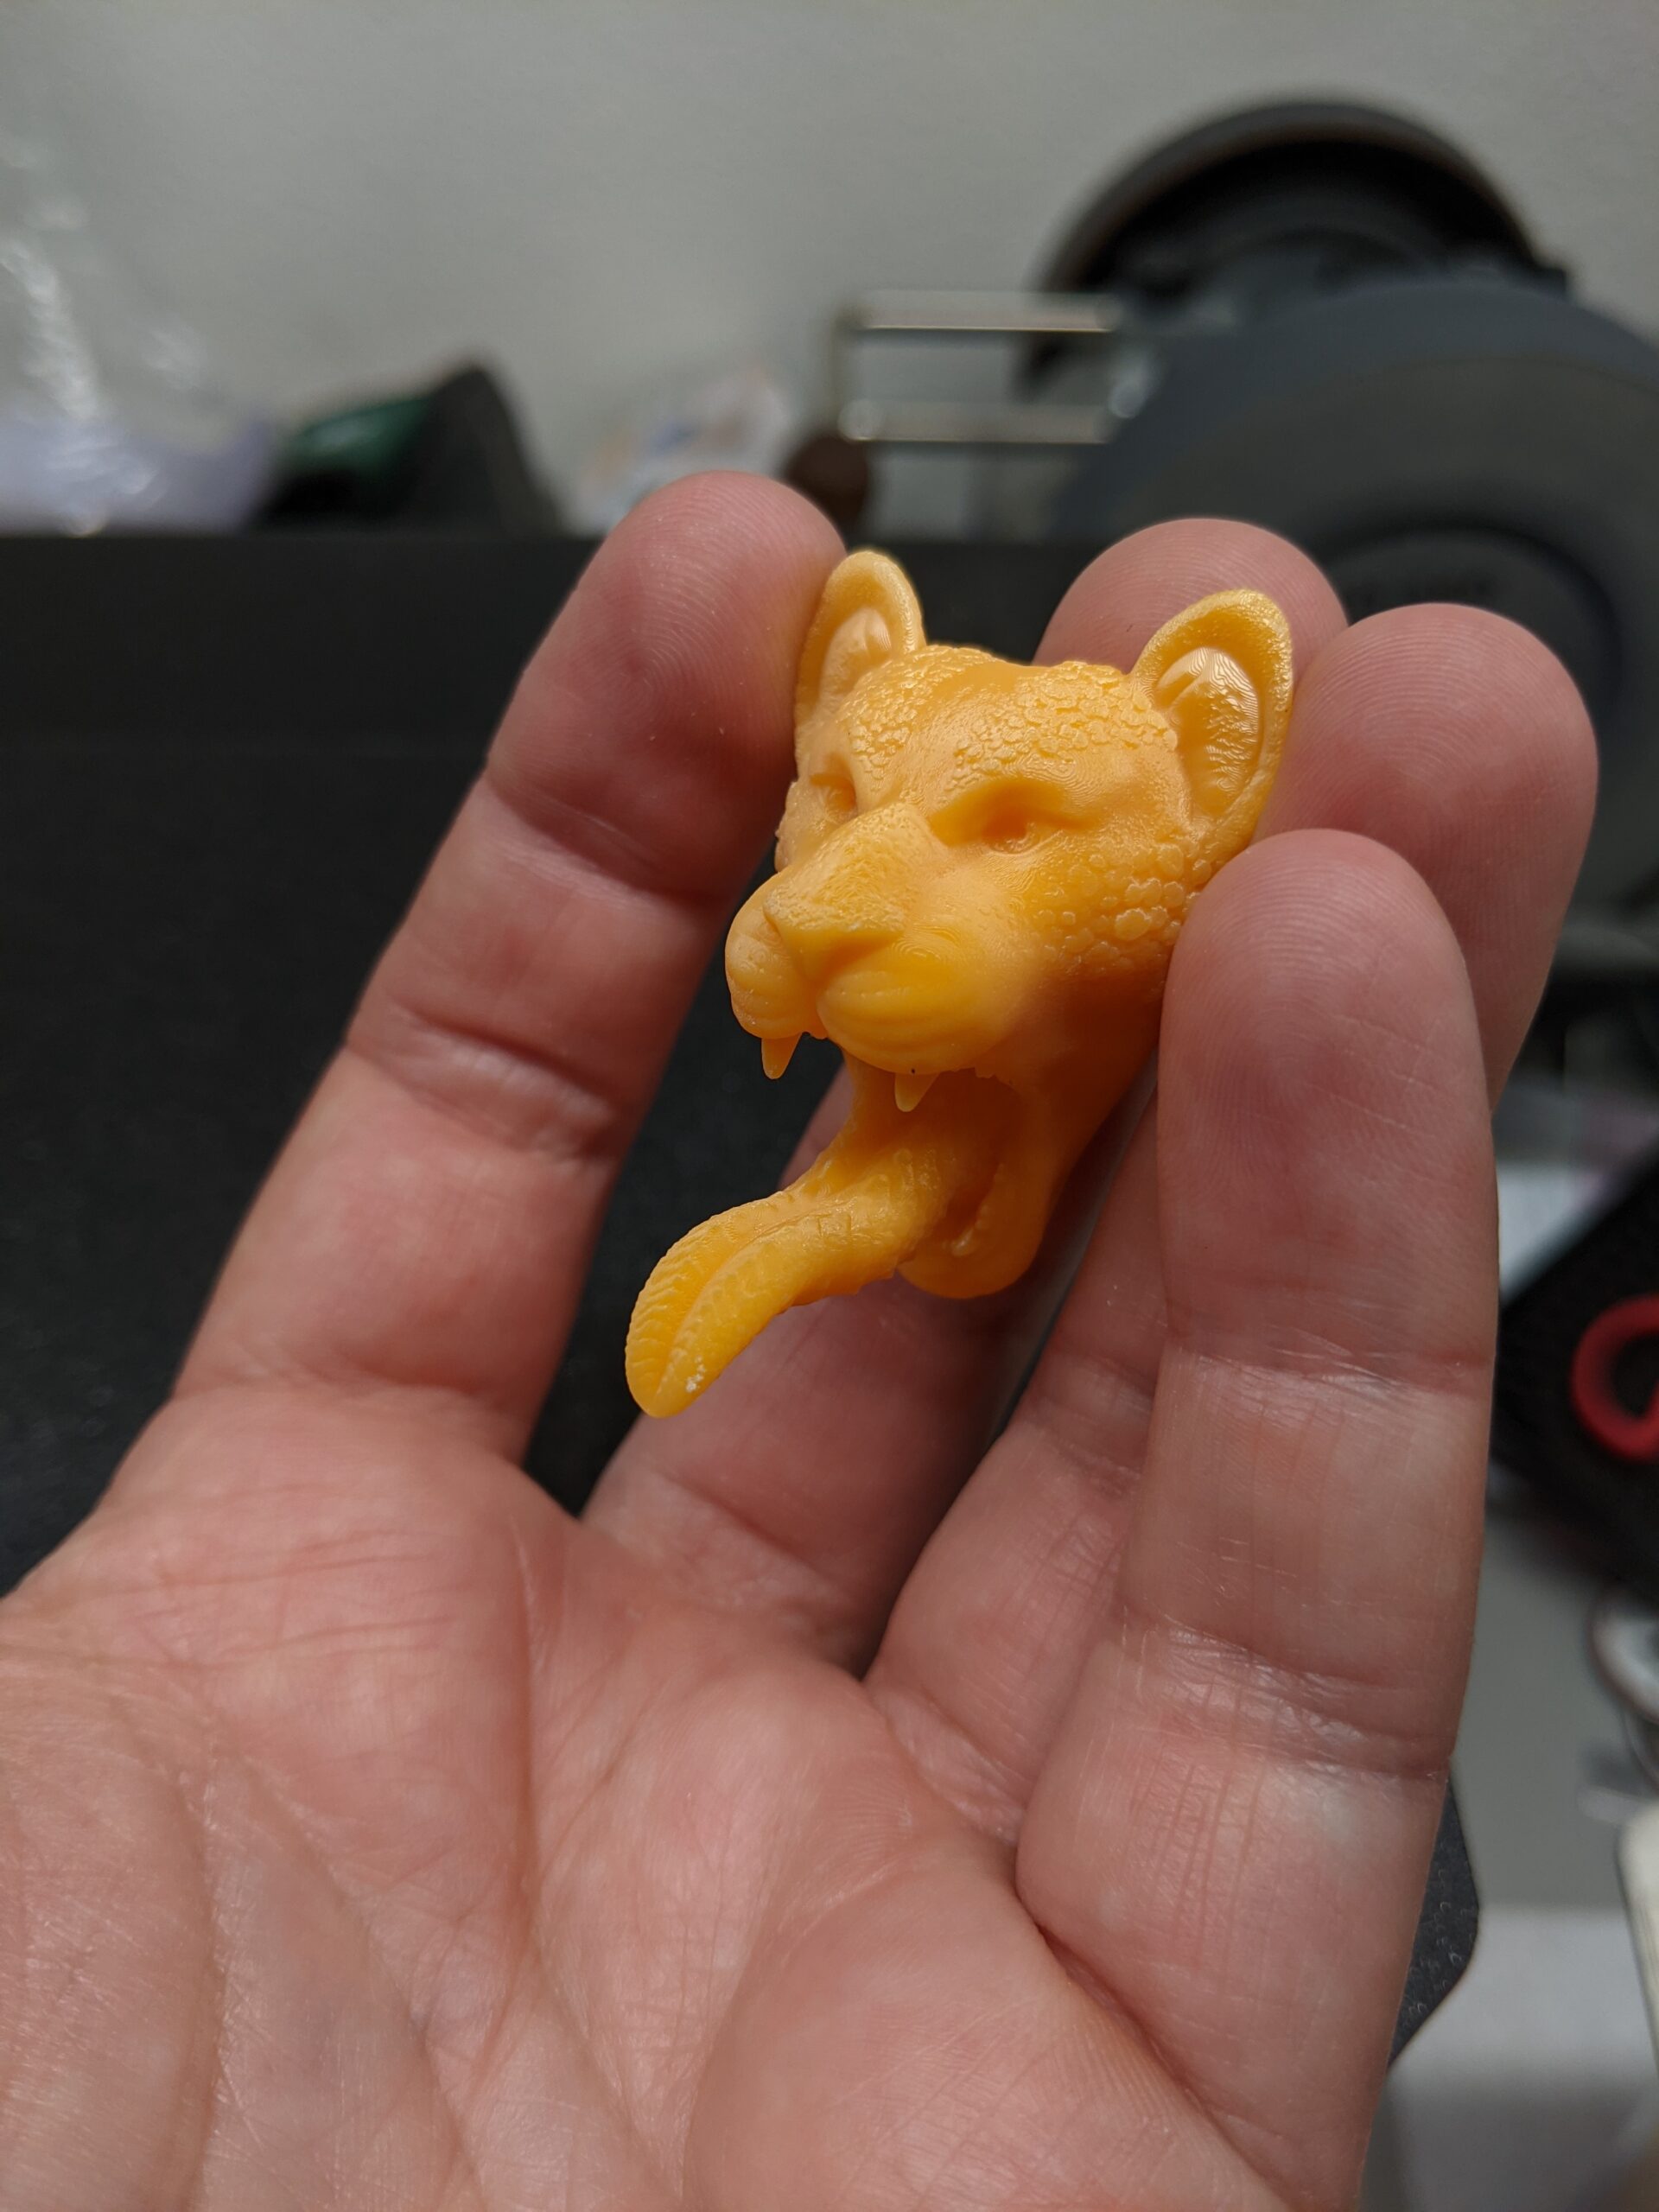
Sweet, sweet success! This is my second try at this guy, the first one he lost a chunk of his tail, and the gunk messed up an ear, but a few more support points around the initiation of his tail fixed that! This particular print is one of the requests from a friend that got me seriously looking at a SLA in the first place, when I realized how awful it was gonna be to try on my FDM.
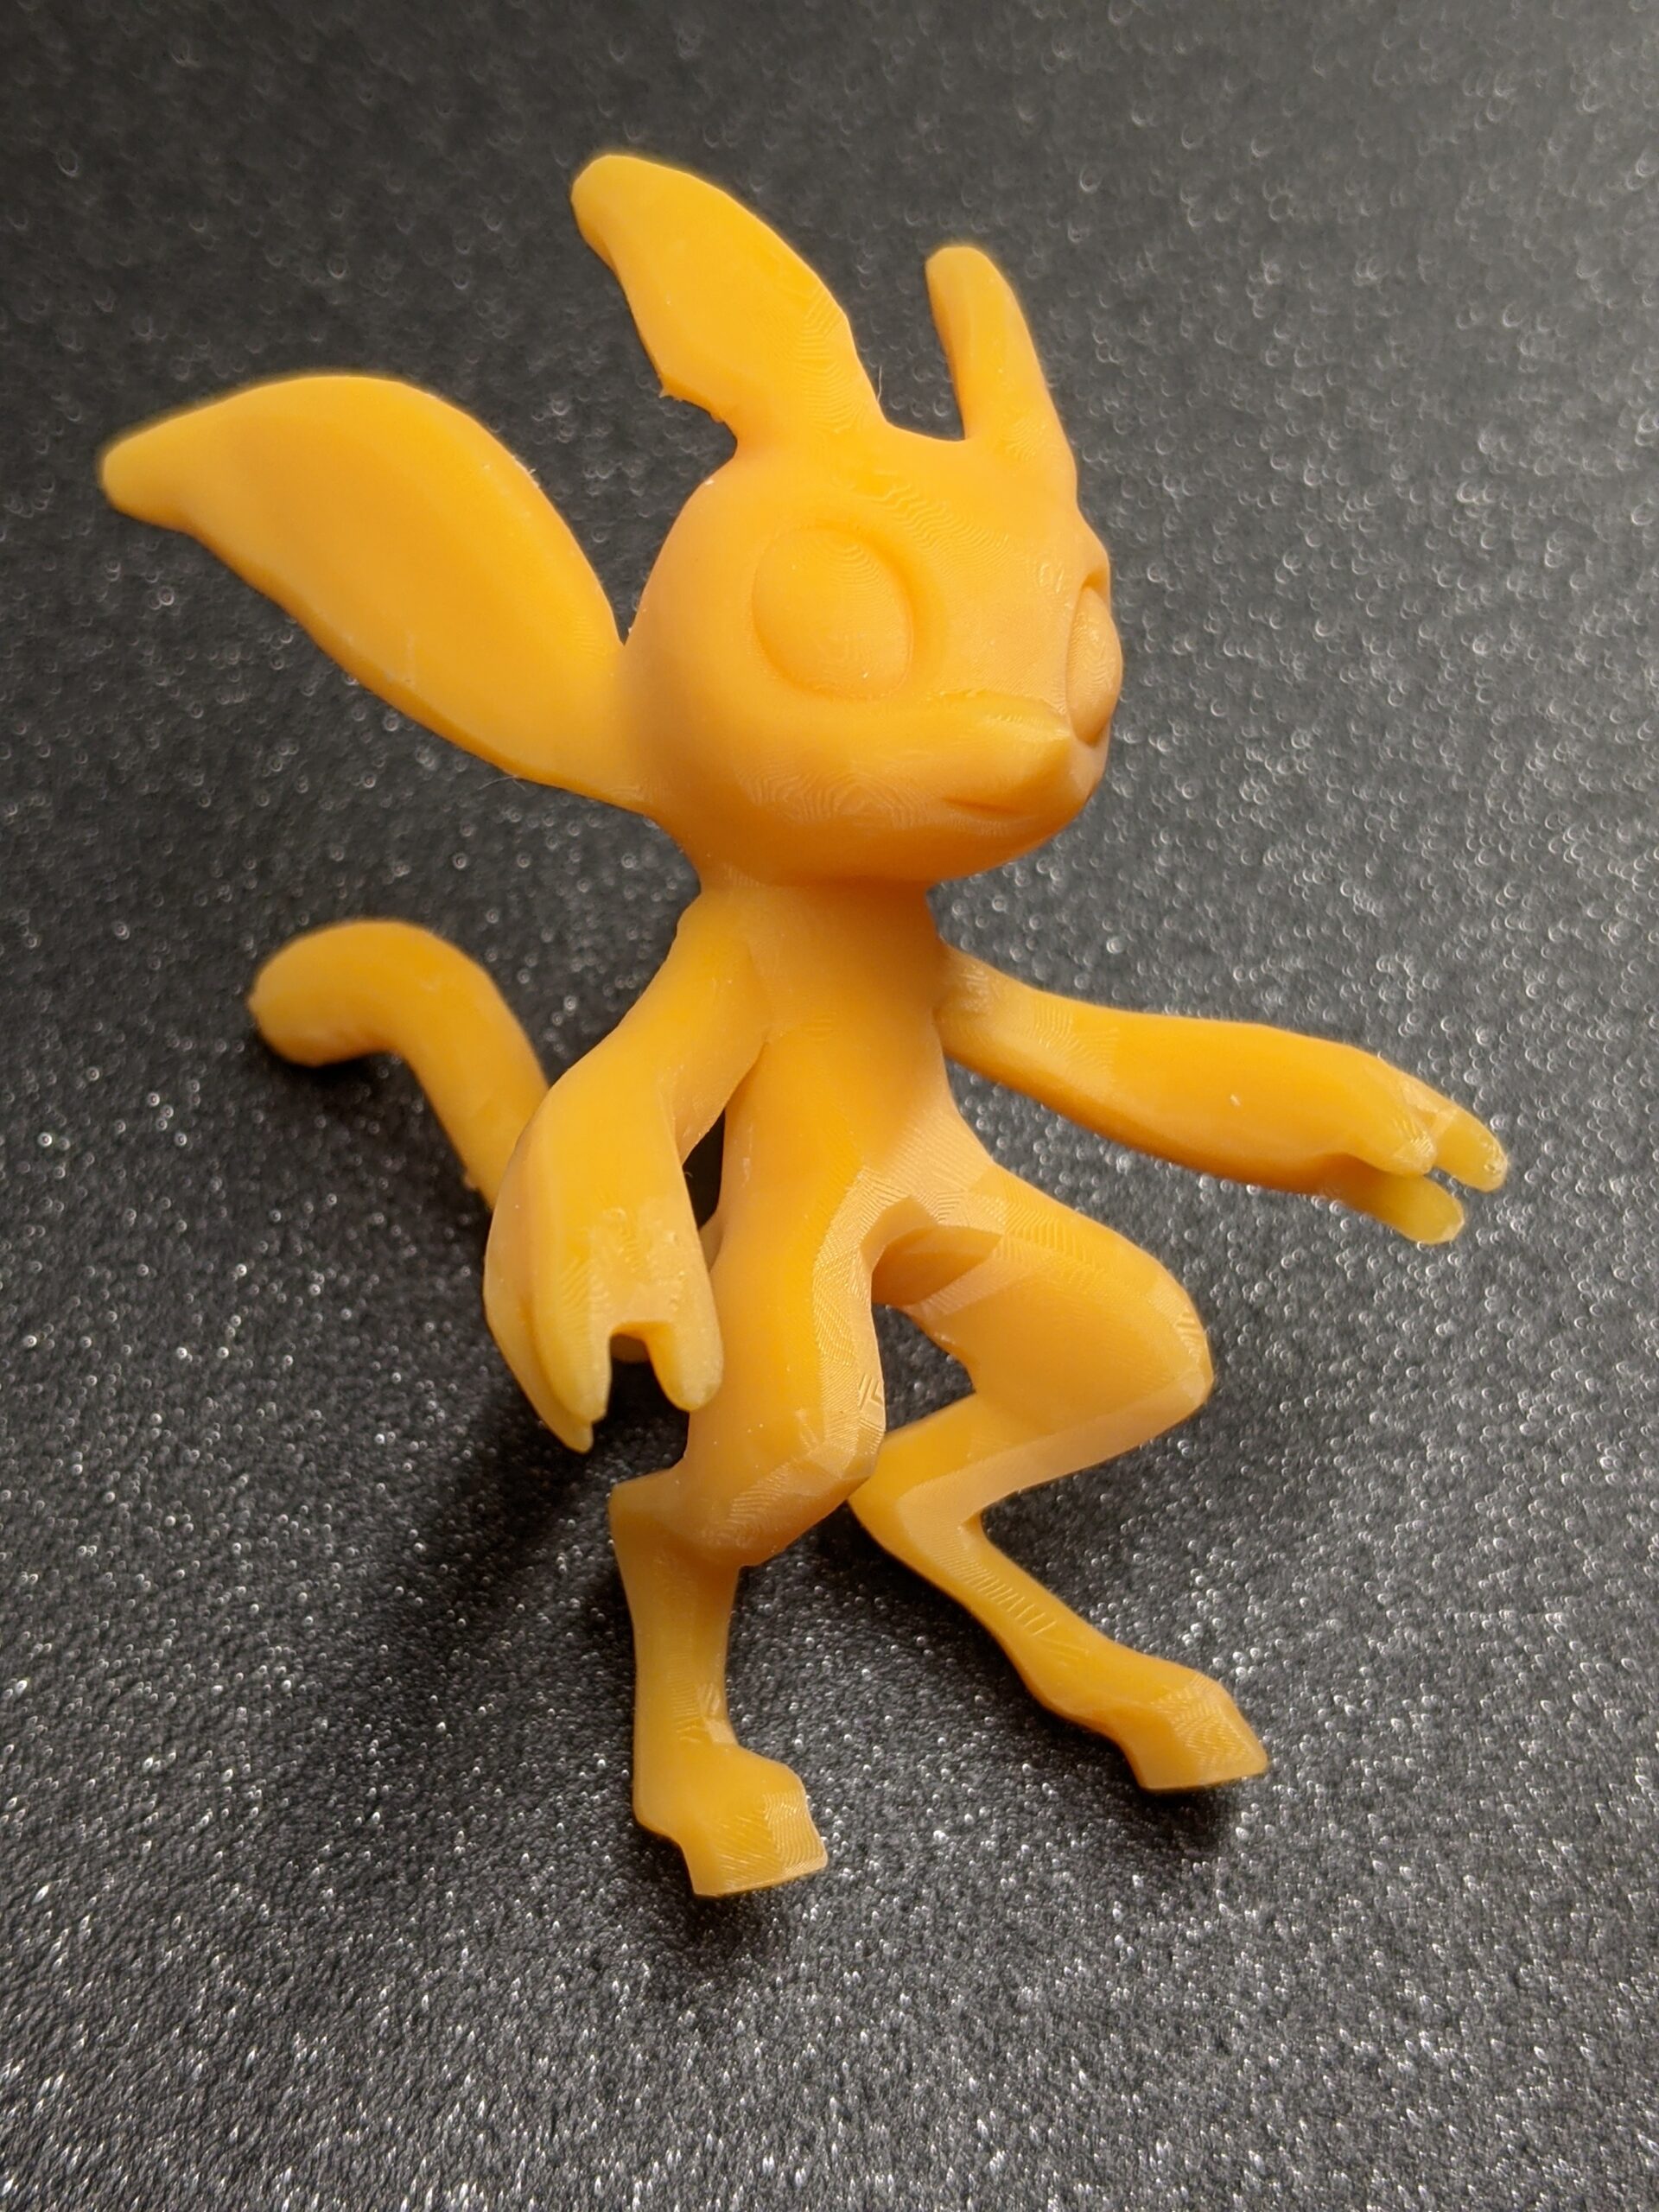
I'm printing a larger version now, first attempt at hollowing! This is working great, I think it must have been my calibration. No more FEP damage at all. And the S-model is living up to the Speed name, these are taking under an hour to print!
CW1S
Thank you for sharing your experience! This will certainly be helpful to other SLA beginners.
Can you also say something meaningful about the CW1S? Or does it just work perfectly, so no need to lose any more words about it?
Hmm
Today's printing has been 100% successful (two prints now) after a night of several failed prints in a row, all due to failure to adhere to the bed. It seems that the printer is very sensitive to calibration, and might lose it fairly easily. If you calibrate just before your print, I haven't had a failure yet. My string of issues with yesterday's prints started with a failure of a large, heavily-supported and hollowed part that only partially printed. That was my fault due to adding insufficient supports to the inside of the hollowed cavity, I think. But I think that failure must have somehow impacted my calibration, because all successive attempts to print anything also failed. However, after cleaning the vat thoroughly and re-calibrating, both prints I've run today have worked beautifully with no issues.
One thing I am noticing, the printer does *not* like using the high-speed tilt on the vat when it is printing large areas. It makes a nasty hammering sound, then slowly peels it away and starts the next layer. On the tower test print, that heralded damage to the FEP, but none of the succeeding times have I seen that happen, the second FEP has held up for 8 print attempts now with no issue at all, it still looks brand new. And the level of detail this thing will resolve is absolutely staggering! I'm coming from FDM printing, but this is far in excess of what I was expecting. It's almost impossible to capture it with a phone camera, I really need to set up my macro setup for some real shots.
Honestly, I'm not really sure of what to say about the CW1S, so far it's been absolutely unremarkable, which is exactly what I want from a supporting utility device. The washing works just fine, the dry works as well as you could hope for something that's that complex (sometimes it takes two drying cycles, rotating which face it's sitting on, but I'd expect that) and the curing has resulted in a nice, hard, no-thumb-nail-dent piece each time I've used it. The steel container can be a bit hard to fit into the machine at times, the rails hold it VERY tightly, but that seems to be improving a bit with use, it slides in much easier now than it initially did. They sent me two of the metal containers, for some reason.
It seems that the printer is very sensitive to calibration, and might lose it fairly easily. If you calibrate just before your print, I haven't had a failure yet.
That's definitely not right. Have you triple checked to make sure the bolts on the platform's gimble are tight? Get something what will give you leverage so you can really torque them down.
I thought I had mine tight on my SL1, but I kept having issues where either prints would be slanted or stuff wouldn't adhere to the platform. I finally followed someone's advice to really torque the hell out of those bolts after a calibration and I haven't had issues since.
Honestly, I'm not really sure of what to say about the CW1S, so far it's been absolutely unremarkable, which is exactly what I want from a supporting utility device. The washing works just fine, the dry works as well as you could hope for something that's that complex (sometimes it takes two drying cycles, rotating which face it's sitting on, but I'd expect that)
Back in November I submitted a PR to up the max time for the drying cycle. I use a water washable resin and found that I really needed about 30 minutes of drying and got tired of having to manually start the extra cycles. Now (even though I've switch to alcohol for cleaning) I set it for a 30 minute dry cycle and 10 minute cure and things come out perfect. Jakub said in another thread that they are finally extending the dry cycle with the next firmware release.
I have been down on the SL1 based on my experience, but I have loved the CW1. I think it is a bit over priced, but as you said "it just works" and I think the dryer is it's killer feature compared to other options as I have never had the white scale that is the tell tale sign of the object not being completely dry before curing.
They sent me two of the metal containers, for some reason.
There are two because most people do a two stage wash procedure. The first is with a medium that is changed/cleaned less often to get the worst of the excess resin off. The second is kept cleaner and meant for the final cleaning. Personally I have 99% alcohol in the metal basin where I run a 10 minute wash, then I have a plastic tub of warm water for my second stage where I get after the part with a toothbrush. I've never used the second basin or the parts cage.
cw1s fep
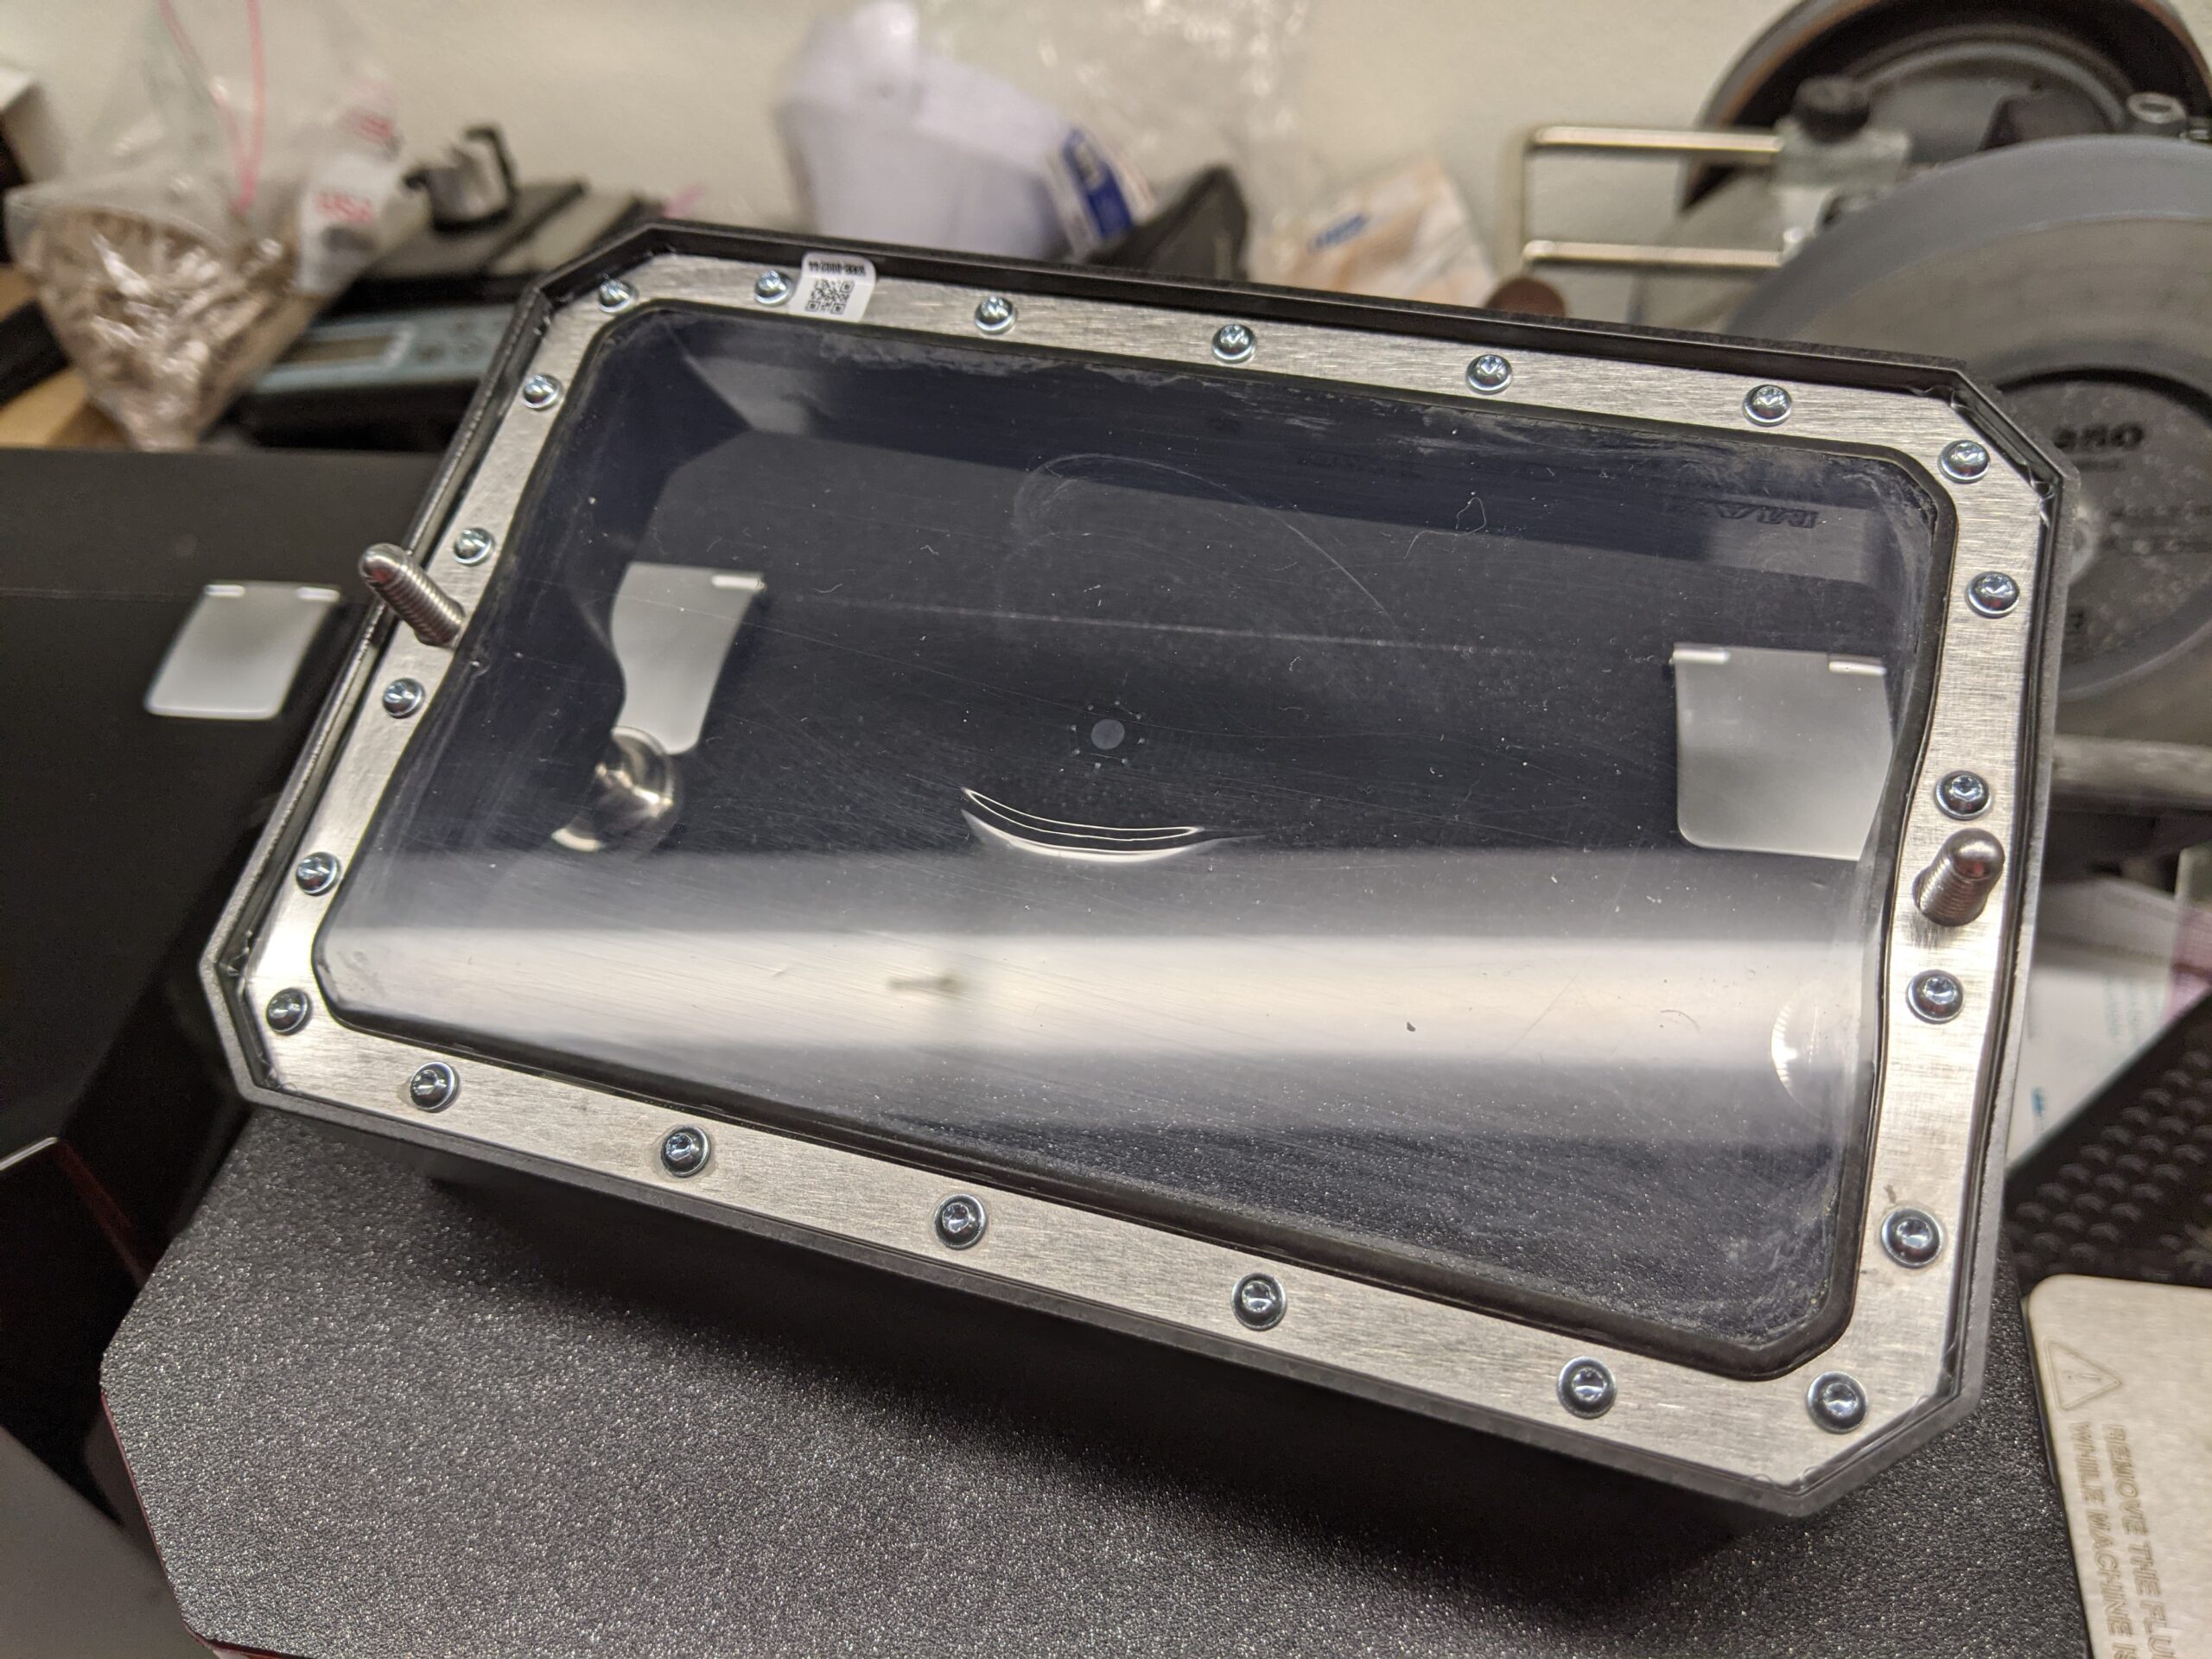
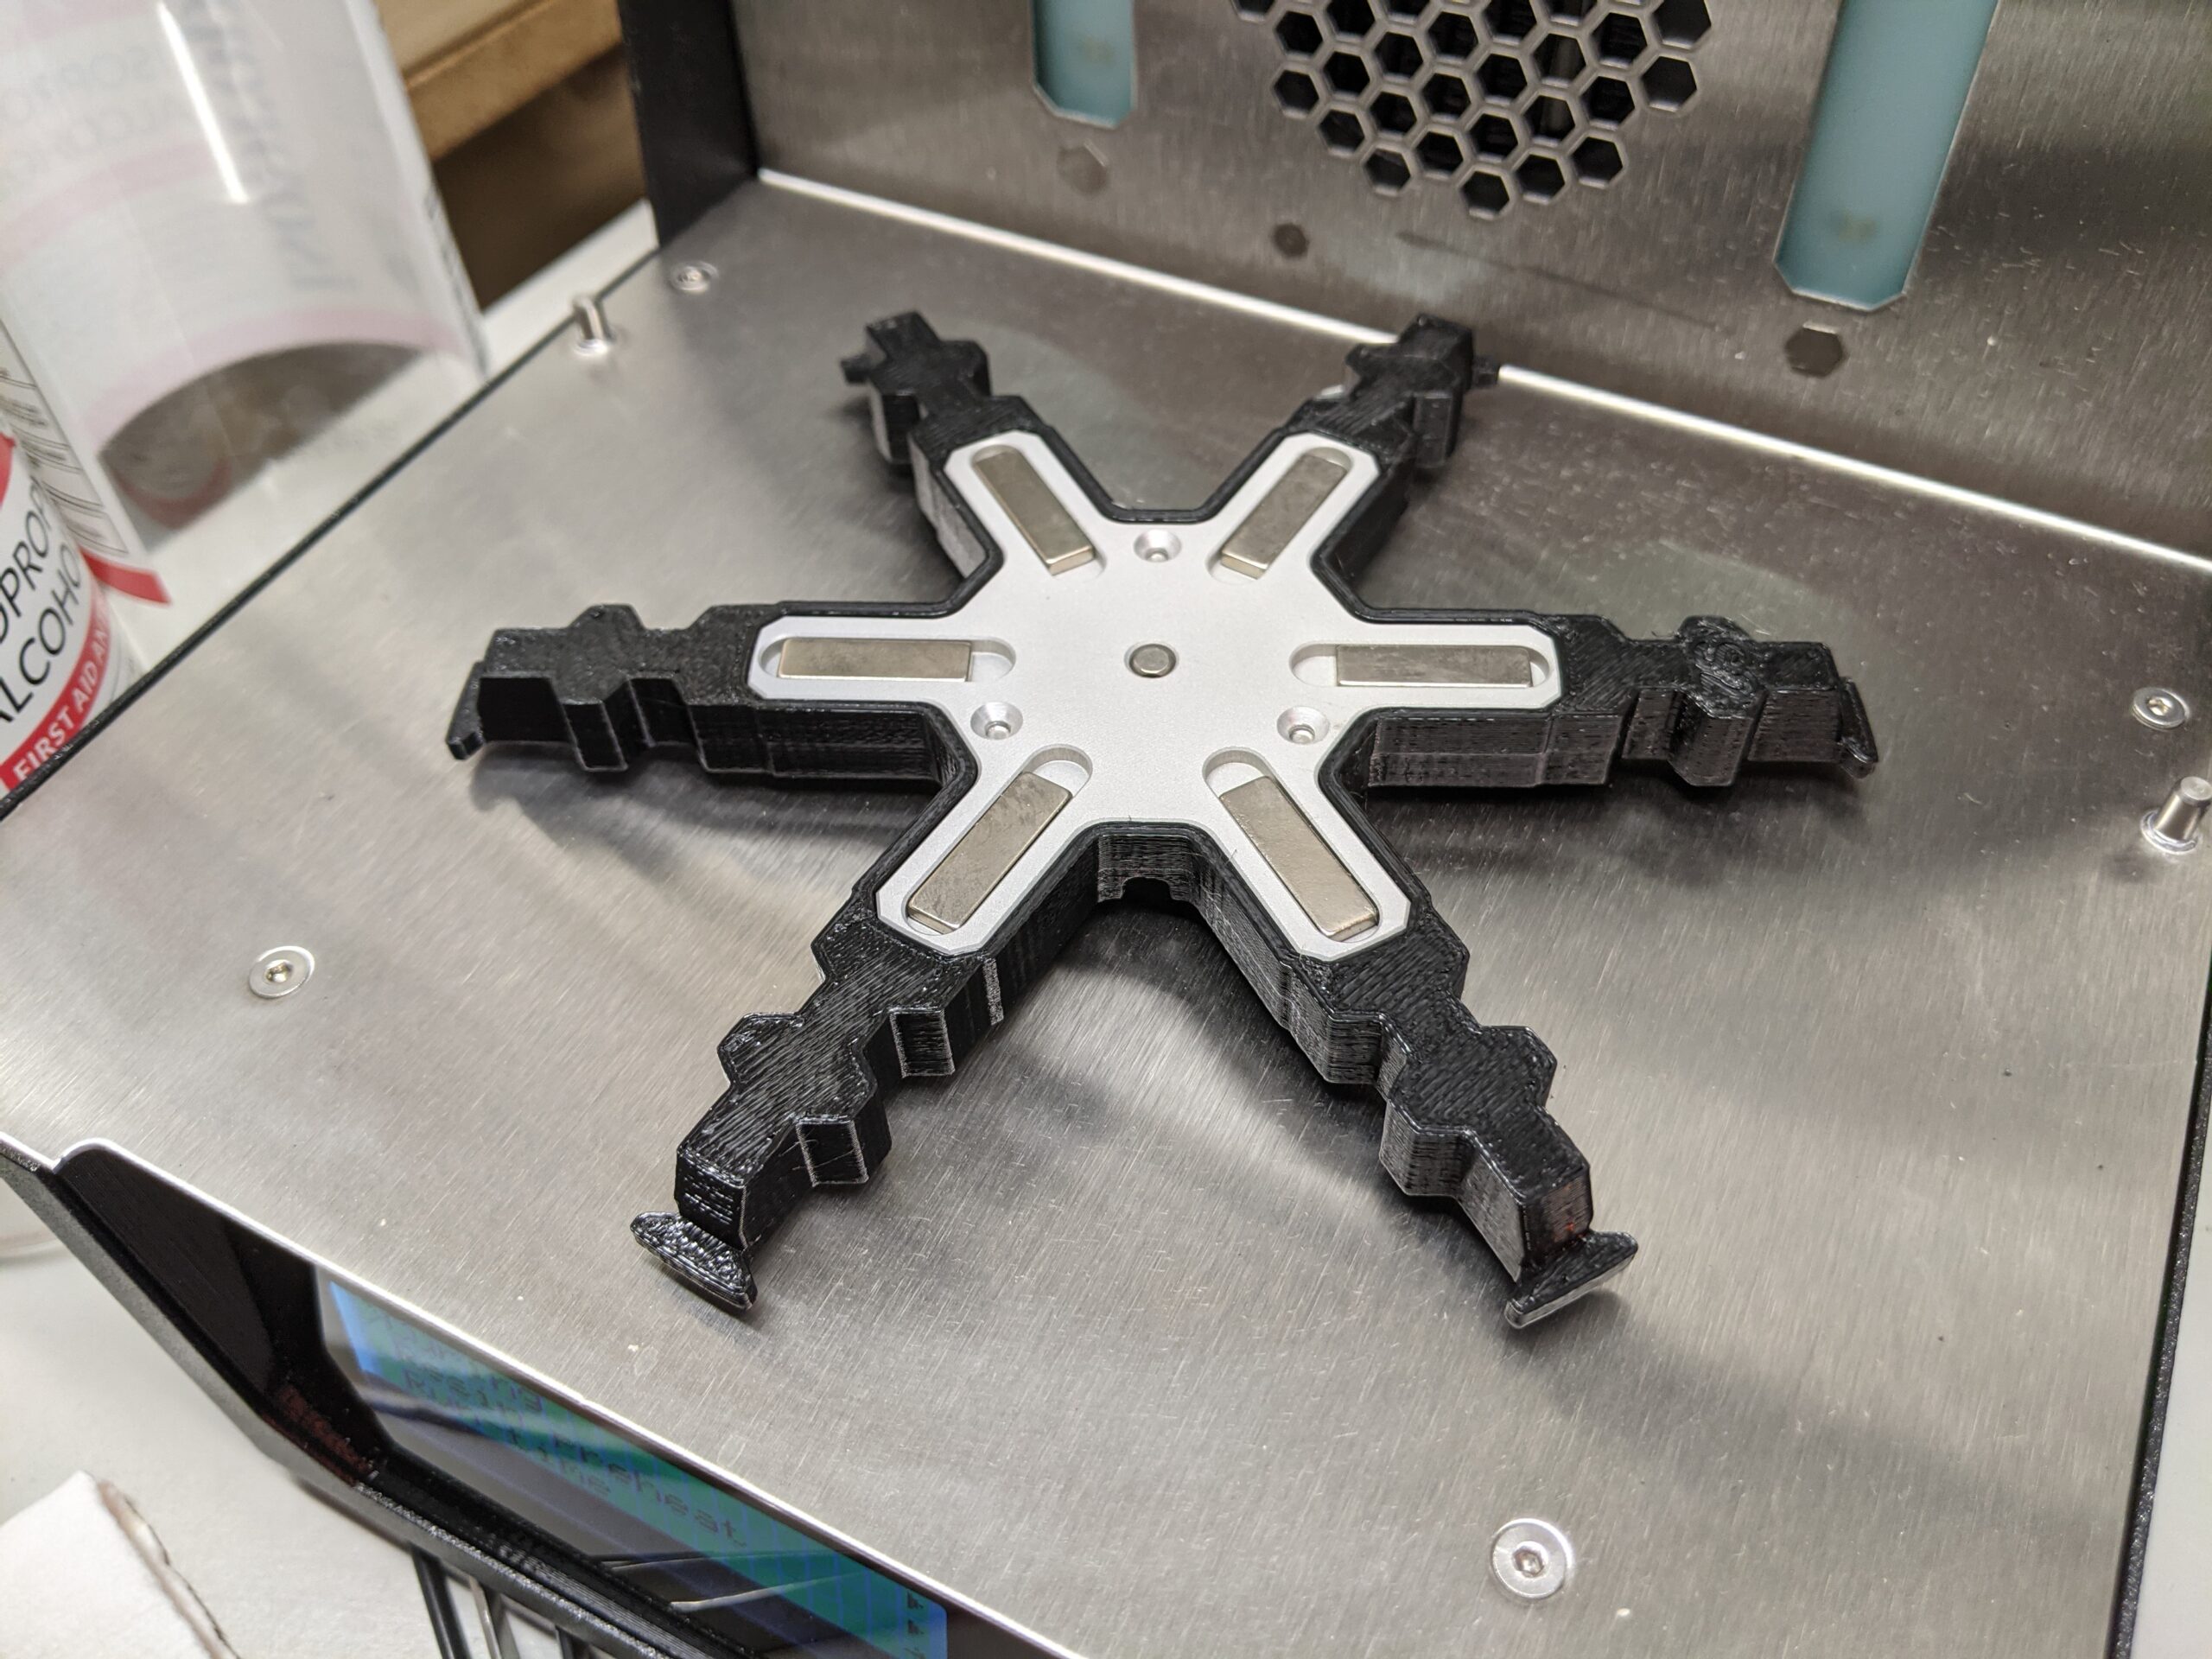
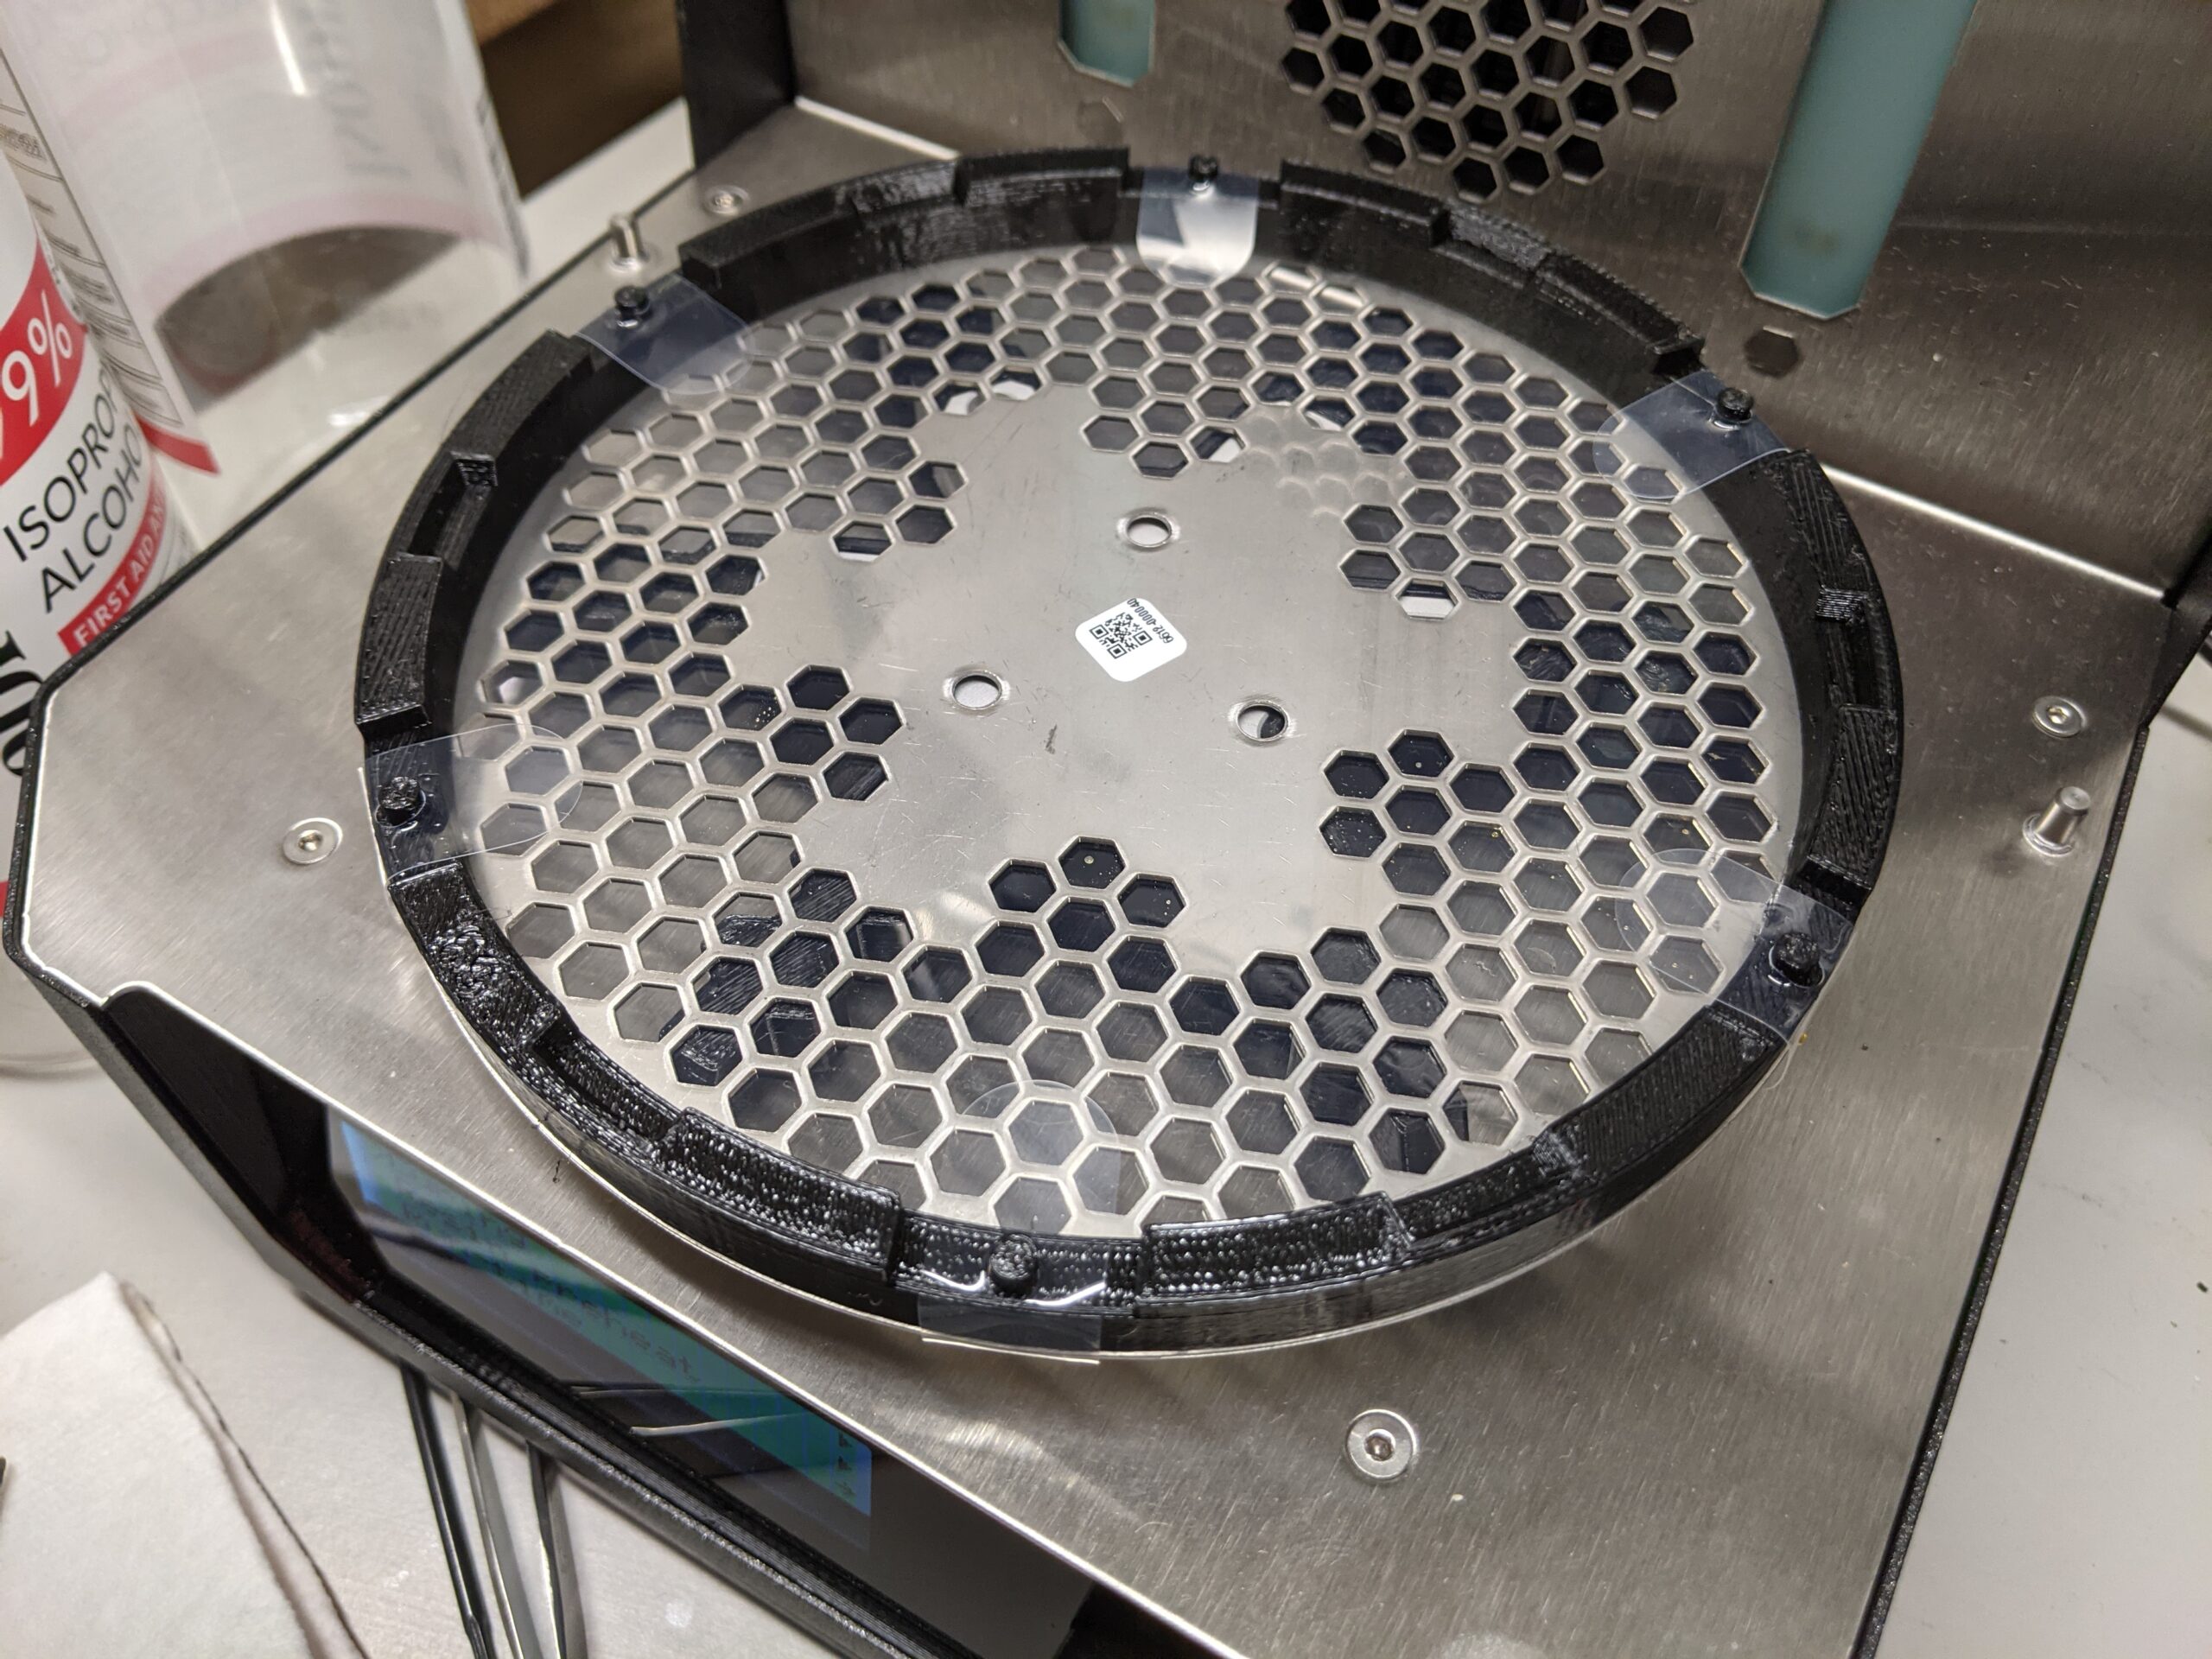
Can you share a picture of the CW1 rotating platform? Apparently there is a new printed part for the stage that allows attachment of a FEP film so any uncured resin doesn't drip down onto the uv lights under. I am just wanting to see how they attached this film. Thanks in advance!
Hmm
I haven't had any trouble drying alcohol from my prints with the stock four-minute dry time so far, aside from underneath where the FEP and the part are in contact. I just run one dry cycle, flip it over so that side isn't face-down any more, and run another. Then cure. So far, it's worked marvelously!
I might need to give that screw a heftier crank-down, then! I've just been calibrating it each print run, and it's been working fine.
Can you share a picture of the CW1 rotating platform? Apparently there is a new printed part for the stage that allows attachment of a FEP film so any uncured resin doesn't drip down onto the uv lights under. I am just wanting to see how they attached this film. Thanks in advance!
And I can! They did, and included several spare FEP films as well. Super easy, just ears that fold over the side, and go over pins on the bottom.
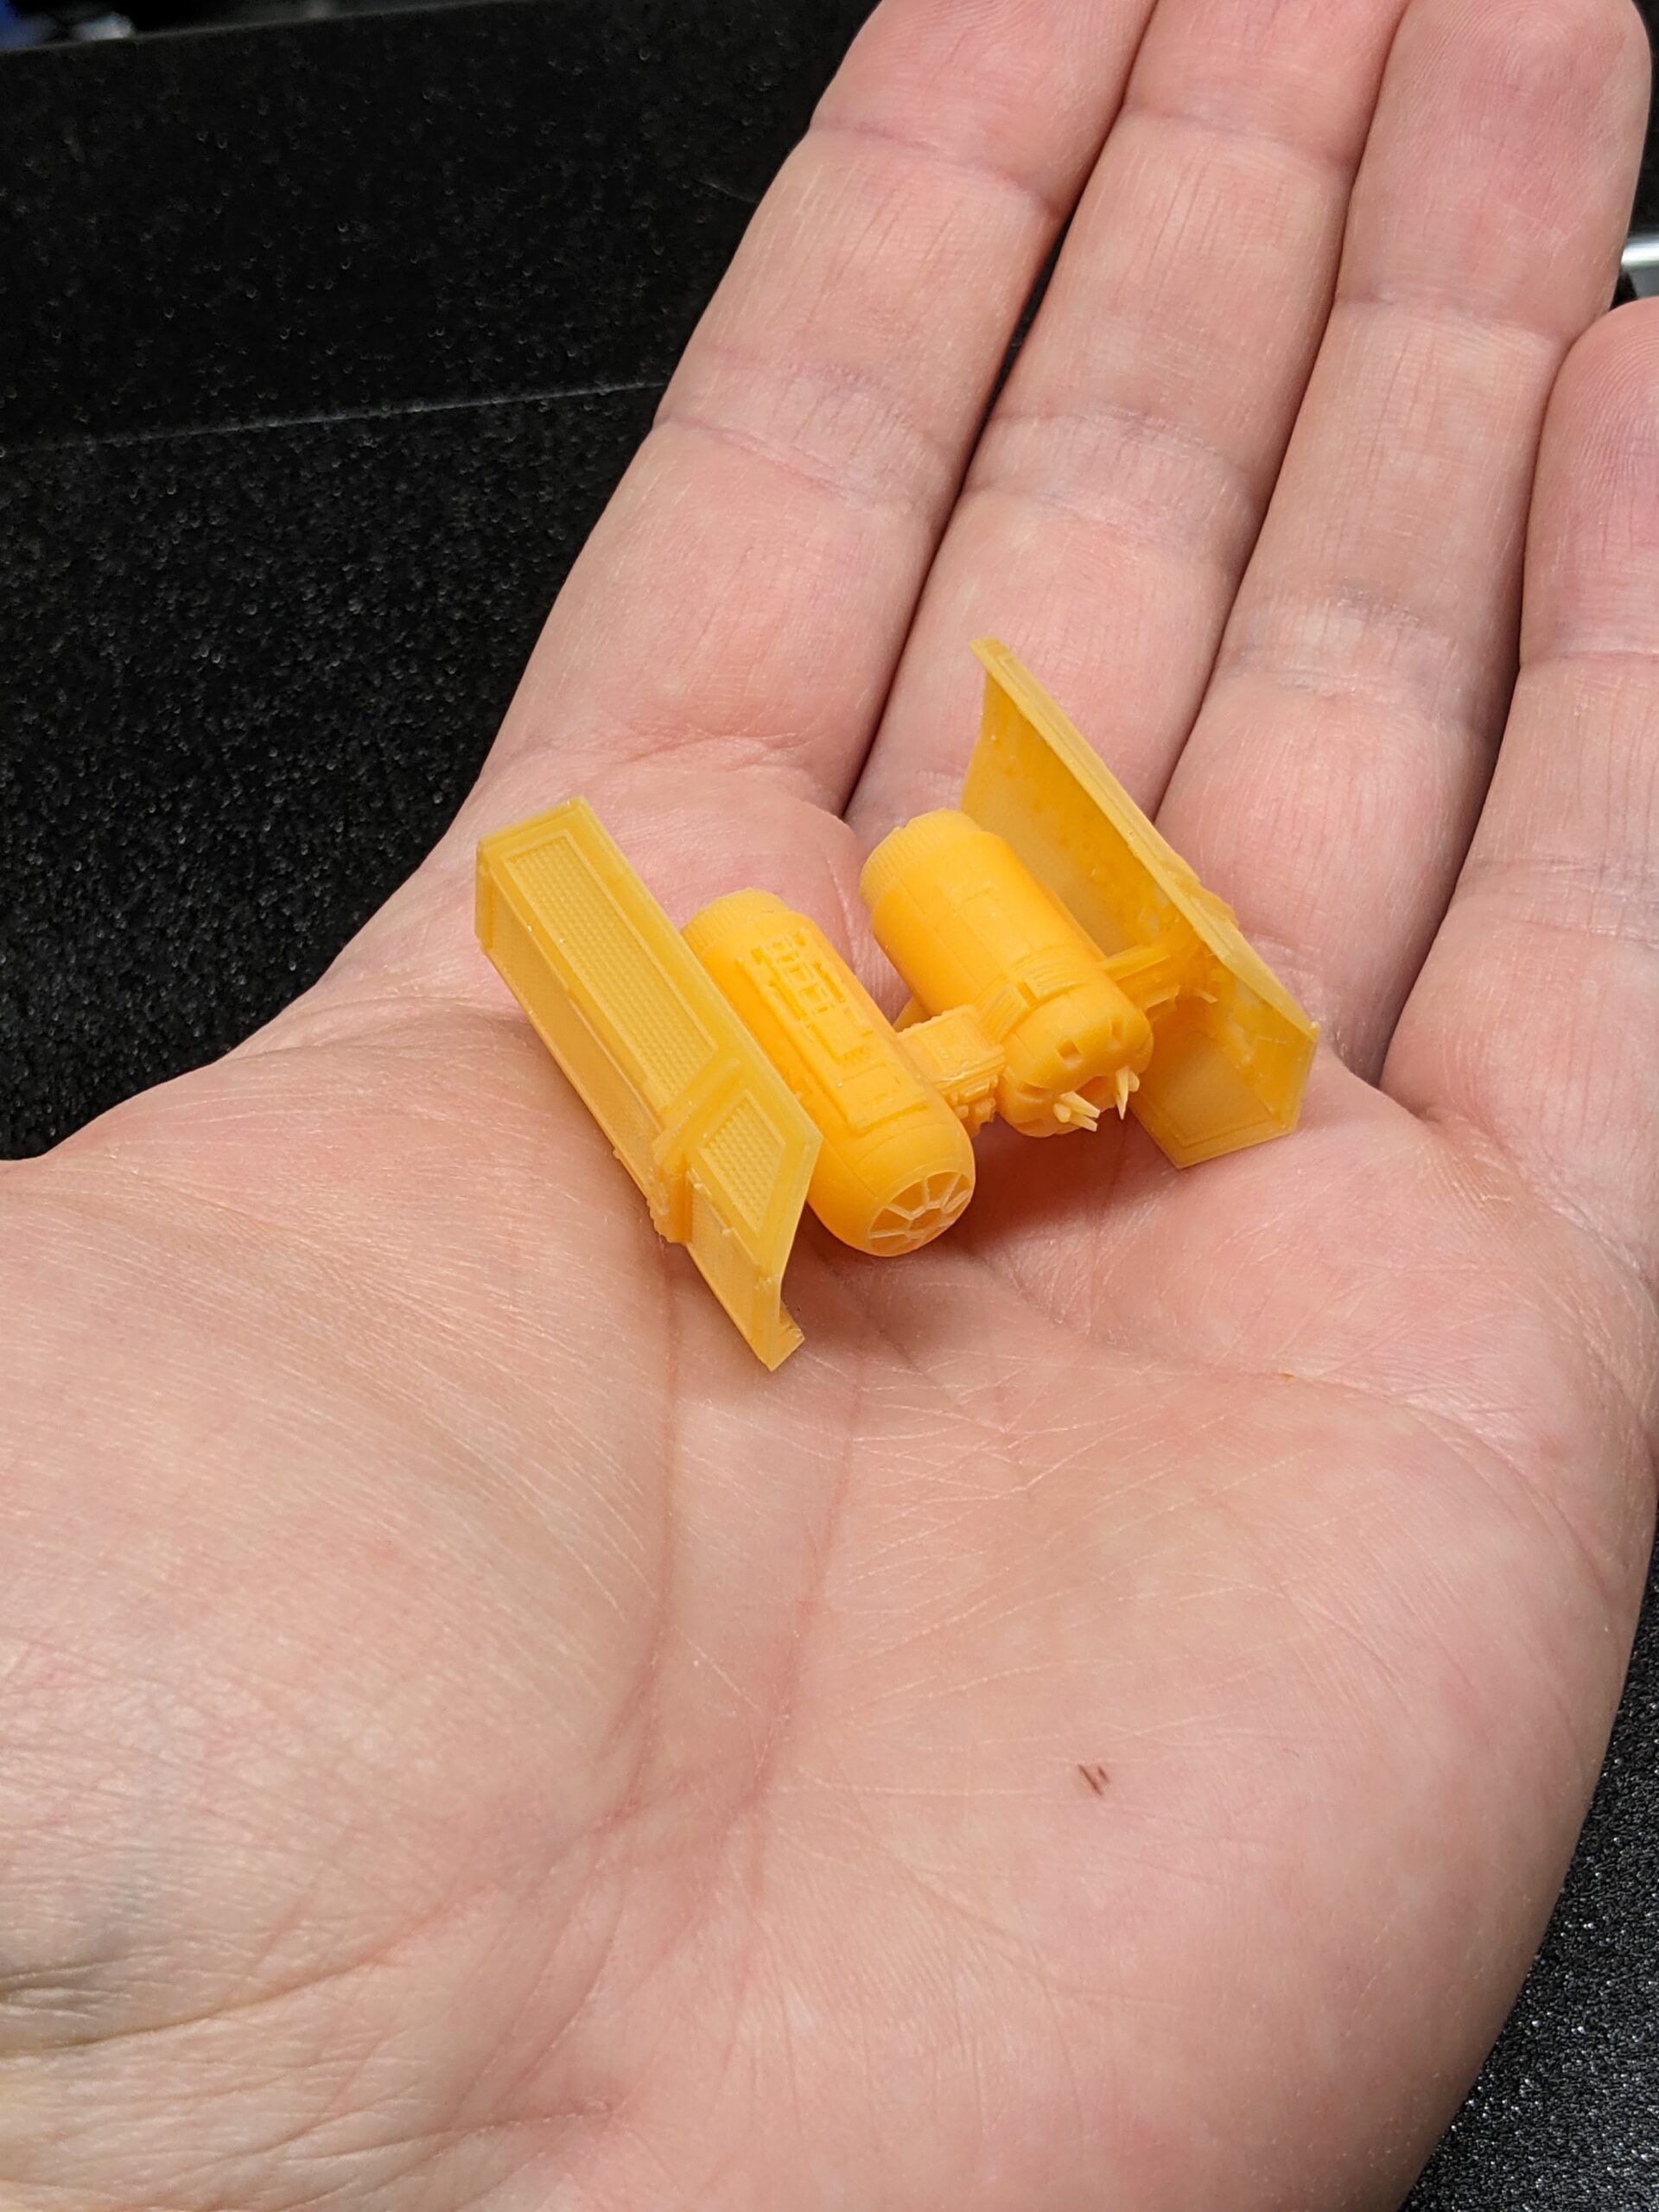
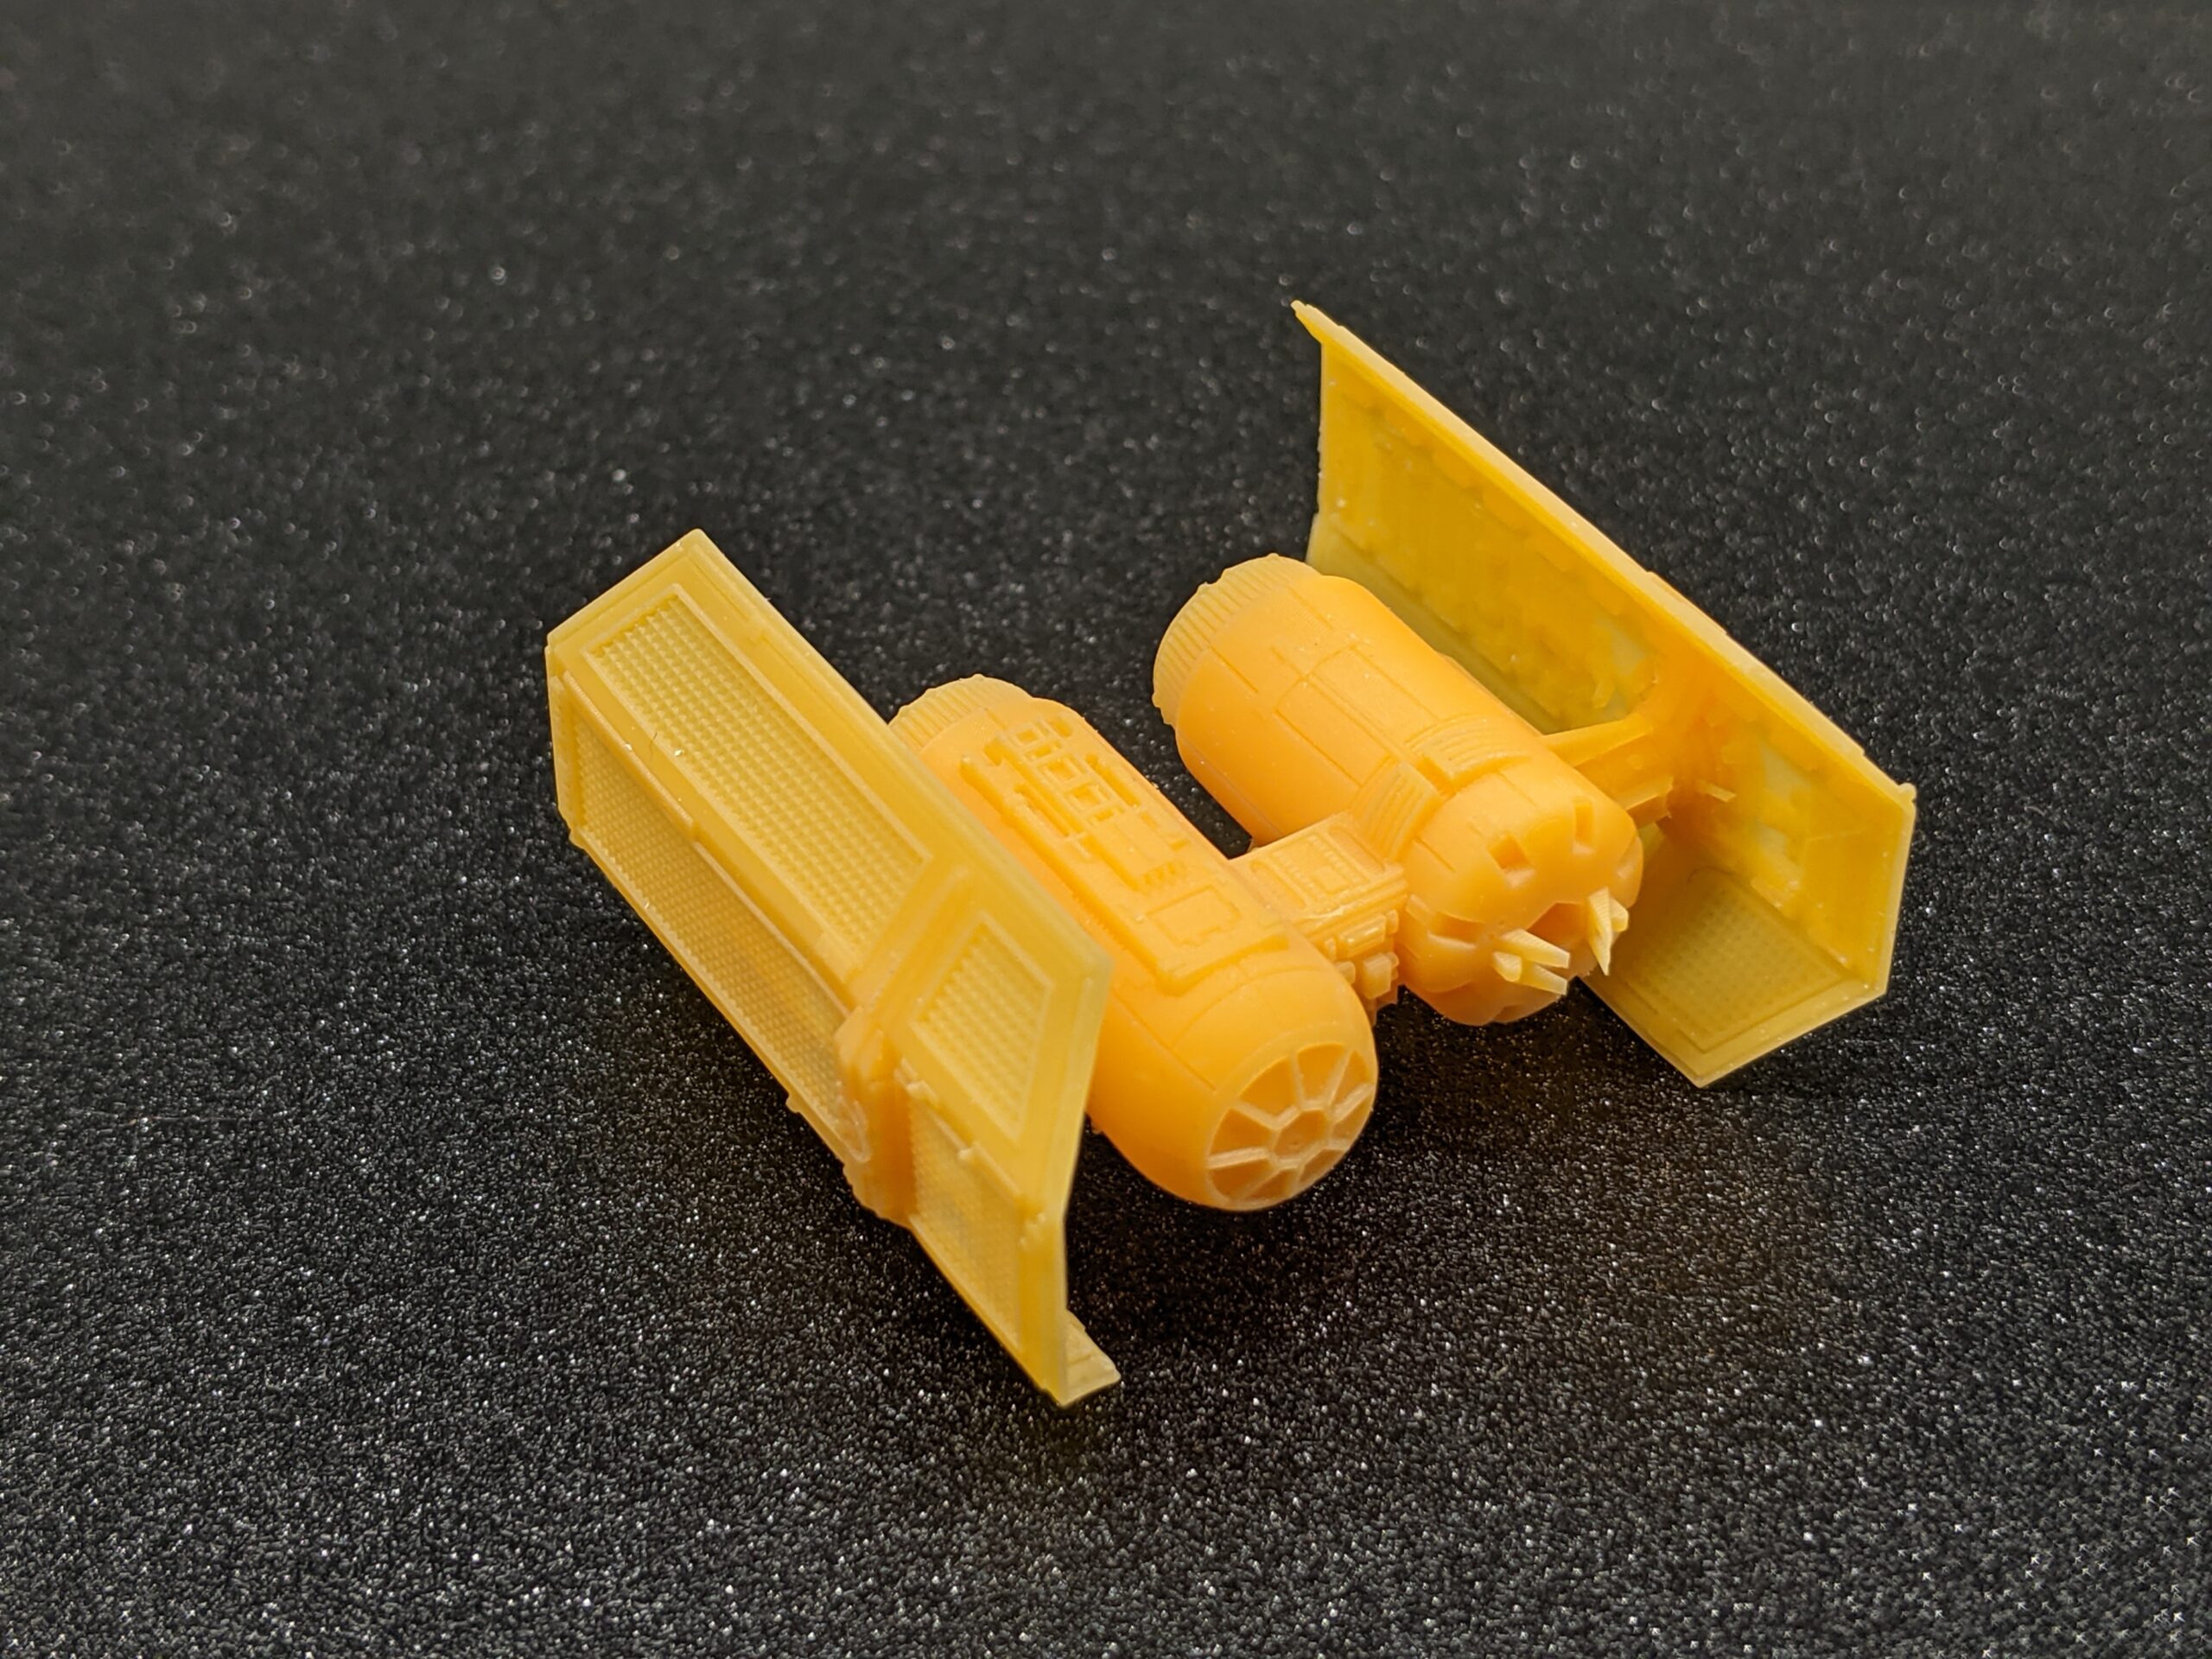
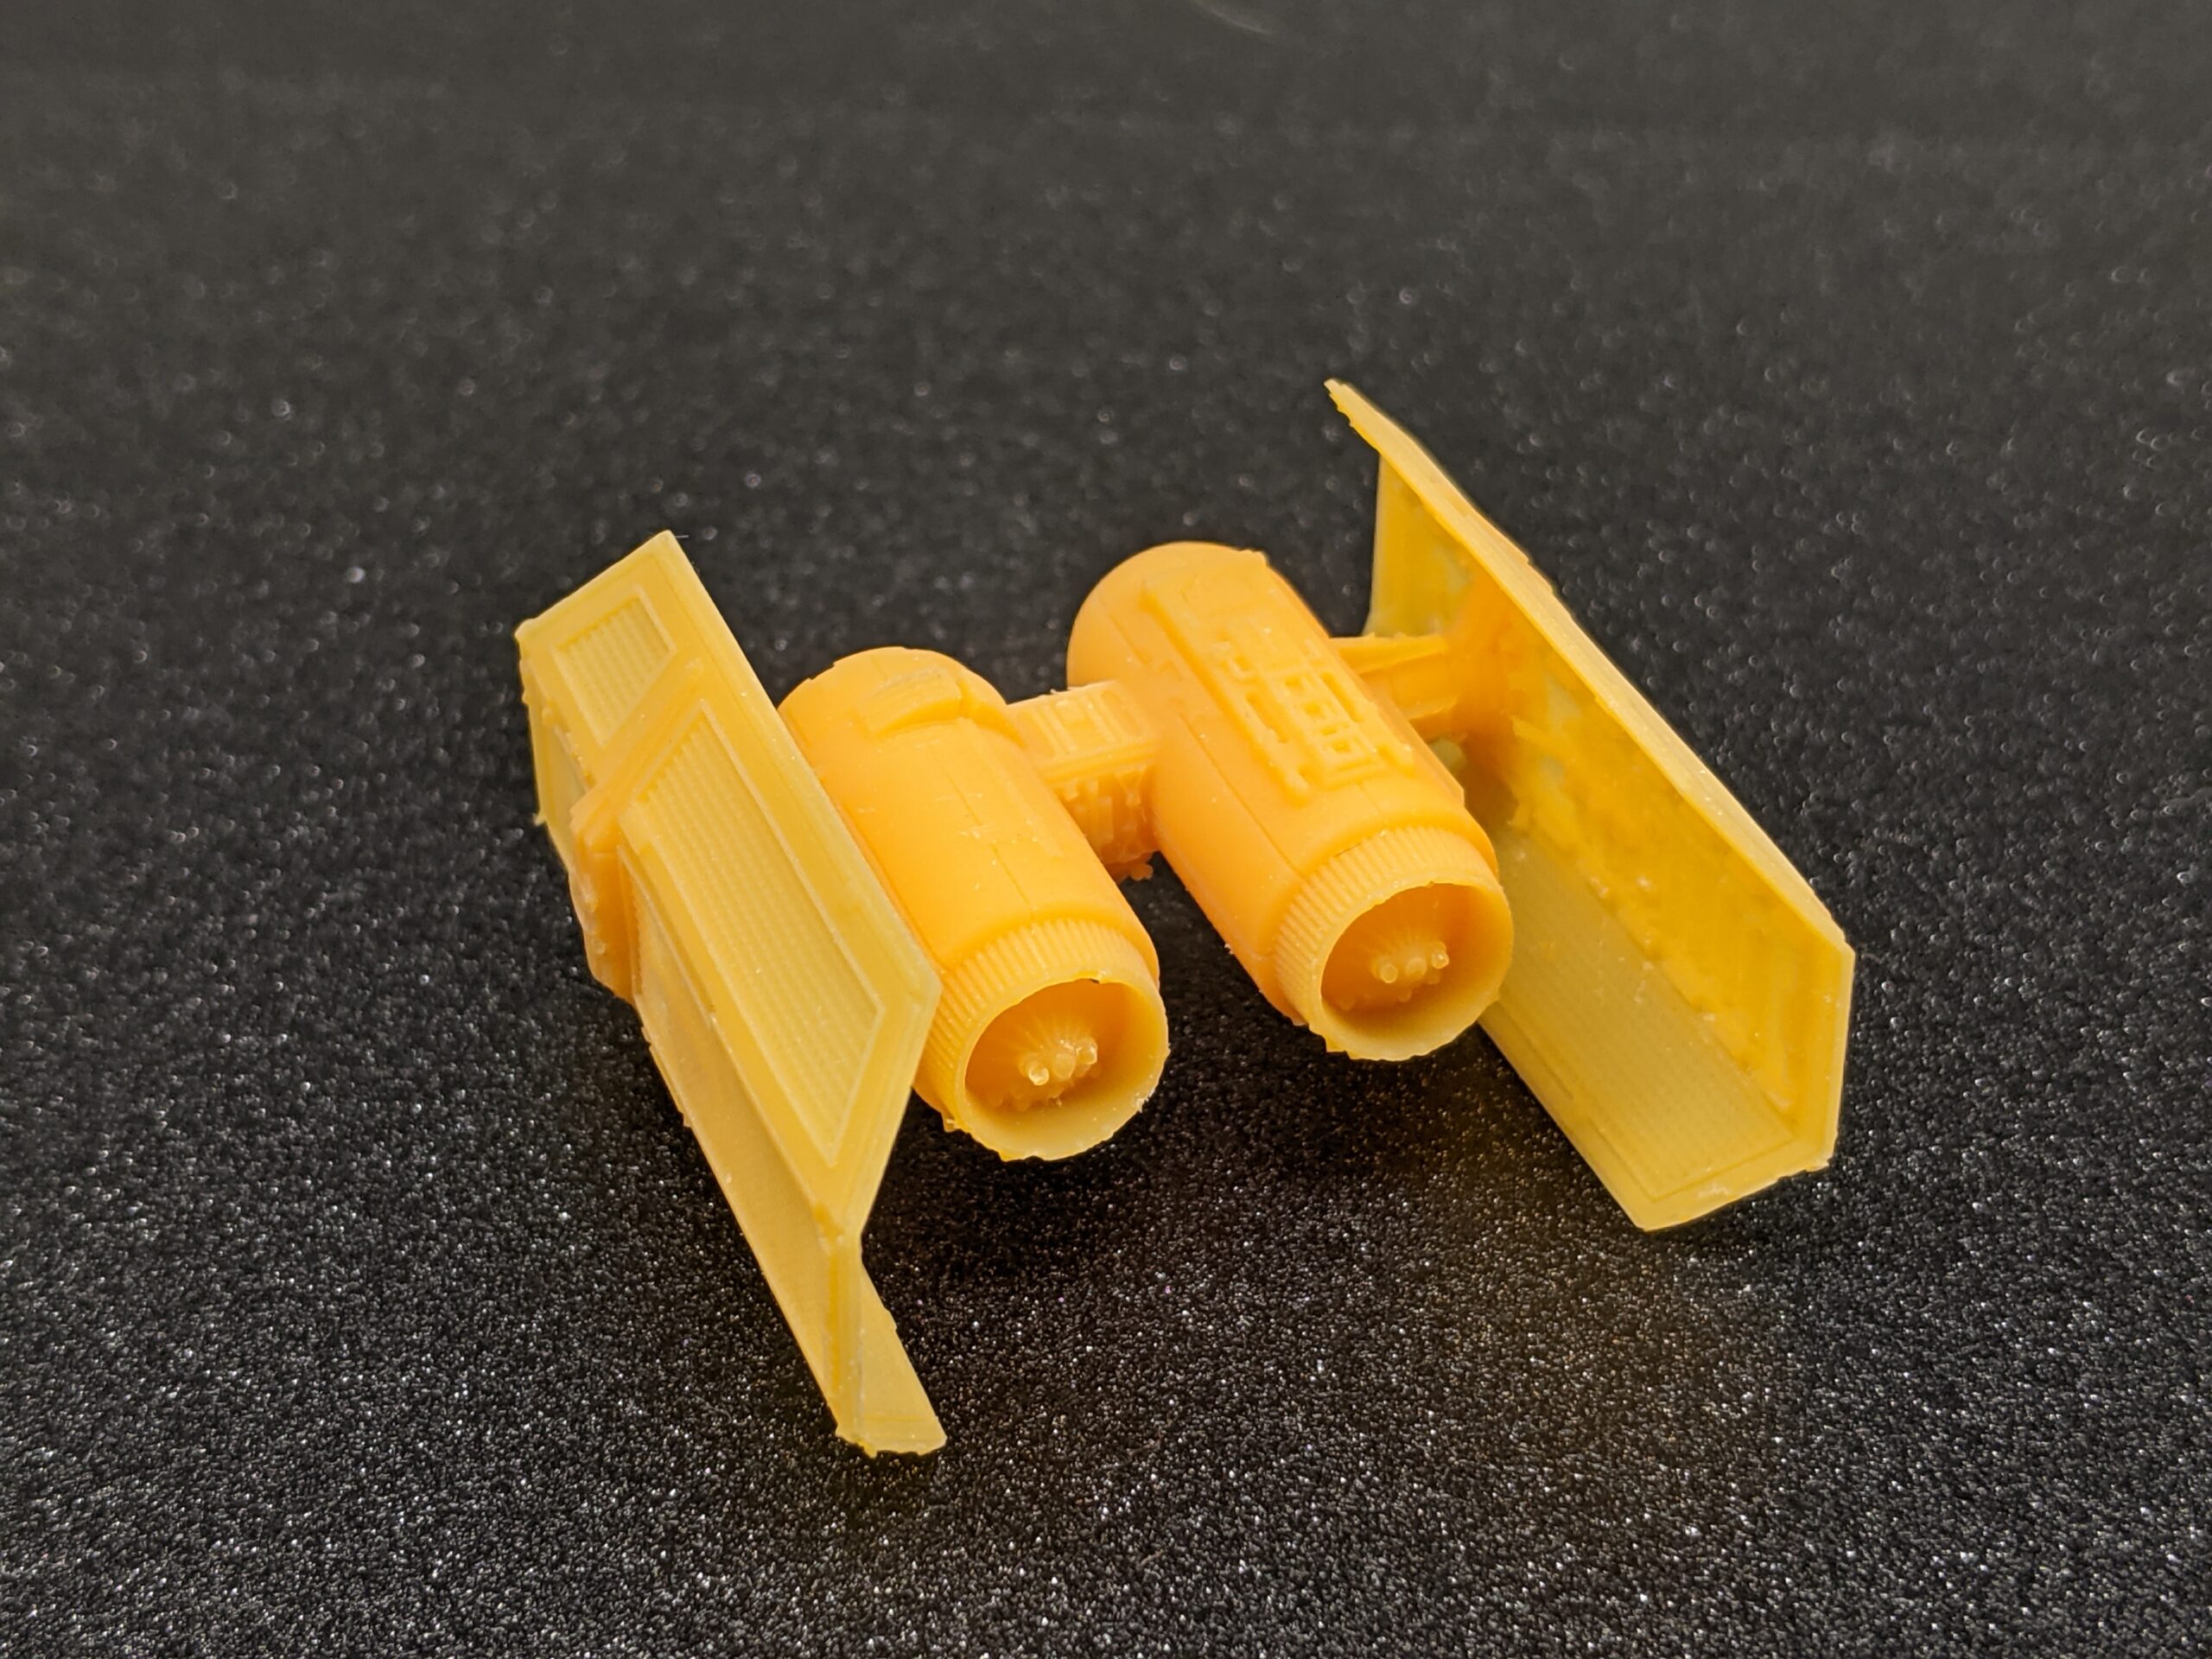
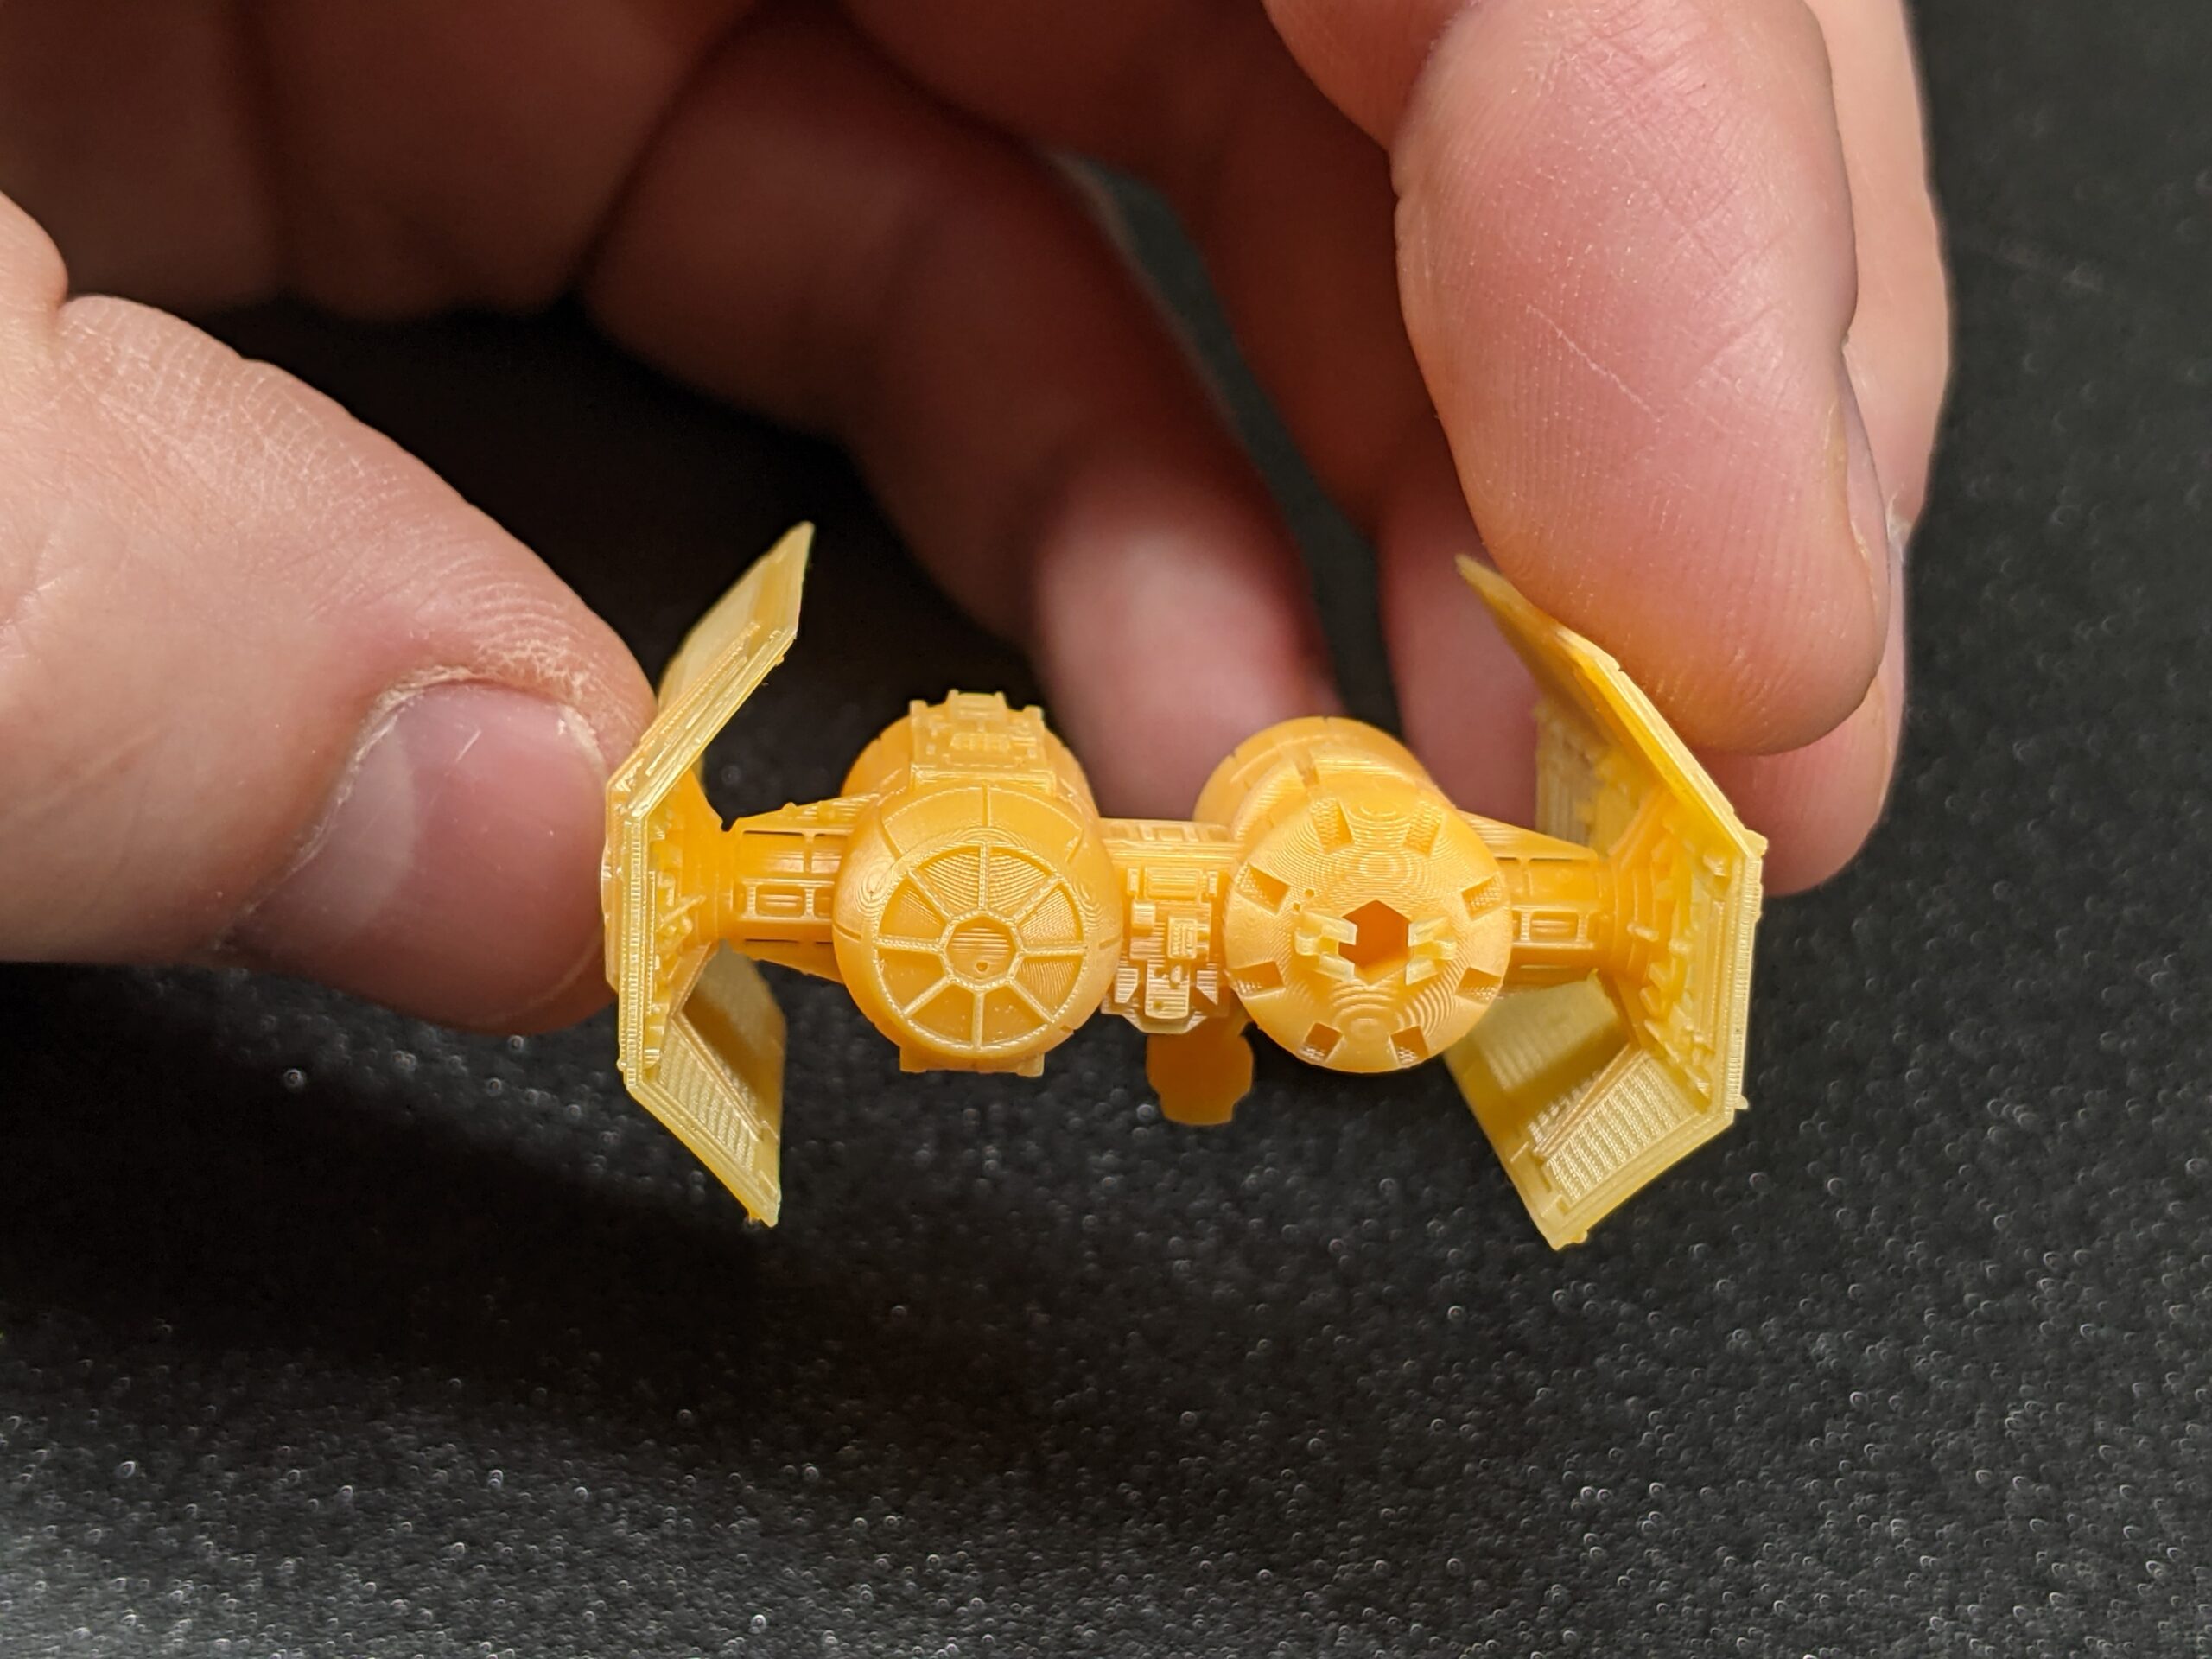
RE: TIE Bomber
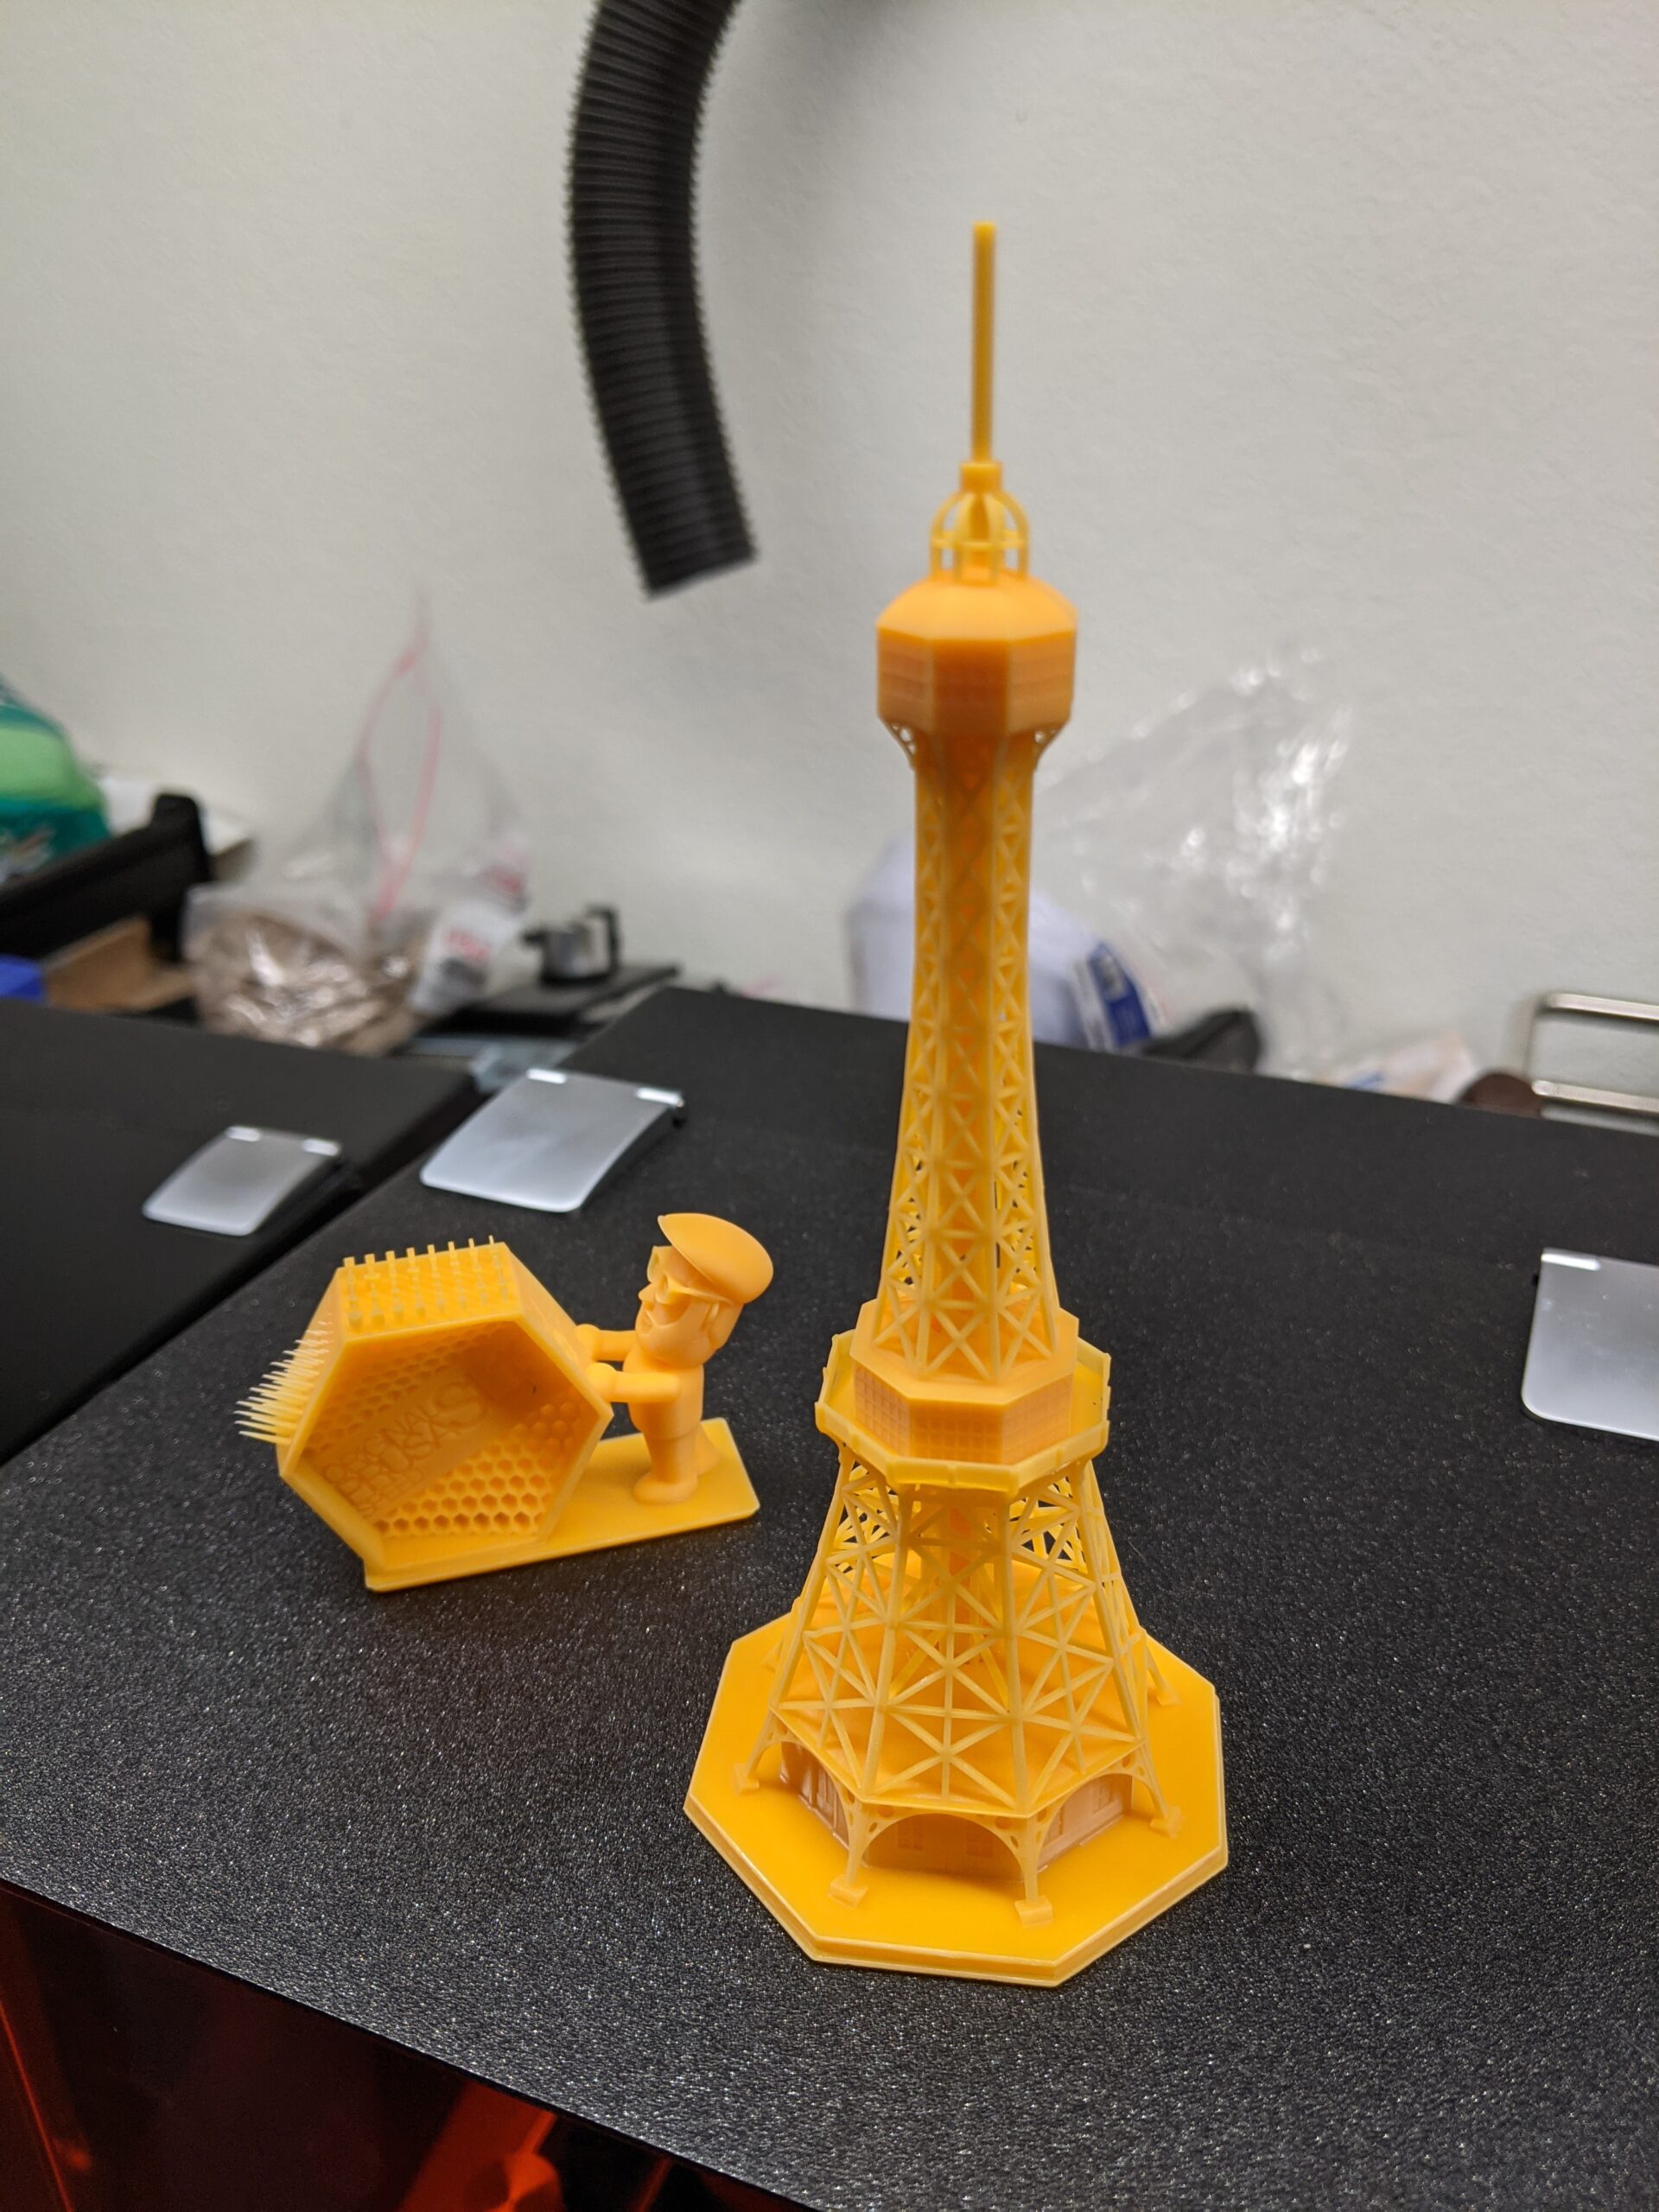
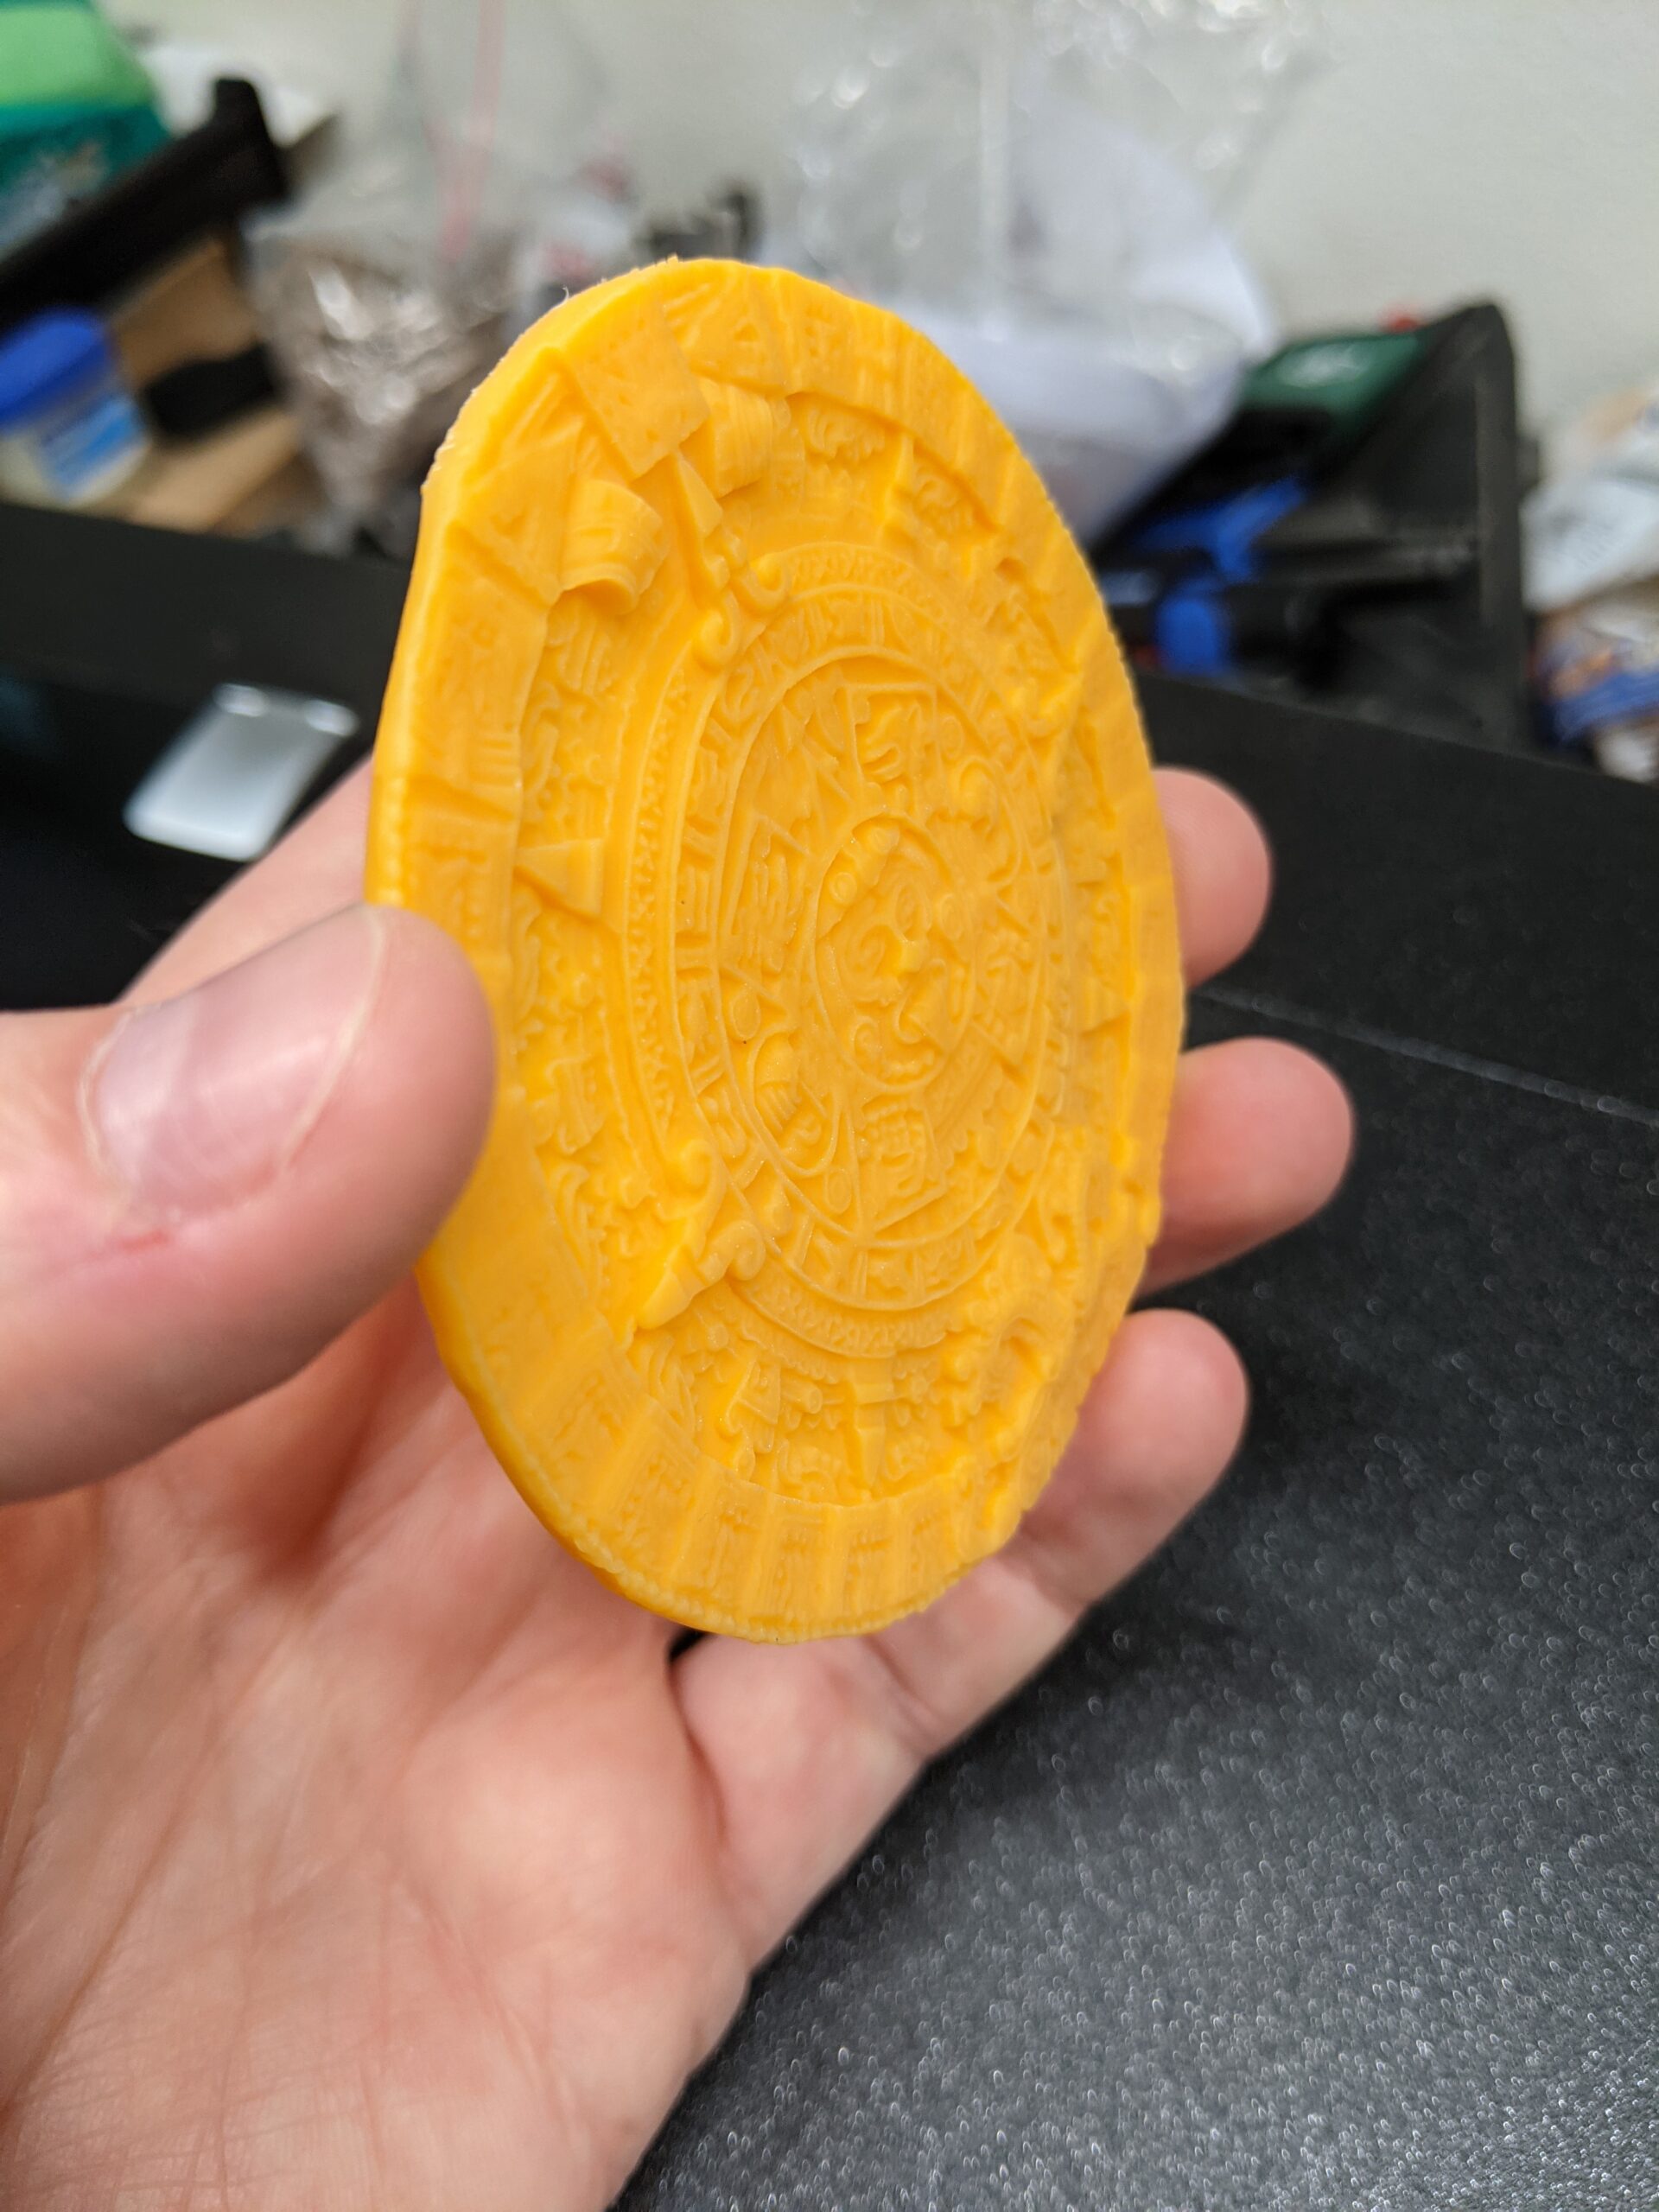
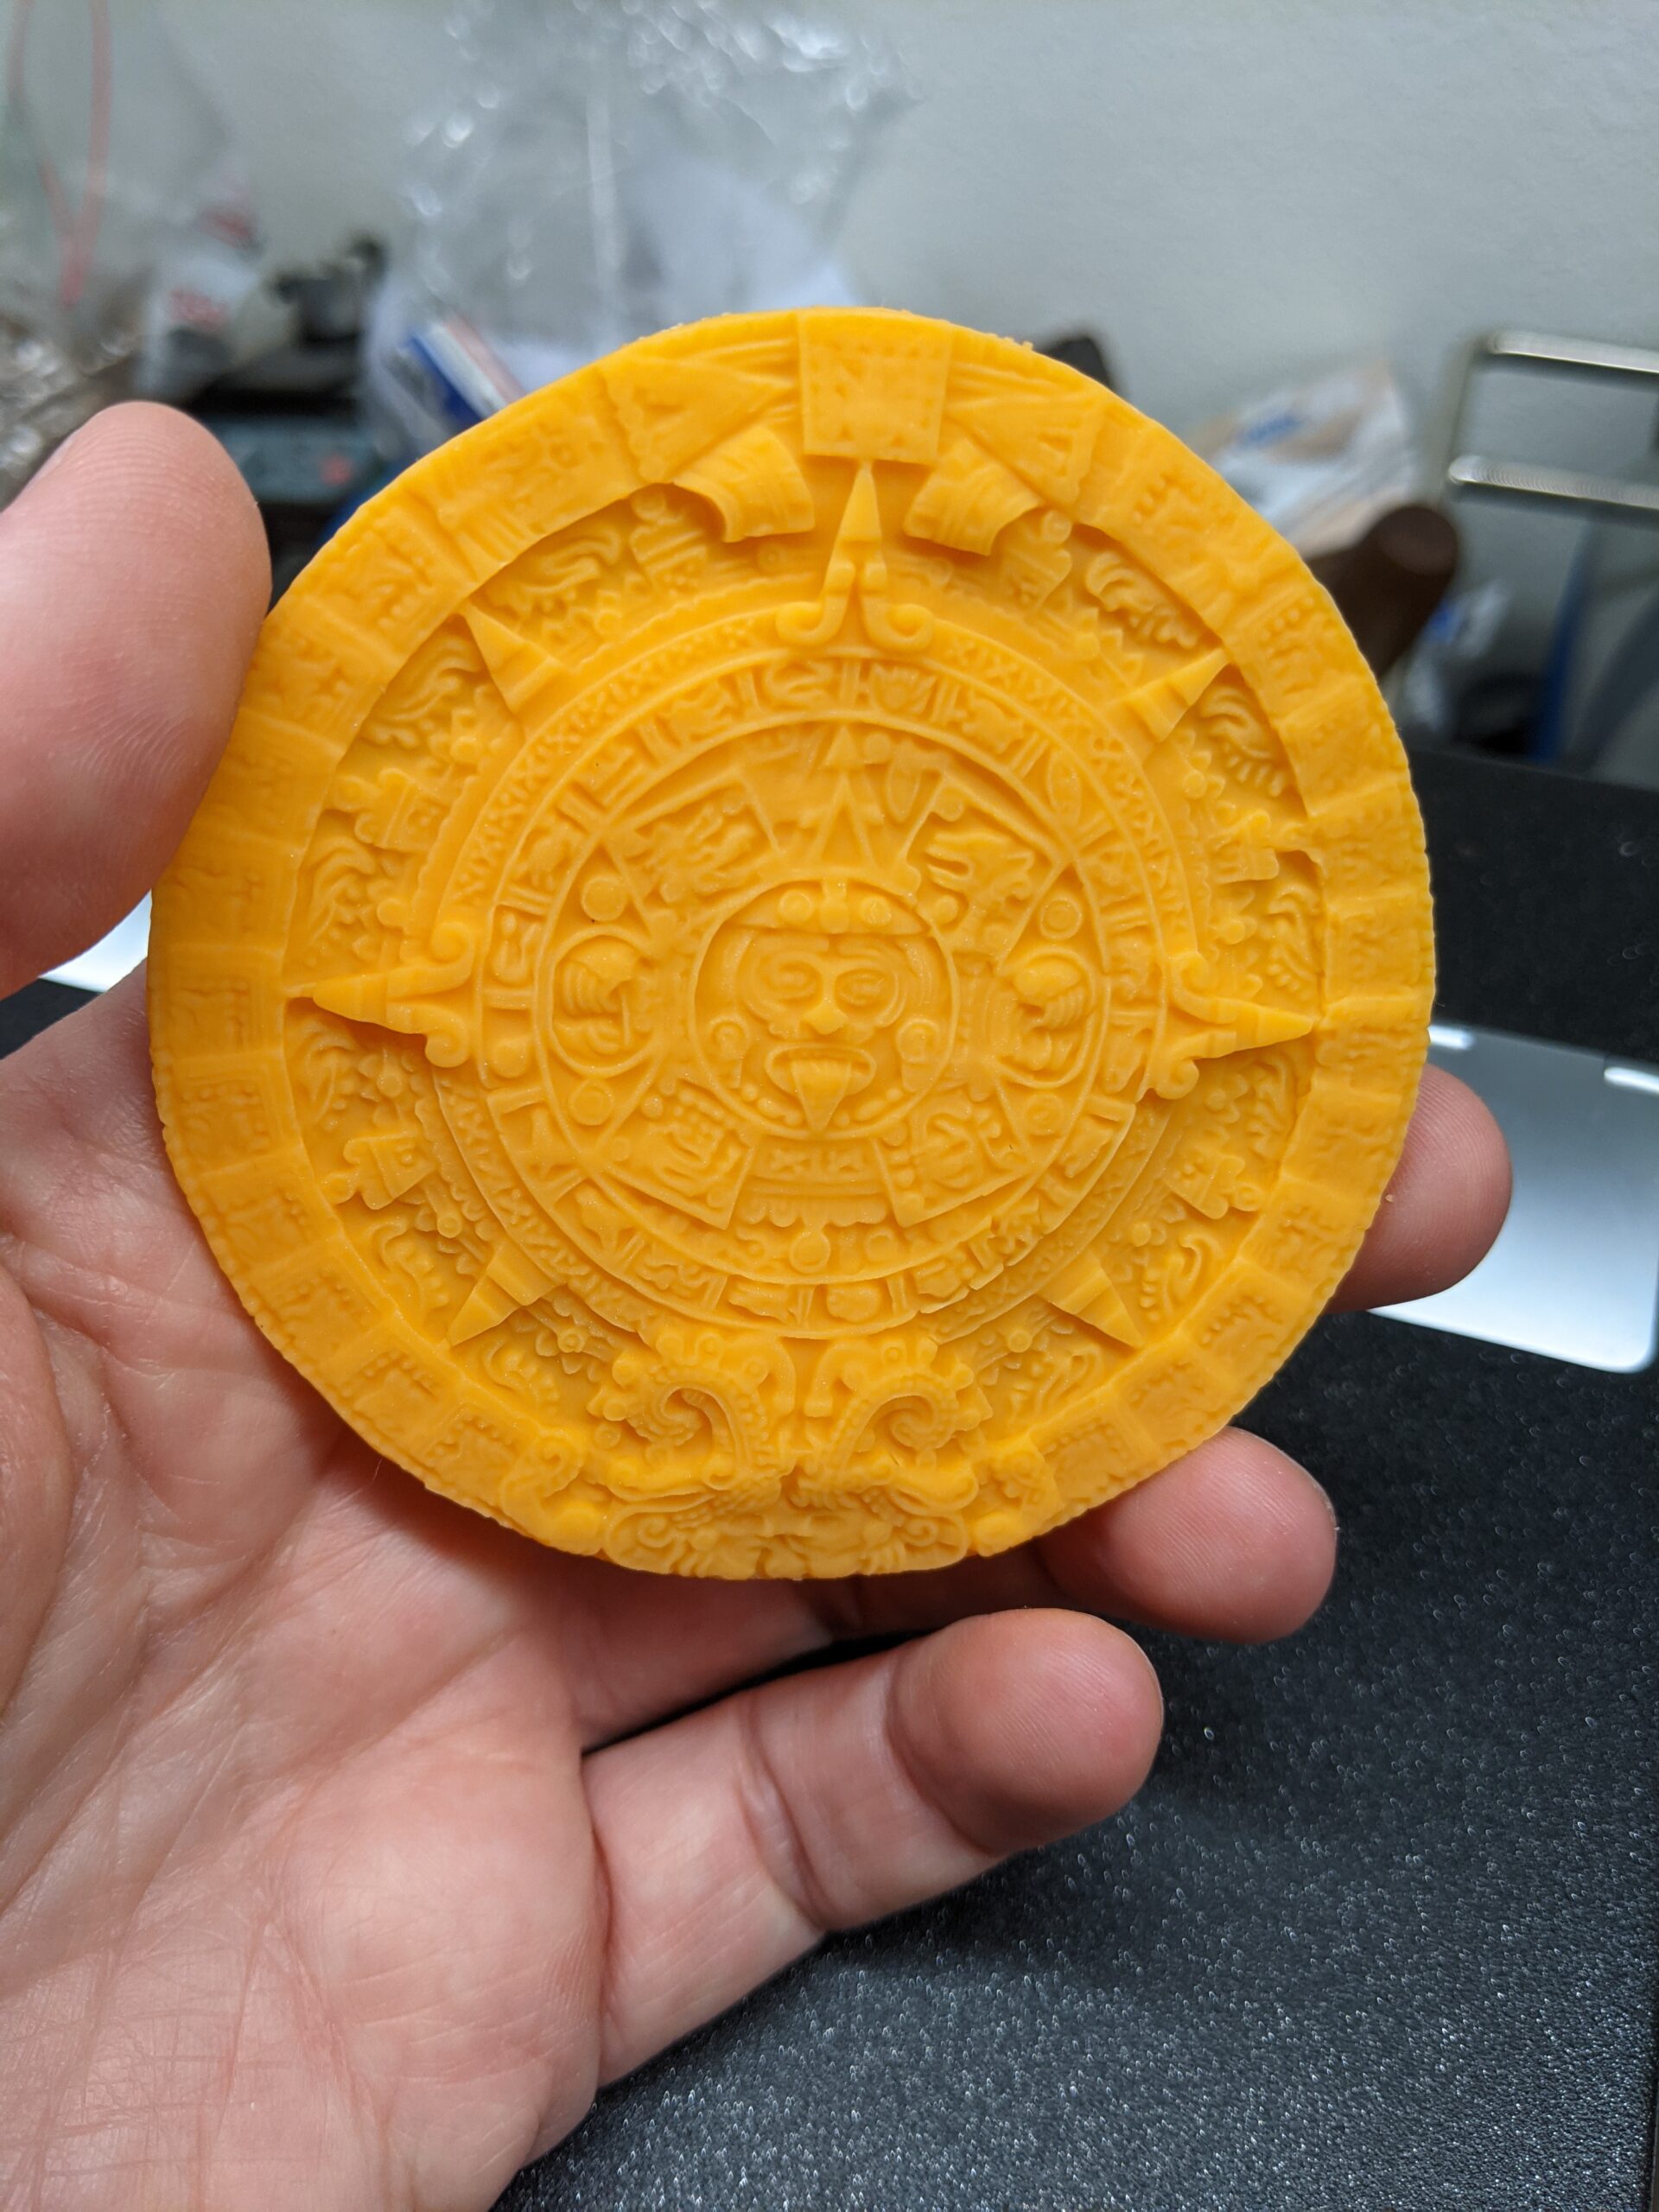
Got a little bit support-happy with this one, took a fair bit to get them all off and they left some marks, but overall not bad. I'm absolutely stunned with how well this thing prints, this was right at 1hr to print! I mostly did this one just to see how well it'd work, I couldn't have touched this with my FDM!
I'm really hoping they start deploying profiles for other resins soon, not even all the Prusa resins are in PrusaSlicer for the SL1S yet, unfortunately.
I'm really hoping they start deploying profiles for other resins soon, not even all the Prusa resins are in PrusaSlicer for the SL1S yet, unfortunately.
As negative as I am about the SL1, the built in resin calibration is a really nice feature. Pick the layer height you want and then pick best guess times.
Creating your own profiles is MUCH easier than for FDM. For normal resins, just copy a Prusa resin for the same layer height and then change the layer and initial times. No need to wait on Prusa.
Hmm
Unfortunately, it doesn't look like that's available in the SL1S yet. At least, following the directions for the SL1, the object files don't exist, and downloading the examples like the SL1 page directs does not give the resin calibration examples either. I'm researching it more, but unfortunately information for the SL1S, distinct from the SL1, is hard to come by as yet.
I'm really hoping they start deploying profiles for other resins soon, not even all the Prusa resins are in PrusaSlicer for the SL1S yet, unfortunately.
As negative as I am about the SL1, the built in resin calibration is a really nice feature. Pick the layer height you want and then pick best guess times.
Creating your own profiles is MUCH easier than for FDM. For normal resins, just copy a Prusa resin for the same layer height and then change the layer and initial times. No need to wait on Prusa.
WTF would they REMOVE functionality for? That feature is one of the bright spots on the SL1 in my opinion as it makes it dead simple to dial in the resin.
I let my SL1 upgrade it's firmware over the weekend and just checked, the calibration objects are still in the local "examples" folder. Have you confirmed that you are running the latest firmware? Maybe it shipped with a pre-release?
Eh
I *strongly* suspect it's still present, probably just moved. I think it might just be a different calibration object and way of getting to it with the SL1S.
Need that old-style calibration for the SL1S
I just received my SL1S and CW1S.
I went straight for the tower file as my first print.
I had the same overloaded tilt noises on the first few layers. Then it smoothed out and operated just fine.
The tower came out perfectly though.
I think that the FAST profile is a bit too fast for some of those early layers with the large base.
I think I saw a setting in the menu that would allow for different loads on the tilt before it switches to the slower (and I'm guessing higher torque) peel away.
And like you, I would REALLY like to find that calibration test that they had for the SL1.
https://help.prusa3d.com/en/article/sl1-resin-calibration-object_112182/
With so few resins in the database for the SL1S, we really need a quick and easy way to dial in new resins!
RE: SL1S First Print!
When they originally added the calibration object you had to first use the "Download examples" function to pull them down before they were available:
Anyone try that? Maybe they went back to that flow?
Resin calibration tool is coming
yep, download examples was my first step. Just spoke to someone in support who said the resin calibration tool will be available for Sl1S in the next firmware update. Claimed it would just be a few days. So . . . Yay!!