Messy Top Surface - Only with a Wide Surface
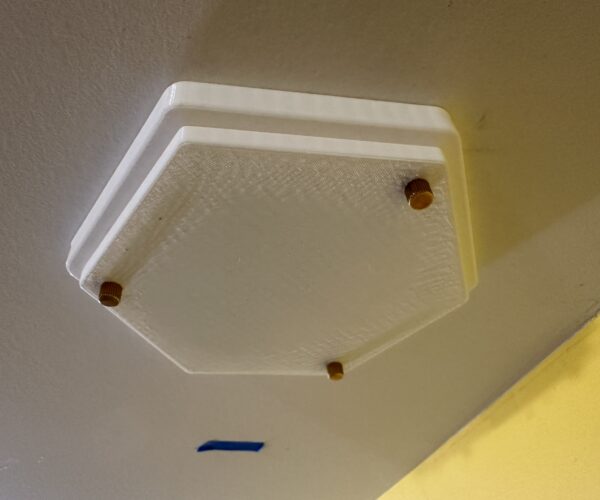
I'm getting a kind of wavy mess on top of some prints. Here's the problem piece (for orientation, it's mounted on the ceiling):
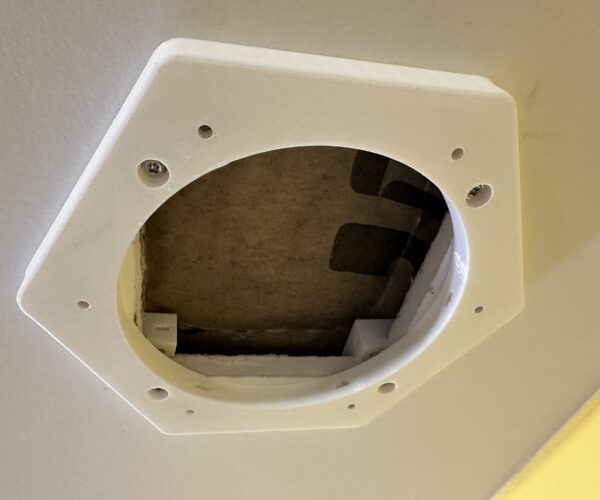
This is the part it's attached to. It's larger, as you can see in the top photo, but not by much.
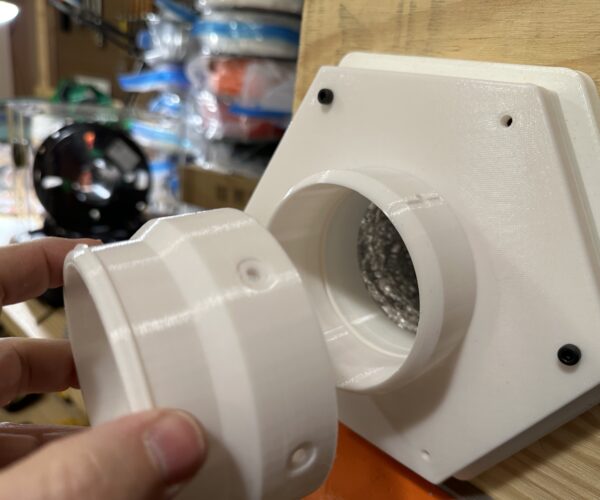
And this is a bit smaller than the problem piece. (Don't need feedback on what looks like a sloppy groove on the circular part - that's a prototype and I've fixed that.)
The wavy interference pattern shows up on the piece with the large flat expanse. It does not show up on the larger part that has a large circle cut out in the middle and does not show up on the slightly smaller piece that has a cylinder sticking up from the flat surface. (It looks like it has some issues, but that's more from light reflection.)
It wasn't much before this that I lubed everything and did a full round of maintenance on my printer - but I can get distracted, so I could always have missed something.
What's causing the rough waves on that first piece and what can I do to stop it?
It's warping. If you look at the underside you may see lines where the part partially detached from the print sheet. As the part warps away from the bed the upper layer(s) have fractionally less area than calculated and compession causes crumpling.
Your larger parts with cut-outs do not warp because the extrusion run is interrupted and the thermal contraction is dispersed among several shorter runs.
So: design a few slots into the part where they will not be seen so that the stress lines are broken.
Cheerio,
RE: Messy Top Surface - Only with a Wide Surface
It's warping. If you look at the underside you may see lines where the part partially detached from the print sheet. As the part warps away from the bed the upper layer(s) have fractionally less area than calculated and compession causes crumpling.
Ah! While the rest of your explanation helps, I never thought it would be something that could start at the bottom layer and be an issue with the whole object!
Your larger parts with cut-outs do not warp because the extrusion run is interrupted and the thermal contraction is dispersed among several shorter runs.
So: design a few slots into the part where they will not be seen so that the stress lines are broken.
What about using an adhesive on the bed instead of adding slots? There are some situations where I just need a larger flat surface, so adding lines would be an issue in some designs. And would I need them at the top layer or add something on the bottom, or both?Also, I'm thinking maybe I'd need something in the top that would not be just a few lines across in one direction, more like a bit of a mesh.
Also, since this isn't an issue with the one with the pipe on it, I'm wondering if I added, say, a circle that stuck up about 10-15mm above the surface, and maybe put a logo (also a relief above the surface), would that help? Or do I need something going down into the surface to break it up?
What about using an adhesive on the bed instead of adding slots?
Better to make sure the print-sheet is very clean and that you are not printing in a draft. You could add brim or mouse-ears. Glue stick is usually used to reduce adhesion.
would I need them at the top layer or add something on the bottom, or both?
Look at the underside of the print and decide which direction(s) of thermal contraction are causing the issue. Sometimes it's enough to break that direction of filament lay a few millimetres above the base - it's worth considering a different infill pattern, simple grid is not good in flat parts. A non intuitive option is a narrow void that does not break the surface anywhere but accommodates contraction internally.
Also, I'm thinking maybe I'd need something in the top that would not be just a few lines across in one direction, more like a bit of a mesh.
The top layer is contributing very little, it's showing the effect from contraction beneath.
this isn't an issue with the one with the pipe on it
Because the circular hole distorts imperceptibly and relieves the stresses.
Cheerio,
RE: Messy Top Surface - Only with a Wide Surface
I haven't had time to do test prints. There are three things that I want to try that may or may not help. One is to print a logo on the surface, but raised up a bit. Also to print the same logo or design recessed down into the surface. Lastly, since I'm putting together an MMU3, to see if printing a design with a different color filament might make a difference.
I realize those aren't on the list of suggestions, but those would be fairly easy to add to the printed object without significant change. (I'm also going to work on the issues about bed adhesion, too.)

