RE: MMU3 printable parts R4 (F1)
Printer-holder (R4)
There is no change to this part, no need to reprint existing setup.
Hello, Can you please update either this article or the print file names. "Printer-holder (R4)" is not listed in the parts download. I believe it should be called "buffer-holder-R4".
RISPONDI: MMU3 printable parts R4 (F1)
For those like me that have to upgrade the printer and the mmu3 at the same time must be a jungle with all this parts, I mean the instructions should be really clear to avoid having to go back and dismantle some pieces that needed to be replaced with new ones, the instructions are single for mk4 and mmu3, while instead they should also be for mk4 which will mount mmu3, are they? so as not to have to assemble and then disassemble all after a few hours to replace the parts, there are many pieces and many versions of them, I hope not to make confusion and have to assemble and reassemble the parts several times. anyway, still waiting for mmu3 for mk3s to mmu3 for mk4 upgrade kit in e-shop 😭
RE: MMU3 printable parts R4 (F1)
Hi Jakub
I have my MMU3 up and running using the R4 parts, but I have a question about the segments and the segmenter. I see a lot of muttering online about the need to reprint 10x segment halves, and I wonder if that's really the case. Your detailed explanation is perfectly clear that we have to print the new R4 parts, since the new segments don't sit so deep inside the buffer, and they therefore create the extra space needed for the buffered filament.
Out of curiosity I replaced one of the R4 segments with an R3 that I'd already printed, and it seems to work fine. The extra buffered filament does indeed stick out the back of the buffer, but in cases where some extra space behind the buffer is available, it seems like people could use the R3 segments if they wished. They seem to fit the R4 segmenter perfectly well - in fact the shorter arms even seem to grip the segmenter a little better. And while they might need a bit more space behind the segmenter, the trade-off is that they take up less space in front.
Is there another reason that the R4 parts are needed, or would it in fact be acceptable to use the R3 parts with the proviso that a little extra clear space at the back of the buffer is needed? If that's the case, I'm sure people would welcome a note to that effect so that they can choose not to print 10x the R4 versions.


Segment (R4)
If you are upgrading your current MMU3 setup to MK4/MK3.9 you have to reprint this part. Additionally, you'll need to print the Segmenter (R4).
Segmenter (R4)
If you are upgrading your current MMU3 setup to MK4/MK3.9 you have to reprint this part. Additionally, you'll need to print the Segment (R4).
RE: MMU3 printable parts R4 (F1)
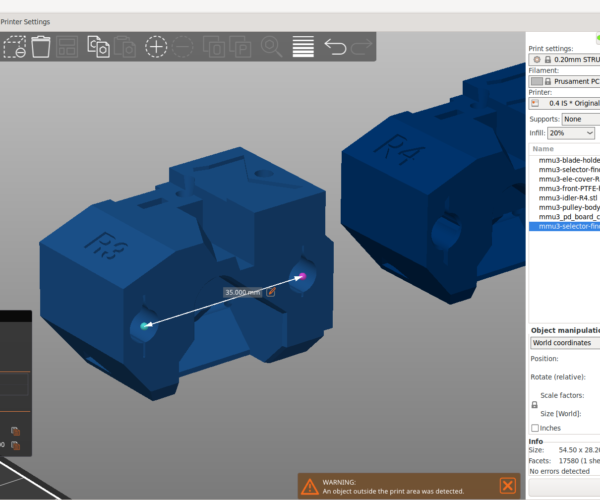
So I had some issues with the selector unit binding and tried to figure out what was going on - and unfortunately I think there's an error in the R4 model. They did tighten up the grip of the selector on the bushings, but it appears they also changed the distance between the holes. It looks like I'll be going back to the R3 pieces, as soon as I figure out a way to remove the bushings without damaging them 🫤.


RE:
For more context: I've been printing my parts with Prusament PC-CF, maybe the material works differently than PETG?
. . . and yes, going back to R3 did seem to resolve the binding problem.
@chris-hill did you have any issues with the selector unit? Did you print with the supplied PETG?
RE: MMU3 printable parts R4 (F1)
Hi Jeremiah
I printed the R4 selector from the supplied gcode, using a different brand of PETG. I haven't noticed any binding, but I really haven't done a great deal of filament changes with my unit yet - been too busy working on the enclosure setup. But I'll keep an eye on it now.
@chris-hill did you have any issues with the selector unit? Did you print with the supplied PETG?
RE: MMU3 printable parts R4 (F1)
Did you also check the spacing of the shaft holes on the R4 Pulley Body to see if the distance between them changed the same amount as the R4 selector?
So I had some issues with the selector unit binding and tried to figure out what was going on - and unfortunately I think there's an error in the R4 model. They did tighten up the grip of the selector on the bushings, but it appears they also changed the distance between the holes. It looks like I'll be going back to the R3 pieces, as soon as I figure out a way to remove the bushings without damaging them 🫤.
RE: MMU3 printable parts R4 (F1)
I just noticed you were using PS to measure the part, so I checked the R4 Pulley Body and the holes are 35.00mm. That does seem like an error.
RE: MMU3 printable parts R4 (F1)
Are there (or going to be) official Prusa printable parts for using the MMU3 with the official Prusa enclosure?
RE: MMU3 printable parts R4 (F1)
Hi,
Together with the release of the MMU3 upgrade for MK4 & MK3.9, we are also releasing updated printable parts. Please read the following text carefully, it explains all possible MMU3 combinations and describes changes in the printable parts. If you are already running your MMU3 setup, reprinting parts won't bring any significant difference.
MMU3 combinations
- MMU3 is currently compatible with the following printers:
- Original Prusa MK3S+
- Original Prusa MK3.5
- Original Prusa MK3.9
- Original Prusa MK4
- The MMU3 consists of 4 major parts:
- Spoolholders
- Buffer
- MMU unit (incl. power/data cable)
- MMU parts for the (N)extruder
The MMU3 was designed to be compatible with all the printers listed above, however, there are some parts, which are unique to each printer model. For example, if you want to move your MMU3 from MK3S+ to MK4, you have to change the power/data cable, upgrade some printable parts and get parts for the Nextruder.
To make your transition easier, we have prepared these upgrade sets:
- MK3S+ MMU3 to MK3.5 MMU3 => e-shop link
- MK3S+ MMU3 to MK4/MK3.9 MMU3 => e-shop link coming soon
Printable parts F1/R4
Printable parts from this “MK4 release” iteration are marked either F1 (printed on Prusa farm) or R4 (available on Printables). It's important to note that there is no functional difference between F1 and R4 parts. The different markings are solely intended to help our colleagues from support with eventual troubleshooting.
Now, let's go through the four major MMU parts and explain the differences:
1. Spoolholders
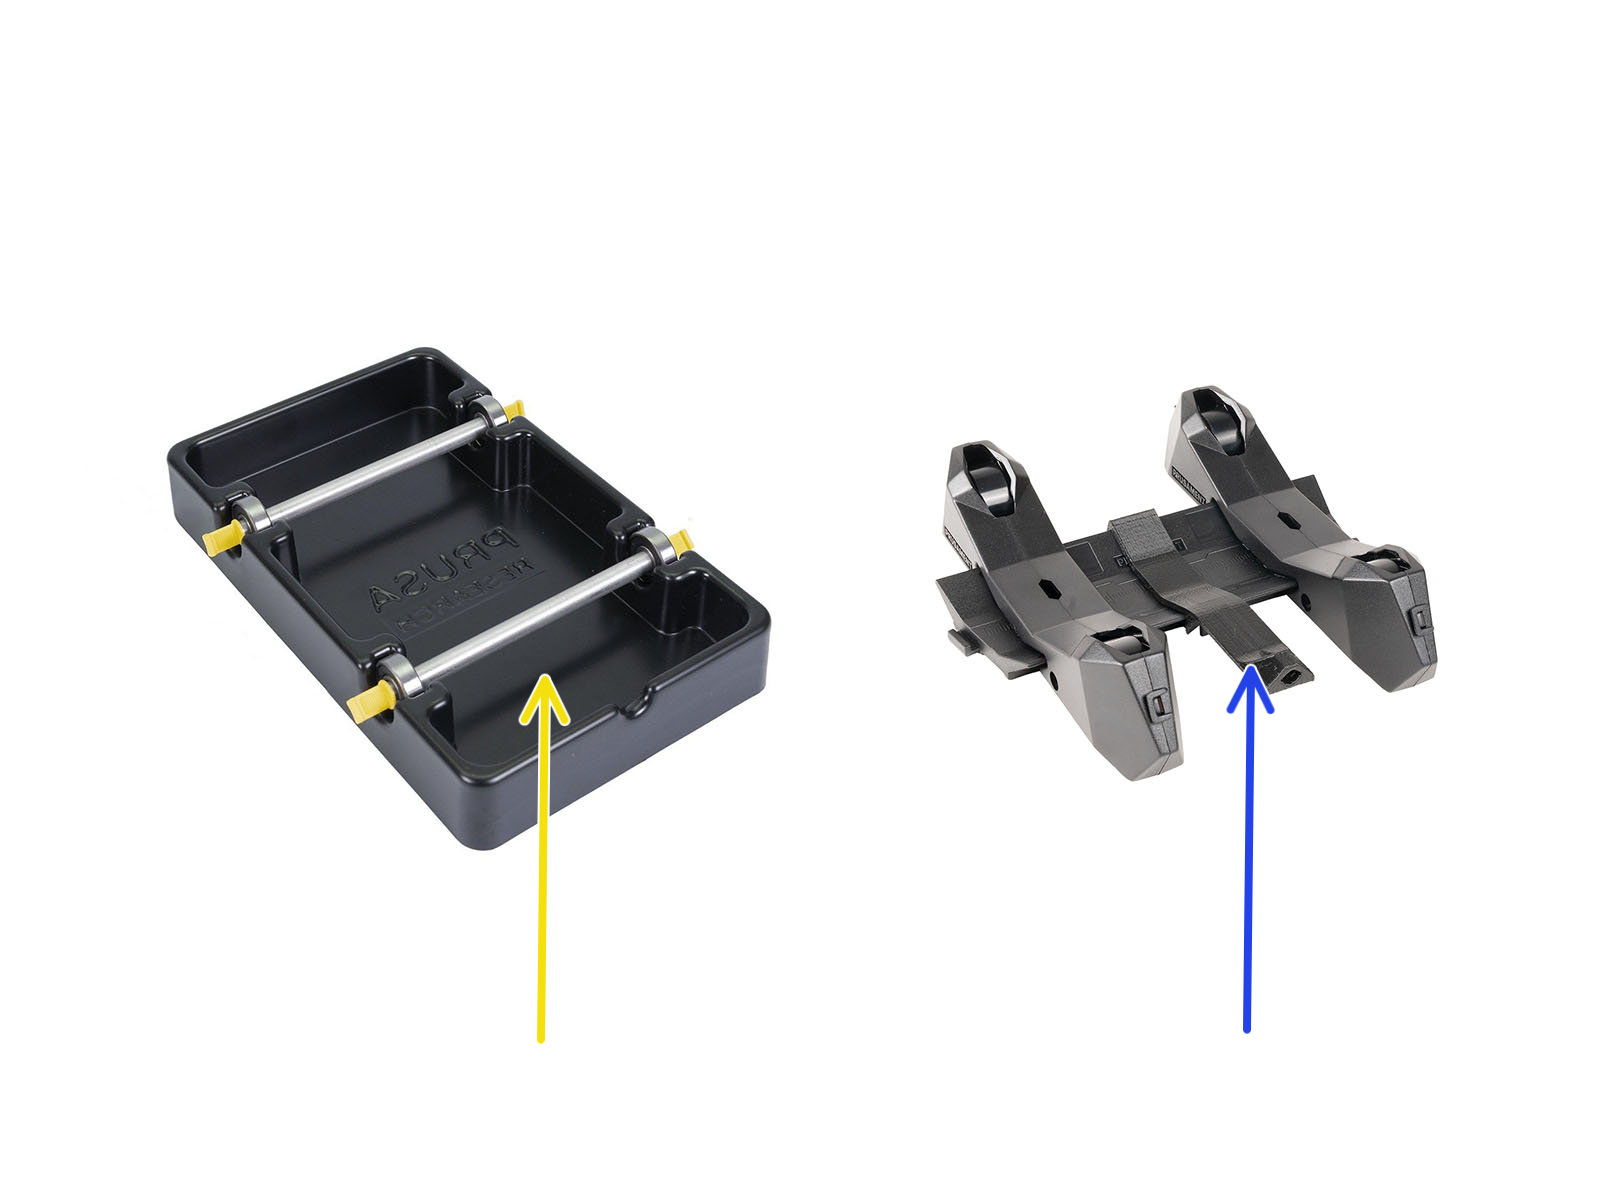
The MMU3 was originally shipped with vacuum-formed spool holders, consisting of steel bearings and aluminum rods. These spool holders are compatible with all supported MMU3 and printer combinations. You can continue using them, even if you move your MMU3 to a different printer.
MMU spoolholders: Vacuum-formed (on the left, yellow arrow) and Injection-molded (on the right, blue arrow)
At the beginning of 2024, we introduced an updated injection-molded variant of the spool holders, offering improved spool arrangement and the ability to connect the holders together. These new holders are compatible with all supported MMU3 and printer combinations, with a small exception. After months of extensive testing, we found that worn wheels could potentially lead to loading issues specifically on MK4 and MK3.9 setups. As a preventive measure, we've upgraded the material of the wheels, and MK4/MK3.9 MMU3 packages will now include these updated wheels. If you're using MK3S+ and MK3.5 setups, there shouldn't be any issues. However, if you're upgrading your existing MK3S+ MMU3 setup to MK4/MK3.9, we recommend changing the wheels (wheels are part of the upgrade package).
Conclusion: There are no changes in the MK3S+ and MK3.5 setups. However, for MK4 and MK3.9 setups, it's recommended to change the new spool holder wheel for the injection molded variant (part of the upgrade package).
2. Buffer
The buffer consists of plastic plates and printable parts. During the testing of the MK4/MK3.9, we discovered that the space inside the buffer is slightly smaller than needed. To keep the compatibility across all printers, the plates will remain unchanged, but we have updated the printable parts. Specifically, the cassettes were slightly repositioned outward from the buffer, resulting in increased internal capacity.
Leg (R4)
There is no change to this part, no need to reprint existing setup.
Plate-holder (R4)
There is no change to this part, no need to reprint existing setup.
Printer-holder (R4)
There is no change to this part, no need to reprint existing setup.
Segment (R4)
If you are upgrading your current MMU3 setup to MK4/MK3.9 you have to reprint this part. Additionally, you'll need to print the Segmenter (R4).
Segmenter (R4)
If you are upgrading your current MMU3 setup to MK4/MK3.9 you have to reprint this part. Additionally, you'll need to print the Segment (R4).
Wheel (R4)
There is no change to this part, no need to reprint existing setup.
Conclusion for Buffer : There are no changes in the MK3S+ and MK3.5 setups. However, for MK4 and MK3.9 setups, it is recommended to use the new cassette design. Cassettes with their updated dock, called segmenter, can be reprinted from PETG.
3. MMU unit
The MMU unit consists of multiple printable and mechanical parts. While there are no changes to the mechanical components (such as motors, pulleys, main MMU board, etc.), nearly every printable part of the MMU unit has been updated. This doesn't mean that you have to reprint your existing MMU unit. These changes primarily focus on improving printability and refining the dimensions of openings, thus allowing for even better assembly. For the MK4/MK3.9 we are introducing a new part, which can be applied to the older setups improving the ESD protection. You can find more information below.
Blade-holder (R4)
This part has been updated, and the new version offers slight improvements in two areas. First, the blades are now slightly tilted to reduce the resistance and the screw is brought closer to the blades to provide more grip. However, if your current blade holder is working fine, there is no need to reprint it. Please note, that this part must be paired with Selector and Pulley-body (both R4).
Collet-holder (R4)
There is no functional improvement in this update. The developers have changed only the position of the arrow. If your collet holder is working properly, there is no need to reprint it.
Ele-cover (R4)
This part is responsible for securing the MMU control board. The new iteration is improving protection against electrostatic discharge (ESD) together with a new printed part PD-board-cover (described below). During the laboratory tests, we discovered that the MK4/MK3.9 electronics are more sensitive to the ESD. To ensure sufficient protection in all possible conditions, we have updated this part. If your working environment charges you up with “energy”, we recommend updating these two parts on your existing setup. They are compatible with surrounding R3 parts.
PD-board-cover (R5)
As described in the previous section, this new cover improves protection against ESD and must be paired (printed together) with Ele-cover (R4).
Frame-holder (R4)
There is no functional improvement, there is no need to reprint this part.
Front-PTFE-holder (R4)
Based on the feedback from the community, the design of the openings for PTFE tubes was improved. The seams were moved further away from the opening, ensuring easier assembly regardless of whether the part was printed on Prusa farm or at home. Reprinting this part for existing setups is not needed.
Idler (R4)
While updating the parts, we have also refreshed the idler. Some users reported that the pin closest to the outside bearing seemed to be too loose. The design was updated and the hole for the pin is now tighter. Updating existing setups is not required unless your pin is loose.
Idler-body (R4)
There is no functional improvement, there is no need to reprint this part.
Label-plate (R4)
There is no functional improvement in this update, so there is no need to reprint this part. Additionally, the Label-plate is included in all packages because post-processing (labeling) is done at our factory and cannot be easily replicated at home.
PTFE-clip (R4)
There is no functional improvement, there is no need to reprint this part.
Pulley-body (R4)
Similarly to the Front-PTFE-holder the design of the openings was improved. In this case to enable easier assembly of the smooth rods. Ensuring that the selector will move without any resistance. If your MMU3 unit is working as expected, there is no need to reprint this part.
Selector (R4)
The design of the selector is bound to the Blade-holder mentioned earlier. Another change was made to the openings for smooth rods, where the tolerance was tightened to improve the grip of the "golden" bushing tubes.
Selector-front-plate (R4)
There is no functional improvement, there is no need to reprint this part.
Conclusion for MMU unit: For the existing MK3S+ and MK3.5 setups there is no need to update the parts. The only thing to consider is printing the updated Ele-cover with PD-board-cover. Owners of the MK4/MK3.9 should print the R4 revisions. However, if you have pre-printed the R3 parts, print the R4 versions of the Ele-cover and PD-board-cover.
4. MMU parts for the Nextruder
All the parts below are included in the MK4/MK3.9 MMU3 packages, regardless if you have selected MMU3 with or without printed parts. There is no need to print them.
Idler-lever-A (R2)
This is a brand new part for the MMU MK4/MK3.9 Nextruder designed to replace the existing lever. Long-term testing has shown that this part performs best when printed from PCCF or similar material, therefore it is printed on Prusa farm and included in all packages. However, an STL file will be available to download on the Printables.
Note that this part is not compatible with the MK3S+ or MK3.5 due to a completely different extruder design.
Idler-lever-B (R2)
This is a brand new part for the MMU MK4/MK3.9 Nextruder designed to replace the existing lever. Long-term testing has shown that this part performs best when printed from PCCF or similar material, therefore it is printed on Prusa farm and included in all packages. However, an STL file will be available to download on the Printables.
Note that this part is not compatible with the MK3S+ or MK3.5 due to a completely different extruder design.
Idler-nut-FS (R2)
This is a brand new part for the MMU MK4/MK3.9 Nextruder designed to replace the existing filament sensor assembly (ball holder, ball, magnet and spring). Long-term testing has shown that this part performs best when printed from PCCF or similar material, therefore it is printed on Prusa farm and included in all packages. However, an STL file will be available to download on the Printables. This part requires a magnet inserted in the slot; the magnet is part of the package.
Note that this part is not compatible with the MK3S+ or MK3.5 due to a completely different extruder design.
Main-plate (R2)
This is a brand new part for the MMU MK4/MK3.9 Nextruder designed to replace the existing main-plate. Long-term testing has shown that this part performs best when printed using the MJF technology, therefore it is included in all packages (1+1 spare). However, an STL file will be available to download on the Printables. Using materials like PETG or PCCF is possible, but may significantly reduce the lifespan of the part.
Note that this part is not compatible with the MK3S+ or MK3.5 due to a completely different extruder design.
PG-assembly-adapter (R1)
This part is needed when assembling or servicing the planetary gearbox. Printing at home is possible, however, tighter tolerances are required, therefore this part is included in all MK4 MMU3 packages. STL file is available to download on the Printables.
Note that this part is not compatible with the MK3S+ or MK3.5 due to a completely different extruder design.
Screw-guide (R2)
This is a brand new part for the MMU MK4 Nextruder designed for the idler tension screws. It can be printed from PETG, however it is included in the package. STL file will be available to download on the Printables.
Note that this part is not compatible with the MK3S+ or MK3.5 due to a completely different extruder design.
Swivel-A (R2)
Brand new part for the MMU MK4 Nextruder designed to replace the existing swivel. Long-term testing has shown that this part performs best when printed from PCCF or similar material, therefore it is printed on Prusa farm and included in all packages. However, an STL file will be available to download on the Printables.
Note that this part is not compatible with the MK3S+ or MK3.5 due to a completely different extruder design.
Swivel-B (R2)
Brand new part for the MMU MK4 Nextruder designed to replace the existing swivel. Long-term testing has shown that this part performs best when printed from PCCF or similar material, therefore it is printed on Prusa farm and included in all packages. However, an STL file will be available to download on the Printables.
Note that this part is not compatible with the MK3S+ or MK3.5 due to a completely different extruder design.
Conclusion for Nextruder: All necessary printable parts are provided in the package. If you need to replace any of them, it is recommended to use PCCF or similar material. In case of the main-plate it is recommended to get a spare MJF set from our e-shop. You can also print all parts from PETG/ASA, however their resistance against stresses and wear is lower than the original parts from Prusa.
Is it possible to mix previous R3 parts with the latest R4 parts?
=> Yes, it is possible with some exceptions.
- Blade-holder, Pulley-body, Selector - all three parts must be R4
- Ele-cover, PD-board-cover - both parts must be R4
- Segmenter, Segment - both parts must be R4
Non-printable part: Festo QSM-M5
Existing MMU3 setups already utilize Festo fittings. However, with the introduction of the MK4/MK3.9 MMU3, we are now shipping the same fittings with an increased internal diameter of 2.6 mm. This information is crucial for those upgrading to the MK4/MK3.9 MMU3 from an existing setup. When replacing the old PTFE tube and fittings, it's essential to discard them to avoid any mixing with the new Festo fittings. Your package includes the updated fittings along with the new tube.
Link to G-codes and STL files:
https://www.printables.com/model/531604-mmu3-printable-parts
In closing, should you have any questions, feel free to ask. Happy printing!
Is there anyway i can used the pd board civer with the originail mk3 mmu3 electronics cover
Please help me out by downloading a model it's free and easy but really helps me out https://www.printables.com/@Hello_474427/models
RE: MMU3 printable parts R4 (F1)
The MMU3 was designed to be compatible with all the printers listed above, however, there are some parts, which are unique to each printer model. For example, if you want to move your MMU3 from MK3S+ to MK4, you have to change the power/data cable, upgrade some printable parts and get parts for the Nextruder.
To make your transition easier, we have prepared these upgrade sets:
- MK3S+ MMU3 to MK3.5 MMU3 => e-shop link
- MK3S+ MMU3 to MK4/MK3.9 MMU3 => e-shop link coming soon
HI,
any Idea when the Upgrade kit drops ?
Used MMU3 for my Mk3s and now i wanna use it for one of my MK4´s , is it possible to order just the Powercable at the moment and use it with the "standard" extruder setup ?
regards
RE: MMU3 printable parts R4 (F1)
The MMU Filament sensor is different to the standard setup
the standard filament sensor ball moves to the right and triggers hall effect filament sensor, before the filament gets to the big extruder gear causing the planetary gear to start turning and feed the filament.
when the MMU Feeds filament, it feeds quickly, until just before it expects the filament to arrive at the Extruder planetary gear, then the MMU Slows filament feed and the printer starts the planetary gear rotating, ready to feed the filament to the nozzle.
the MMU Filament sensor waits for the filament to be presented to the planetary gear, at which time, the filament is driven past the idler roller in the extruder, this motion causes the idler lever to deflect, which in turn, causes the idler lock / swivel, to move to the left and pull the filament sensor lever to the left which triggers the hall effect sensor, causing the MMU to disengage leaving the extruder planetary gear to control the filament

If you use the standard filament sensor instead of the revised MMU Filament sensor, the filament will trigger the sensor, before it reaches the extruder planetary gear, and the extruder will not be able to take control of the filament, before the MMU releases control of the filament.
I believe that you can instruct the MMU to feed the filament a little further before releasing control, which might resolve this issue, but I have never tried it.
regards Joan
I try to make safe suggestions,You should understand the context and ensure you are happy that they are safe before attempting to apply my suggestions, what you do, is YOUR responsibility.Location Halifax UK
RE: MMU3 printable parts R4 (F1)
I'm curious about a design "feature" that I noticed on a couple parts. For the m3-pully-body and the m3-idler-body there are a bunch of squares that print as just the borders for the first layer and then are filled in on the second layer. It creates an interesting visual feature but what is the point? Does it help with warping by breaking up the first layer or something?
I actually asked about that with their support, and got this response:
I'm following up on our last chat conversation. You asked about the squares and their purpose: it was designed like this because previously it was printed on the non flexible heatbeds and it was hard to remove it easily. This is actually all 🙂 Have a nice day
RE: MMU3 printable parts R4 (F1)
Ah okay i see , i printed all parts new in ABS , should work i think .... will test it after the Cable arrives
RE: MMU3 printable parts R4 (F1)
Anyone printed the whole unit in PCCF?
what is your experience?
I just done MK4 overhaul and the rods were hard to fit in in PCCF, very tight.
the rest was perfect fit and work like a charm. no ghosting rippling etc...
RE: MMU3 printable parts R4 (F1)
Anyone printed the whole unit in PCCF?
what is your experience?
I just done MK4 overhaul and the rods were hard to fit in in PCCF, very tight.
the rest was perfect fit and work like a charm. no ghosting rippling etc...
I got binding and determined the dimensions are off. Unfortunately they have been silent about the issue, it looks like R3 is needed for some pieces at the moment, especially if you're printing in PC-CF. The rods bind if I use all R4 pieces.
RE: MMU3 printable parts R4 (F1)
I've decided to use R3 for the selector and blade-holder and R4 for everything else. Hopefully that works. Printing the parts using PC-CF.
RE: MMU3 printable parts R4 (F1)
I've decided to use R3 for the selector and blade-holder and R4 for everything else. Hopefully that works. Printing the parts using PC-CF.
The first post literally says that the selector, blade-holder AND pulley-body all need to be of the same revision...
RE: MMU3 printable parts R4 (F1)
I've decided to use R3 for the selector and blade-holder and R4 for everything else. Hopefully that works. Printing the parts using PC-CF.
The first post literally says that the selector, blade-holder AND pulley-body all need to be of the same revision...
Well - kinda.
The description of the R4 blade-holder says that they changed the tilt of the blades and the screw is closer to provide more grip. The selector is ditto, but they also changed the openings for the smooth rods. That particular change should only affect the width of the openings, but they changed the position too. That causes binding with PC-CF from what I can tell.
If the R3 selector slides better, then I don't really see that the incompatibility listed should affect anything.
The R4 pulley description focuses purely on the smooth rods as well. If the rods slide smoothly for me, then I don't really see any other incompatibilities listed.
I really don't want to disassemble the pulley-body again, and I can't use the R4 selector with the R4 pulley-body. I'll take the risk I think.