MMU 2.0 First couple days
Hello,
Just would like to share my first out of the box experience of my newly installed MMU 2.0. In short, I'm impressed. Firmware MK3 3.4.2, MMU 1.0.2, Slic3r 1.41.1
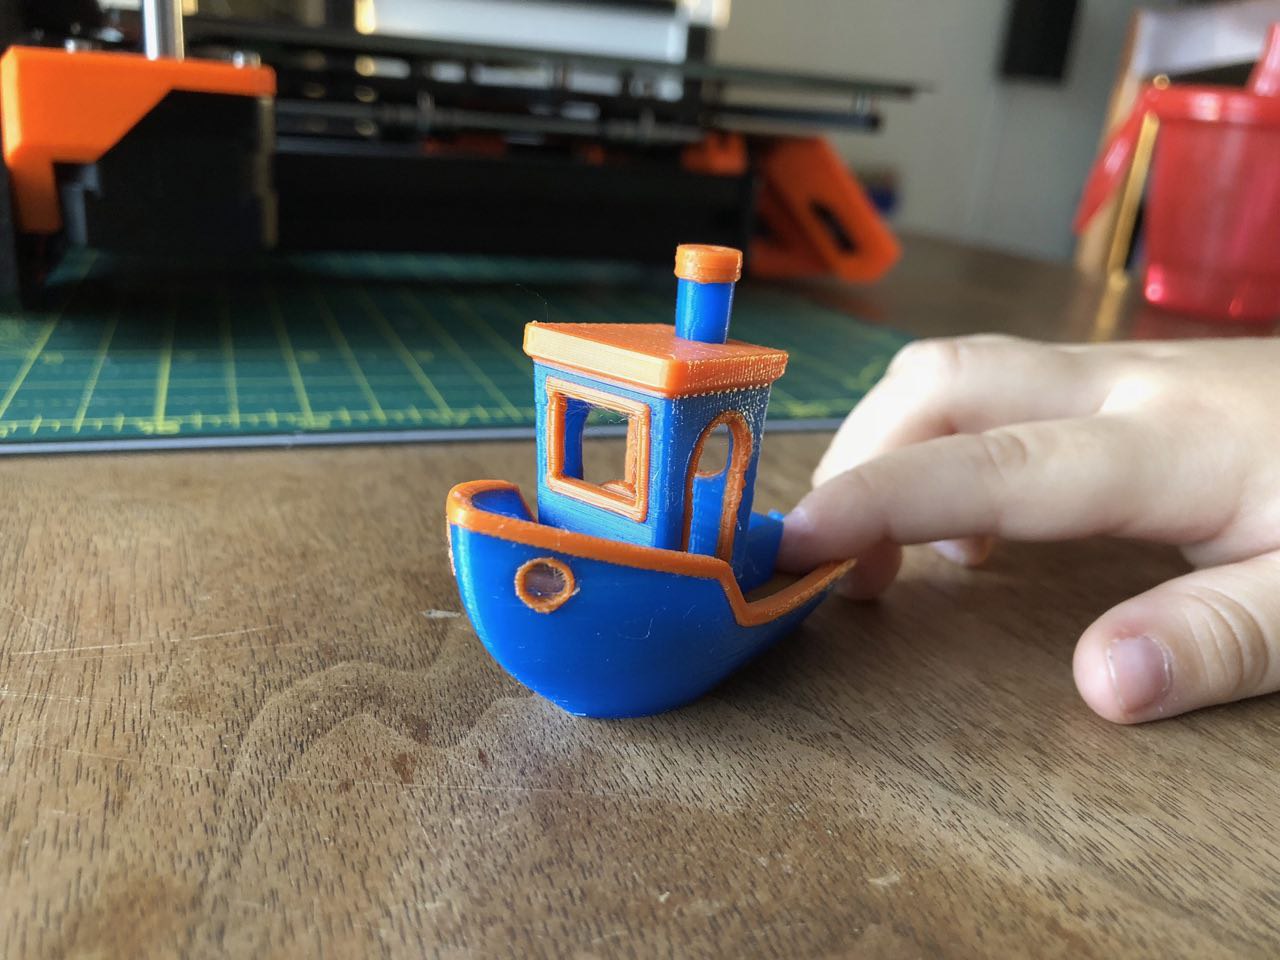
I used this Sunday to assemble it and put it on my MK3. Printing my first multi color models and this is the result so far:

I had only one failed print (the first one) due to the low filament temp.
Things I paid attention to:
-> Did the tube length calibration for all 5 filaments right at the beginning
-> Lowered the Filament temp to colder area
-> Checked and adjusted the screw tension on the MMU (screw head is flush with the plastic)
Based on the really bad forum postings about the MMU 2.0 I was ready to take the fight. But I was surprised to see it printing out of the box with the default settings. Just for clarification: I'm printing on my MK3/MK2 with very high success rate. If it fails, then because of the new model which requires crazy stuff but not because of the printer fault. I'm also using the same filament for almost 2 years, so I know my brand and how it works at certain temperatures.
There are still couple things I would like to adjust and get better results but overall thumbs up for this design and the current firmware/slicer version. It does work for me!
Often linked posts:
Going small with MMU2
Real Multi Material
My prints on Instagram
Re: MMU 2.0 First couple days
Just curious, what temperature are you running your filament at?
Jonathan Kayne, KM4CFT
Virginia Tech Class of 2021 - Electrical EngineeringCreator of the CFT1 Transceiver"I am always thinking about making. My future begins when I wake up and see the light." - Miles Davis
Re: MMU 2.0 First couple days
Just curious, what temperature are you running your filament at?
Makergeeks regular PLA with first layer 225C and 220C for the rest.
Single extrusion I print it usually with 230C/235C to get a nice shiny finish, so it's pretty cold for this filament. Below 215C it's causing already issues.
Often linked posts:
Going small with MMU2
Real Multi Material
My prints on Instagram
Re: MMU 2.0 First couple days
Those temps seem high for PLA, or are they the norm for that particular brand?
Texy
Re: MMU 2.0 First couple days
I use MakerGeeks and yes it prints hot. The Maker and Crystal Series have a mid temp of 235 suggested. Its Raptor Series has a mid temp of 245. If I remember correctly they all have a temp range is +/- 15.
Over all I really like the MakerGeeks filaments and would recommend them. BUT...they do have some problems with delivery at times. Not often, and in about two years of being a customer I have only recently had problems with them on two occasions since last July and we are still working it out.
Neal
MakerGeeks does print hot and everyone says I am printing too hot but if you try to print cooler I have had it jam and I have had Moisture issues with their filament right out of the bag lately. I now put their filament in a dehydrator before I even try to print with it. Also you are right about shipping. There shipping is a total mess right now. You have to email them repeatedly to get your order and even though my order is all showing at Fulfilled they still owe me 2 rolls. I don't know if I would order from them again because of the shipping issues.
Other than that nice colors and prints nice once you dehydrate it.
Re: MMU 2.0 First couple days
MakerGeeks best filament, IMO, is the Maker Series. Crystal is good but I don't use translucent much. Raptor is OK but it acts like a sponge when its humid. That said when I use a .6 nozzle and don't have to worry about moisture jams it does make for a unique "rough" finish on the print. Heck the layer lines are invisible at those times.
Neal
Re: MMU 2.0 First couple days
Welcome to the club...... 😀
I had only one failed print (the first one) due to the low filament temp.
Things I paid attention to:
-> Did the tube length calibration for all 5 filaments right at the beginning
-> Lowered the Filament temp to colder area
-> Checked and adjusted the screw tension on the MMU (screw head is flush with the plastic)
Based on the really bad forum postings about the MMU 2.0 I was ready to take the fight. But I was surprised to see it printing out of the box with the default settings. Just for clarification: I'm printing on my MK3/MK2 with very high success rate. If it fails, then because of the new model which requires crazy stuff but not because of the printer fault. I'm also using the same filament for almost 2 years, so I know my brand and how it works at certain temperatures.
Sounds like u benefited from reading all of our post (how it should be)
In the early days:
we didnt know about hobbed gears being different sizes
we couldn't calibrate all 5 bowden lengths
chris warkocki hadnt made his filament path resistance videos yet
Was no ramming guide, and no one had posted ramming settings that work with certain filaments
There where no better roller designs
No one had a nice out of box success
Where's your 5 color benchy? 🙂
Prusa MK3 > MK4s
Prusa MK2.5 kit > MK3 > MK3s > MK4s
Prusa SL1 3D printer + Curing and Washing Machine (day1 order)
Taz6 - taken apart for space
CR10s4 - upgrading
Delta 3ku - dont use
Re: MMU 2.0 First couple days
Sounds like u benefited from reading all of our post (how it should be)
Yes, we all benefit from the community work. This is how it should be in a good community 🙂
In the early days:
we didnt know about hobbed gears being different sizes
we couldn't calibrate all 5 bowden lengths
chris warkocki hadnt made his filament path resistance videos yet
Was no ramming guide, and no one had posted ramming settings that work with certain filaments
There where no better roller designs
No one had a nice out of box success
I know. I wanted to show the current state. The experience if somebody would buy MMU2 now.
Where's your 5 color benchy? 🙂
Benchy is soooo old school. There are nicer things out there 🙂
Often linked posts:
Going small with MMU2
Real Multi Material
My prints on Instagram
Re: MMU 2.0 First couple days
I will be calibrating my MMU tonight and then start printing.
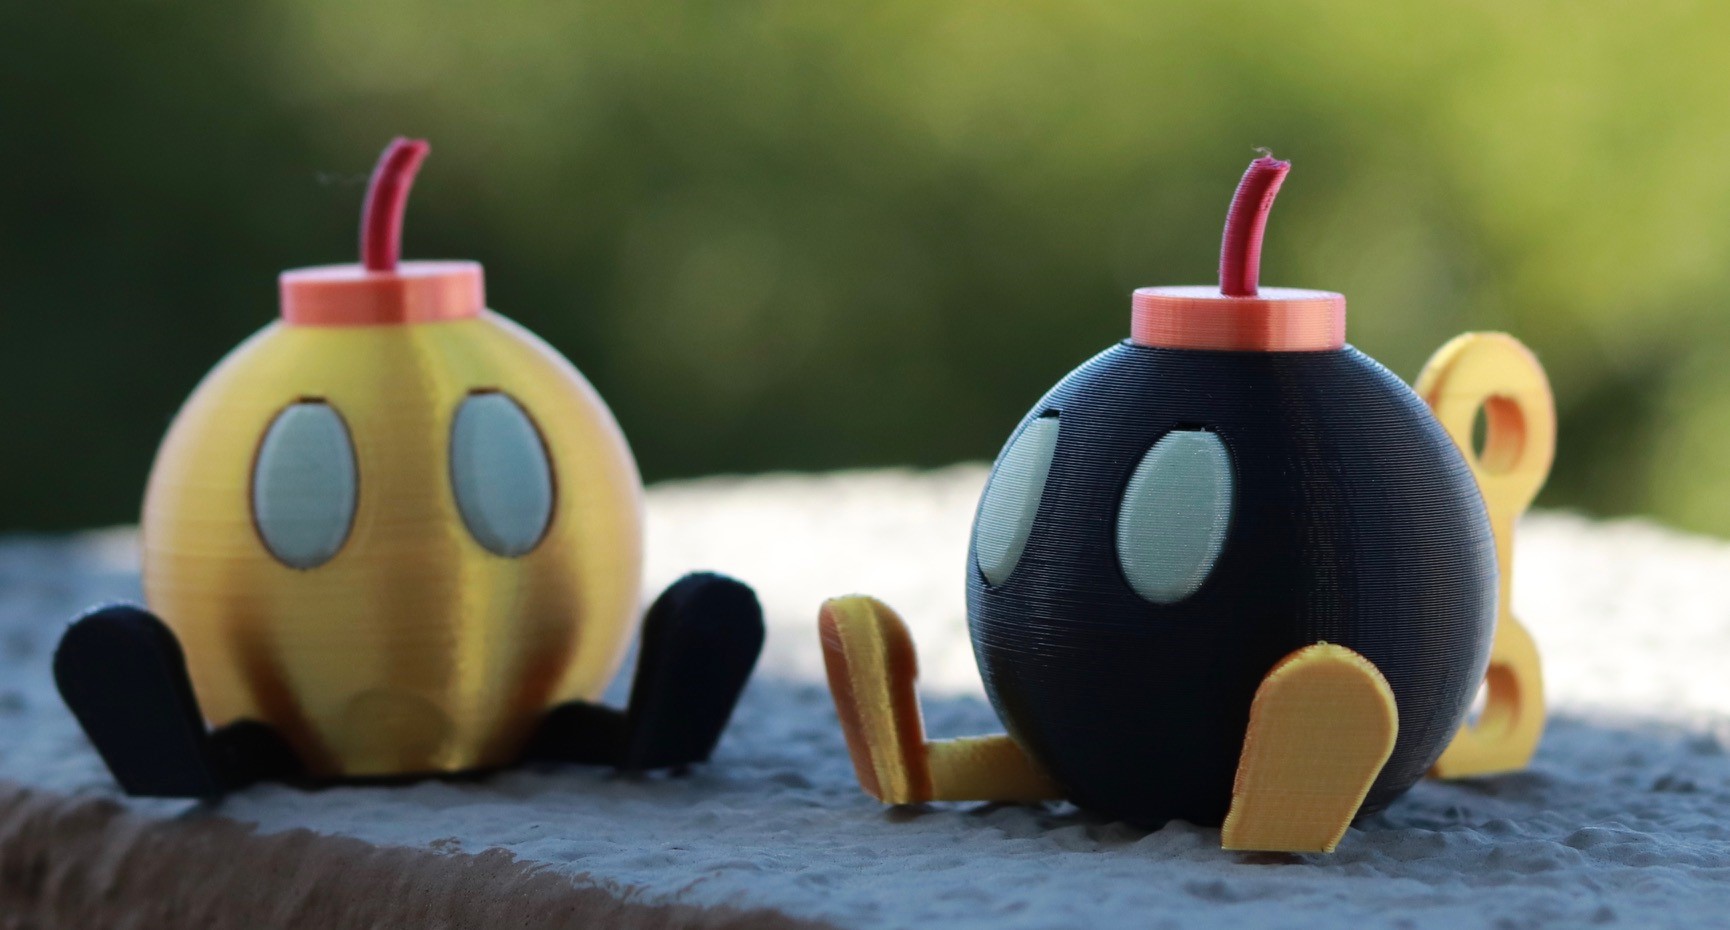
Where do you get the model for Bomberman? I did a quick search and couldnt seem to locate it.
Re: MMU 2.0 First couple days
I will be calibrating my MMU tonight and then start printing.
Where do you get the model for Bomberman? I did a quick search and couldnt seem to locate it.
depending on the model slicer PE can split colors up even.
I have a Prusa,therefore I research.
Re: MMU 2.0 First couple days
Where do you get the model for Bomberman? I did a quick search and couldnt seem to locate it.
Here you go..
Re: MMU 2.0 First couple days
thanks!
Re: MMU 2.0 First couple days
hi, First day experience...
received the MMU yesterday evening, and build it.
first printeof course the Prusa sheep 😀 (sliced myself)
one normal, one as wipe object...
Did take around 11 hours to compleet.
no layer skips or any issues. no manual intervention needed.
now printing the Lizard 3 colors.
next is the Bob-Om from chaosCoreTech... wanted to print it when i had seen the video 6 months ago.
so first print 100% succes.
PS received the powder coated sheet in same shipment 😀
regards Ron
Re: MMU 2.0 First couple days
Hi,
What material are you printing with? PLA worked very well for me, but PETG always seems to string after 4 to 5 hours causing a short feed and missing layers. I am still playing with temps and such to try to solve, but so far it still happens more than I would like.
I should probably stick with PLA for non-mechanical parts and move on, but I'm stubborn and going to make it work!
HI,
Indeed PLA, first want to test that PLA print 100% OK.
PETG is next, also what mechanical part would you print in multi color?
i would use PETG for the translucency types but more for a non functional part.
just wondering what would you print as mechanical and multi color.
also because multicolour has not the strongest bond between color(s)
regards Ron
Re: MMU 2.0 First couple days
Hi,
I was really using PETG due to my impatience! I wanted to test the MMU and all i had was PETG so I used it. I did actually succeed in printing all the examples in PETG.
The key settings for me are:
Lift Z: 0
first layer filament/bed: 236/84
other layer filament/bed: 234/90
first layer speed: 40
infill/solid infill: 70
and the key to reducing stringing is Number of Cooling Moves to 4.
I also use the blue E3D sock.
I'm running near 100% success right now.