Re: MMU2 is junk...
Another unhappy MMU2 customer here....
Hello Alan. I agree with you in couple points. MMU2 is not fool proof designed. But so far it was for me always in a deterministic state. If error occurs, you have tools and time to resolve it. After the issue is resolved, it continues printing.
-> Spool holders. Yes, no questions about that. Need to be improved. Most people are replacing those which is a good indicator they doesn't work for the majority.
-> Filament sensors. Actually it doesn't matter how many sensors you will add. With long filament tail you will have always an issue to decide where is the end of this tail? I would prefer to check on filament moving or not. It's easier to react programmatically depending in which state you're.
For me only essential modifications were:
-> Clean filament path. No catching or big resistance
-> Replacing the filament holders
-> All tube length calibration
-> Adjusting the filament temperature for clean filament tips
Now I have almost 100% reliable multi color printer.
PS: I'm wandering how people are able to make their Chinese clone printer reliable and struggling to do the same thing on their Prusa machines. But it's a different story ...
Often linked posts:
Going small with MMU2
Real Multi Material
My prints on Instagram
Re: MMU2 is junk...
Another unhappy MMU2 customer here. (...)
Hi Alan,
Thank you for your comment, I'll make sure to pass it on to our devs. Some of the points have already been discussed and we concluded that the way it is is the best way (the tensioning screws) and some others are already in testing (a better spool management system).
The thing is, the MMU2 is a completely new system that no one has ever presented before as a product, but please be ensured that we are working every day on improving it and making it more reliable and user-friendly.
Martin L.
Official Prusa Research CS
Re: MMU2 is junk...
Another unhappy MMU2 customer here.
Hi Alan.
I've had a near 100% issue free MMU2. however there has been a lot of preparation and setup to get to this point.
i guess it depends on how mechanically inclined you are. the MMU is not a turn key system it is basically a kit and the better you can assemble it the better the result.
first if possible i would print out those replacement spools that pmeyer made
https://www.thingiverse.com/thing:3113520
don't even fight it just print those out and cut out the 1" PVC pipe you need to fill in between the bearings 85mm each.
attempting to use the original spools design in any capacity should be avoided.
I've written some lengthy reply's on the spools. but the original spool arm design works well but depends on your situation.
they do not work well side by side. they are more designed to be sitting on a large table spaced apart and i recommend a 1/4 Circle layout.

i also recommend using a PTFE tube separator.

continuing on sadly still on the spool holders. the L locks on the spool holders need to be drilled out with a 2mm bit so the filament can more freely through them until they lock back from reverse pressure from the assembly body.
next the spool holders should be taped down to the table so the cannot move around.
this prevents an accidental shift in the spools which can cause some filament to pop out the front of the tube and hit the selector and cause a jam.
make sure the L bracket on the spools moves correctly and smoothly(didn't overtighten the bolt) make sure the printed Swivel for the PTFE tubes moves around smoothly, i put some plastic safe oil in the pivot and manually moved them around until they felt smooth and not sticky. make sure you didn't turn those bolts that hold the PTFE into the spool holders to much as they pinch the tubes and cause binding. just like 1 thread on those tubes is enough(prusa should of made these 3mm grub screws instead of the 3mm bolts)
*there is also a procedure i use to check and preload the spools before a print. the idea is get all 5 spools loaded with the nice filament loops ready to go.
filament has lots to do with this also. some may just not work. i'm using Hatchbox PLA
the rest of the machine.
you have to hand shape some areas and make sure the filament can get into the selector and the extruder smoothly from different angles.
i used a small round jewelers file with a tapered end, by hand i carefully shaped some areas where the filament was hitting and getting stuck.
if the filament hits and gets stuck on anything the pulleys will chew into them and strip them out causing a load unload failure.
once the filament can get to and from the extruder/spools smoothly then the load and unload failures will lessen.
the INLAND PLA settings.
https://shop.prusa3d.com/forum/general-discussion-announcements-and-releases-f53/work-in-progress-mmu2-inland-pla-profile-t24592.html
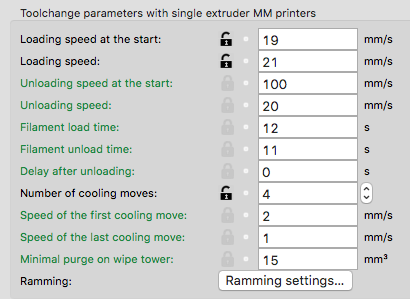
are a good start you want to match the speeds of the MMU and the extruder pulleys.
loading speed at the start : 19mm/s
Loading speed: 22mm/s
and i set my Unload at the start to 80mm/s the faster numbers make the tips a little more stringy.
next you have to reduce the filament temps. to reduce stringing.
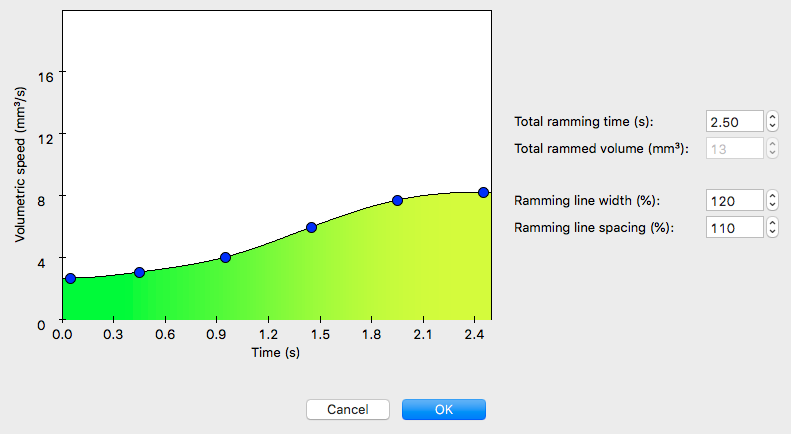
check the ram settings in the INLAND PLA as well. 2-4 cooling moves can help and a 4 second ram time.
the strings can be a problem or not, for example i have long strings some times on my filaments however they are not triggering the FINDA the only real issue i had was with Yellow filament it was very stringy like cotton candy and that actually filled up the FINDA ball cavity with junk and then i got an error i lowered the temps just on yellow from 205 to 200 and it started to work fine but was still a little stringy.
i settled at 197C for my final temps on all my Hatchbox PLA what ever little strings occur are getting rammed back down into the extruder on a filament change and get merged into the wipe tower on start anyway.
the tension springs on the assembly body and extruder have a sweet spot. the online manual does give you a good starting point but i found i had to go lighter on the pulleys to avoid the filament stripping out.
the machine has to be running mechanically well since the software doesn't have much fault tolerance.
some areas where prusa could improve initial performance.
1) the spool holders should just be changed to the pmeyer's design
2) *the selector should have an improved Knife holder
* certain areas should be tapered for the filament to easily enter.
* the layering should be changed from that .3mm ish to .15 this would allow for more resolution on the part and smoother entrance for the filaments
there are some redesigns on thingiverse: example
https://www.thingiverse.com/thing:3157550
3) the extruder body should be printed in higher resolution due to the tapering entrance for the filament below the sensor PCB the area is very rough in that .3mm resolution and the tips easily hit a ledge of material in there and jam and then strip out and cause a load/unload error.
these 3 areas i feel would improve the starting experience for many users, just getting the filament to smoothly move from the spools to the extruder would knock down many of the problems at least allowing people to explore the string issue and many find better settings in slic3r. with an inconstant machine it is impossible to start locking down software settings.
------------
my startup procedure. when ever a new spool is installed.
first i cut a nice 45 degree tip on the new spool filament.
next straight out about 6" of the filament so it is straight and not spool curved. load it into the pmeyer spools. and start to feed it into the TPFE
go to the front and start a load on that spool.
load it.
go back to the front and visually have a look at the ends of the TPFE tubes around the selector and just see if something doesn't look right.
click load filament select all.
the reason is because you can accidentally disturb another spool while you are back there loading so i always double check that the selector is happy.
now with a new load the tip should be prepared , this procedure pre-tensions the filament at the spools. when you load a new filament the spool slightly loads up and the L retainer on the spool slightly locks back in position but it isn't correct yet.
so go to calibration and select first layer cal, and select the new filament you just installed.
don't touch the live z just let it run and when complete the extruder is unloaded and filament has the starting tip from from the ramming and now the spool is pretension correctly with a loop of filament. this prevents that first time load jam that could happen.
as a test you can continue to use that first layer calibration to keep switching filaments and observe the load and unload and see if you spot a problem.
over time with constant tool changes the path the filament takes should naturally smooth a little more and polish itself a little.
for the most success you want to go with filaments that have been shown to work and also i would try to keep them all from the same companies so that the heat ranges are all the same.
additional i recommend using a silicon Sock on the extruder. it helps the nozzle hold heat and it also acts like a teflon protector when a problem occurs sometimes it can save a print going wrong.
“One does not simply use a picture as signature on Prusa forumsâ€
Re: Still zero successful prints
Printing with MMU2.0 is like watching suspense thriller movie. It will run for a while then boom.
Re: Still zero successful prints
I've been having good luck with mine after a week. I swear the biggest thing was bracing the 5 PTFE tubes going to the MMU. when I get home it should be up to around 10,000 filament changes without any errors
I have a Prusa,therefore I research.
Re: MMU2 is junk...
Another unhappy MMU2 customer here. (...)
Hi Alan,
Thank you for your comment, I'll make sure to pass it on to our devs. Some of the points have already been discussed and we concluded that the way it is is the best way (the tensioning screws) and some others are already in testing (a better spool management system).
The thing is, the MMU2 is a completely new system that no one has ever presented before as a product, but please be ensured that we are working every day on improving it and making it more reliable and user-friendly.
Thanks for the feedback, it's good to know Prusa is listening.
I'm printing new spool roller parts currently (on my Qidi printer...) so will try that.
Another issue I've found with the existing spool holders is that if the spool has nearly run out (and the filament has a tight curl to it) it tends to pull the spool off the rollers!
I think something with a centre shaft that rotates freely on bearings would be better.
Anyway, I finally have another successful print!
I've found that the MMU screws need to be slightly tighter than others suggest here, just below the surface seems to be needed otherwise the feed wheels kept slipping during unload or load.
I'm using the software settings suggested here:
This had about 15 failed unloads along the way, sometimes from a long tail, other times from a slightly wide tip getting stuck, so I had to keep 'helping it'.
Picture attached. Maybe appropriate design.
if you have the original spool holders then you need to increase the spring tension so that the pulleys can bite enough to get the spools moving on the higher friction prusa holders. when you change to the pmeyer design you will need less tension and then the pulleys will not strip out the filaments so easy. the less tension the better.
“One does not simply use a picture as signature on Prusa forumsâ€
Re: Still zero successful prints
Mine is ZERO SUCCESSFUL print due to filament jamming on heat break.
Please refer to the link below:
https://shop.prusa3d.com/forum/general-discussion-announcements-and-releases-f53/filament-tip-problems--t26062.html

Re: Still zero successful prints
bad machining inside? space between the PTFE tube?
“One does not simply use a picture as signature on Prusa forumsâ€
Re: Still zero successful prints
Only happens when using MMU2.0.
Re: Still zero successful prints
well the MMU is going to constantly move the filament in both directions while in single mode it will basically run in a single direction and then a manual swap by hand on spool change.
on mu MK2s i had a PTFE tube pop up a little in the nozzle and removing a filament became near impossible because the tube had popped up enough to cause the filament to leak out the sides and create like a plug. i had to take my extruder apart pull the hot end and take it apart to find out the tube popped up just a tiny bit and was causing a problem. i printed one of those PTFE retainer clips to make sure the connector locked upwards and held the tube tight into the hot end.
so couldn't hurt to inspect for a defect in there. aftermarket nozzles cause problems because many of them are flat on the bottom or the cavity opens up wider then at the top and so the filament gets stuck. jams load/unload.
“One does not simply use a picture as signature on Prusa forumsâ€
Re: Still zero successful prints
I have finally achieved a successful print! Keep in mind that I am using Volcano heat block which makes it extra challenging.
I designed a new part and it solved all my issues (it would seem). It should help V6 users too. Check it out here: https://www.thingiverse.com/thing:3255317
Re: Still zero successful prints
Hi all,
I've been trying to get at least one succesful print with my MK2.5+MMU2 without success.
I've tried many parameters by reading a lot of advices from the forum. But now I'm lost, I don't know what to do to improve my filament tips. Everything else is solved, the filament path is ok, at loading and unloading as long as my tip is good.
The print can go flawlessly as long as my tip is good. I know that because I've tested a print (small print) and after each filament change, I've cut the tip to make it perfect, during the time it was printing with the other filament.
Now I need some help to have a constant good tip because my problem is that sometimes it's ok and sometimes not. Here's a picture of my bad tips:

Those were obtained with those parameters:

Any advice will be very well appreciated.
My youtube channel about the Prusa I3 MK2 https://www.youtube.com/channel/UCz-zQZcKcvEDdd9C9hOKYWg
Re: Still zero successful prints
Any advice will be very well appreciated.
First we need to know what filament you are using. Is it PLA ? And what brand? Btw. not only the ramming sequence is im important for the tips but also the temperature which is used for ramming. Some filaments work better if you lowering the temps some work if you increase them.
Re: Still zero successful prints
Thank you for your reply flaviu.
I'm using PLA prusament (black and grey). I've got all the latest firmware installed 3.5.0 and 1.0.2. Extruder is R3/B7.
My youtube channel about the Prusa I3 MK2 https://www.youtube.com/channel/UCz-zQZcKcvEDdd9C9hOKYWg
Re: Still zero successful prints
Well Prusament should definitely work.
I use these settings with Prusament and have good tips (Ramming temperature @205°C):
Re: Still zero successful prints
I used your parameters and my filament tip still measure more than 2mm... 🙁
My youtube channel about the Prusa I3 MK2 https://www.youtube.com/channel/UCz-zQZcKcvEDdd9C9hOKYWg
Re: Still zero successful prints
I used your parameters and my filament tip still measure more than 2mm... 🙁
I would suggest investing in a 2.5 mm PTFE tube instead of the orange one and the 5 small ones in the MMU2 unit like already discussed here https://shop.prusa3d.com/forum/general-discussion-announcements-and-releases-f53/improving-the-mmu2-by-changing-the-orange-ptfe-tub-t26498.html . It cost me under 10 euro.
Re: Still zero successful prints
I used your parameters and my filament tip still measure more than 2mm... 🙁
My tips look like yours, maybe a little less string than the black.
I use the default Prusament settings except setting the load speed to 19mm/s.
It works great.
But i also did this mod to prevent failure to load (missing layers):

But i also did this mod to prevent failure to load (missing layers):
general-discussion-announcements-and-re ... ml#p115345
Re: Still zero successful prints
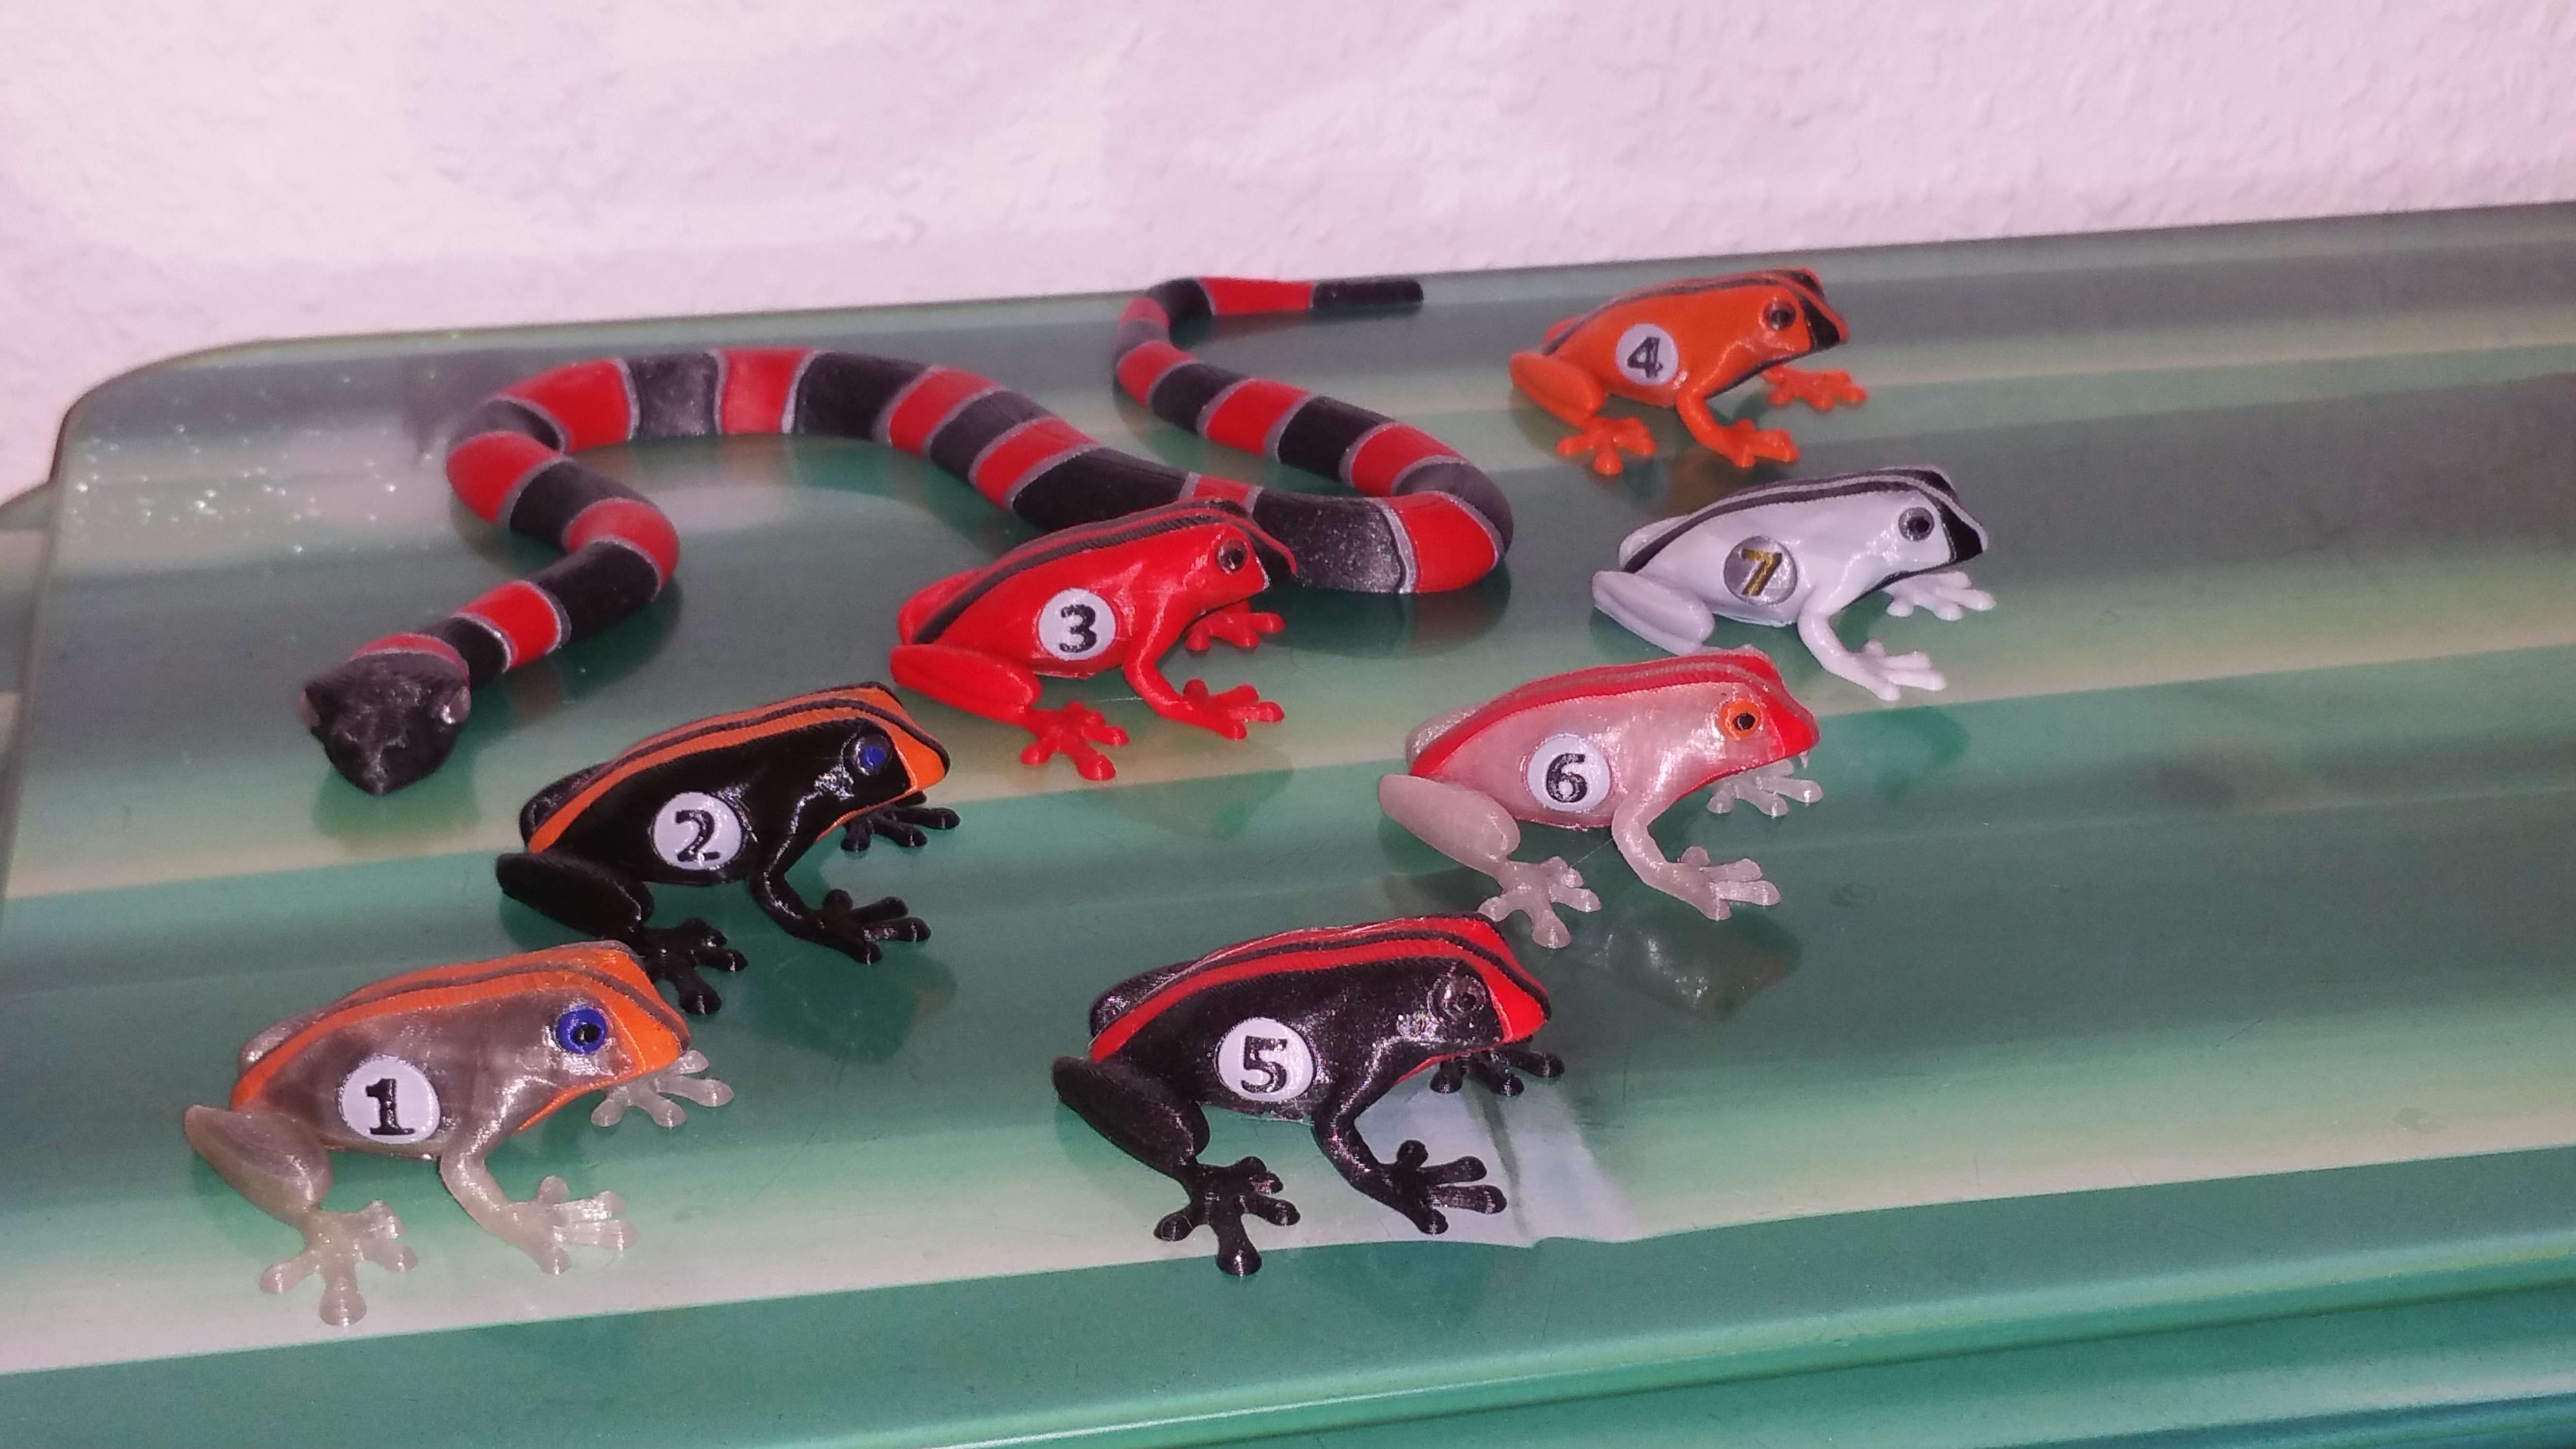
frog one looks cool.. is that natural pla?
I have a Prusa,therefore I research.