RE: Making your i3 MK3S+ Printer PERFECT. 100+ hours of mods and testing!
Let's not go back to square 1 please. As we get the bearings with the kit from Prusa, not from Misumi, it does not matter what Misumi does in direct market sales. Prusa has very clear communication that the bearings are pre-greased, period. E3D sells afaik the V6 extruder with a silicone sock, Prusa does not. Seems like nobody suggests the extruders are not from E3D....
The bearings do not come pre-greased from Prusa. I assembled my 3S+ kit in March, then I scratch built a second printer using genuine Misumi bearings sourced from 2 other vendors. All of the bearings came in the same sealed bags with the same very light oil whether they had come from Prusa or were sourced from one of the other vendors.
RE:
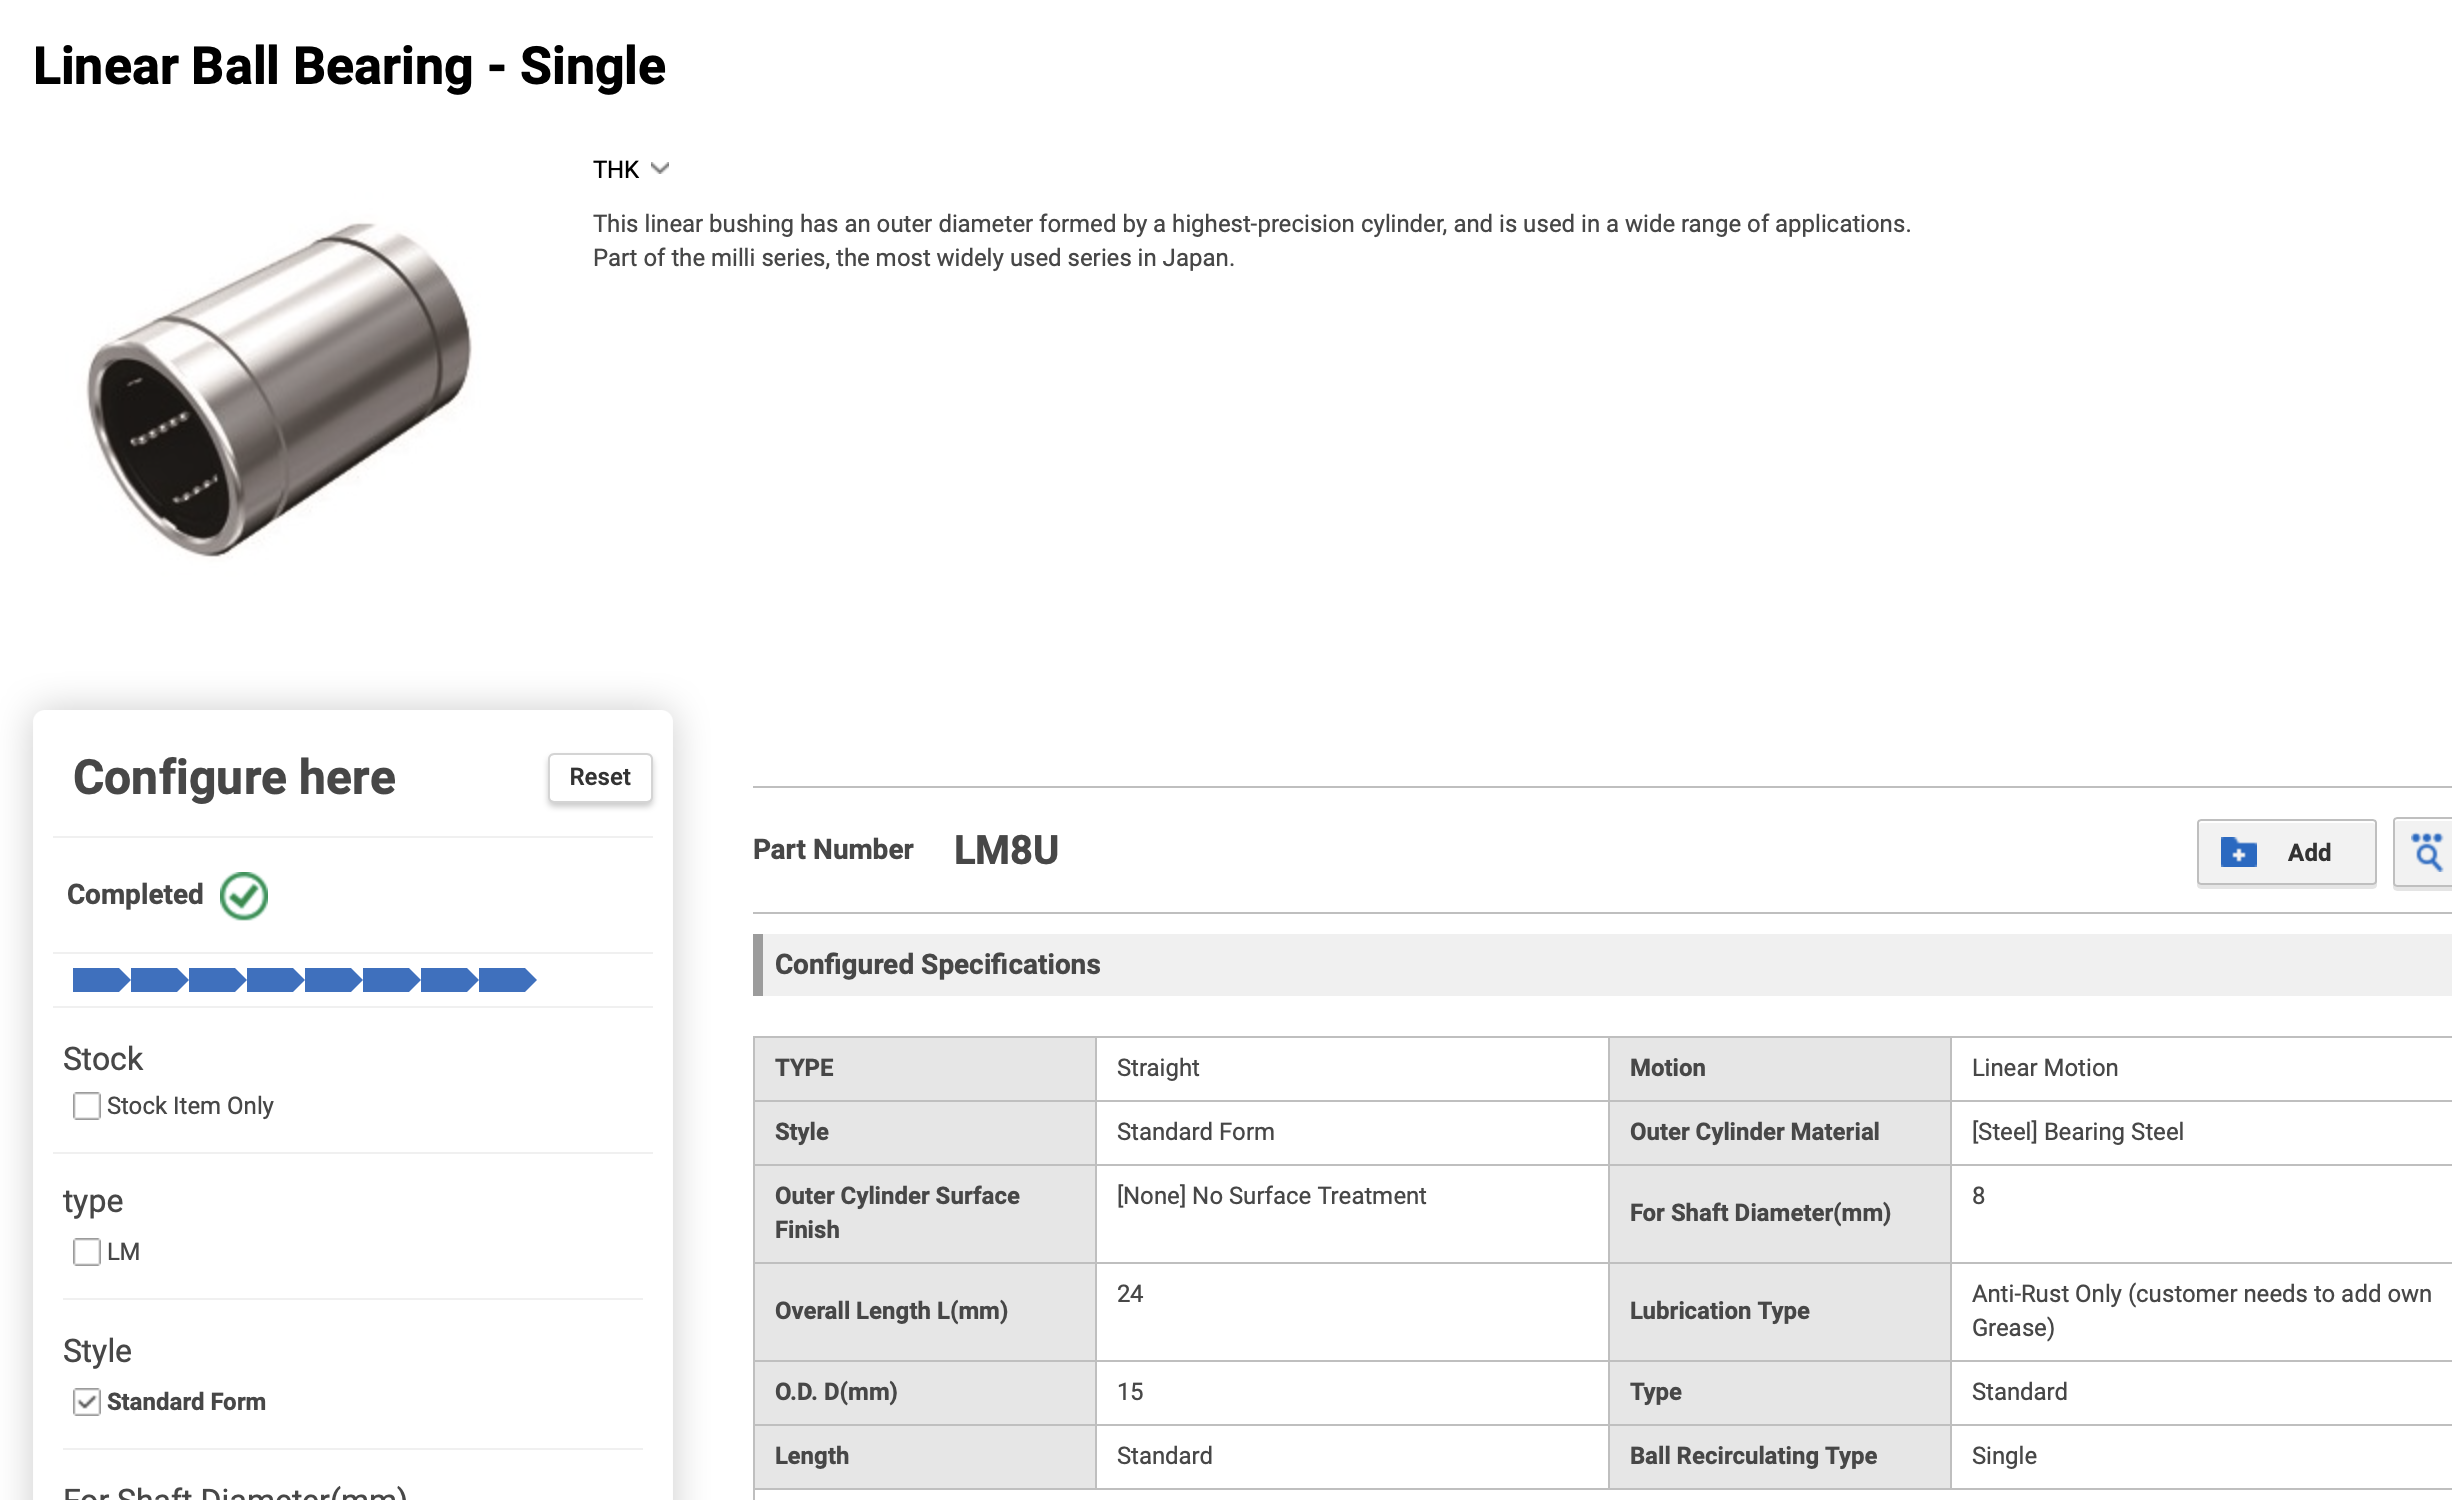
Here is the data sheet for the MISUMI LM8U bearing they use.. They do not sell them greased. They state customer must grease. (click on picture to read all) Voxel Factory in Canada sell them as replacements and they state right on the part description to grease them. So Prusa would have to either have a special order with Misumi (doubtful) or they'd have to grease them manually when they get them (doubtful). And I do remember when I got the bearings that I only saw the packing oil.. I didn't see any grease.. but I wasn't looking for it either. Now Misumi do sell greased bearings.. any chance they use a different part?
Damn.. I don't want to disassemble and grease.. anyone know how much time that might take? And is there enough in one tube to do all the bearings?
Dave
RE: Making your i3 MK3S+ Printer PERFECT. 100+ hours of mods and testing!
The little tube of grease that came with the Prusa was enough to do all 10 bearings for the Prusa, and the 6 bearings for the X and Y axes of my Bear. I used the 10mm Z mod for the Bear, so I had to print a 10mm applicator nozzle for a tube of Super Lube that I already had. There is still some of the Prusa grease left; it doesn't take much to pack each bearing.
As for greasing after the fact, I can't help you much there. You could maybe smear some on the smooth rods and hope some of it gets to the bearings. Most of the grease seems to end up coating the rods anyway despite the presence of seals on each end of the bearings.
RE:
Okay.. I think there is a definitive answer. I just talked to Prusa Support. They say that they 'don't not recommend greasing but the bearings come with some lubrication'.. Their words.. Well the oil is some lubrication but Misumi in their data sheet says the customer must 'grease' the bearing. So that oil is not meant as lubrication.
So the bearings come with the packing oil only for rust prevention and Prusa has mistakenly assumed that is enough for the bearings.. It isn't .. So there should be a *big* addendum to the build kits to grease the bearings.. You likely don't need to fully load grease in to the bearings.. but I'm an electrical guy, not a mechanical guy.
Tech support did point me to their maintenance page that directs you to add grease to the rods to get more lubrication in the bearings.. So every week forever, I will add grease to the rods to get them into the bearings.. Prusa should bite the bullet and change all their docs and their procedure with these bearings.
I'll see if I can add a comment to their online build instructions for the MK3+ kit.
RE: Making your i3 MK3S+ Printer PERFECT. 100+ hours of mods and testing!
Depends on your experience with the printer, it took me two hours and then recalibration.
Stay safe and healthy, Phil
RE: Making your i3 MK3S+ Printer PERFECT. 100+ hours of mods and testing!
Prusa should bite the bullet and change all their docs and their procedure with these bearings.
In order to do that, they would have to admit they were not only wrong, but fundamentally didn't understand the proper use of a component that is integral to their product.
RE: Making your i3 MK3S+ Printer PERFECT. 100+ hours of mods and testing!
When i leaned of this oversight It bothered me enough remove the bearings from my original printer to pack the 3 "Y" bearings (most load and seem to fail first). I did not bother to do the X Axis bearings. If you are just going to pack the 3 Y axis bearings, it's not a big deal at all, just loosen the front rail mount screws and you can tilt up the build plate to remove the bearings to pack them without much fuss.
If my post helps you please consider downloading & making one of my most popular Prusa-Printables 3D models below:1. Ultimate Printer Knob Upgrade - The Best Knob of Both Worlds 2. Prusa MK3S Right…
RE: Making your i3 MK3S+ Printer PERFECT. 100+ hours of mods and testing!
Revo / Hot End Upgrade
- Safety – REVO has built in thermal protection, the OEM hot and can apparently get hot enough to melt aluminum, potentially causing a fire. I print overnight 24/7 so this is especially important for me. Upgrade Link
- Installing - very straightforward, I recommend the two prints below to help you. If you are considering adding the upgraded delta-P duct mod (highly recommended) and you are planning on adding LEDs (very cool) this would be a great time to do it as you will need to power the LEDs and the wiring goes through the same loom to the motherboard or RPI to power the LEDs.
- Ease of extruder/nozzle size changing by hand
- Changing extruder nozzles - the filament must be extracted every time you change extruder nozzles, see the G code mod below to do it automatically and make other changes that make it automatic and seamless.
- You definitely want this modification for easy accessibility to the nozzle changes by hand
I'm super interested in this upgrade. I am printing VERY soft TPU, CF-Nylon AND PETG out of the same MK3S+. Wondering if this print high temp materials and how it does with TPU? Thanks!
RE:
Yes, it prints TPU great, I had no issues with flexible materials.
Yes, it prints high temperature material very well also I have some poly max filament that I was printing at 270C nozzle /bed temperature 100C and it printed great as well.
If you are going for the upgrade I recommend possibly waiting for their hardened ObXidian nozzles so you can print abrasive filament without worrying, they also worked great because nothing can stick to them so they don't really need to be cleaned. I have 2x .6mm ObXidian I picked up at the E3d booth and they worked great, and i have the .4mm ObXidian nozzles on order and will order .25mm if/when they are relesed
The only real negative with this systemin my experience is you still need to do first layer calibration every time you swap nozzles
If my post helps you please consider downloading & making one of my most popular Prusa-Printables 3D models below:1. Ultimate Printer Knob Upgrade - The Best Knob of Both Worlds 2. Prusa MK3S Right…
RE: Making your i3 MK3S+ Printer PERFECT. 100+ hours of mods and testing!
Awesome! Hopefully that nozzle comes out soon. Switching the nozzles has been a huge headache on my Prusa. Not just the recalibration but something just always seems to go worng. Thanks for the reply!
RE: Making your i3 MK3S+ Printer PERFECT. 100+ hours of mods and testing!
hi oriddlero, just wanted to know, as yours setup was the best i could find a while ago.
are you still rocking that setup? did you do any changes? with the new mk3.5 and mk4, did you upgraded it, if not can you share with us your currently state? thank you
RE : Rendre votre imprimante i3 MK3S+ PARFAITE. Plus de 100 heures de mods et de tests !
Hi
I am jumping in this post very interesting...I hope that it's not inconvenient to post here rather than to do a new post.
Since May 2025, I am a new joiner in the 3D printing world with a second hand MK3S upgraded to S+ by the previous owner, with firmware 3.14.1-8237.
It was working correctly, doing some printing to understand how it works, as experienced learn more than the reading I did prior to buy it.
I was doing some maintenance stuffs, but also tightened some screws which seem to be not enough tightened on the frame itself , but also on the heatbed 🙄 ....wrong choice. ! !.....the result is that I messed up my heated levelling.
Then looking for a solution to fix this, unsuccessfully using the octoprint bed levelling, one thing leading to another, someone told me that my heatbed was a kind of Nylon Lock mod ...Ok...cool but what is this ? and also what is the original set up ?
I first found the jackvmakes guides for nylock-mod-for-the-mk3s post , then this current post from @oriddlero and also this BedLeveling GitHub from PrusaOwners .
Awesome work @oriddlero ! and the exchange with this forum members are also instructive at least for me.
I look after the original bed mount from Prusa which was , unless I am wrong, with 9 spacers from 6x6x3mm.
In the Nylon lock mod, (with nylon washers as shown on the jack makes picture below or without), the height set-up is to ensure that a spacer can fit between the Y-carriage and the heatbed....
I like the mod mood, but what is the benefit to replace the 6 mm high spacers by a nylon lock mod set up at 6mm too ? I don't get it as a newbie.
will it help to manage more easily the heatbed flatness changes due to T° variation ?

Before to come back to Nylon lock + washer + purple thread lock, currently, I came back as close as possible to the original Prusa mount with a heatbed mounted with 9 spacers like those ones but with a thread...no idea if it's better with or without thread, but I found those ones to start.
I have issue on printing the first calibration layer, on the front left corner especially.
here is my last levelling :

Merci 😉
Lakwell