replace Z leadscrew
Hi,
is it possible to remove the leadscrew from the Z - nemas and to replace them?
If yes, how?
Mines are very bad an run very uneven. Also scraping on the plastic on top
Re: replace Z leadscrew
Why don't you ask PR for replacement? It should be covered by warranty.
Re: replace Z leadscrew
Hi bastian.g,
leadscrews shouldn't touch the 3D printed parts on the top of Z axis, see the manual for more:
http://manual.prusa3d.com/Guide/4.+Z-axis+assembly/106#s1600
You can remove them by disassembling the Z axis, but be careful not to break anything. 😉
For replacement options, contact support: info{at}prusa3d.com
/ Knowledge Base
The guy behind Prusa assembly manuals...
Re: replace Z leadscrew
Yes I know they shouldn't touch and I also talked to the support and send them a photo.
But no replacements for me....... 🙄
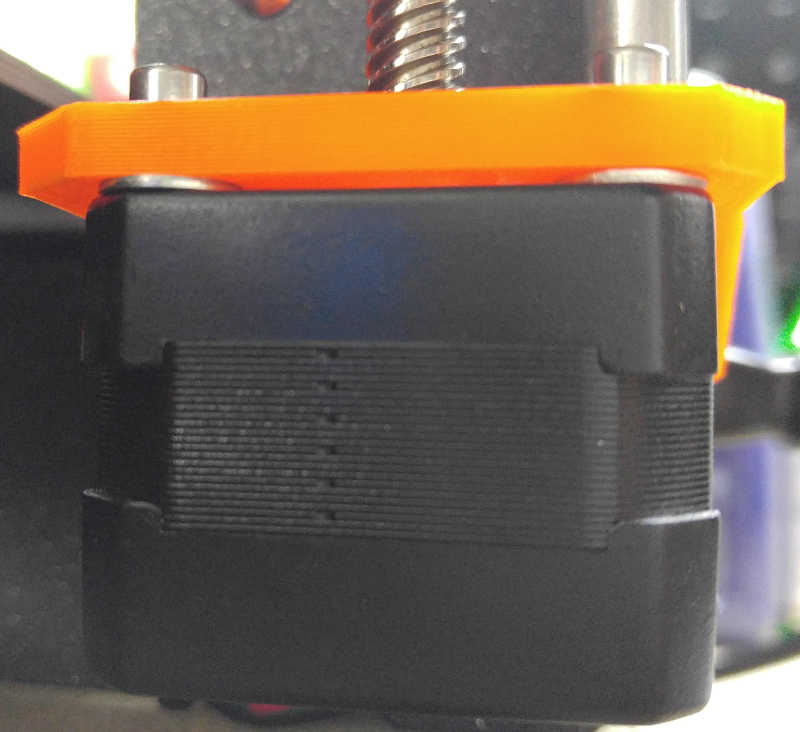
Maybe I'm using the wrong word. I mean the threaded rod on the NEMA motor. It's running unround and the threaded rot scrapes on this part:

Re: replace Z leadscrew
I have this same exact issue, however when my X-axis is all the way up on the Z, the lead screw is center. When it is below the half way point of the screw, it starts touching the plastic, which definitely induces vibrations throughout the entire printer (can be heard). With that said, I have read in the manual...
Check both leadscrews in the upper part of printer, they shouldn't touch the edges of printed part. If so, release the motor holder at the bottom and slightly move it.
Tried this, no go. I don't believe the thread screw is bowed, because I would think if that were the case, then as the thread turned, the rod would touch in different places on the upper printed holder. On mine, it constantly touches the same spot. From the center of the upper hole, the rod touches the printed piece closest to the z-frame. Any tips would be awesome!
Re: replace Z leadscrew
There is nothing we can do. Only a spare Part Can fix this
Re: replace Z leadscrew
I don't believe the thread screw is bowed, because I would think if that were the case, then as the thread turned, the rod would touch in different places on the upper printed holder. On mine, it constantly touches the same spot. From the center of the upper hole, the rod touches the printed piece closest to the z-frame. Any tips would be awesome!
Looks like the motor is a bit further from the frame. You need to unscrew all 4 motor screws a bit and then push motor itself (not its holder) towards the Z frame. Do it while X-axis assembly is all down so you can clearly see the effect of change on top side of lead screw.
Re : remplacer Z trapézoïdale
Hello, I had the same problem, I refocused the rack nut on the support and since all is well, no more contact.
(Translated from French with Google Translate)
Re: replace Z leadscrew
Looks like the motor is a bit further from the frame. You need to unscrew all 4 motor screws a bit and then push motor itself (not its holder) towards the Z frame. Do it while X-axis assembly is all down so you can clearly see the effect of change on top side of lead screw.
Just gave that a shot, no difference.

Re: replace Z leadscrew
Is bottom printed part (motor mount) clean at back side (the side which is in contact with Z frame)? By "clean" I mean no burrs, no sawdust, no debris, clean flat contact with the frame. If not, try to make it clean and flat using sandpaper. You need to reposition the motor a few fractions of mm closer to Z frame.
Re: replace Z leadscrew
You can also try turning the motor 90 degrees so that the cables exit at the side and not against the frame.
Peter
Please note: I do not have any affiliation with Prusa Research. Any advices given are offered in good faith. It is your responsibility to ensure that by following my advice you do not suffer or cause injury, damage…
Re: replace Z leadscrew
OK, here is how I solved my issue. On the 2 screws furthest from the Z-frame, I added a washer between the stepper holder & the stepper.
Re: replace Z leadscrew
In your first photo the M3 screws don't look properly attached to the frame to me, That seems to be causing the printed part to be misaligned.
Re: replace Z leadscrew
In your first photo the M3 screws don't look properly attached to the frame to me, That seems to be causing the printed part to be misaligned.
First photo wasn't me. Mine are in correctly. No binding at all when screwing them in originally.