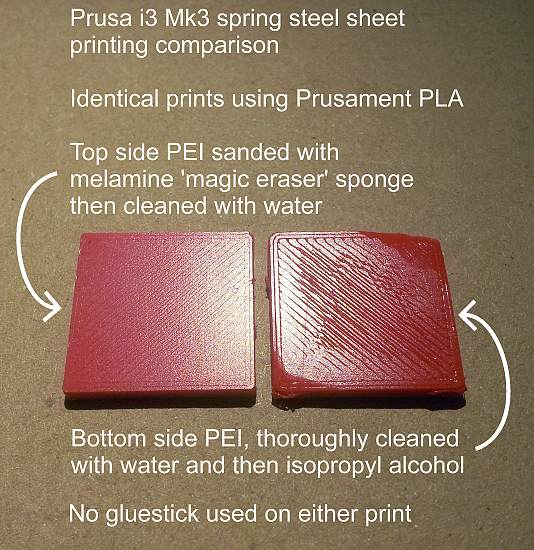
Using a melamine 'magic eraser' on your PEI sheet
I've never had perfect repeatable success using just the (extremely clean) PEI spring steel sheet, prints would often curl up slightly at one or more edges or not even stick properly, so I resorted to using the Kores glue stick (even bought a pile more) which would sometimes make the print stick too hard.
But not anymore.
Yesterday I used one of those melamine 'magic eraser' sponges on the PEI spring steel sheet, carefully scrubbing in circles the entire surface, then rinsing it clean with just water & drying with a tissue.
The result? The sheet now has a fine matte surface and PLA/PETG/TPU prints stick perfectly without needing the gluestick, and they easily pop-off when flexing the (cooled) sheet. Check this out, 20x20x2 mm test prints about an hour ago, the results on the right are what I used to get, but now I get the results on the left.

High resolution version: haku.co.uk/pics/Prusa_melamine_sanded_PEI.jpg
Very happy with the first layer now 🙂
RE: Using a melamine 'magic eraser' on your PEI sheet
I hate to be negative, but Wikipedia has this to say:
In the early 21st century it was discovered that melamine foam is an effective abrasive cleaner.[2] The open-cell foam is microporous and its polymeric substance is very hard, so that when used for cleaning it works like extremely fine sandpaper, getting into tiny grooves and pits in the object being cleaned.
You are using a fine abrasive on your PEI. This is fine for infrequent use, but should not be used in place of simple Dawn dish soap and water for a thorough cleaning of the PEI surface. Looking at your picture, the print on the right suffers from 2 problems:
- Your Live-Z adjustment is too low, resulting in the uneven lines on the bottom.
- Your bed adhesion is poor, resulting in the lifted corners. This is likely caused by contamination of the PEI surface.
In other words, it looks like you're trying to compensate for a dirty bed by mashing that 1st layer into the PEI. The Magic Eraser works (destructively) by abrading away whatever gunk contaminated the PEI. Better to do that non-abrasively with dish soap and water to preserve the longevity of the PEI surface.
-
A dirty PEI print surface. Even if you don't think this is the cause, it's always a good idea to make sure your PEI surface is clean before trying any other fixes. Take it to the kitchen sink and give it a good dunk with Dawn (original formula, no vinegar or hand softener variants) dishwashing soap or your local equivalent (e.g. Fairy in UK). Use a clean paper towel to clean it off, and another to dry it. Avoid using any sponge or cloth that has been in contact with grease. Above all else, avoid touching the PEI print surface. Once it's good and clean, you should be able to use 91%+ isopropyl alcohol between prints, 100% acetone when that fails, and another dunk when acetone fails. Worst-case, use a 3M 7445 ScotchBrite pad or equivalent to give it a very light buff, but only infrequently.
-
If you have not already done so, try using Jeff Jordan's "Life Adjust" procedure for calibrating your Live-Z setting. It is much easier to use and understand than the on-board routine. In general, start high (less negative) and work lower (more negative) in large increments (e.g. 0.1mm) until the filament starts to stick on its own. When it's right, you should be able to gently rub it without it coming loose. Then start lowering (more negative) the level until there are no gaps between layers. When you've got your Live-Z setting adjusted properly, you should be able to gently rub the extruded lines without dislodging them.
and miscellaneous other tech projects
He is intelligent, but not experienced. His pattern indicates two dimensional thinking. -- Spock in Star Trek: The Wrath of Khan Unfortunately,…
RE: Using a melamine 'magic eraser' on your PEI sheet
I tried cleaning the thing to death, as well as many live-Z adjustments, in about a year of owning this it never gave good prints without using the gluestick. I don't intend to use the melamine sponge on it every time, just water & tissue until the problem rears its head again.
Ah, OK. It wasn't clear from your original post that it was only for infrequent use. It sounds like you've found another alternative to the 3M 7445 Scotch Brite pad, although I'm not sure just how fine a grit the Magic Eraser is. If it significantly changes the surface texture, go easy with it!
and miscellaneous other tech projects
He is intelligent, but not experienced. His pattern indicates two dimensional thinking. -- Spock in Star Trek: The Wrath of Khan Unfortunately,…