Z Axis Brace
Just curious, has anyone seen or attempted a Z axis brace for the MK3 yet? Was watching mine print R2 parts yesterday and could see some vibration up top (my spool holder is off the printer). Really liking the look of some of these that use rods to connect the top of the frame to the bottom rear of the machine. Maybe some pretty awesome designer with a name that starts with RHD can think something up? 😀
My MK3 Parts: [Bowden] [New Shoes] [TPU Micro Springs]
Re: Z Axis Brace
RHD only has 24 hours a day. 8 of them I have reserved for sleep and then I want a moment to relax with a glass of whiskey 😮
But remaining time may be enough to look at the Z axis again 😀
Currently I am doing fine tuning of the project "Fine tune your MK3".
Bear MK3 with Bondtech extruder
Re: Z Axis Brace
Does it vibrate as much with the spool on it?
Im still waiting for mine but am undecided on if i should mount the spool to the wall or the printer. One would think removing it from the printer would be better for vibrations but if its designed to be used as a counterweight and dampen vibrations that may not be the smartest move to remove it.
Re: Z Axis Brace
RHD only has 24 hours a day. 8 of them I have reserved for sleep and then I want a moment to relax with a glass of whiskey 😮
But remaining time may be enough to look at the Z axis again 😀
Currently I am doing fine tuning of the project "Fine tune your MK3".
lol I understand completely, just wanted to shout out for your work. 🙂
Does it vibrate as much with the spool on it?
Im still waiting for mine but am undecided on if i should mount the spool to the wall or the printer. One would think removing it from the printer would be better for vibrations but if its designed to be used as a counterweight and dampen vibrations that may not be the smartest move to remove it.
I have been considering this as well, but I don't see how the spool holder up top could reliably cancel things out at all times. I have been thinking about making a phone mount for the top bracket of the prusa and doing some accelerometer testing, maybe we can test it? Will get started modelling it after I rebuild my X axis today. 🙂
My MK3 Parts: [Bowden] [New Shoes] [TPU Micro Springs]
Re: Z Axis Brace
....after I rebuild my X axis today. 🙂
Are you using Prusa parts or one of the others? I'm curious to know if you experience any improvement from redoing the X-Axis...
On a side note... I was thinking about the ghosting you experienced the other day...
I was at Ikea getting furniture for my kid in college and saw the Lack table for $8 and thought, heck can get the printer off of my desk and can't build something for less than this. Took the Lack table home, set it up and figured I'd try the beefed up Y-Axis mount, printed it out and installed along with moving the printer to the Lack table. First couple of prints noisy as $Hi^ then printed the test cube to get serious ghosting, never had that before... Now I'm thinking I f'ed up the Y-Axis with the beefed up motor mount... Then pondered a little more and moved the printer back to my heavy wood desk and printed the cube again. Noise was gone and ghosting was gone... I moved the printer back to the Lack table and both returned. I fear that tightening the legs any further on the Lack table will destroy it so the printer is back on my desk printing much more quietly and with the minimal ghosting I initially experienced. I would have never guessed that moving the printer to the Lack table could have a noticeable effect on print quality.
Anyway, not sure what your printer is sitting on but if it's not on something solid you may want to move it to a solid base and see if that helps.
I thought tons of people were using this lack table though, one would think if it had such negative effects on quality and noise someone would have mentioned it by now? I have seen nothing negative posted thus far regarding the ikea table.
Re: Z Axis Brace
....after I rebuild my X axis today. 🙂
Are you using Prusa parts or one of the others? I'm curious to know if you experience any improvement from redoing the X-Axis...
On a side note... I was thinking about the ghosting you experienced the other day...
I was at Ikea getting furniture for my kid in college and saw the Lack table for $8 and thought, heck can get the printer off of my desk and can't build something for less than this. Took the Lack table home, set it up and figured I'd try the beefed up Y-Axis mount, printed it out and installed along with moving the printer to the Lack table. First couple of prints noisy as $Hi^ then printed the test cube to get serious ghosting, never had that before... Now I'm thinking I f'ed up the Y-Axis with the beefed up motor mount... Then pondered a little more and moved the printer back to my heavy wood desk and printed the cube again. Noise was gone and ghosting was gone... I moved the printer back to the Lack table and both returned. I fear that tightening the legs any further on the Lack table will destroy it so the printer is back on my desk printing much more quietly and with the minimal ghosting I initially experienced. I would have never guessed that moving the printer to the Lack table could have a noticeable effect on print quality.
Anyway, not sure what your printer is sitting on but if it's not on something solid you may want to move it to a solid base and see if that helps.
I am rebuilding the X axis with the Prusa R2 parts, have already rebuilt Y axis and Z axis with RHD Type-R Sport Performance Spec Parts™. May go the RHD parts on X as well eventually, figured he might want to redo some work after Prusa's R2 release though. 🙂
Right now I am printing on a fairly sturdy wood desk, but I wouldn't rule it out as a contributing factor. Once I get this accelerometer rig figured out I will try with and without some pavers under the machine. I hear that helps out a bit.
My MK3 Parts: [Bowden] [New Shoes] [TPU Micro Springs]
Re: Z Axis Brace
....
I thought tons of people were using this lack table though, one would think if it had such negative effects on quality and noise someone would have mentioned it by now? I have seen nothing negative posted thus far regarding the ikea table.
Agreed, that's why I bought one as I was walking through Ikea and it took a while before I put the printer back on my desk to try. In my case the difference is noticeable enough that for the time being it's where the printer will reside. My desk is a bit of a beast and it's a 2 man job to move it inches so it's pretty solid especially next to to the hollow top Lack table. Maybe I'm just unlucky who knows...
Re: Z Axis Brace
The lack definitely is not the most sturdy design when they are stacked, but I have not noticed a negative effect on the print even though the tables do sway slightly during printing. As far as sound goes, no difference between the lack and my kitchen table(which is very sturdy). It probable depends what you are using to secure the lack tables together and the floor they are set on.
Re: Z Axis Brace
This has some very interesting info.
My MK3 Parts: [Bowden] [New Shoes] [TPU Micro Springs]
Re: Z Axis Brace
I have a Lack table setup for my non-OG Prusa (still waiting on my MK3). It definitely is louder than my previous stand because it acts as a drub and the vibrations (mostly during travels) are magnified. I purchased a 6-pack of 1/2in thick foam mat pads (24x24in) for $20 to add some sound dampening. I haven't added them to my enclosure yet but the biggest difference should be from the foam under the printer. If anyone is interested in how it turns out I can post my findings later.
Re: Z Axis Brace
A really interesting video, thanks for sharing it.
Bear MK3 with Bondtech extruder
Re: Z Axis Brace
I have been printing on a paver stone for a while now. Cheap good solution. The frequency analysis is good standard engineering. Not sure I agree with his conclusion. You want to move the natural response frequency above the peak excitation if you can’t damp it out. I think those anti-vibe feet will cause more problems.
As for lack table, I thought those were popular for making enclosures. I would never print on something that flimsy.
Re: Z Axis Brace
Okay, needing minds more technical than mine to weigh in on this. Took some inspiration from this page: http://www.desiquintans.com/ringing and did some vibration testing. The results are interesting and I'm not sure what to make of it. First off, my test setup:
G28 W ; home all without mesh bed level

G80 ; mesh bed leveling

G1 F6000          ; Base speed 100 mm/s

G1 X125 Y105 Z100  ; Center all axes
G1 X10 ; Traverse X 3 times
G1 X240
G1 X10
G1 X240
G1 X10
G1 X240
G1 X125
G1 Y10 ; Traverse Y 3 times
G1 Y200
G1 Y10
G1 Y200
G1 Y10
G1 Y200
G1 Y105
G1 Z10 ; Traverse Z 3 times
G1 Z200
G1 Z10
G1 Z200
G1 Z10
G1 Z200
G1 Z100
M1 ; Sleep. Stops printer from going back to home.
The above gcode just homes the printer, sets print speed to 100mm/s, then centers each axis. It then proceeds to move X back and forth a few times, then Y, then Z. Below are the line graphs showing X, Y, and Z forces during those traversals:
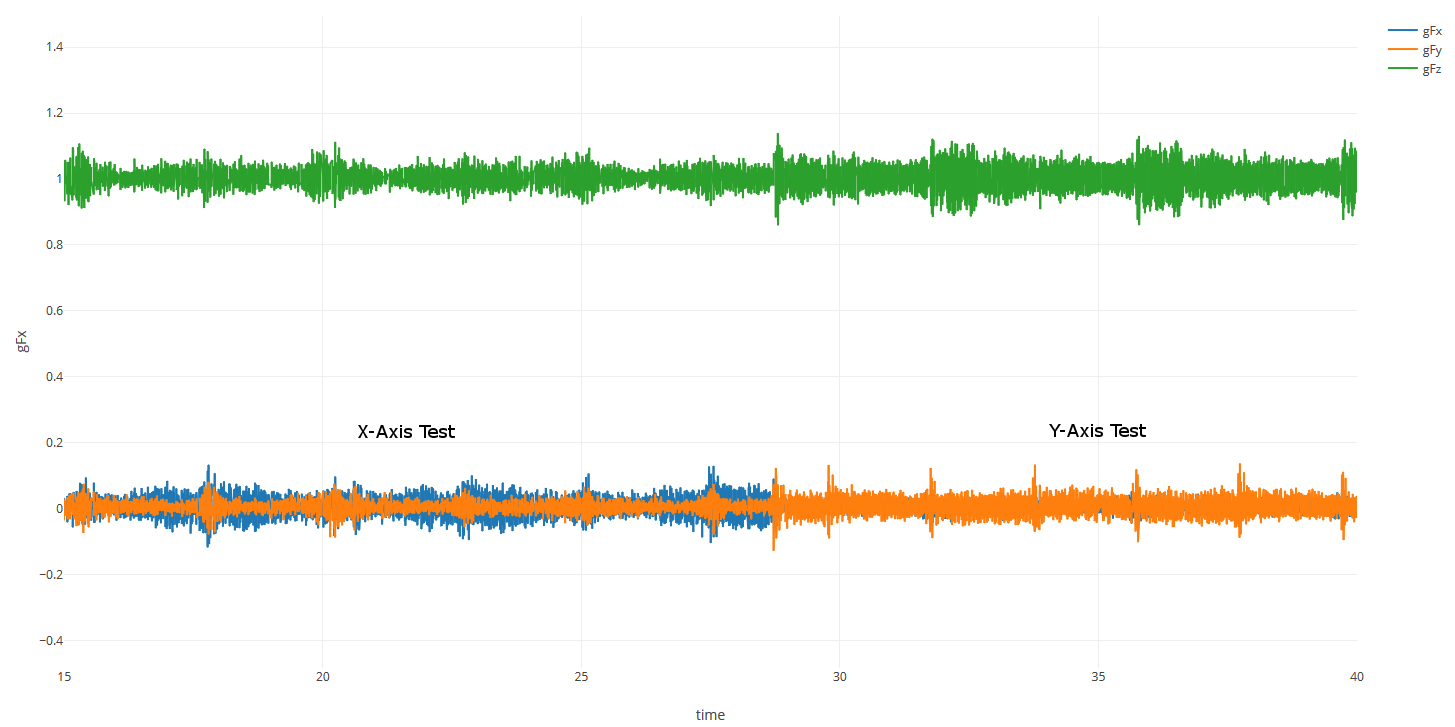
In the above you can see the clear difference of when X is being tested vs Y. Please notice the Z-Axis and the spikes that correlate with the axis being tested below it. On X you can see there is some Z vibration happening that correlates, but it's pretty much "when X is moving" so I would expect that. Y is a completely different story, we can see spikes in Y that correlate directly with Z above, but only half of them do. Let's zoom:
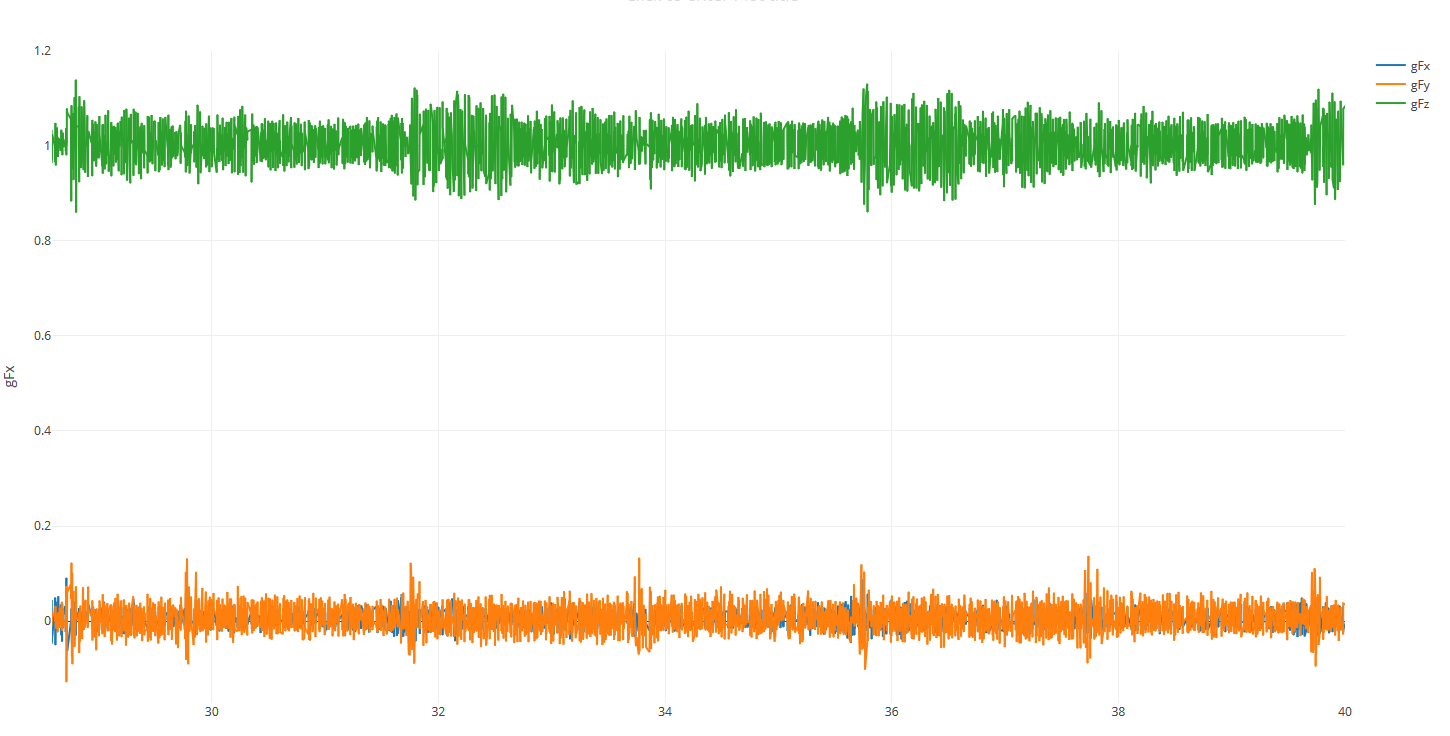
As some of you may have suspected, the spikes on the Y (orange) axis are when the print bed is changing direction. This is causing spikes in Z, but only in one direction. After watching the gcode test again, I confirmed the movements:
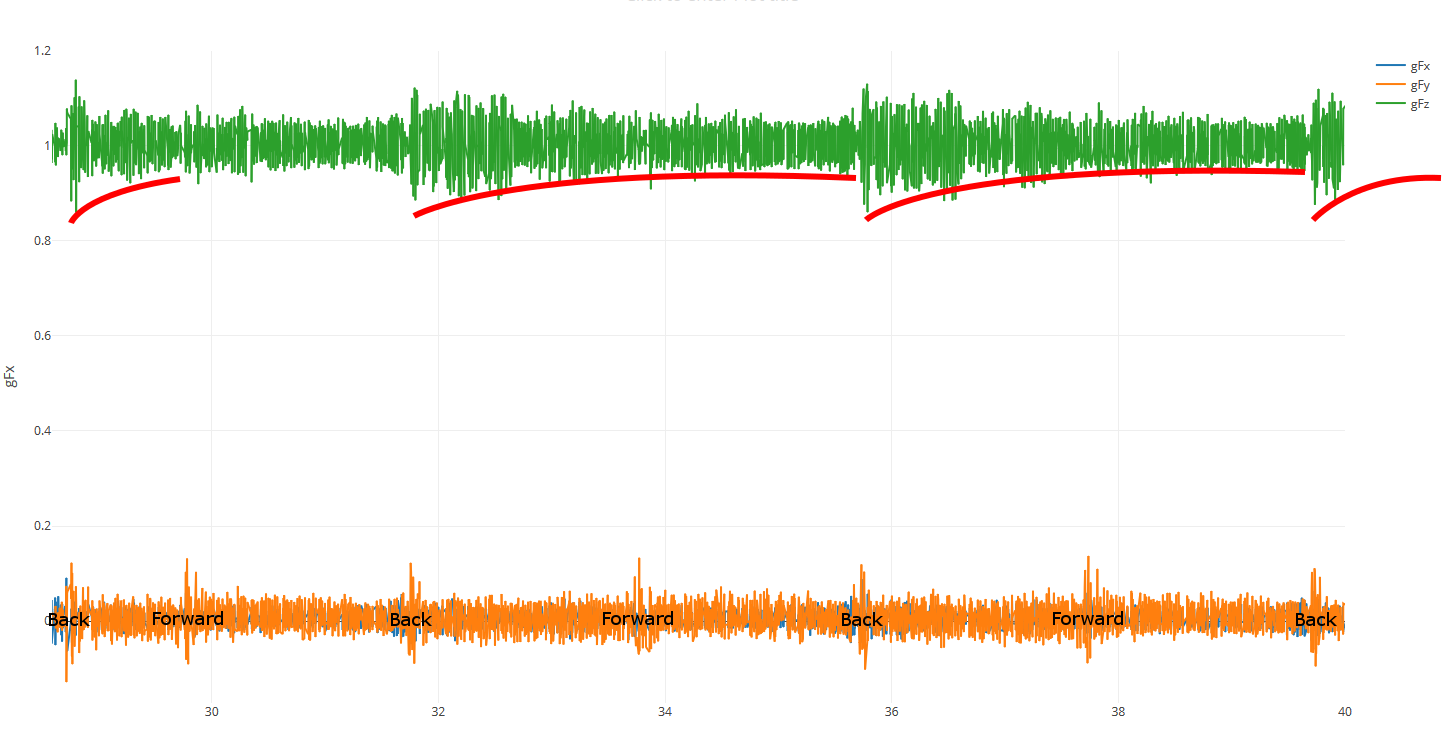
By "Back" I mean the bed is moving towards the rear of the machine, by "Forward" I mean towards the front. First "Back" movement is half because Y axis was centered at start. I have added some red emphasis lines as well to highlight the vibration clearly starting and fading off until that movement happens again. Also surprise surprise, one side of my usual XYZ calibration cube tends to look worse than the other, and it's the side the bed is moving backwards on. 🙂
So now printing gurus far beyond me, what is happening here? At first I thought it may be changing distance from the bed belt anchor from the stepper pulley affecting how the belt resonates when tension is applied, but it seems like this would happen in either direction. To further discredit (at least I think discredit?) that idea is I am running RHD's GT2 16T Y axis modification, so I have an identical 16T pulley on each in with a completely parallel belt the entire Y axis, no bigger idler on one end. I then started wondering if the janky two screw anchor on the idler is absorbing vibrations so we aren't seeing it when there's a pull back to the front?
Anyway, discuss. 🙂
My MK3 Parts: [Bowden] [New Shoes] [TPU Micro Springs]
Re: Z Axis Brace
Anyway, discuss. 🙂
If I had to guess: The rear of the printer is more sturdy (braced with psu) than the front, resulting in spikes during -Y travels, but not +Y. (if that was what you were asking, sorry I'm tired)
I think a better question would be what exactly are we trying to diagnose? You could see artifacts on the FRONT side of cali cube, but not the rear if the effect is strong enough.
Re: Z Axis Brace
I think a better question would be what exactly are we trying to diagnose? You could see artifacts on the FRONT side of cali cube, but not the rear if the effect is strong enough.
More or less I am printing at 100mm/s accel right now because ringing is bad, especially on my Y axis. My initial idea was maybe a Z brace would help, then it moved to just hunting down strange vibration in general and eliminating it. On the cali cube, the ringing is worse on the side the extruder is on when the bed is going backwards.
EDIT: Also just optimization for optimization's sake. 🙂
My MK3 Parts: [Bowden] [New Shoes] [TPU Micro Springs]
Re: Z Axis Brace
EDIT: Also just optimization for optimization's sake. 🙂
gotcha. I'm guessing your jerk is equally low?
shot in the dark, but I did notice the other day my z-axis top plate-things had a little slop in the smooth rods. I've since replaced them with design from jtlx which keeps them in place better, but haven't really tested them yet.
another shot in the dark: super low acceleration/jerk can have some weird artifacts as well
Re: Z Axis Brace
gotcha. I'm guessing your jerk is equally low?
shot in the dark, but I did notice the other day my z-axis top plate-things had a little slop in the smooth rods. I've since replaced them with design from jtlx which keeps them in place better, but haven't really tested them yet.
another shot in the dark: super low acceleration/jerk can have some weird artifacts as well
Jerk is the default 10 in firmware, I will check the Z axis rods for play.
Also yes, at the lower speeds I was seeing bulge. I re-enabled Linear Advance in the firmware and it compensates pretty much completely, but I am forced to use sdcard for print. 🙂
My MK3 Parts: [Bowden] [New Shoes] [TPU Micro Springs]
Re: Z Axis Brace
gotcha. I'm guessing your jerk is equally low?
shot in the dark, but I did notice the other day my z-axis top plate-things had a little slop in the smooth rods. I've since replaced them with design from jtlx which keeps them in place better, but haven't really tested them yet.
another shot in the dark: super low acceleration/jerk can have some weird artifacts as well
Jerk is the default 10 in firmware, I will check the Z axis rods for play.
Also yes, at the lower speeds I was seeing bulge. I re-enabled Linear Advance in the firmware and it compensates pretty much completely, but I am forced to use sdcard for print. 🙂
Want to send one of your 20mm non linear advance gcode files to me, I’ll print on my machine with the Prusa gray pla that came with the printer. Maybe it will help rule out software?
Re: Z Axis Brace
You know, I've been baking on this one for a bit...
The middle of the printer isn't actually touching "ground". The entire thing is being held up by the four corners of the extrusions.
I wonder if that might be a bit much to expect the bolts to secure on their own.
So I've been thinking of running an experiment like supporting the center frame on some springs to help with the load of, you know, the entire printer right in the middle.