Re: [Testers Needed!] TPU "micro springs"
Wave washers that aren't completely flattened would have a tendency to expand/contract when heated. Every thermal cycle would contract it more and more.
So long as the temps are low. (I'm talking as far as metal is concerned) I don't think the washers would have any "lasting" effects. You are correct that they will expand and contract as they heat and cool... but that's not very relevant, as the screw that you use to level the bed would hold the bed "level" regardless, of minor contraction/expansion.
Assuming you have .25inch of wave washers, the thermal expansion would be .000252 inch. That's assuming your room is 60f, and you are printing ABS at 100C.
I used to work in automotive machining, and I can't imagine why a part would fatigue with 0.1% deflection, per heating cycle.
For Steel to get to a point where it loses it's "spring" is around 1000c. I could imagine it becoming easier to fatigue at around 700c. I however can't imagine a difference in the steel from a material standpoint, knowing the difference of room temp, and 100c.
REAL WORLD EXAMPLE of what you are saying.
The springs that retain the brake caliper and help prevent your brakes from staying engaged on your car/suv/truck/semi/train/etc, This spring gets super hot. We are talking well over 100c temp cycles.
You are only able to use the brakes on your car around 10,000 times, before needing to take it to the shop to have your brake springs changed every 3000 miles.
^-- This example says 10,000 brake cycles, which each cause a rather large temp-spike on these parts. On a 3D printer, you will experience no more than a 70c temp spike a few times a day. Let's say you print 24 times a day. (This is seriously un-realistic, realistic would be 4) That would give you 416 days of 24 heat cycles a day. More realistically, you would be looking at around 2500 days of 4 heat cycles a day. (which assumes your printer will actually last 8 years, printing 24 hours a day... which is highly unlikely)
And this goes to my point.
Even if springs failed quickly due to "minor" heat changes... It would still last almost 10 years, of commerical use. And honestly, I highly doubt .1mm change over 10 years would matter.
PS: The springs in the 50ton press used to work on, last around 250,000 compressions. These springs actually get hot every time they compress due to the extreme energy they absorb/release.
Hi, I'm Sean. I used to work on CNC machines.
I try to not make mistakes, but the decision is YOURS.
Please feel free to donate to my filament/maintance fund.
Re: [Testers Needed!] TPU "micro springs"
I was looking at springs, and trying to find what was mentioned above, when I found EXACTLY what we need.
"Wave springs"
I can't find a specific spring to our specs (yet)... but they are VERY stiff it seems, which would be perfect for our application. 😉
I also found "Wave Washers" that look like they might work... the question is, how much deflection can you get out of them, and how much "torque" to get the said deflection.
Awesome, this looks like a more suitable solution. The screws are 3mm, but I was able to find the M3 version of them here: https://www.amazon.com/gp/product/B0786LYF3V - should be here in a couple days. In the thumbnail you can see a breakdown of thicknesses. It looks like:
If you were able to mash them completely, that would mean a travel of 0.3mm, though realistically a little less considering we want some tension at all times. If more travel was needed, a stack pair would net you 0.6mm, etc. Scratch that, didn't consider that these can turn and fit into each other. You could still extend travel, but not by another 0.3mm. Would need a flat washer stacked inbetween to extend travel fully, I think? Coffee made the difference. 🙂
Here's my "after" mesh level results with the TPU micro springs and a couple hours tweaking on those nine screws:
I'm just curious, but I assume, after adding your shims you ran routines like Calibrate XYZ again?
Given your current success, I am at the point I want to take one last try at shimming my bed before attempting to plead my case to Prusa support for a replacement. I tried shims before, but was just winging it and putting shims where I thought they were needed... nothing like the methodical approach you took here.
For the record, I'm using layers of aluminum foil tape for lack of a better alternative at this time though your TPU washer idea is definitely inventive.
I haven't done the Calibrate XYZ yet, but I have done Calibrate Z multiple times and getting similar results.
Speaking of which, did a few test prints to heat things up and down and decided to check it while it was cold this morning. Here's three back to back mesh leveling results with no heat:
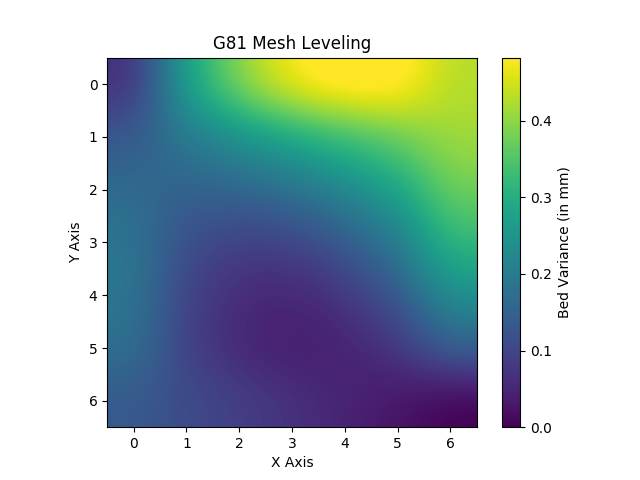
As you can see, this is getting to a level that the pinda isn't trustworthy. Based on the three tests, I would say I have gone from 0.025mm variance to 0.05. Not too bad so far.
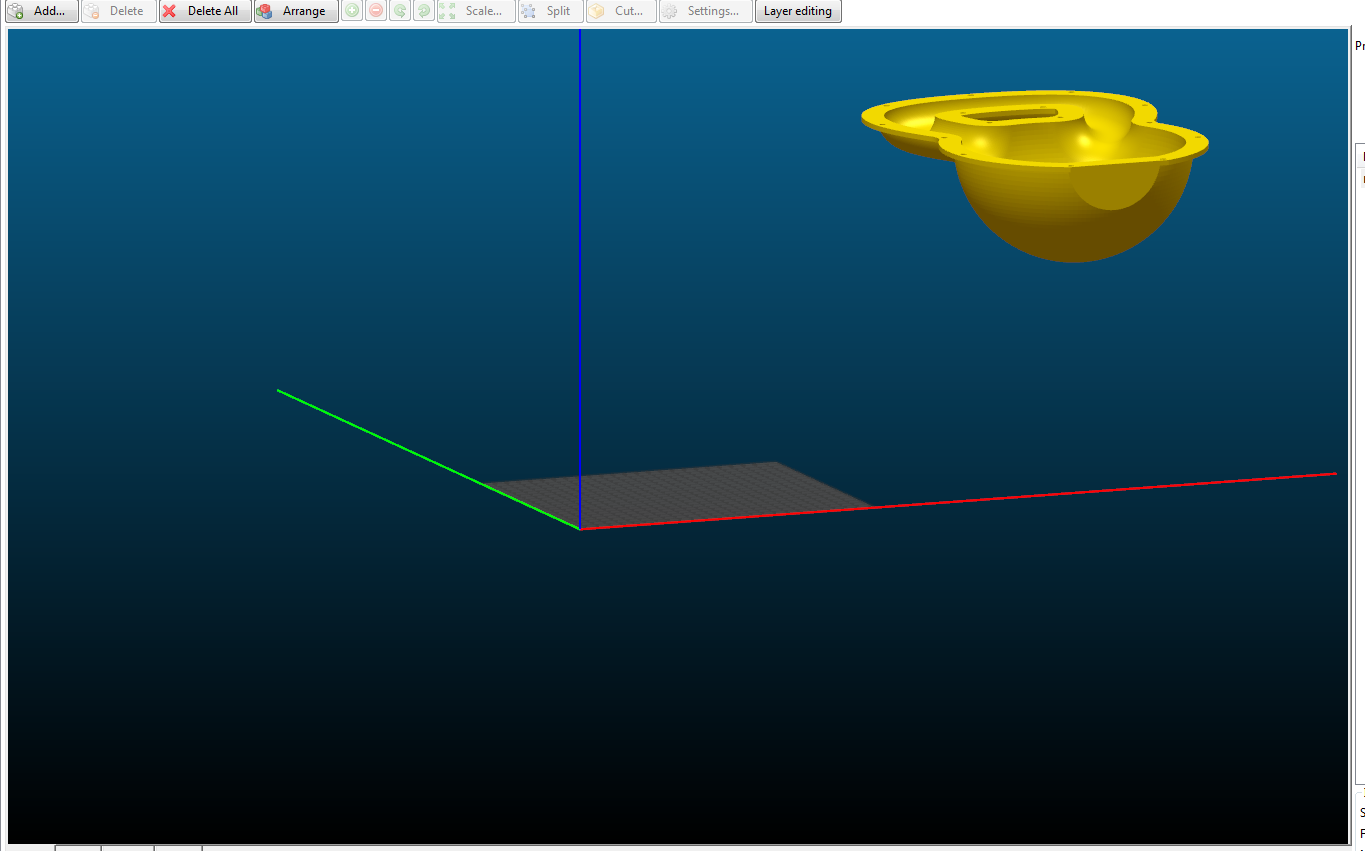
My MK3 Parts: [Bowden] [New Shoes] [TPU Micro Springs]
Re: [Testers Needed!] TPU "micro springs"
Awesome, this looks like a more suitable solution. The screws are 3mm, but I was able to find the M3 version of them here: https://www.amazon.com/gp/product/B0786LYF3V - should be here in a couple days. In the thumbnail you can see a breakdown of thicknesses. It looks like:
If you were able to mash them completely, that would mean a travel of 0.3mm, though realistically a little less considering we want some tension at all times. If more travel was needed, a stack pair would net you 0.6mm, etc. Scratch that, didn't consider that these can turn and fit into each other. You could still extend travel, but not by another 0.3mm. Would need a flat washer stacked inbetween to extend travel fully, I think? Coffee made the difference. 🙂
If you put a flat washer in between... 🙂
Hi, I'm Sean. I used to work on CNC machines.
I try to not make mistakes, but the decision is YOURS.
Please feel free to donate to my filament/maintance fund.
Re: [Testers Needed!] TPU "micro springs"
I did this test and shimmed one Y-axis rod support UPward to compensate for a low corner. This is easier because it is done external in an easy-to-reach place and does not carry the risk of getting loose screws or melted plastic.
This worked really well to obtain symmetry.
My end result is still a slight upward, but symmetric bow in the plate. I never had any first layer problems, I am just picky like some of you all and wanted to look for any improvement, especially an easily measured one : )
If I were to attempt fixing the bow, I think a good approach would be to either purchase thin metal (very thin) shims for all mounting points except the center one or else remove a very slight amount of material from the center-most standoff.
Re: [Testers Needed!] TPU "micro springs"
UPDATE Part 1 of 2: Got the M3 Wave Springs in and installed with good results. Figured out a few things before I started:
That said, I put all nine screws in with wave springs under them. I then tightened them just to the point that the screws quit turning freely. I did a test and had a notably low bottom right corner, so I went ahead and added another wave spring there. That left me with the following:
I began to tighten the hot spots very small amounts and repeatedly checked G81. Since there was little tension on any of the screws when I began, tightening hot spots down also had the side effect of increasing tension on screws that I hadn't touched at all. This is important, as it shows we are good to start at the very minimal tension and can expect it to go up as hot spots go down. Eventually arrived at this:
0.014mm~ variance, not too shabby. 🙂
I wish the mesh level operation would let you define how many times to check a spot (instead of the 1,2,3 next), because at this level the pinda output gets pretty shaky. The above G81 was the first one I got at that level without an unusually high/low spot (usually there's at least one spot that is 0.03+- that throws the chart off). Took me about five tries to get one that didn't seem like it was lying to me. Seems this would also make mesh bed leveling more consistent at very low layer heights.
Part 2 coming next post to detail how the previous TPU micro springs held up...
My MK3 Parts: [Bowden] [New Shoes] [TPU Micro Springs]
Re: [Testers Needed!] TPU "micro springs"
UPDATE Part 2 of 2: How did the TPU micro springs hold up and how do they compare to steel wave springs?
The TPU micro springs held up surprisingly well and I think they are still a great solution if not the most optimum one. Pics:

So this particular spacer (above) was in a low spot, meaning the screw wasn't heavily tightened down on it and the tension being applied to it was being caused primarily by the high spot screws being tightened down around it. No noticeable change here, and calipers still show this guy as being precisely 0.6mm.

This spacer (above) was on the highest spot on my bed, and I had to tighten it down very hard to get things to cooperate. As you can see, after being heated a few times the TPU was content to keep this shape and potentially quit pushing upward quite as hard; however, it doesn't seem to have melted or moved out of the way. I believe as long as you didn't need to loosen off of this guy, and you shouldn't need to if you correct things by primarily tightening high spots downward, you should be fine.
So takeaways/comparisons:
My MK3 Parts: [Bowden] [New Shoes] [TPU Micro Springs]
Re: [Testers Needed!] TPU "micro springs"
Not much to add on the technical aspect but my right front corner is definitely high and is driving me crazy. Wasn’t there a spot in the manual about adjusting corners ever so slightly. I really want to get this fixed.
Re: [Testers Needed!] TPU "micro springs"
Just want to say thanks for uploading your TPU "springs." They've definitely helped me get my bed closer to level. This is the first printer I've had with "smart" features, and maaaaan it's killing my prints. With your springs (slightly modified to .8mm thickness), I've finally been able to get a decent first layer twice in a row. I think I'm still experiencing the PINDA firmware issue, but I suspect that's going to be fixed in the coming update.
Awesome! Keep us posted on how they hold up. You probably want to check a G81 every now and again and adjust high spots downward as these give way to the pressure, and they may do so more than in my testing if you use bed temps higher than 80C. 🙂
My MK3 Parts: [Bowden] [New Shoes] [TPU Micro Springs]
Re: [Testers Needed!] TPU "micro springs"
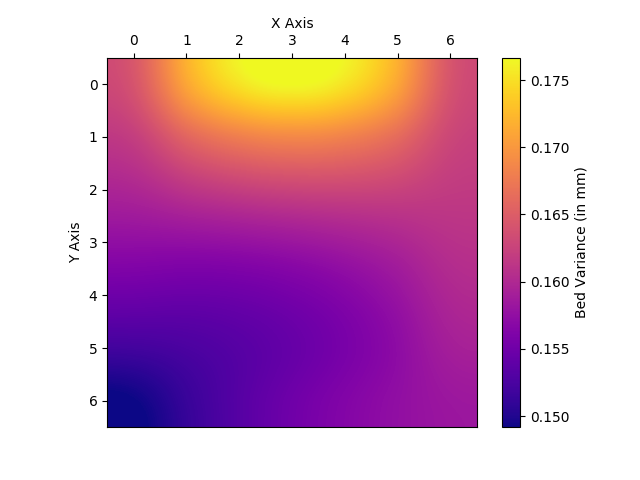
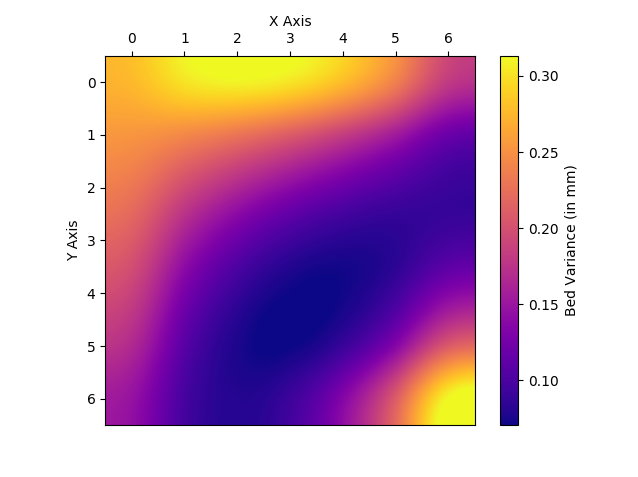
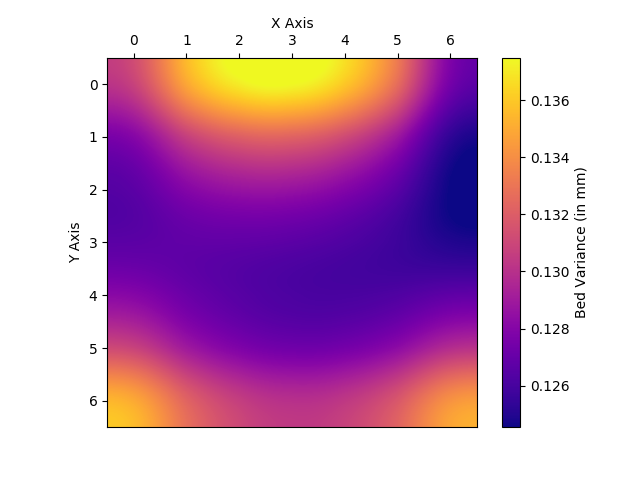
Thanks for the heatmap software, it was a great way to visualize the problems with the bed leveling.
My bed has a total variance of 0.7mm but I don't have any flexible filaments so I've ordered some similar wave washers and will be trying that out.
Re: [Testers Needed!] TPU "micro springs"
Thanks for the heatmap software, it was a great way to visualize the problems with the bed leveling.
My bed has a total variance of 0.7mm but I don't have any flexible filaments so I've ordered some similar wave washers and will be trying that out.
Glad it's useful! I am secretly working on an Octoprint plugin for it, will post details in a separate thread when it's ready for use. 🙂
My MK3 Parts: [Bowden] [New Shoes] [TPU Micro Springs]
Re: [Testers Needed!] TPU "micro springs"
Have you thought of using a conical spiral spring or compression spring and remove the standoff entirely?
MK3 Kit, Designed, built 4x4 CNC Plasma Cutting Table, Motorcycles Bigdogbro's Adventures
http://www.youtube.com/channel/UC5djrxBeeOKB9_6rHnn6G8A
Re: [Testers Needed!] TPU "micro springs"
Thanks for the heatmap software, it was a great way to visualize the problems with the bed leveling.
My bed has a total variance of 0.7mm but I don't have any flexible filaments so I've ordered some similar wave washers and will be trying that out.
Glad it's useful! I am secretly working on an Octoprint plugin for it, will post details in a separate thread when it's ready for use. 🙂
+1
This is an awesome idea, especially if you can just click "check level", printer does it's thing, and you get a new heatmap... adjust, push "check level", rinse and repeat until done... so... optimal!
Hi, I'm Sean. I used to work on CNC machines.
I try to not make mistakes, but the decision is YOURS.
Please feel free to donate to my filament/maintance fund.
Re: [Testers Needed!] TPU "micro springs"
I will give a try to that clever tweak once i decide to upgrade my Mk2s to Mk3.
I think i will go to conic washer. I saw some m3 with 0.25mm stroke. Advantage is you can pile few of them. Guideline is to not compress more than 75% of the total stroke.
Re: [Testers Needed!] TPU "micro springs"
I completed a variation of this mod and it seems to work well.
I used a sandwich of 4 parts
short spacer + 2 spring washer + medium sized spacer
to replace the original spacer, which is about 5.5 mm long
more specifically
center screw: 1.5 mm spacer + 2 waver washers + 4.77 spacer * Wave washers nested to each other
side screws: 1.5 mm spacer + 2 thin conical washers + 4.77 spacer * conical washers like this ()
corner scrws 1.5 mm spacer + 2 thicker conical washers + 4.77 spacer * conical washers like this ()
I did that arrangement because I knew I had a symmetric shape to the bed measurements already and I wanted to invert this. There is not very much adjustment range in the spring stack but certainly a person could make a stack using more spring washers and less solid spacer height.
I think the washers end up getting compressed nearly all the way.
I did a few rounds of measuring and each time I computed the difference to a number of turn degrees PLUS or MINUS that would be required and each time it improved. One has to be careful not to run out of travel (bottom out totally and lose range or loosen totally)
That said - I wonder if the shape of the bed has more to do with the Extruder and bed deflecting more at mid-span than at the ends? Technically this must be happening but I don't know if the amount of deflection matches what we see in the measurements.
Re: [Testers Needed!] TPU "micro springs"
I used small (3x1) O-rings for this. They are elastic and resistant to reasonably high temperatures, so I'm more confident they will not deform as much with time. Managed to get the variance down to 0.015mm across the bed and I think at this point the PINDA inacuracy is the limiting factor as with each run I get slightly different result. You could probably go with 2.5mm ones instead of 3mm so they fit tightly on the screws and hold the spacers in place.