Flexion Extruder Prusa Mk2S
I am a big fan of the Flexion Extruder that I had on my Wanhao i3. It has very good performance, particularly with flexible filaments. The E3d will be repurposed for a 400x400mm Hypercube build I am working on. The problem is that I couldnt find anyone who had modded the Mk2s to accept the extruder.
I decided to start playing with a solution. My goal was to use all existing hardware except for the thermistor. I used Josef's mk2s files as the base in order to keep the probe and mounts in the same location as a stock mk2s. The only thing that is not 3d printed is a 2inch L bracket ( http://www.homedepot.com/p/Everbilt-2-in-Galvanized-Corner-Brace-4-Pack-15267/202033914 ).
Performance is outstanding (once I callibrated the extrusion steps per mm).
I am willing to publish the files on thingiverse but the only thing I cannot confirm is whether Josef's files allow derivatives to be published. I tried contacting Josef but didnt get an answer (he is probably a very busy guy). Can anyone answer the licensing question for me?
Re: Flexion Extruder Prusa Mk2S
Ok so I have everything working. Still fine tuning the extrusion settings but it prints. I have uploaded the files to Thingiverse.
https://www.thingiverse.com/thing:2446630
Instructions
1.) Get hold of 2 inch L bracket https://www.homedepot.ca/en/home/p.2-inch--galvanized-corner-brace-4pk.1000773650.html
2.) Use dremel/metal tool to create hole for extruder barrel and drill extra hole to bolt extruder block to bracket
3.) Bolt corner brace to 3d printed extruder cover. The 3d printed parts include holes so you can line up the L bracket and get the right height. I used whatever screws I had sitting around
4.) Remove the extruder cover from stock e3d hotend and dissassemble
5.) Mount the 3d printed extruder cover using the two stock m3 bolts.
6.) Assemble the flexion extruder, you can use the stock extruder heater.
7.) Replace thermistor with NTC 3950 100K type thermistor. Soldering is required here. I just cut the existing thermistor wire and soldered the new one in.
8.) Mount the heater block and extruder with the stepper motor (similar to instructions for the Duplicator i3 plus https://flexionextruder.com/support/i3-style-printer/ )
9.) Attach the 30mm extruder fan using m3 bolts and install the Pinda probe in the same manner as stock.
10.) Attach parts cooling fan using 3d printed part on thingiverse (same link as above)
11.) Insert following gcode to reset home Y position
G1 Y25 F1500; move to Y=25
G92 Y0; set this position as new Y0
12.)You will also need to recalibrate the steps per mm for the extruder.
I used the following and assume it will be similar for other systems.
M92 E96.98
What is outstanding is calibrating the extrusion multiplier and width.
Re: Flexion Extruder Prusa Mk2S
This looks promising to me great work!!
Did you try TPU and when yes what is the Print speed?
Re: Flexion Extruder Prusa Mk2S
Currently I just put TPE and it worked great. I have not pushed the speed to fast but comfortably printing TPE test cubes at 2000mm/min. I only have the HT version connected so far which has issues TPU. I will switch to the regular version and give it a go soon.
Re: Flexion Extruder Prusa Mk2S
Ok an update on my experience with the Flexion. It prints really well.
I had some major quality issues at first.
For Simplify3D you need to turn off "coast at end" and "wipe nozzle". I am not sure why this makes a difference, maybe it is because the flexion has much better filament control than stock E3D. I also set retraction to about 2-3mm as the flexion can easily handle it. For most filaments you will need to drop down the extrusion multiplier. Stock settings for the Prusa are 1.0 but with the Flexion I am hitting 0.95.
Re: Flexion Extruder Prusa Mk2S
Hey John,
Thanks for posting these instructions. I purchased a Flexion Extruder a few days ago and I'm trying to fit it to my Prusa i3 Mk2. I've very new to 3d printing so I'm way out of my comfort zone! Anyway, I believe I have completed most of the steps but I have a few questions:
1. Would it be possible to get a few more photos of the assembled extruder from a few different angles just to make sure I've got it right?
2. I'm struggling a bit with step 10... Does the printed part slide onto the end of the L bracket? I live in Australia so I wasn't able to go to Home Depot to get the exact L bracket that you suggested and unfortunately it doesn't quite fit into the groove in the printed part. A photo of how this goes on would be great if you don't mind.
3. Do the gcode values (step 11) go into Slic3r somewhere?
4. How do I do step 12 and where does this code go?
Thanks for your help!
Stephen
Re: Flexion Extruder Prusa Mk2S
Hi Stephen,
Being an Aussie expat I can understand getting the homedepot part is an issue.
Whatever L-bracket you use, you will need to use a dremel or similar tool to get the barrel to fit. I did toy with 3D printed versions but the problem is that even using carbon fiber PETG it lacks the rigidity of steel. I attached some more photos so it is clearer. You will be able to reuse at least one hole from the L-bracket for mounting the heater block. The other hole you will likely need to drill.
The fan bracket does slide onto the slot. I have attached a photo of how the fan bracket slides onto the L-bracket. If you can give me the measurements for the end of your L-bracket I can make you a bracket and then upload to thingiverse. The only thing I ask is that if you can add details in thingiverse comments of where you got the L-bracket from so that it can help people who do not have access to the home depot version.
Will continue with gcode in next post.
Re: Flexion Extruder Prusa Mk2S
For the gcode I am assuming that you are using Slic3r.
I use Simplify3d and give you more detailed settings for that slicer.
I did take a look at Slic3r and attach a screen shot of where to go in order to add the gcode. I inserted the gcode where it should go based on my Simplify 3D profile.
Re: Flexion Extruder Prusa Mk2S
Hi John,
Thanks for your message. I have everything in place now and I'm just waiting for my thermistor to arrive (I wish I'd read your instructions more carefully the first time and ordered it with the flexion!).
I ended up doing a bit of filing on the printed part so it would slot into the L bracket. Just in case anyone else want to know I purchased the following bracket from Bunnings:
https://www.bunnings.com.au/zenith-50mm-zinc-plated-angle-brackets-4-pack_p2760232
The end of this bracket is 16mm in width and about 1.5mm thick.
Thanks for the gcode information. Yes, I am using Slic3r. Will my settings be the same as yours? I believe my hot end is sticking out an extra mm or two from the L bracket (judging from your photos).
I have a couple more questions:
1. I've notice that the flexion nozzle sits in a completely different spot to the original one. It means the nozzle can't reach the back of the heat bed. Does that mean I've reduced the size of my print area a bit?
2. When you say "calibrating the extrusion multiplier and width"... This is done in Slic3r too?
Thanks again!
Re: Flexion Extruder Prusa Mk2S
Yes you do lose a little bit of build area.
If you find your nozzle is offset differently to mine then you can adjust the gcode. If you can change the value of Y25 to another value (eg Y30). Do not worry if you get it wrong. The worst that can happen is that the purge strip at the beginning prints into air.
G1 Y25 F1500; move to Y=25
G92 Y0; set this position as new Y0
For Slic3r, I have attached screenshots of where the relevant settings are.
I would recommend finding something small to print and test your settings.
https://www.thingiverse.com/thing:1363023 is a good test.
With the Slic3r settings it is generally pretty hard to screw things up too badly . I learnt what most of the settings do by changing the setting and looking at how the print turns out. Takes time to get the hang of it but once you do you can diagnose print defects pretty easily.
https://www.simplify3d.com/support/print-quality-troubleshooting/
Re: Flexion Extruder Prusa Mk2S
Thanks again John. The link you sent for common defects is fantastic!
I've noticed the slot in my printed part that slides into the bracket is a lot higher on my printed part than yours. This is causing the fan to sit very low... almost as low as the tip of the nozzle. Did you change this design a bit? Once I have it all up and running I might print this part again to correct this problem.
I'm also wondering if the following extruder may have been more suitable to the Prusa i3 Mk2:
https://flexionextruder.com/shop/extruder-for-e3d-hotend/
Thanks!
Re: Flexion Extruder Prusa Mk2S
Yes I forgot that I changed the height a little because it was a little close. I updated the stl on thingiverse.
I also created another mount based on your L-bracket dimensions. If you get a chance it would be appreciated if you could see if it fits.
The other Flexion designed for E3D would work but not as well as the standard Flexion. The standard Flexion has two variants (Standard and HT). The standard has a teflon liner in the hotend part (as opposed to the E3D which is all metal hotend). It also has a far shorter filament path than the E3D. I would anticipate that the Flexion kit would have better performance than the Flexion E3D retrofit.
I am trying to figure if there is a way to make it all 3D printed but still have the rigidity necessary to avoid any wobble of the hotend.
Re: Flexion Extruder Prusa Mk2S
Hi John, my thermistor arrived and I have now fully assembled the flexion extruder. The good news is that everything is working and I can print flexibles again!
Thanks for designing the fan attachment for my Bunnings L bracket. The 16mm width was perfect but the slot wasn't thick enough... it actually felt like it had shrunk a bit (or maybe that was a poor print job on my behalf). Anyway, I filed the slot out with a nail file for about 10 minutes and it worked well.
A fully printed solution to attach the flexion would be fantastic if you are able to achieve that. I take it that would restore most of the print area back to its full size?
Thanks for all your help getting this to work. I wouldn't have been able to do it without your help.
Re: Flexion Extruder Prusa Mk2S
Glad to hear you got it up and running.
The goal with the 3d printed part is to make a part that requires no additional brackets. I also want to integrate the cooling fan better and improve the performance. I think the loss of volume is unavoidable. Most of the other major extruder mods (eg titan aero) do lose some Y build volume. There is bound to be a way to get around this but I think it would involve rebuilding the printer. If I could have an easily 3D printed part that is a drop in replacement the loss of y axis would be worth it.
For your tolerances you may want to check your extruder multiplier as you may be overextruding.
https://mattshub.com/2017/04/19/extruder-calibration/
I love my Flexion extruder, I dont print a lot of flexibles but find the performance for all filament is better than stock E3D (no offense to Josef).
I have both the Standard and the HT version and have gotten very quick changing the heads over. If you need to print PLA, PETG, Nylon the HT is worth the price.
Re: Flexion Extruder Prusa Mk2S
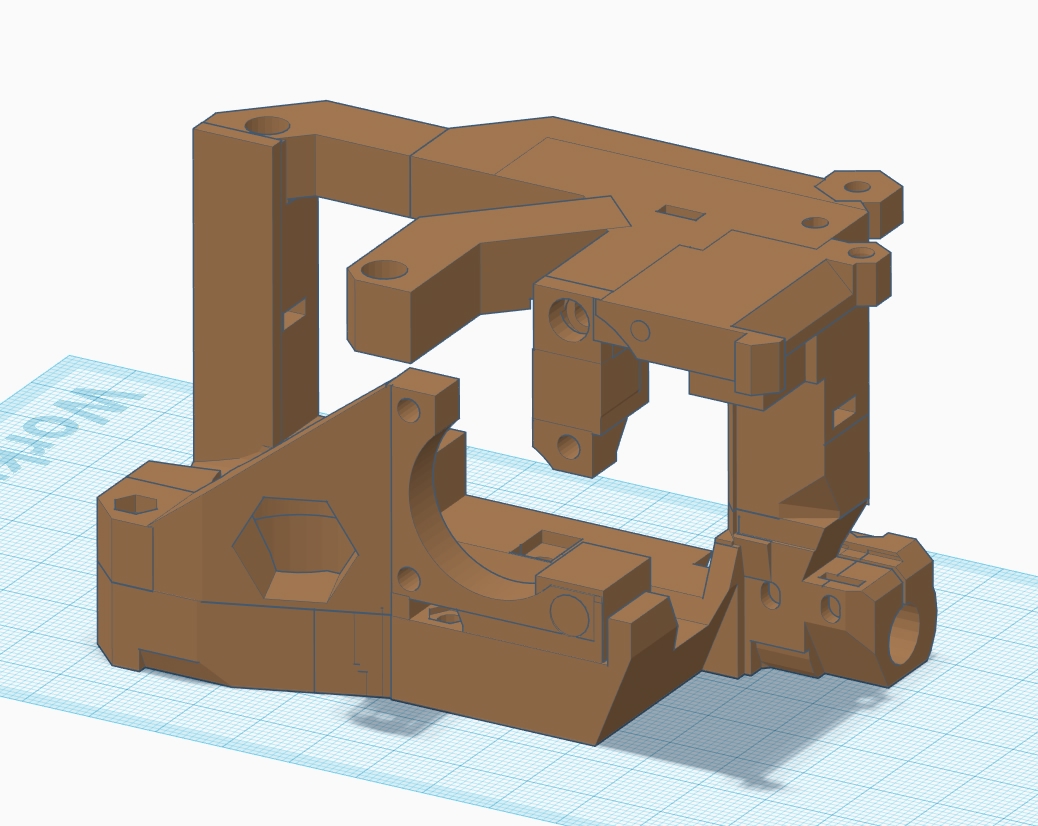
I hope you don't mind john.w18, but I decided to design a from-scratch extruder assembly based on your mounting solution.
Honestly, I think the initial idea of where and how to position the extruder stepper (roughly) and other things you figured out were the hard part, and I very much consider this to be a derivative work. You still came up with the enabling solution, all I did was run with it and try to come up with something that wouldn't require that metal L-bracket.
It's *almost* done, I am about to test a slightly earlier version that I printed yesterday, but doesn't have any way to mount the blower fan and is generally a rough fit.
The good news is I was able to squeeze out a few more millimeters of savings, and it looks like with this mount, we may only need to lose on the order of 10mm of build area on the y axis.
Another design goal was to maintain blower nozzle and fan mount compatibility. There are a lot of cool nozzle designs and various adapters (like the noctua fan adapter) that are all only compatible with the stock extruder mount, so I've done my best to create something that should still work with them.
Now, I have no idea what I am doing, I've never really done any sort of MCAD stuff before, and this is one hell of a 'first project' attempt. I was doing it in OpenSCAD, but I got a bit sick of the constant suicide ideation OpenSCAD tends to cause, and upgraded to tinker cad =P. So if anything seems dumb or 'noobish'... it's because it's dumb and noobish hahaha.
I'm also a bit worried about the thermal performance...that's what I'll be testing shortly. Mechanically it fits and is quite rigid, but the proof in the pudding is in the printing :). Hopefully it can do so without melting.
Anyway, I'll post here once it's finished, and even if it is a total failure (hopefully not but who knows), maybe john or someone might find it useful as, at worst, an example of what not to do.
(Note: It is printed as two pieces, analogous to 'extruder body' and 'extruder cover')
Re: Flexion Extruder Prusa Mk2S
Definitely dont mind at all, excited to see more people interested in the Flexion.
Do you have any photos of it attached to the printer?
Your CAD skills are way better than mine and good to see a solution that doesnt involve the L-bracket. The two main issues I faced were thermal problems and also wobble due to the weight/momentum of the stepper motor.
Another option is something that I worked on with my Hypercube Evolution was to mount the stepper motor backwards ( https://www.thingiverse.com/thing:2640254 ).
Once you get it up and running I will definitely give it a shot.
Re: Flexion Extruder Prusa Mk2S
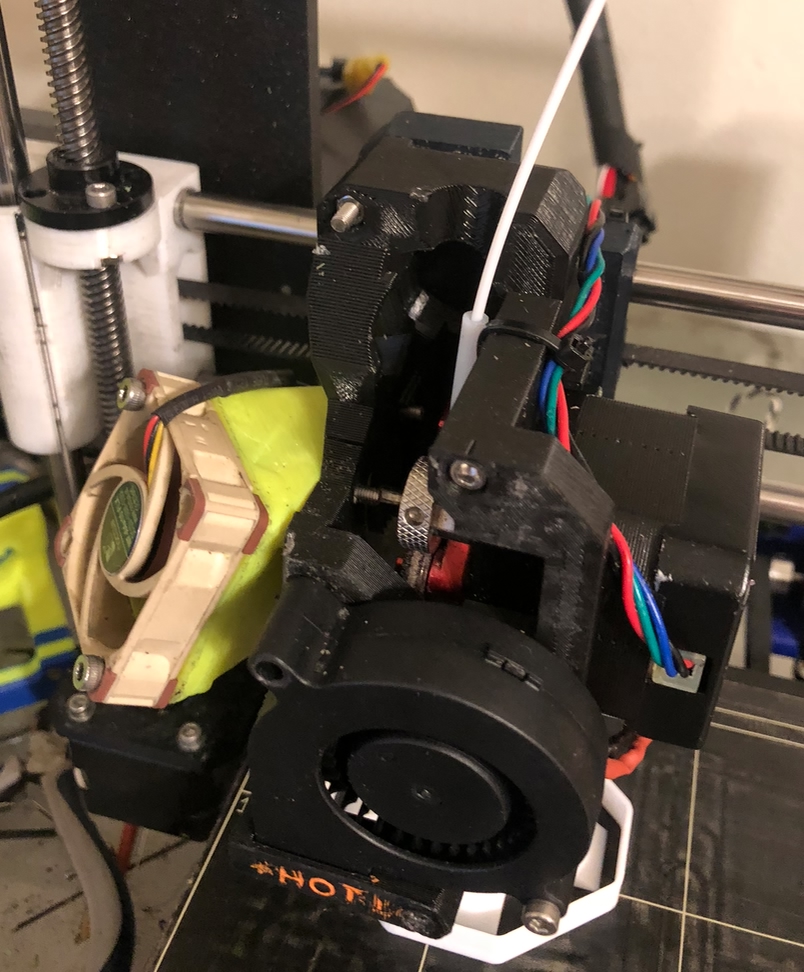
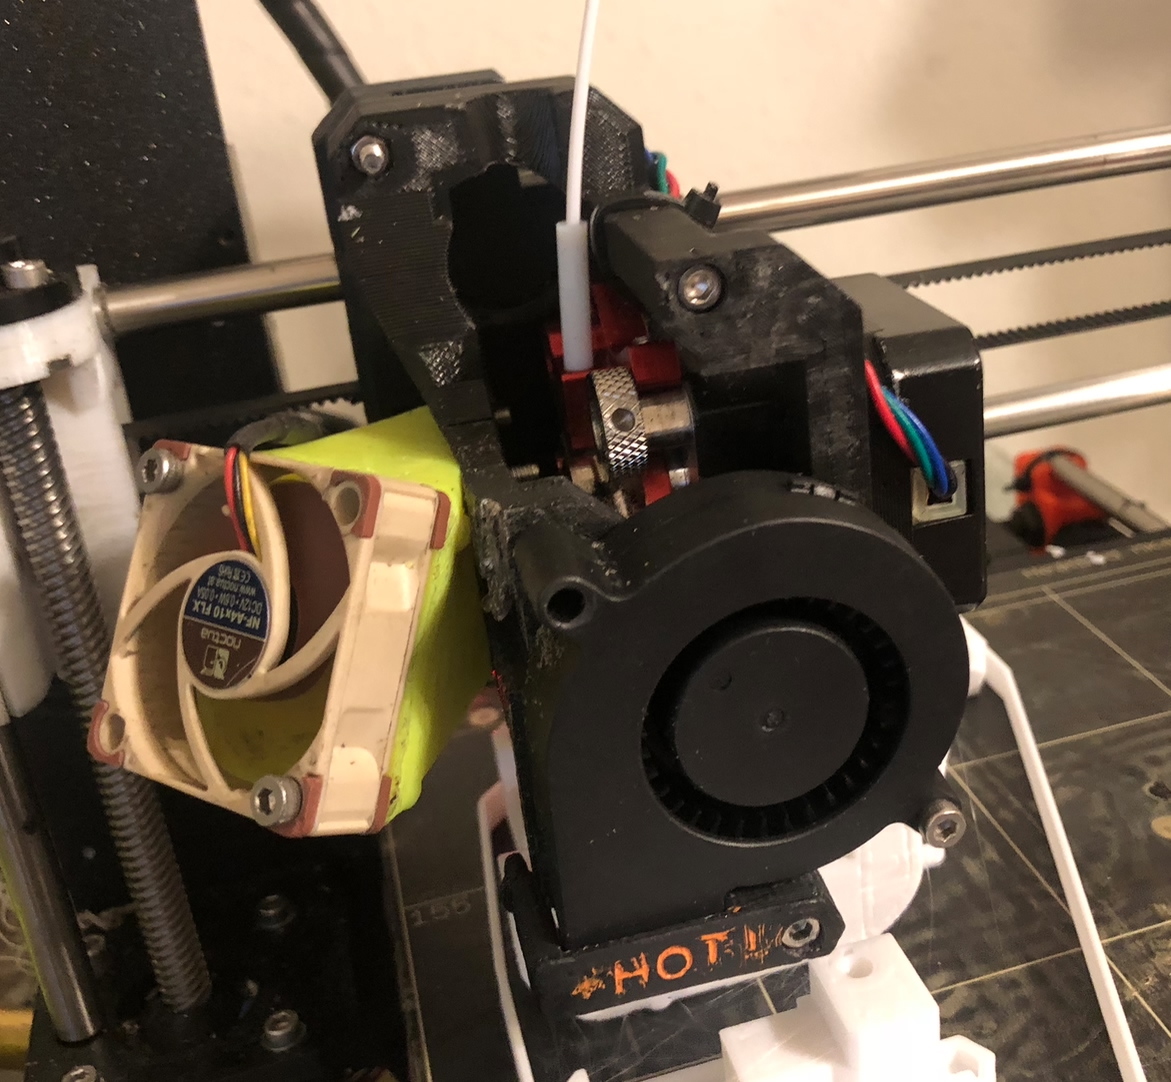
Hi, after some revisions and testing, I think it's ready for release. I've published the design along with a visual assembly guide here: https://www.thingiverse.com/thing:2721786
And, as requested, here are some action shots of it on my MK2S. It's currently printing a polycarbonate version of itself. :).
Also, holy crap, I was a bit skeptical about the extrusion performance, but not anymore. It's seriously night and day. And this thing can just RIP (extrude) plastic out crazy fast if you use a 40W heater cartridge. I'm printing polycarbonate at 270°C at around 18mm^3/s and it isn't even breaking a sweat. I'll have to see how high it can really go eventually. And the bead quality is just perfect. So consistent. And the retraction this thing tolerates is just nuts.
My personal opinion: as pricey as it is, it is worth every penny. I almost don't even care about printing flexible stuff anymore, because the improvement and speed at printing everything else is that much better.
Re: Flexion Extruder Prusa Mk2S
I really like how you did this. I never thought of stabilizing the stepper motor that way. I am planning to rebuild my setup after I finalize my Hypercube build so will give your mount a shot. I am pretty confident that it will outperform what I built. One question though. Do you find the Noctura fans have enough power to cool the hotend or is the fact your duct targeted enough to get proper cooling? Would you mind sharing the stl for the duct?
Re: Flexion Extruder Prusa Mk2S
Thanks for all of the hardwork and designs!!! I was interested in the HT module for my Prusa mk3, potentially the dual HT module. Is this able to be used for the Mk3 in either the single or the dual HT diabase extruder? Diabase directed me here and to your thread. Thanks so much!!!