Issue with under extrusion, need help?
I have a MK3 and I'm having issues with this printed piece. Designed in Fusion360, sliced in Prusa using the standard .02 quality setting.
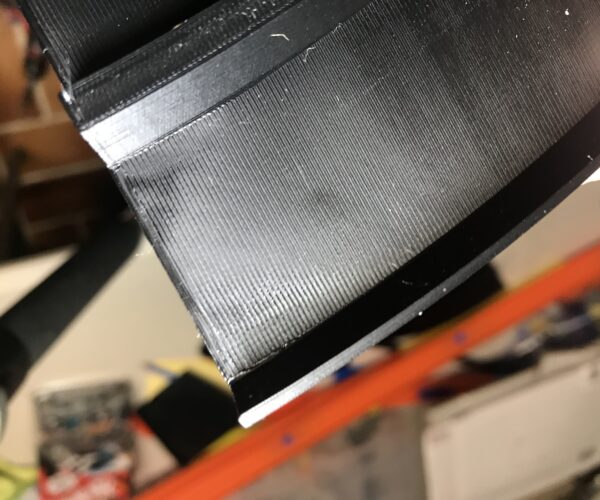
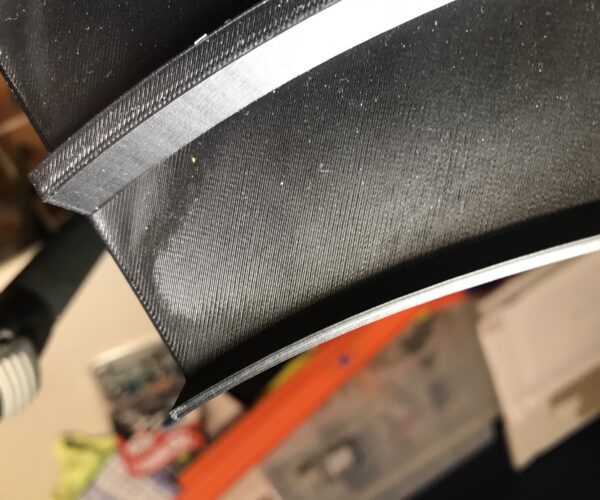
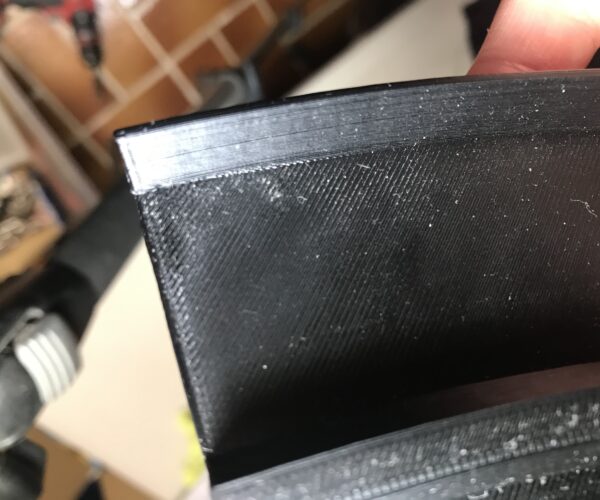
The issue is under extrusion I think on the corners and also along the top, it seems the layers don't join.
Sorry for my lack of knowledge on describing this.
I have printed 4 x pieces of this item and still the same results appear.
Does anyone have advice on what to look for in fixing this issue.
Thanks in advance
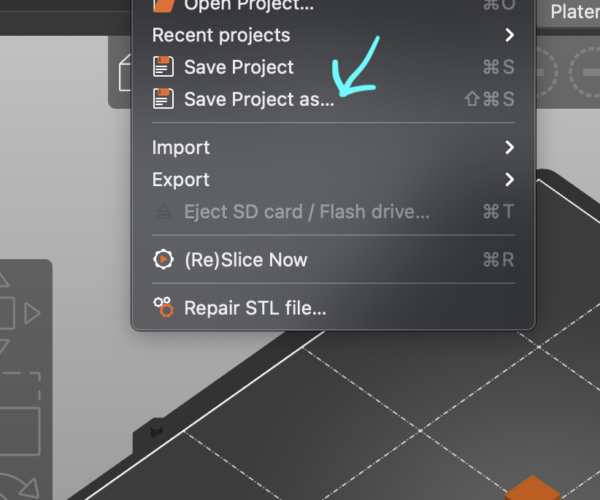
What filament? Zip up your post-sliced .3mf file (file/save project in prusa slicer) and post it here. Also show a pic of the bottom of the printed part (first layer). You can use the add-media button to avoid having to do the jpg two step.
Hard to tell from the pics
It's always tricky trying to interpret pics. That looks like an upwards curving surface. I don't see any obvious under extrusion, but a curved top surface is always going to show the "stair step" effect just due to the nature of FFF printing. As @dan-rogers says, save your current 3MF project file, zip it up, and attach it to a reply here so we can see your part & settings and give better recommendations.
and miscellaneous other tech projects
He is intelligent, but not experienced. His pattern indicates two dimensional thinking. -- Spock in Star Trek: The Wrath of Khan Unfortunately,…
Map
Just to to help:
Click on the image to see a map of how to do this.
--------------------
Chuck H
3D Printer Review Blog
RE: Attached is the file
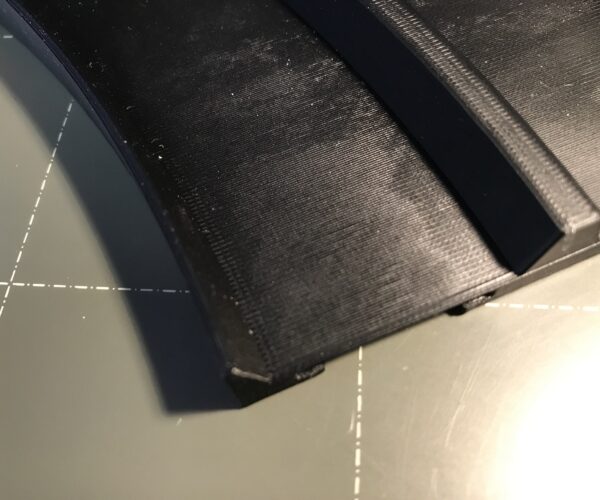
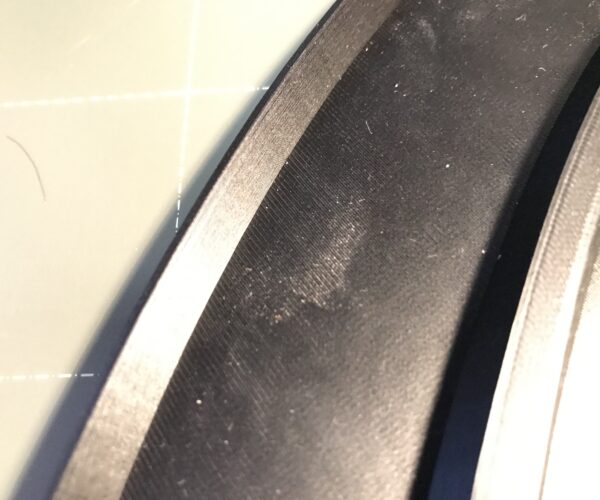 Thanks guys, the filament is 1.75mm from 3D Fillies here in Australia, this is the 4 fourth print I have done and using two other PLA rolls as a test as I thought maybe a bad batch of PLA,
The issue seems to happen on the top layer and in the corners. This is a piece for a client and sadly I can't send this to them until I find the issue with the stair stepping on the tip surface. The underside is fine as with the outa walls.
Attached is the file
Thank you
Thank you for the help, appreciate this.
RE: Sorry, not seeing the issue in these pics
Sorry to be dense, but I'm not able to see a problem in the pics. It sounds like you're describing a bit of under extrusion. Along the top edge the lines aren't closing up. That might be resolved by increasing your extrusion multiplier under filament settings 1-3%. I'm understanding this is the 3rd from a batch of the same brand of PLA and it's behaving differently. It is possible for filament to absorb moisture and thus change the printing characteristics. You might try drying your spool, though the pics don't show the obvious symptoms.
If the problem is the stair-stepping jagged appearance on the slopes, unfortunately, the only real way to fix that is to use a finer layer height (e.g., 0.15mm instead of 0.2mm). This is really going to slow down your prints though.
and miscellaneous other tech projects
He is intelligent, but not experienced. His pattern indicates two dimensional thinking. -- Spock in Star Trek: The Wrath of Khan Unfortunately,…
I'll look at your suggest setting and give that a try. Thanks
Thanks for looking, there's defiantly an issue which has me baffled and it's only on the top layers, looks like when the extruder get to the edges it's missing top layers or fails to fill the gaps, it also happens along the top main surface of the piece. I'll look at your suggest setting and give that a try. Thanks
Circle the problem area in a pic
It would help if you'd post a pic highlighting or at least pointing at the problem area.
and miscellaneous other tech projects
He is intelligent, but not experienced. His pattern indicates two dimensional thinking. -- Spock in Star Trek: The Wrath of Khan Unfortunately,…
Other optimizations can reduce print times
By the way, if you're printing a lot of these, there are some straightforward optimizations that will reduce your print time from the current 5h5m to more like 3h15m while actually increasing detail at the higher visible layers.
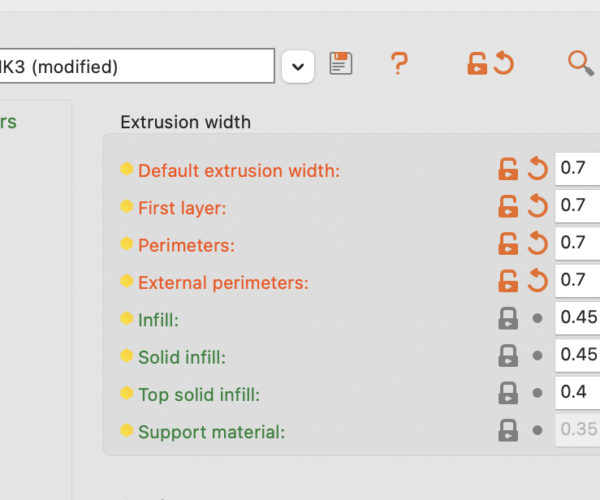
- Increase extrusion width. Up to 0.7mm with a 0.4mm nozzle will work. This might alter the gaps you're seeing as well.
- Decrease layer height to 0.15mm overall, thus improving resolution at top visible layers. Apply variable layer heights to lower layers below surface to reduce printing time. Using 0.25mm on those layers offsets the time increase from the lower height on the upper layers.
- Switching to the Support Cubic fill pattern is a bit more efficient.
and miscellaneous other tech projects
He is intelligent, but not experienced. His pattern indicates two dimensional thinking. -- Spock in Star Trek: The Wrath of Khan Unfortunately,…
I'll supply another pic, give me a few minutes.
I'll supply another pic, give me a few minutes.
Great advice
Great advice, I'll set a print off today and come back with the results.
Expert mode settings?
With extruder width is this found in the Expert, Advanced, Default extrusion width? this is currently set to .045
I can't seem to locate the variable layer height adjustments.
Advanced mode for extrusion widths & variable layer heights in Plater view
Most of the extrusion width settings do require Advanced or Expert mode, yes.
You can change specific or all extrusion widths. You can go up to 200% of your nozzle size with decent nozzles. As a quick experiment, try changing perimeter and external perimeter widths to 0.7mm (or whatever you like). This will speed printing up.
The variable layer heights are done in the Plater view by selecting the part and clicking on the variable layer height button at the top (the "hamburger" stack):
and miscellaneous other tech projects
He is intelligent, but not experienced. His pattern indicates two dimensional thinking. -- Spock in Star Trek: The Wrath of Khan Unfortunately,…
Thank you for supplying all the info
Thank you for supplying all the info, I'll do a print and come back with the results.
RE: Issue with under extrusion, need help?
Late to the party - dry the filament. 3D fillies is always damp for me. Had the same issues. Dried it out and re-calibrated, not too many dramas. But to be honest - have moved to eSun filament. Same price and a heap more reliable and consistent.
RE: Issue with under extrusion, need help?
Thanks mate, I purchased a dryer as I had other issues with orange PLA, dried for 22hrs with moderate success. Latly I have been using Ink Station PLA+ which seems good so far.
=
