How to strengthen this part?
So I usually make functional parts for machinery. This is a rail holder for a conveyor. I made it out of PETG. Prints beautifully and very strong, but with the mechanical aspect of the screws it breaks if I tighten too much.
What can I do to make this stronger?
Here's some ideas, but what would you suggest? Printed on MK3, ESun PETG Gray, No fan, .2 layer height, 240 temp, 40% Infill.
1. I remade the model with a thicker base so the area that broke has more material beneath it. I'm going to test this today.
2. Use Nylon. Never used Nylon and I'll try that tonight.
3. PETG with 100% Infill.
4. Some other way to orient the part or have it print a certain way to strengthen the layers?
Any help would be appreciated.
Re: How to strengthen this part?
Your print looks perfectly correct. The orientation is right, the 4 walls is correct and a lot of top/bottom layers.
Following items you can still do:
* 100% infill
* Print hotter. PETG you can get up to 255.
* Use other filament. CNC Kitchen ( https://www.youtube.com/channel/UCiczXOhGpvoQGhOL16EZiTg/videos ) did a lot of comparison, check out his videos
* Think about using ABS for this. It doesn't break that fast. It will slightly bend before break,
Beside of that I think you're hitting already the boundaries of plastic. You can improve it slightly but not double or tripple.
Often linked posts:
Going small with MMU2
Real Multi Material
My prints on Instagram
Re: How to strengthen this part?
Another option would be polycarbonate. I’ve done some brackets with PC/CF at 100% infill that were very stout.
Re: How to strengthen this part?
* Use other filament. CNC Kitchen ( https://www.youtube.com/channel/UCiczXOhGpvoQGhOL16EZiTg/videos ) did a lot of comparison, check out his videos
+1. Thomas Sanladerer has also done a lot on this. Search his page for strength.
That's "MISTER Old Fart" to you!
Re: How to strengthen this part?
Another option would be a redesign that would allow you to use weld /surface mount nuts instead of hex nuts. It's hard to tell how much room you have and whether this might help distribute the load. Mcmaster/Carr sells these and you can download a 3D model or 2D drawing from their website to confirm the sizes. It looks like a low profile narrow base weld nut might work.
https://www.mcmaster.com/#weld-nuts/=1eeru5u
Gary
MK2S & Mk3 my mini farm is alive 😆
Re: How to strengthen this part?
One thing I like to do to strengthen parts is use epoxy. Here's an example :
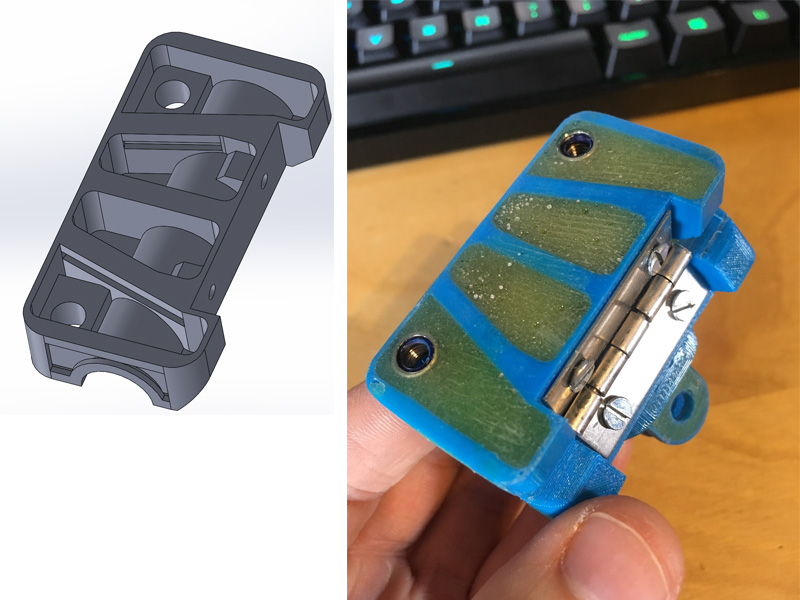
I design the part hollow and then fill it with standard 15min epoxy and leave it to dry for 24h. As you can see I also included lock nuts into the cast. This thing is not moving anymore, it's really strong.
Based on this technique I would design your part something like this (rough sketch) :
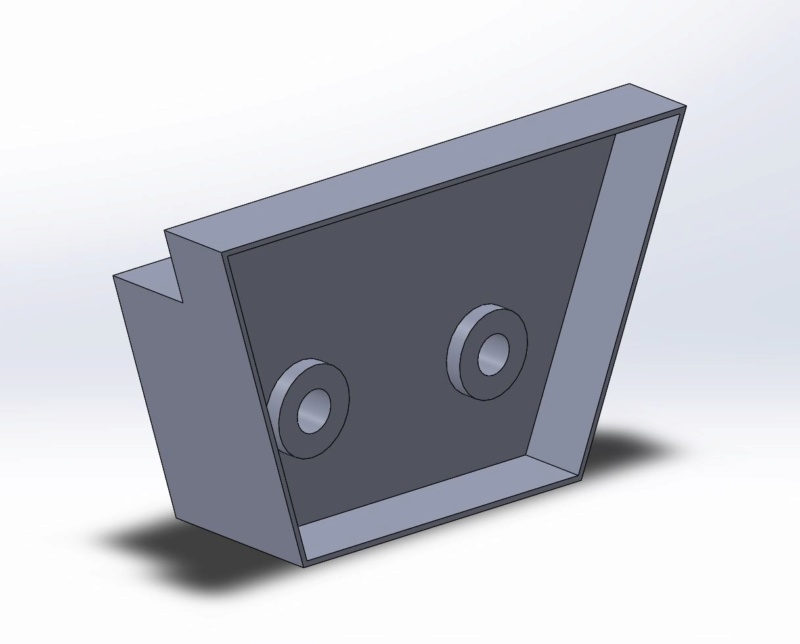
A 1mm thick wall/bottom is enough, epoxy will do the rest. The goal for the nuts it that they are flush with the top, so that when epoxy is level with the top the nut is completely embedded (see my part).
Just an idea 😉
Re: How to strengthen this part?
One thing I like to do to strengthen parts is use epoxy
A really good idea. This is how I usually repair parts :). The only downside is the price. Epoxy is more expensive then plastic.
Often linked posts:
Going small with MMU2
Real Multi Material
My prints on Instagram
Re: How to strengthen this part?
Do you need square corners in the clamping channel?
These Sharp transitions focus stress and strain at the corners!.
Perhaps small fillets would help...
You say that the parts fail when you tighten the screws. Could you have made the parts a little too 'tight'?
The clamping channel seems to be parallel sided... if the channel was slightly narrower along the long edge of the openning then tightening would flex the sides rather than fracture the corners of the channel
Increasing the number of perimeters would increase the sectional strength...
A combination of the above. May resolve your query. Regards Joan
I try to make safe suggestions,You should understand the context and ensure you are happy that they are safe before attempting to apply my suggestions, what you do, is YOUR responsibility.Location Halifax UK
Re: How to strengthen this part?
WOW People! All great suggestions. I've seen some of CNC Kitchens' strength test, but not based on Filament brand. I wasn't getting notifications for this post so I went ahead and printed it 100 infill, solid. That did the trick. I'm still fairly new to 3D printing so all your help was good info for my education.
The epoxy idea is really interesting. Cost is not a problem i have a gallon of West System that I've been using for years. It still holds up, I did a strength test a few months ago.
Radius-ing the fillets (corners) is something I usually put in my design but I think I overlooked it when I did a test fit (you know to make sure I had room).
I'm printing the last batch now, solid.