How D I Print This?
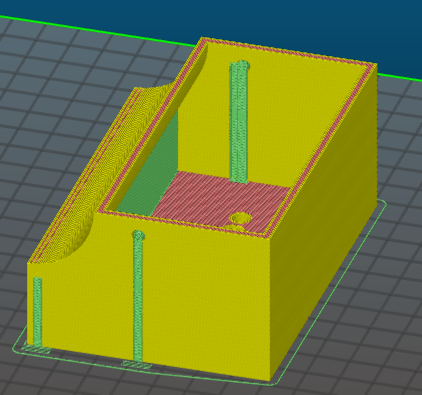
I've got a box, with a weird curvature along one edge and 2 holes in the sides. The green matter is the support created by Slic3R-PR. I'm fine with the support material under the curvature since that area is empty space anyway. I'll probably not even remove it. But those 2 holes on the sides...
The support material for the 2 holes starts at the base and goes all the way to the top of the hole. What's with that? Why doesn't it just build on the bottom of the hole and go from there to the top of the hole? What I think I want to do is to tell Slic3R to leave out support for the holes and I'll let it get messy, then fix it later by drilling out the hole if needed. Can I do that? Or, can I just make the hole so small that Slic3R won't even bother with support and then drill it out when done?
Another question...
It appears as though the support material is being generated outside of the wall of the box. That'll sure look like a mess when done if that's what it's going to do. Is this just an aberration in the way the material is shown in the preview or will it really do this?
(In case you're curious this is a cover, shown upside down, for a mechanism that opens/closes the slats on my blinds. It's mounted on the floor next to the wall and the curvature is to fit the quarter-round molding.)
Re: How D I Print This?
In many cases, I find it easier to add specific support structures in the model design where (I think) they're needed myself. If I were to design this model, this would be one of those cases.
You mentioned that the volume under the curvature is unused anyway. So I'd design that as a solid with infill to begin with.
Now for the holes, I typically add 0.4mm wide (= the width of my nozzle) vertical lines in holes to act as bridge supports. See the following image of a belt buckle for example, where I used one line to support 6mm diameter holes. For larger holes and depending on the material, I'd put in 2 or more vertical lines. In this case, one turned out to be enough. These 0.4mm structures are very easy to break off and remove in both PLA and PETG. with little need to post-process the surface, as opposed to messing around with the green Slic3r generated stuff.
Personally, I'm not a fan of Slic3r's own support generation (although I'll reconsider once I get the chance to play around with the MMU and soluble supports). Since it's a machine algorithm second-guessing my design, I often find it easier to make those decisions myself.
Re: How D I Print This?
Thanks gdo & Martin.
I'm still not fully tuned in to how it's going to work. I'm thinking that the stuff coming out of the nozzle is going to fall off or droop before it ever gets to the supports, but I guess it's got enough viscosity to stay up for the short time the nozzle is over thin air. Since you guys have printed stuff and I haven't, you know these things and all I can do is imagine it. And I appreciate your suggestions and guidance.
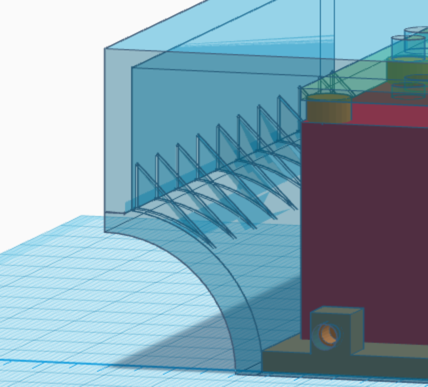
So here is my modification...
I overdid it and spaced them 10mm apart. I'd hate to be the subject of an episode of Engineering Disasters on TV next month. 🙂
Oh, and I did away with support for my hole. It's only 4mm in diameter.


