Re: Buldge when print reaches "solid" layers
I had read that article, but my initial results at 1.6mm got the poor results. I'll generate test pieces with a couple of thicknesses using those recommendations for completeness. Good point, thanks for pointing that out.
[...] First I changed the wall thickness to 1,67 mm (it's more sophisticated than multiplying the nozzle diameter: https://mattshub.com/2018/12/01/demystifying-thin-walls/ - that's why slic3r PE recommends 1,67 mm for 4 perimeters/0.2mm layer height:
Edit: As we go through this, I think we need to pinpoint whether the results vary by slicer as well as by settings. I'm going to try generating the gcode for the part that generates the "worst case" Slic3rPE output (seems to be the 1.5mm walls) using Cura and S3D for comparison. If the same physical model prints significantly different with a different slicer, I think I can quit worrying about hardware issues (belt tension, stability) and better try to understand the intricacies of Slic3rPE versus the other slicers. Tim, I think you were heading down this path with your infill testing.
If a part sliced with another slicer looks good oriented along both X & Y axis I think my head is going to explode.
Re: Buldge when print reaches "solid" layers
I think we need to pinpoint whether the results vary by slicer as well as by settings. I'm going to try generating the gcode for the part that generates the "worst case"
I manually (Notepad++) poured over the gcode for the worst case 1.5mm - and found the edge that overhangs the most in the physical print had the exact dimension and flow as the edge below it that did not overhang. Also looked through the gcode to ensure all corners that displayed "bulge" were indeed the same XY point, regardless of direction.
Add the finding that rotating the part 90 degrees almost eliminates the issue of wall offsets (a small offset on the far right is visible, but goes away as the nozzle moves towards the hole), the only conclusion I can find is the printer is doing something odd. I have tightened and loosened the belt that would cause the offset, and the only difference I see is with the tighter belt the step is more distinct. It appears the surface texture looks different due to nozzle movement direction. But the step in the wall is real, the texture change make it more obvious.
I tried setting Slic3r PE to use a set resolution: 0.05 mm and then 0.10 mm. Neither setting affects the step. I have looked my printer over to find anything that flexes in the Y-Axis, and short of a rotational play I once had with bad bearings, there isn't anything that seems loose enough to cause a well defined and very repeatable step in a wall. Changing seam location has an effect, but doesn't resolve it. Photo below shows three parts:
Top: Rotated 90
Mid: REAR Seams
Bot: Normal
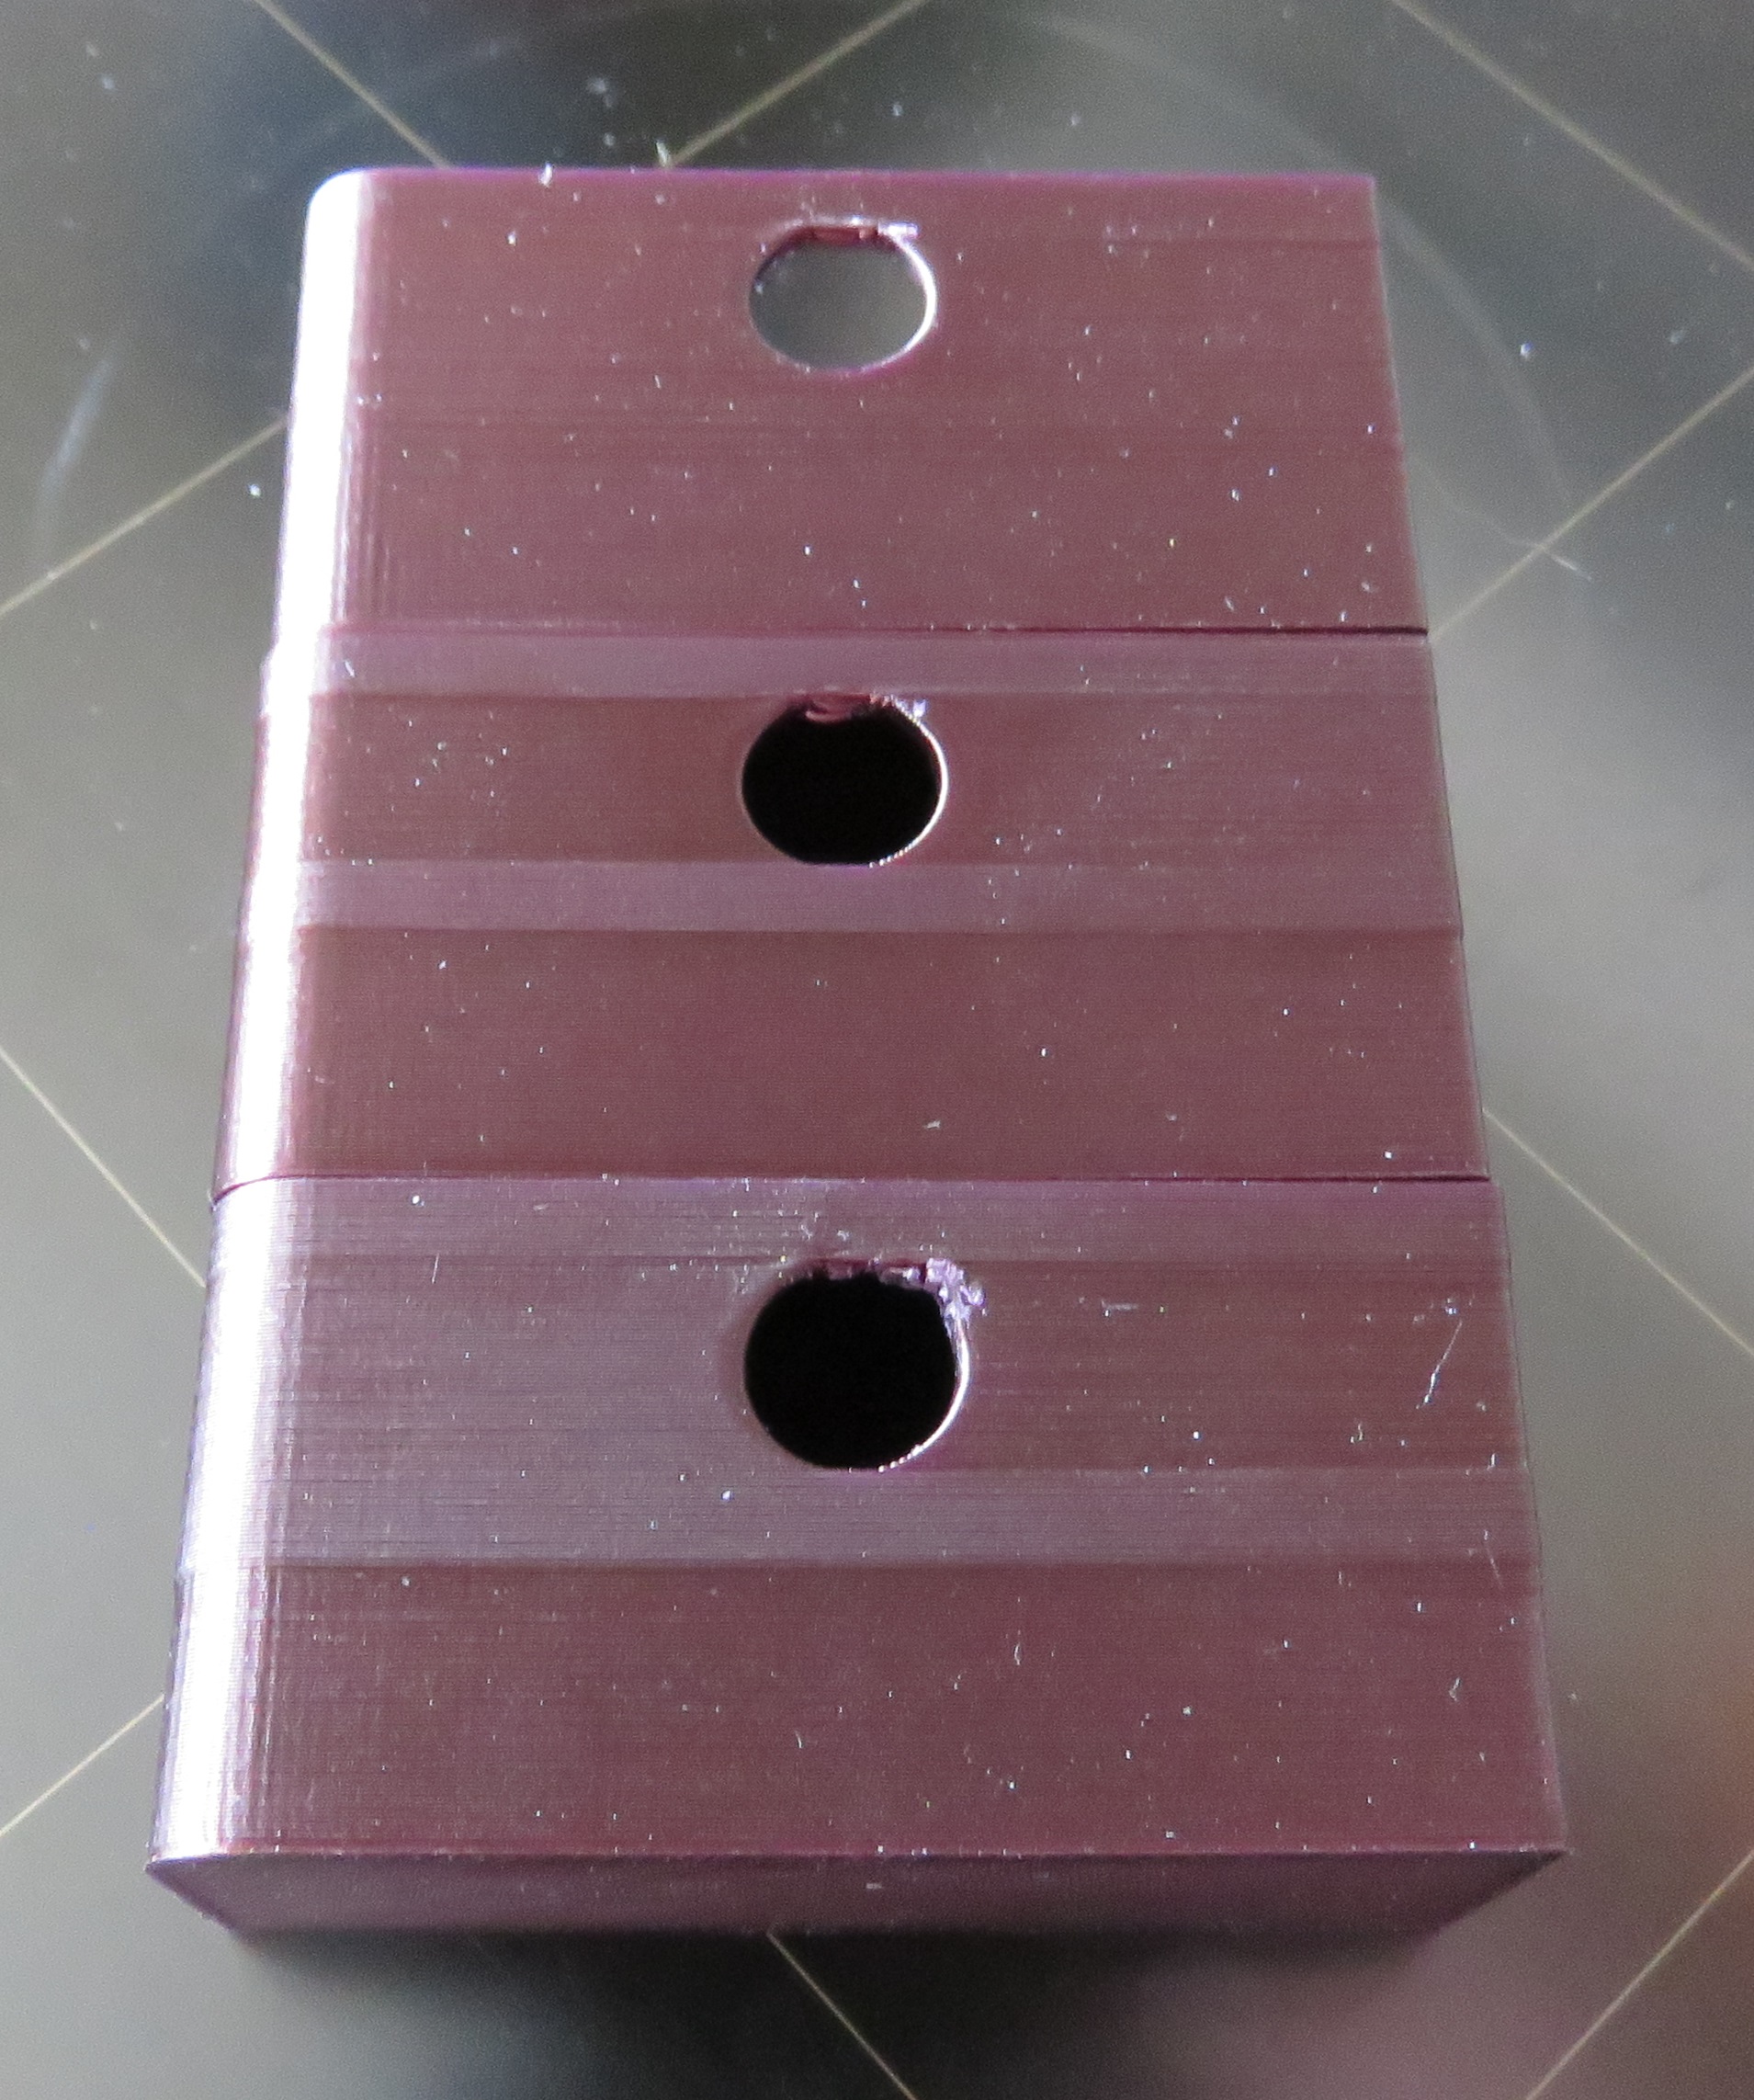
ps: I knew this place was dusty, but these photos are making me crazy ...
pps: I did the Linear Advance test and my results show best case at 20 or 25 rather than the 30 Prusa defaults to... But the 30 result isn't different enough to fully explain the issue I see. By the way? Off is NOT a good idea.
ppps: Just finished a print at 230c ... one out of four places showed no step when all other prints did show a step. Inconclusive at best. But another hint it is mechanical within the printer. I really need to sit down with the firmware: this, the filament sensor, and a couple other gnawing questions are starting to bug me. But damn it - this is a hobby - not my job. 🙄
Re: Buldge when print reaches "solid" layers
Guy,
Didn't get a chance to reply earlier...
[...] What happens if you manually edit the gcode to keep feedrate the same rather than changing.
Probably would need to also edit the extruder move distance to match feedrate.
That is a significant feedrate change and could definitely alter how the extruder matches nozzle motion.
Would that be the same as disabling Linear Advance? Otherwise I'm not sure exactly how to do that. If it's a matter of tweaking the F parameter on the G0/G1 moves, I can do that easily enough. I'd expect to need to modify the E parameter as well. Would it just be a matter of keeping F at a fixed rate and adjusting E to provide the same amount of extrusion per mm? But... wouldn't that just be the same as setting all speeds the same? I'm not sure how Slic3rPE handles acceleration and jerk in the calculations as they're no longer M2XXX commands at the top of the gcode. Or would this effectively ignore the jerk & acceleration options? Many questions on my part!
Am I understanding correctly that you see this even with your work on microstepping, VFA etc? I've been following those discussions even though I have no way to implement any of the suggestions at present.
Re: Buldge when print reaches "solid" layers
Am I understanding correctly that you see this even with your work on microstepping, VFA etc? I've been following those discussions even though I have no way to implement any of the suggestions at present.
Yes. motor linearity doesn't appear to be the culprit for this. Definitely a head scratcher.
I printed your test bench object with very monotonic 0.9 degree setup on X Y and E. Still see the problem at transition from top surface adjacent wall to wall above transition. What is really puzzling is that the effect is very minimal at stat of pass along wall, but worsens as motion progresses left to right across long dimension of wall. Linear advance should not affect that long a motion segment [edit: but the code used to implement linear advance does some funky manuipulations of extruder position to achieve its effect]
This is happening even with a highly monotonic motor setup. I wonder about problem with how the axes and extruder are kept synchronized during some motions. Digging through how Marlin calculates rates to keep the motion and extrusion proportional feels a bit daunting.
Trying to wrap my head around the linear advance calculations and manipulations. Anybody else want to read? Search in firmware against "LIN_ADVANCE" in planner.cpp to see the relevant code. Hurts my brain.
Maybe easier to disable LIN_ADVANCE in firmware and see if this bulge still occurs to rule in/out LIN_ADVANCE as factor.
Another thing to investigate is EXTRUDER jerk. A test with it dialed down would be worthwhile. A high extruder jerk could interact with LIN-ADVANCE. The over extrusion creating this bulge isn't necesarrily happening during the out perimeter extrusion, but rather the ends of the top surface infill. That would be consistent with specifying a big separation between infill and wall helps.
Re: Buldge when print reaches "solid" layers
New data point. Printed two of Bob's parts, one rotated 90. The rotated part shows no signs of steps at the layers of infill while the part not rotated shows the odd steps ... printed at the same time. Makes zero sense unless the issue really is as simple as print accuracy.
I tightened up my Y-belt and tried again. I want it to be better, so I see a difference, but I doubt it's measurable.
I have one more out of the box test to do ...
Part rotation helped with some of my prints as well. Although it was 45 degree that helped the most for me.
Re: Buldge when print reaches "solid" layers
I think we need to pinpoint whether the results vary by slicer as well as by settings. I'm going to try generating the gcode for the part that generates the "worst case"
I manually (Notepad++) poured over the gcode for the worst case 1.5mm - and found the edge that overhangs the most in the physical print had the exact dimension and flow as the edge below it that did not overhang. Also looked through the gcode to ensure all corners that displayed "bulge" were indeed the same XY point, regardless of direction.
Add the finding that rotating the part 90 degrees almost eliminates the issue of wall offsets (a small offset on the far right is visible, but goes away as the nozzle moves towards the hole), the only conclusion I can find is the printer is doing something odd. I have tightened and loosened the belt that would cause the offset, and the only difference I see is with the tighter belt the step is more distinct. It appears the surface texture looks different due to nozzle movement direction. But the step in the wall is real, the texture change make it more obvious.
I tried setting Slic3r PE to use a set resolution: 0.05 mm and then 0.10 mm. Neither setting affects the step. I have looked my printer over to find anything that flexes in the Y-Axis, and short of a rotational play I once had with bad bearings, there isn't anything that seems loose enough to cause a well defined and very repeatable step in a wall. Changing seam location has an effect, but doesn't resolve it. Photo below shows three parts:
Top: Rotated 90
Mid: REAR Seams
Bot: Normal
IMG_0647.jpg
ps: I knew this place was dusty, but these photos are making me crazy ...
pps: I did the Linear Advance test and my results show best case at 20 or 25 rather than the 30 Prusa defaults to... But the 30 result isn't different enough to fully explain the issue I see. By the way? Off is NOT a good idea.
ppps: Just finished a print at 230c ... one out of four places showed no step when all other prints did show a step. Inconclusive at best. But another hint it is mechanical within the printer. I really need to sit down with the firmware: this, the filament sensor, and a couple other gnawing questions are starting to bug me. But damn it - this is a hobby - not my job. 🙄
Should have responded to this one of your posts instead Tim.
I have looked extensively at gcode for a variety of problem prints. In every case the x, y, z, e code seems to be spot on. No overhangs, etc.
Part rotation helps for me on some prints (again, 45 degree seems to be best).
I played quite a bit with linear advance. For my problem green filament my calculated K was 35 instead of 30. But I experimented from K=10 to K=45, with no particular differences in the bulge on prints (again my bulge issue is different than most of yours but may be related).
I agree with Bobstro that it seems the most likely cause seems to be mechanical in some way (or firmware interaction with mechanics).
I completed my upgrade to the MK3S and took the chance to do some checks and improvements:
-latest firmware and drivers
-all MK3S upgrades
-tightened all bolts
-checked for square and parallel alignments as best could (all seemed close)
-drastically tightened x-axis
-installed y axis tensioner and tightened
-moved printer to granite surface for improved levelness and less vibrations
-probably some other stuff I'm forgetting
I created a print object that still shows the problem but much less than in other previous prints so not sure it is worth sharing. I also printed an actual part (6 hour print) that still shows the bulge prior to transition to raised area but it is better and acceptable to me, however, it is with only 3 top layers (vs default 7) and is with a filament that both doesn't show the issue as much (to your asthetics comments Bobstro) and also has less ooze than the green filament I have used which also helps.
At this point I am stumped as to what is going on, although I will try a few more things. For the most part I wil continue to experiment with ways to mitigate as opposed to solve the problem and will move on. Disappointing not to figure it out or to hear from someone (or PRUSA) who has managed to fix it.
Fun and educational, however, to hear everyone's approach to analyzing the problem !! 🙂
Re: Buldge when print reaches "solid" layers
I am down to believing it's a microstep issue in the firmware. The step I am seeing is sub 0.1 mm ... but the entire wall steps, it's not a "this track is thicker than the others" issue (not LIN_ADV or extrusder related). Just flat out, when the extruder is traveling left to right vs right to left, there is a 0.05 mm step in the Y-Axis. Slowing down helps to nearly eliminate the step. Setting a random seam makes the issue vanish, but it does so by spreading the step over multiple layers (appears as 1/2 the error every layer); but is rather ugly overall.
One last test I want to do is move the part a fraction in the Y-Axis direction to see if I can get on another cog of the stepper.
Re: Buldge when print reaches "solid" layers
I tried my worst-case print (1.35mm wall) with Max volumetric speed set to 1 to slow everything way down and try to ensure consistent extrusion, with the thinking that keeping all internal and external speeds consistent rather than just proportionally slower would help, but the result was nearly identical in my case. Will try repeating dialing speed back with the front knob when I return home this weekend.
[...] Just flat out, when the extruder is traveling left to right vs right to left, there is a 0.05 mm step in the Y-Axis. Slowing down helps to nearly eliminate the step.
Thicker walls made the biggest different, with the magic value starting at 1.8mm. Thinner walls with a thicker nozzle also seem to have worked well, which is counter-intuitive, other than perhaps indicating it's related to proportion of extrusion width to wall thickness... or not.
Setting a random seam makes the issue vanish, but it does so by spreading the step over multiple layers (appears as 1/2 the error every layer); but is rather ugly overall.
I'm thinking producing a near identical part with another slicer should help prove or disprove it being slicer or hardware. Any thoughts on that approach? One thing I can do here on the road is play with slicing parameters.
One last test I want to do is move the part a fraction in the Y-Axis direction to see if I can get on another cog of the stepper.
Not being able to test is driving me nuts. I need a travel Prusa.
Re: Buldge when print reaches "solid" layers
Nick.m11, good additional data.
Re: Buldge when print reaches "solid" layers
Not being able to test is driving me nuts. I need a travel Prusa.
What, no remote server login? 😮
Doing a few stress reduction prints ... sometime in the next day or two I'll get back to the last test. After that I am relatively confident I'll be burying my nose into C++ code snippets to find how the steppers are being controlled and just how a starting point can cause a few microsteps of offset when the cal constant is 66% of another axis. Then I'll probably find both axis are susceptible to whatever the effect is, but part placement just happened to align with the planets this week.
Re: Buldge when print reaches "solid" layers
Interesting link listing possible causes of offset layers, shifts, missed steps etc:
https://reprap.org/wiki/Shifted_layers
Won't all apply to a Prusa machine but may spark an idea.
Re: Buldge when print reaches "solid" layers
Step rate too high for 8-bit controller (like Arduino)
And I think back to the times we used bit-sliced risc cpus to improve real time performance ...
Last test: printed as usual, latest default Mk3, Prusament PLA, 0.15 Optimal; but repositioned 0.25 mm forward, and sliced with Slic3r PE 1.42.0.alpha7.
Bottom part is the new print. Shows signs of changes, but the result is still unacceptable. I am now convinced there is a firmware or stepper resolution issue behind the wall steps happening around directional changes in layer and layer area.
Once upon a time I designed a linear table to move a microscope in very precise steps by microstepping a motor - measuring position, diameter, and angles of micron sized ink droplets coming out a piezo ink jet head under varying drive conditions - and nothing from that experience hints at anything like what we seeing here. Admittedly I was using higher quality gear for that exercise, so I could be wrong, but for now it has to be a defect in the firmware telling the steppers to do something weird. A driver not fully completing a microstep in one direction due to a quasi state in one of the quadrature controls... something esoteric but unexpected. Ugh. Could even be an impedance thing and ringing in one of the cables... X and Y are different lengths and maybe the designers never worried about the impact it could have.
I feel like a vampire must feel when someone they were after dumped a jar of jelly beans at their feet just as they were leaning in for the kill.
Re: Buldge when print reaches "solid" layers
Yuck - just spend an hour reading through Marlin code ... the TMS2310 requires step compensation for microstepping; and it doesn't seem very linear, curve fitting and all; some of the gaps in the default table are 7 microsteps. If no one took the time to properly map (aka tune) the TMS to the motors and cable lengths being used ... and I think I saw acceleration affects it ... what a rabbit hole.
Re: Buldge when print reaches "solid" layers
And looking into the TMC2180 microstep detail - found that I can induce a step similar to what we are seeing in this test part: and this step is caused by nothing more than where in the wavetable I start, and is 100% repeatable. aka: firmware or motor flaw is causing this Y step. X doesn't show any of this.
Re: Buldge when print reaches "solid" layers
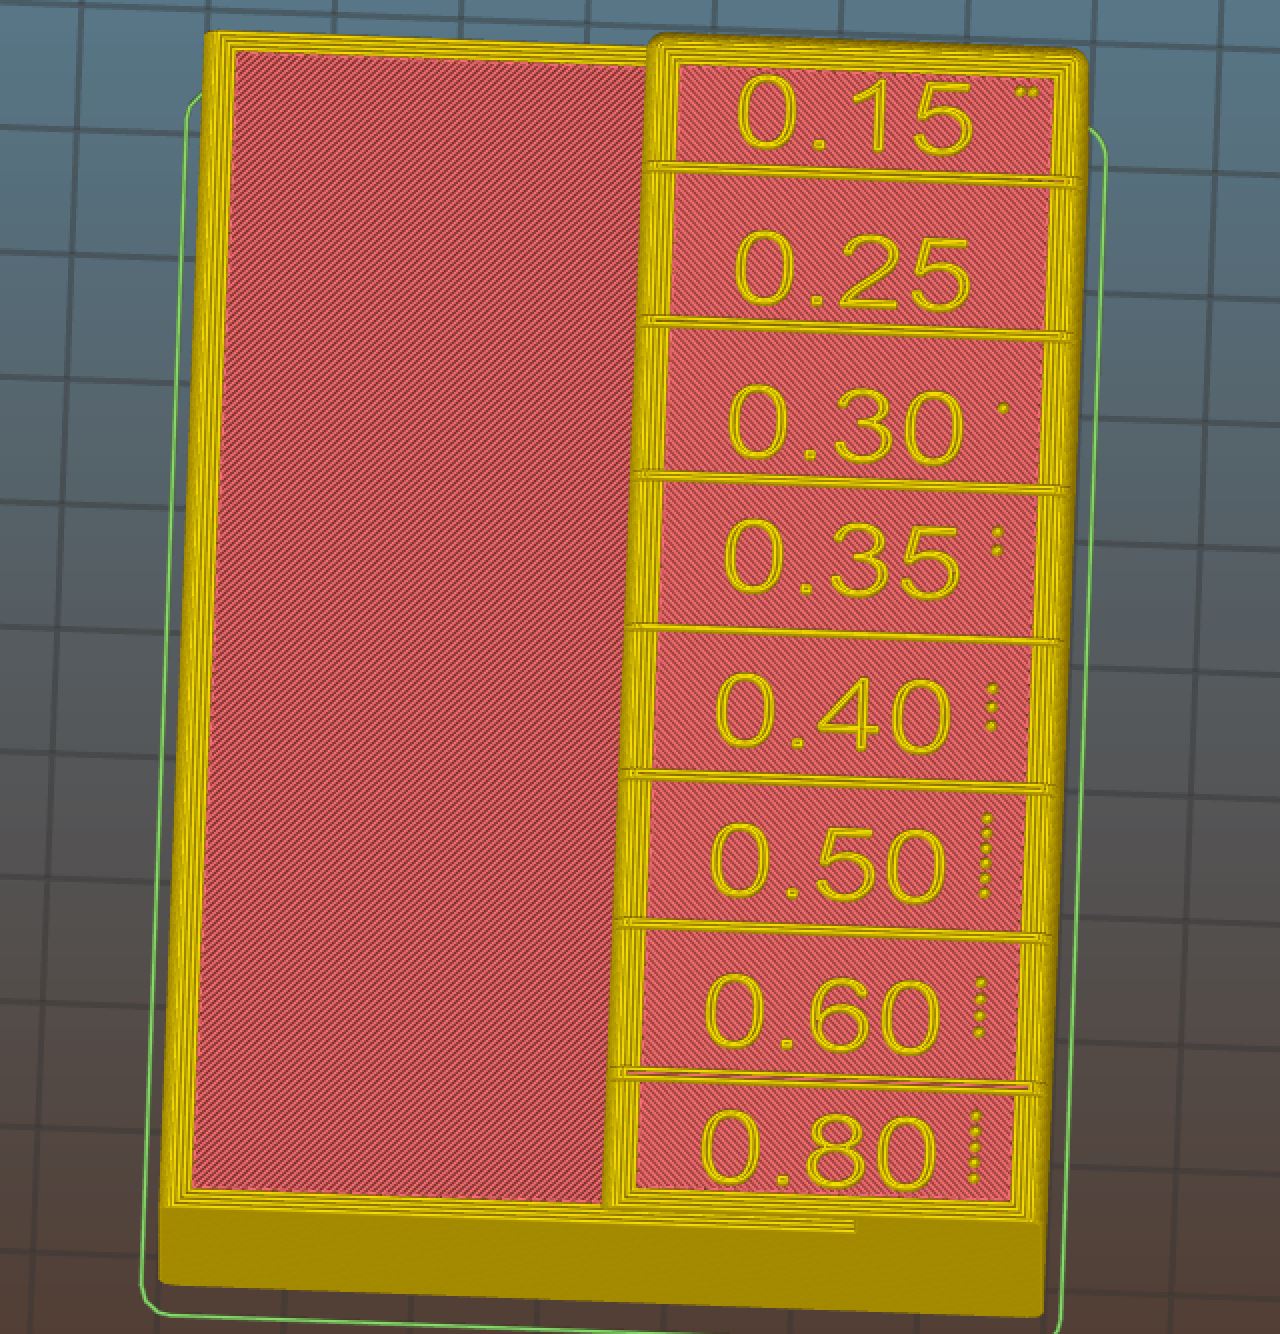
A quick final follow-up with some comparison prints. I printed the 1.35, 1.5, 1.67, 1.8 and 2.00mm wall samples. I took some comparison photos with the 1.35mm piece that yielded the worst-case results with several slicer combinations:
I made the settings as close to each other as possible, pasting in acceleration and jerk settings into S3D. Here are the results from left-to-right in this order:

This isn't a slicer comparison by any means, but shows what difference small settings changes produce. I found the contrast between the 2 Slic3rPE pieces interesting:

Same part, same slicer software, same printer. Just different settings. I've attached the STL files for the test pieces, a snapshot config of my Slic3rPE settings, and the gcode file for the entire set of 5 parts (~4 hour print) as produced from each slicer if anybody's interested.
My conclusion is that slicer settings may need to be tuned for specific pieces for best results.
Re: Buldge when print reaches "solid" layers
external_perimeter_extrusion_width = 0
My conclusion is that slicer settings may need to be tuned for specific pieces for best results.
Did you really intend for all extrusion widths to be set to zero?
Re: Buldge when print reaches "solid" layers
Did you really intend for all extrusion widths to be set to zero?
Yes! One of my favorite features of Slic3rPE. Using 0 (auto) let's me use the same profile with any nozzle size. I do a lot of prints using any one of 11 nozzle sizes, and my everyday layer height profiles take advantage of this. IIRC it uses 1.125 X nozzle size for most extrusion widths with this setting. I do sometimes a "precision" profile with specific extrusion widths, but haven't seen any big benefit.
Some notes here.
RE: Buldge when print reaches "solid" layers
I have had success eliminating these horizontal bulges/bands by selecting:
- External perimeters first
- Seam position: Rear
My working theory is that the bulges/bands are correlated to the direction in which the head prints as well as to inner perimeters the outer perimeter layer may be touching and that are pushing the extrusion towards the outside of the print.
These settings force the slicer to start at the same spot for every later and start in the same direction for every layer. Still, holes in sides can make the slicer change direction, so even with that the settings aren't perfect. And they make the seam look rather ugly, too.

RE: Buldge when print reaches "solid" layers
@volge - The bulge is NOT related to print direction ... through there are offsets that can be related. Read the entire thread and you'll see the topic - i.e., possible simple and even several complex causes - is covered fairly well.
RE: Buldge when print reaches "solid" layers
Looks like the test prints were lost in the forum transition. I've attached a ZIP archive with the tests with various wall thickness.