RE: Mintemp error after (possibly) shorting board
@tk-3
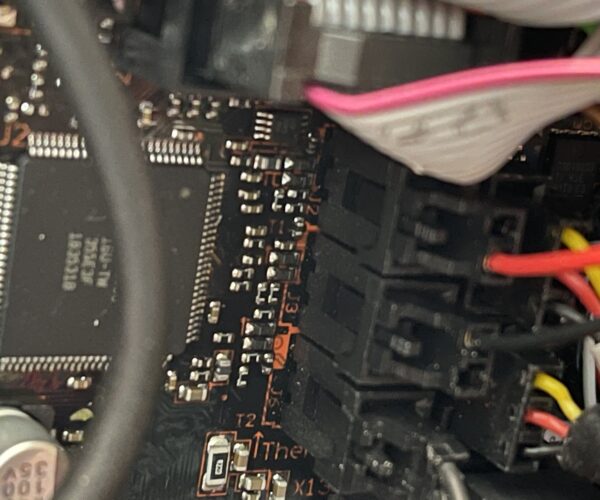
Yes sorry am having difficulty with it. The picture had rotated and the ports should be horizontal. So the left hand port has the bed thermistor in it. The middle port is the spare thermistor port which you will use. The right hand is the hot end thermistor port. That's when everything is horizontal. I took the Dupont connector off my old thermistor. Then I took the black cable out from my new thermistor, which is on the right of the connector. This I then put into the rhs of the connector from my old thermistor. So from my new thermistor I still have the red cable on the lhs of the connector. The black cable is now inserted in the connector from my old thermistor. Then looking at the Einsy board plug the connector with the red cable into the right hand port where it was originally. That's the positive feed to the thermistor. The black cable in the spare connector is plugged into the middle port. This now uses the gnd circuit on the spare to complete the circuit for the thermistor. So you are still using the feed from the original port, but as the gnd circuit on that has been damaged you plug into the spare port using the connector with the black cable now utilising the gnd circuit in the spare port. Have been trying to make and send a video, but failed. If you still need clarity I will try again tonight.
RE: Mintemp error after (possibly) shorting board
@daryl-p
For your third solution, could you send some pictures on what to solder to what? I'm scared of connecting something wrong together and possibly making my board worse.
Thanks for replying, btw.
I should have taken a picture before I re-assembled after soldering, but at the time I was anxious to get the printer running again to determine whether I needed to place an order for a new RAMBO from Prusa. When I connected everything back up and it worked, it was too late to take the picture.
Before you do this, you should confirm the 5V on the hotend thermistor port first as I indicated above. No use in wasting your time if the voltage is present. Should you find that it is not present, you can also use Dupont male to female jumper wires to perform a temporary test. The jumper wires allow you to insert the thermistor red wire to the +5V pin on the hotend thermistor port while inserting the black thermistor wire to the GND pin on the spare port. When you turn your printer back on and you get the all clear, you can seek a more permanent solution.
@volpe
@daryl-p
In the discussion, I didn't realise I was not just corresponding with bd4307, but also with you Daryl-p. So thanks for your help as well.
bd4307 is my alter ego. I'm not sure how that handle crept into the thread, possibly I responded once through my phone instead of the computer?
RE: Mintemp error after (possibly) shorting board
TK How's it going? Do you now understand better the problem. Have you tested as Daryl-p suggested to check that the thermistor circuit you shorted has burnt out the gnd/negative side. If it has then the solution he suggested worked for me and the should do the same for you. So do you need more photos?
RE: Mintemp error after (possibly) shorting board - THANK GOD 4u guys !!!!
Had the same issue with consistent mintemp ERROR - after cleaning the nozzle with a small brass brush between prints. Changing thermistors didn´thelp at all - till i found you. U made my day, saved a lot of money but most important of all : GOT ME BACK PRINTING 👍
Thank you for sharing your knowledge !
Tomtom
RE: Mintemp error after (possibly) shorting board
@tb6666
Hi there, That's great to hear. I felt the same when with help particularly from Daryl-p I got it sorted. I was happy to share how I did it, so which route did you go. Soldering or using a spare Dupont connector, or even something else? Happy printing 👍😊 Nigel/Volpe
RE: Mintemp error after (possibly) shorting board
@Volpe/ Nigel
good Morning - Í´ve chosen the Dupont-connector version. As the board seems to be „bitchy“ i was worried,
that with soldering it could get another „hit“ and be finally a brick. Not on a Saturday night and not with knowing
i would have to wait at least 14 days to get a replacement.
I know not everbody has Dupont´s flying around, but in my opinion it is the safer and faster way to „repair“ the board.
NICE! AN EINSY FOR FREE + WORKING MALFUNCTION BOARD IN 2min
Seriously Guys,
after after having this unbelievable chat with the prusa support in which they seriosuly told me, I would receive a new Einsy Board but I would have to tell the shop in which I bought the printer that the board has a malfunction so he would tell this Prusa in order to receive a new board which he again has to send to my place instead of just sending me the new board after having the chat in which the support said I would get a new board. Unbelievable stupid. Why should I let the vendor take care of this which takes weeks if I am by law allowed to take care of this myself by telling Prusa and get a new board. Never seen something stupid like this. I own 2 Prusa but there won't be a third one....
Anyways, my board has this malfunction but you guys got me fixing it in 2 min. by plugging in the two cables on those two pins.
At least I can sell the new Einsy Board I will receive for going through all this frustration with the support.
RE: Mintemp error after (possibly) shorting board
I also had the issue this morning, which may have been (likely was) due to cleaning the nozzle/block with a brass brush, while the printer was powered up. Although i was careful to keep the wire brush away from the wire ends/connections, I'm fairly certain that the brass wires from the brush went through the thermistor's wire insulation, causing a short in the 5v power supply at the board connector.
Immediately afterward, I received the dreaded Mintemp error, which would not go away with jiggling the wire or re-seating the connector. Switching the connections of both thermistor connections at the board still led to the "Mintemp" error, instead of the "Mintemp Bed". The resistance of the hot end thermistor was also correct and there was no voltage available at the Einsy board's thermistor connection when checked with a multimeter, although the left and middle connections showed 5v. That lead me to believe the problem was with the board connection, as the above posts suggested.
As recommended, I simply took an old hot end thermistor I had and removed the connector. I moved the 5v wire (right side) from the thermistor connector to the right-side position of the old connector. Then, as suggested, I connected the real hotend thermstor (with the single left-positioned wire remaining) to its regular position, and connected the old thermistor connector to the middle position on the board, thereby receiving the required 5 volts.
Upon powering up the printer, the Mintemp error disappeared and the printer was back to "normal" and happily extruding hot plastic.
These posts, particularly the ones from @5d-concepts saved me from a good amount of head banging and over $200 for a new Einsy board to be delivered, if I could even find one!
Thanks much!!!
RE: Mintemp error after (possibly) shorting board
Hello, quite an old thread, but still new questions, I hooked up a multimeter to the hotend port which gives me 5v however if I try to confirm a working port with the heatbed thermistor it shows nothing. Will this fix still work if the original port shows 5v?
RE: Mintemp error after (possibly) shorting board
I ran into the dreaded "ERR: MINTEMP" error on my MK3S+ after accidentally shorting the hotend thermistor while cleaning the printer with a wire brush—yes, it happened while the printer was on, and it even occurred when the hotend was idle. 🤦
At first, I tried the software solution that involves swapping the TEMP_0 and TEMP_1 pins and rebuilding the firmware. You can check out how I did that here. This worked for me once in the past when only Thermistor 0 was damaged, but this time I damaged the only remaining Thermistor 1, so the only solution was to fix the hardware.
Identifying the Problem
After diving into the board and referencing the schematics, I realized that the components I fried were FB38 and FB39, which are Ferrite Beads. These components primarily suppress noise, meaning they aren't critical to the printer’s function, and you can replace them with a 0Ω short:
What does this mean?
It just means you need to connect the rightmost pin of the thermistor connector to any nearby ground point on the circuit. I’ll explain how I did it step by step.
Initially, I tried shorting the pads from the top of the board, thinking it might be a simple fix. Unfortunately, this didn’t work. Likely, the thin PCB tracks were damaged when the short occurred, which meant I needed to flip the board over and make the repair from the bottom.
The Final Fix
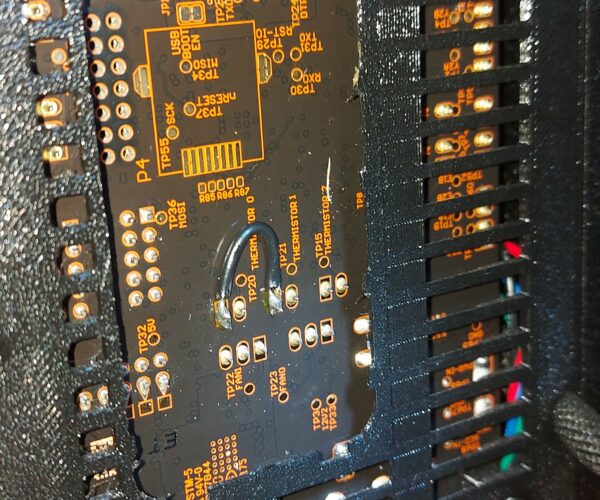
After removing the board from the printer, I soldered a wire to bridge the broken connection. I highlighted the ground pads and pins in red in the image below to show you where I found good ground points for the connection:
Take your time while soldering and ensure the wire only connects the intended pads. I used thin copper wire for this—it’s easy to work with, but make sure you burn or melt off the insulation for solid contact:
Here’s the final result after everything was soldered in place:
Confirming the Fix
To verify the repair was successful, use a multimeter set to continuity mode (the one that beeps). Confirm that the rightmost pin of the broken thermistor connector was properly connected by probing it against the large connectors near the bottom of the board (those linked to the power supply). If it beeps, you're good to go!
With the repair done, my printer is back up and running. For anyone facing the same issue, I hope this helps! Just be cautious when using metal tools near the printer's electronics—learn from my (repeated) mistakes, lol. If you have any questions or need further clarification, feel free to ask.


