RE: Loss of accuracy?
I tried editing my last post but apparently that is not possible anymore.
Printing in 0.2 works with detect thin walls enabled.
I did find two issues, though.
a) my prints are not completely round, but 0.1-0.2 mm off in one direction (I need to do another print to tell which). And
b) the part is slightly too small (less than 0.1 at the one shown, more on a larger piece.
Does that mean I have to mess with the settings for the steppers, or is that something a simple calibration can do?
Remember to Be Inspired!
Standard MK3 (heat break replaced with standard model)
RE: Loss of accuracy?
Depends on the out of round problem. Is it scale related or is is a squirrelly drive gear?
A perfect oval implies X and Y scales are off (XYZ calibration); a non-cylindrical circle with misshappen spots is a drive gear or very loose drive belt. A top down view of the part can help ID the source of the error.
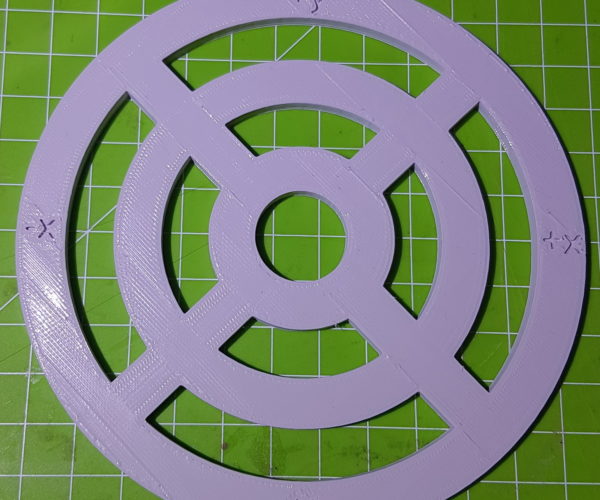
Try printing one of these circles... post a clear sharp photo.
This image shows results of a loose drive gear.
If the test circle prints clean, just not round. Perform an XYZ calibration.
Belts stretch, and if you made tension adjustments after the last XYZ, the scales are off and easily fixed.
RE: Loss of accuracy?
@tim-m30
I had not seen this post when I designed an object for that purpose.
The result (attached) shows that everything is undersized, and the discrepancy increases with the radius. Also, Y axis difference is not the same as that of the X axis. So, XYZ-calibration?
Remember to Be Inspired!
Standard MK3 (heat break replaced with standard model)
RE: Loss of accuracy?
You posted the results, but not what the part size should be so I'll assume they are 20 mm steps. And yes, it looks like XYZ calibration scaling error, especially if you haven't adjusted belts after the last XYZ cal of your printer (they stretch, which over time reduces part size).
The caveat is while the XY calibration is fairly good, it probably isn't perfect. A percent or less is my guess. But you can adjust the steps per mm in firmware to get it as close as the math allows (with microstepping, that means pretty close).
This example sets Extruder, but same code will work for X and Y steps (replace E with X or Y).
RE: Loss of accuracy?
@tim-m30
The designed value should be that in the brackets behind the measurement. I will do a xyz calibration tomorrow, and look into the microsteps if necessary. Thank you!
Remember to Be Inspired!
Standard MK3 (heat break replaced with standard model)
RE: Loss of accuracy?
You can use Pronterface to read and set the step values, too. That would allow reading the current value, and correcting it to the scale you have tested : the print results or 119.6/120.0 or whatever : multiply that by the current step/mm value. This is how I'd proceed. That way you won't need to print another test part (if the part shown above is recent).
Looks like M503 is the command to read step values.
RE: Loss of accuracy?
@tim-m30
Thanks, I'll do that. I did a full XYZ calibration and the values did not really change.
Remember to Be Inspired!
Standard MK3 (heat break replaced with standard model)
RE: Loss of accuracy?
So a new test print is not the proper size. If that is happening, then you calibration inserts are off (and probably within spec, just not good enough for what you need). You may be fighting material shrinkage... PLA does shrink after printing - sometimes a lot.
You'll need to do the manual adjustment to get a better result.
ps: and if you want to maintain the higher accuracy, you'll need to do the adjustment when you change filament types and even brands...
RE: Loss of accuracy?
@tim-m30
I will do that. I have set the microsteps to what should fix the issue as you described, but a test print came out exactly the same as before. I need to look into whether I did that right. Thanks for the help!
Remember to Be Inspired!
Standard MK3 (heat break replaced with standard model)

