How do I clear the filament detection hole in this photo?
https://drive.google.com/open?id=1GNbQdEqE2lm2-cKTgVxtUxRLm9sqiSDb
I bought my printer pre-assembled, so I'm afraid I'm at a loss for what's probably a basic troubleshooting technique.
In the photo above, the lower hole appears to have filament stuck in it. I can't get it out with the Unload Filament option, nor can I push it through with more filament (and I attempted, very gently, to push it through in place with a small hex key). I think I need to remove the panel that it's stuck in, but I don't know how to do that. My attempts to look through posts and google for it have not been fruitful.
Could anyone please point me in the right direction? Thanks in advance!
RE: How do I clear the filament detection hole in this photo?
You have discovered the down-side of buying pre-assembled.
With 3D printing, you pay your dues up front - or you pay as you go.
Start by reading the Extruder section of the assembly manual:
https://manual.prusa3d.com/Guide/5.+E-axis+assembly/1055?lang=en
What you don't need now, you will eventually.
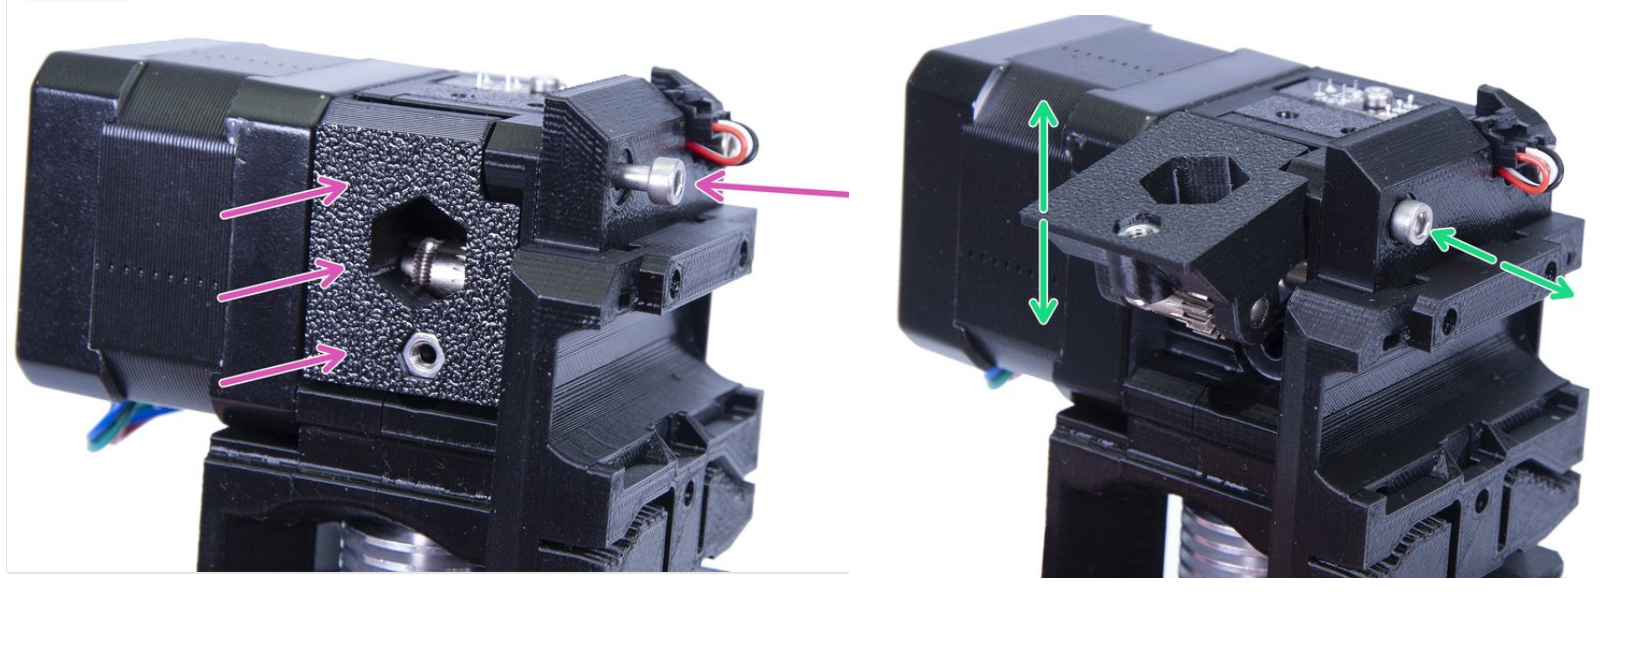
Down about Step 27, you will see the idler assembly. it is held in place by one screw and a spring.
If you remove that screw (just loosen it all the way), the idler door (has a big hole in it) will rotate up.
At that point, you should be able to reach in with a pair of needle nose pliers and grab the filament.
Ideally you will be able to work it back out the entry hole. Might need to heat the heat up with preheat.
Good luck - and welcome! Problems like this will soon seem trivial to you.
RE: How do I clear the filament detection hole in this photo?
Hi Torrey,
there is a trap door on the right hand side of the extruder (Bondtech idler gear door),
 Click on the image to see larger image
which is held closed by a long screw and spring from the left hand side
 Click to view
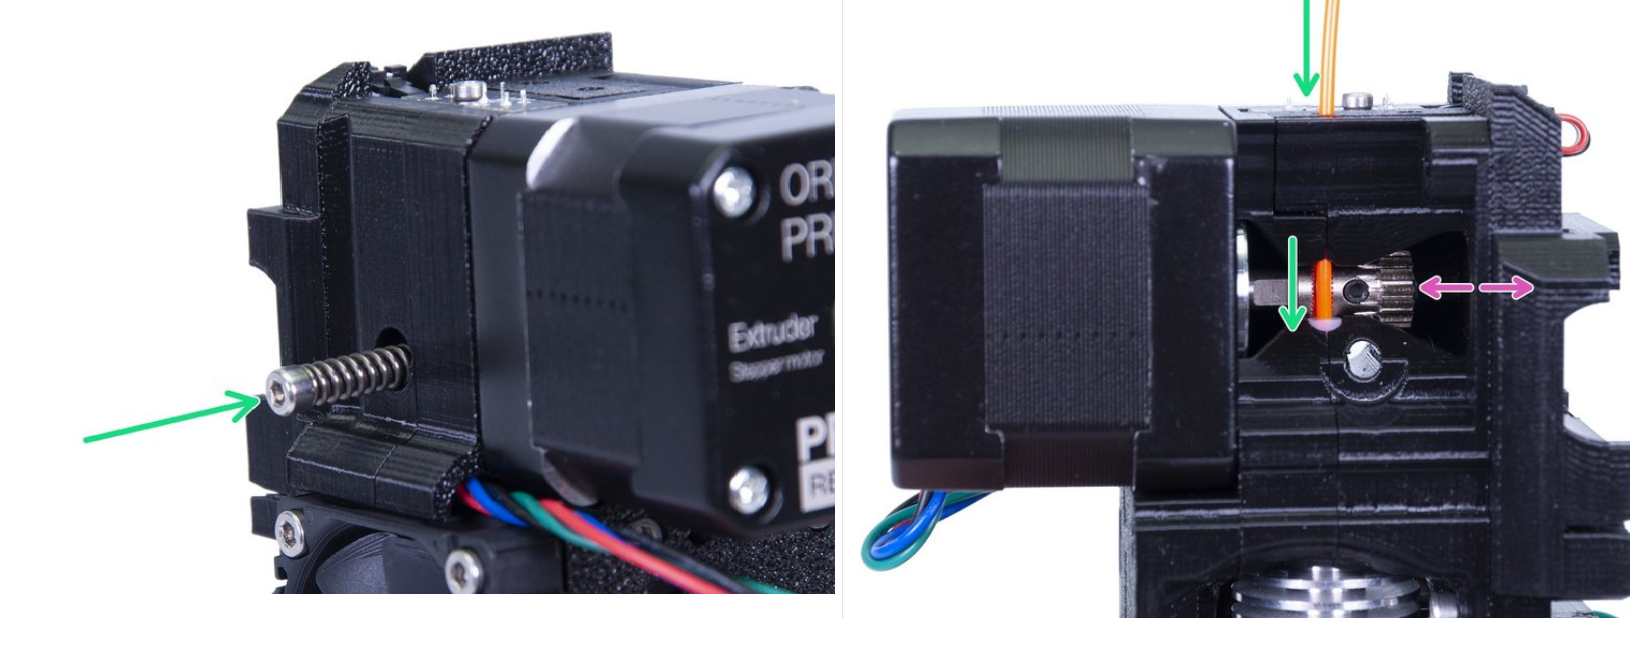
If you open the window, you should see the filament passing over the motor bondtech gear...
with the extruder heated to the correct temperature for the filament, you can try grabbing the filament with your long nose pliers and pushing up towards the top of the extruder gear window, with luck this will cause the top end of the filament to appear above the top of the extruder housing, where you can grab it with your pliers and pull it out.
if that fails to work, you can try cutting the filament off, level with the white PTFE Tube, inside the extruder gear window, then push the short (top) piece of filament out of the extruder, then using a long 1.5mm allen (Hex) key, inserted into the filament hole on top of the motor, you should be able to push the filament down into the ptfe tube, if this works, restore the bondtech idler door, Insert the door retaining screw and it's spring, then using a 2.5mm allen key, screw the retaining screw back into place, until it just engages with the nut, in the trap door, (YOU DONT WANT A LOT OF PRESSURE ON THE TRAP DOOR)...
you should now be able to insert fresh filament into the extruder, and use the load command on the LCD, to load the fresh filament and push the old filament out of the way...
If this does not work, use the LCD Menu to heat the extruder to say 280C and try again
regards Joan
I try to make safe suggestions,You should understand the context and ensure you are happy that they are safe before attempting to apply my suggestions, what you do, is YOUR responsibility.Location Halifax UK
RE: How do I clear the filament detection hole in this photo?
@robert-rmm200
@joantabb
Thank you both very much! I really appreciate your help : )
RE: How do I clear the filament detection hole in this photo?
@torrey-slattery
Good luck
Joan
I try to make safe suggestions,You should understand the context and ensure you are happy that they are safe before attempting to apply my suggestions, what you do, is YOUR responsibility.Location Halifax UK
RE: How do I clear the filament detection hole in this photo?
Well, good news and bad news. I was able to get the filament up from the bottom with a little bit of wiggling, and so I cleared it from the hotend side. However, as I hope is visible in the following photograph, the top part of the extruder appears to be just completely jammed:
https://drive.google.com/open?id=1GhLKUE5RATZwBgEC5ETo2WA4qzRzHXrk
It's almost like the filament shredded inside and then got compacted down. I haven't been able to dislodge what's visible there by pressing down with a hex key (let alone with new filament), and there isn't enough protruding from below to grab with pliers. I almost want to just get a really thin drill bit and drill through it, but I don't know if there's anything delicate there that would be ruined by doing that.
I've also been trying to figure out which piece that is in the extruder assembly docs so that I can maybe just separate it from everything else, but while I can clearly see seams for different parts coming together, I don't recognize it in the steps ( https://manual.prusa3d.com/Guide/5.+E-axis+assembly/1055?lang=en#_ga=2.97776607.1315886896.1571514663-978672147.1569793425 ).
Anyone happen to have a further suggestion on this?
RE: How do I clear the filament detection hole in this photo?
you could try heating the extruder, removing the nozzle and trying again...
Joan
I try to make safe suggestions,You should understand the context and ensure you are happy that they are safe before attempting to apply my suggestions, what you do, is YOUR responsibility.Location Halifax UK
RE: How do I clear the filament detection hole in this photo?
Refer to the manual section I linked you.
Your filament seems to be stuck in a printed passageway. Nothing delicate in that passage; just a steel ball.
Remove the top cover, remove the filament sensor (remove the plug that attaches to the sensor) and anything else accessible with the cover off.
Does that help? A really pointy tweezer might help.
I really like the one I got in this set:
https://www.amazon.com/gp/product/B0797XV8ZK/ref=ppx_yo_dt_b_asin_title_o07_s00?ie=UTF8&psc=1
Worst case - you get to disassemble your extruder to get to it. Not bad - just a pain.
RE: How do I clear the filament detection hole in this photo?
you could try heating the extruder, removing the nozzle and trying again...
Joan
From his description, I think his PTFE tube and hot end are empty now and his jam is above the Bondtech.
Not sure how removing the nozzle will help...
RE: How do I clear the filament detection hole in this photo?
you could try heating the extruder, removing the nozzle and trying again...
Joan
From his description, I think his PTFE tube and hot end are empty now and his jam is above the Bondtech.
Not sure how removing the nozzle will help...
Sorry for my poor description. This is correct.
Sounds like I'll just need to disassemble things and hope for the best. One of my fears (and why I bought pre-assembled) is that my attention to detail will be lacking, and the resulting calibration will be off somehow when I assemble this piece. Doesn't matter now, it's pretty much try or have a printer-shaped brick.
RE: How do I clear the filament detection hole in this photo?
Start simple.
The top cover comes off with one screw.
The filament sensor comes off with one screw.
Only if that does not get you far enough in do you actually have to disassemble anything.
RE: How do I clear the filament detection hole in this photo?
For anyone else who thinks they have the same problem, I had to disassemble things down to the steel ball component in step 7. Basically, that meant two screws on the fan, two screws at the top back, the top cover (of course), the filament sensor, the two screws underneath the stepper motor, and the two screws holding the trap door in place.
Inside, it was almost like the filament I'd been using had been continually shedding, as I was able to pull out a few long "streamers" or shavings that had compacted not only in the feed tube, but around the steel ball and was blocking the filament sensor as well. I'd been 100% fine using Prusament before, but switched to some cheap rainbow filament off of Amazon. Although I did get some prints out of it, probably not the worth the hassle in the future.
Thanks again for all your help!
RE: How do I clear the filament detection hole in this photo?
But look how much you learned! Really glad you got it sorted.
Another problem you may encounter in this area: Autoload stops working, with the filament sensor stuck at 1.
Simple fix:
Print out a calibration circle, 2 layers.
Make a hole for a small screw.
cut a 1/4" square of the calibration circle material, with that hole in the center.
Put that under the sensor board, with the screw going through the hole.
Worked for me, and a number of others. And now you know how all the pieces go together!