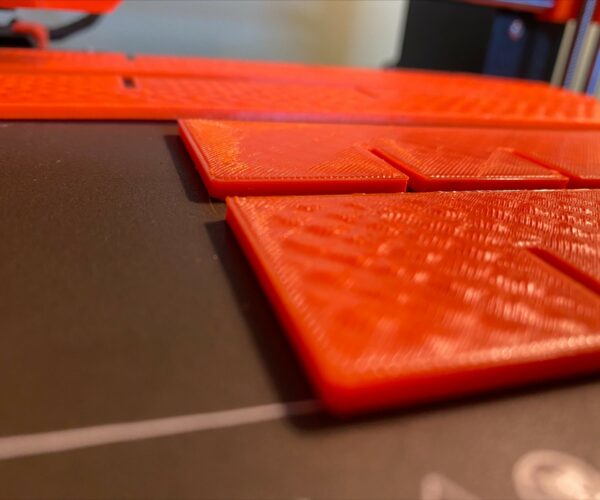
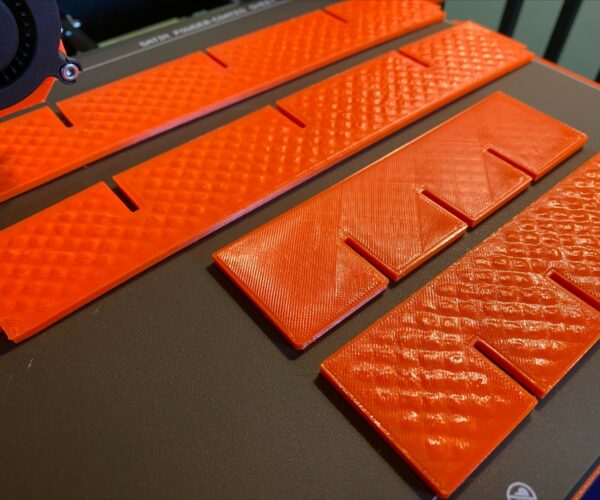
Now what have I done?? How did I mess this print up?
Hello Gods of Additive Manufacturing. I'm running an MK3s upgraded to a plus using prusament petg for this part. Super simple part, just some quick dividers for a storage box, but the oddest thing I've seen happened. I've been experimenting with my Bondtech CHT nozzle, Variable layer heights and MVS but I really just wanted to have a win after weeks trying yet again to get my MMU reliable (and continuing to fail lol). Anyway, I load these into PrusaSlicer, let it use default Adaptive and Smooth for the VLH, stock Prusament PETG settings etc. super simple. Slice, upload to octoprint, and let the printer do what the printer do. Which appears lately to be failing. So, everything is going fine for a hour or so, when I check in on it, and there's filament shaving everywhere my silicone sock is tossed off the heater block, and the extruders making really weird...Grass clumps? I'm not even sure what to call them. I wish I had taken a video. It was wild. It kept printing, but it was like the z-height was off and the nozzle was slicing as it deposited. I double checked feed rate and flow rate in Octoprint, even slowed the print down via the control knob, and out of curiosity, let it go to see if it would somehow come out of it.
Well it did, and attached is some pics of the results. These really weird bubbles sorta? Now the really strange part. Of the four parts, one of them printed perfectly. No grass clumps, no resulting bubbles. I double checked the slicer output, and they all appear to have identical settings applied. I double checked that they were all the same thickness, and they are at 3mm. Oddly, they did slice differently, but I can't see how or why. Any chance anyone has seen this oddity before or sees something I messed up in the slicer settings. These parts are all configurations of the same model, so construction is identical, just length dimensions deviate.
Thanks a ton for any help.
Pete
Best Answer by FoxRun3D:
First, kudos for figuring out how to upload the 3mf file!!!
Honestly, I don't know why you're seeing those pillows. My first thought was, well, "pillowing" but I guess I wouldn't expect that with 15% infill and 6 top layers. Why the parts are slicing differently, that's an easy one: The small one doesn't have Variable Layer Height activated. For simple parts like that I don't think VLH makes much sense, and in fact, if I turn it off I gain 1.5 hours and wouldn't expect to see any difference in quality.
Actually, that brings me back to pillowing. Because of VLH, the top shell for the large parts is only about 0.7 mm thick, whereas for the small part without VLH, it's 1.2mm (6 x 0.2). Could be enough, I guess, to account for the difference. You could try to set Minimum Shell Thickness to 1 or 1.2mm, to make it uniform, and see if that makes a difference.
Hopefully one of the slicer experts here has more profound ideas on why you're experiencing this issue.
RE:
Can't seem to figure out how to attach the sliced .3mf...
RE: Now what have I done?? How did I mess this print up?
RE: Now what have I done?? How did I mess this print up?
First, kudos for figuring out how to upload the 3mf file!!!
Honestly, I don't know why you're seeing those pillows. My first thought was, well, "pillowing" but I guess I wouldn't expect that with 15% infill and 6 top layers. Why the parts are slicing differently, that's an easy one: The small one doesn't have Variable Layer Height activated. For simple parts like that I don't think VLH makes much sense, and in fact, if I turn it off I gain 1.5 hours and wouldn't expect to see any difference in quality.
Actually, that brings me back to pillowing. Because of VLH, the top shell for the large parts is only about 0.7 mm thick, whereas for the small part without VLH, it's 1.2mm (6 x 0.2). Could be enough, I guess, to account for the difference. You could try to set Minimum Shell Thickness to 1 or 1.2mm, to make it uniform, and see if that makes a difference.
Hopefully one of the slicer experts here has more profound ideas on why you're experiencing this issue.
Formerly known on this forum as @fuchsr -- https://foxrun3d.com/
Why do these need variable layer heights?
Cheerio,
RE: Now what have I done?? How did I mess this print up?
First, kudos for figuring out how to upload the 3mf file!!!
Honestly, I don't know why you're seeing those pillows. My first thought was, well, "pillowing" but I guess I wouldn't expect that with 15% infill and 6 top layers. Why the parts are slicing differently, that's an easy one: The small one doesn't have Variable Layer Height activated. For simple parts like that I don't think VLH makes much sense, and in fact, if I turn it off I gain 1.5 hours and wouldn't expect to see any difference in quality.
Actually, that brings me back to pillowing. Because of VLH, the top shell for the large parts is only about 0.7 mm thick, whereas for the small part without VLH, it's 1.2mm (6 x 0.2). Could be enough, I guess, to account for the difference. You could try to set Minimum Shell Thickness to 1 or 1.2mm, to make it uniform, and see if that makes a difference.
Hopefully one of the slicer experts here has more profound ideas on why you're experiencing this issue.
Thank you very much! I thought I had checked it and it did appear to have vlh activated. I wonder what I’m doing wrong there. Anyhow, that explains to some degree then. The VLC must somehow be the culprit. I sincerely appreciate you sharing your shell thickness suggestions.
RE: Now what have I done?? How did I mess this print up?
Why do these need variable layer heights?
Cheerio,
Hello Diem,
They don’t at all. I was merely experimenting with the feature and didn’t realize there was a downside. It’s actually an interesting surface effect, almost organic looking. It was especially interesting to watch. It was like the nozzle was shredding as it also deposited. Scratching the surface with the nozzle. It’s apparent now I understand even less about VLH than I was aware lol.
RE: Now what have I done?? How did I mess this print up?
Could you tell me, how can you tell the one without Pillows (I like that more than bubbles) doesn't have VLH activated? I've checked and re-checked and when I click on it in platter view, the VLC button is activated and the little settings window in the lower right corner pops up, like the other three. Is there another way to see which parts have VLH and which don't? I imagine I'll be embarrassed when you tell me it's something so simple, I couldn't see it lol. I do see the bar graph along the right side is gray only and the green line doesn't waver like the other three. But the Variable and Smooth settings have the same values. Hmm. I'll have to look in the Prusaslicer Knowledge Base page to learn more. Thanks again. I wouldn't have picked up on the deviation, which was the primary reason for my befuddlement. I saw same settings and dramatically different results. That never adds up, and it didn't in this case either.
RE: Now what have I done?? How did I mess this print up?
I imagine I'll be embarrassed when you tell me it's something so simple, I couldn't see it lol.
It is simple, but no need to be embarrased 🙂 It's clearly showing in the right hand panel—there's no entry for variable layer height under that part (you may have to click on the image to see it all) :
I do see the bar graph along the right side is gray only and the green line doesn't waver like the other three. But the Variable and Smooth settings have the same values.
Yes, but you need to press on the Variable or Smooth button to actually apply those values to the part, which you probably didn't do for the small part.
Formerly known on this forum as @fuchsr -- https://foxrun3d.com/
RE: Now what have I done?? How did I mess this print up?
I encountered something similar, but not as severe once. When I checked my settings it turned out that I had enabled ironing. Easy fix. Maybe not your issue, but I´m putting it out here anyway in case someone stumbles on it in the future.
RE: Now what have I done?? How did I mess this print up?
I imagine I'll be embarrassed when you tell me it's something so simple, I couldn't see it lol.
It is simple, but no need to be embarrased 🙂 It's clearly showing in the right hand panel—there's no entry for variable layer height under that part (you may have to click on the image to see it all) :
I do see the bar graph along the right side is gray only and the green line doesn't waver like the other three. But the Variable and Smooth settings have the same values.
Yes, but you need to press on the Variable or Smooth button to actually apply those values to the part, which you probably didn't do for the small part.
As I suspected lol. Why didn’t I think of that? Thanks again for sharing your time in this Fuchsr. I won’t make the mistake twice.
RE: Now what have I done?? How did I mess this print up?
I encountered something similar, but not as severe once. When I checked my settings it turned out that I had enabled ironing. Easy fix. Maybe not your issue, but I´m putting it out here anyway in case someone stumbles on it in the future.
Thank you Tommy. It’s certainly possible. I’ll look at it again closer. Aside from the “clumps of grass” it made before it printed over them (making the pillows), I suppose you could cal what it was doing similar to ironing.
Pete


