Re: Many new printed parts on GitHub
There's a photo of a guy drilling them out. I'm not surprised.
I'd personally attempt to teardrop those holes. You'd think that would save time and make things more consistent than a hand-reaming job.
Can you please explain what you meant by "teardrop"?
BTW, I could not tell what was in the drill chuck ...
Re: Many new printed parts on GitHub
They are teardrop. I went to ream mine just to see but they are already round and true as printed so it had no effect. I will install soon and find out.
I wonder how old that photo is. Maybe they were suffering the early over-extrusion.
I actually checked the repo yesterday... they're... not exactly teardrop. It looks like they tried something though. Kinda-teardrop I guess.
Can you please explain what you meant by "teardrop"?
BTW, I could not tell what was in the drill chuck ...
![]()
Thanks, so just what it sounds like. Why would one want to do that?
Re: Many new printed parts on GitHub
The teardrop shape is used to avoid steep overhangs and bridges when printing vertical circular holes. Some of the holes in the scad files use nopheads polyhole feature, that's why they look a bit weird: http://hydraraptor.blogspot.nl/2011/02/polyholes.html
Re: Many new printed parts on GitHub
The teardrop shape is used to avoid steep overhangs and bridges when printing vertical circular holes. Some of the holes in the scad files use nopheads polyhole feature, that's why they look a bit weird: http://hydraraptor.blogspot.nl/2011/02/polyholes.html
Thanks - great answer - lots of education and food for further understanding in that great link. MUCH appreciated!
Re: Many new printed parts on GitHub
They are teardrop. I went to ream mine just to see but they are already round and true as printed so it had no effect. I will install soon and find out.
I wonder how old that photo is. Maybe they were suffering the early over-extrusion.
I actually checked the repo yesterday... they're... not exactly teardrop. It looks like they tried something though. Kinda-teardrop I guess.
They are teardrop enough. The steep overhang is replaced by a 45 which can print fine. You only need to then go up enough to exceed the radius circle, and maybe a tiny bit more to compensate any bridge sag, but very little that short. Going all the way to a point is way overkill.
So I rebuilt the X yesterday and found the default print fit easily without drilling. Actually, I would have preferred a tighter fit as they slid on easily, but no wiggle. Prints great. I like the belt adjust too.
Re: Many new printed parts on GitHub
Round 2 -
Bad news: Smooth rods on the x axis are still way too tight right off the printer. Used a 5/16 bit to loosen it a bit, and a step bit to give it some chamfer, both just turned by hand with a set of vice grips. I used a little machine oil and a lot of persuasion to get them in finally, and put a small crack in one end again doing that but they were printed so solid doesn't seem to matter. Same deal with the reinforced z brackets, so at least the holes are consistently small, also put a hairline crack in one of them but doesn't seem to matter.
The bearing are also a royal pain to get in, but you can lever the opening bigger with a flat screwdriver so not too bad.
Good news: Once everything is back together, the combo of the upgraded x-carriage and ends and a 16T idler fixed all my belt rubbing/twisting problems on X. Works really well now and the adjustment screw on the x made it easy to get that last bit of tightness.
Printing up the last part for the upgraded Y now. Overnight I did a moderate sized PETG drawer organizer and it went mostly well, one slight layer shift and a little curl on one corner, so plan is to upgrade Y and then micro level and really dial in the bed for PETG since thats what I'm mostly using now.
If I had to do it again, I'd have just ordered a spare smooth rod and bearing to test fit parts and get them dialed in BEFORE taking the printer apart, since I can't really reprint them after...
That's the opposite experience I just posted above you. 🙂 Are you using the latest firmware? Which slicer are you using? The hole for the smooth rod in the z holder is tight (designed to be) but everything else fit easily. I used PETG with 3 perimeters and reduced extrusion multiplier in latest driver.
Re: Many new printed parts on GitHub
That's the opposite experience I just posted above you. 🙂 Are you using the latest firmware? Which slicer are you using? The hole for the smooth rod in the z holder is tight (designed to be) but everything else fit easily. I used PETG with 3 perimeters and reduced extrusion multiplier in latest driver.
Ha! I'm on the latest firmware and used Slic3r PE optimal for the X-ends, and Simplify 3D for the Z and both had the fit issues. Maybe the PETG I'm using is over extruding and screwing up tolerances? I haven't changed the multiplier yet for that but have been having a difficult time with live Z and getting a perfect 1st layer.
I just finished rebuilding the Y axis and using a metal straightedge to level the bed best as possible, so will calibrate now and try some test squares again this time messing with the extrusion multiplier.
Re: Many new printed parts on GitHub
First print off the upgraded setup looks good - blue maker geeks PTEG, S3D MK3/PET Medium (.2) preset.


Re: Many new printed parts on GitHub
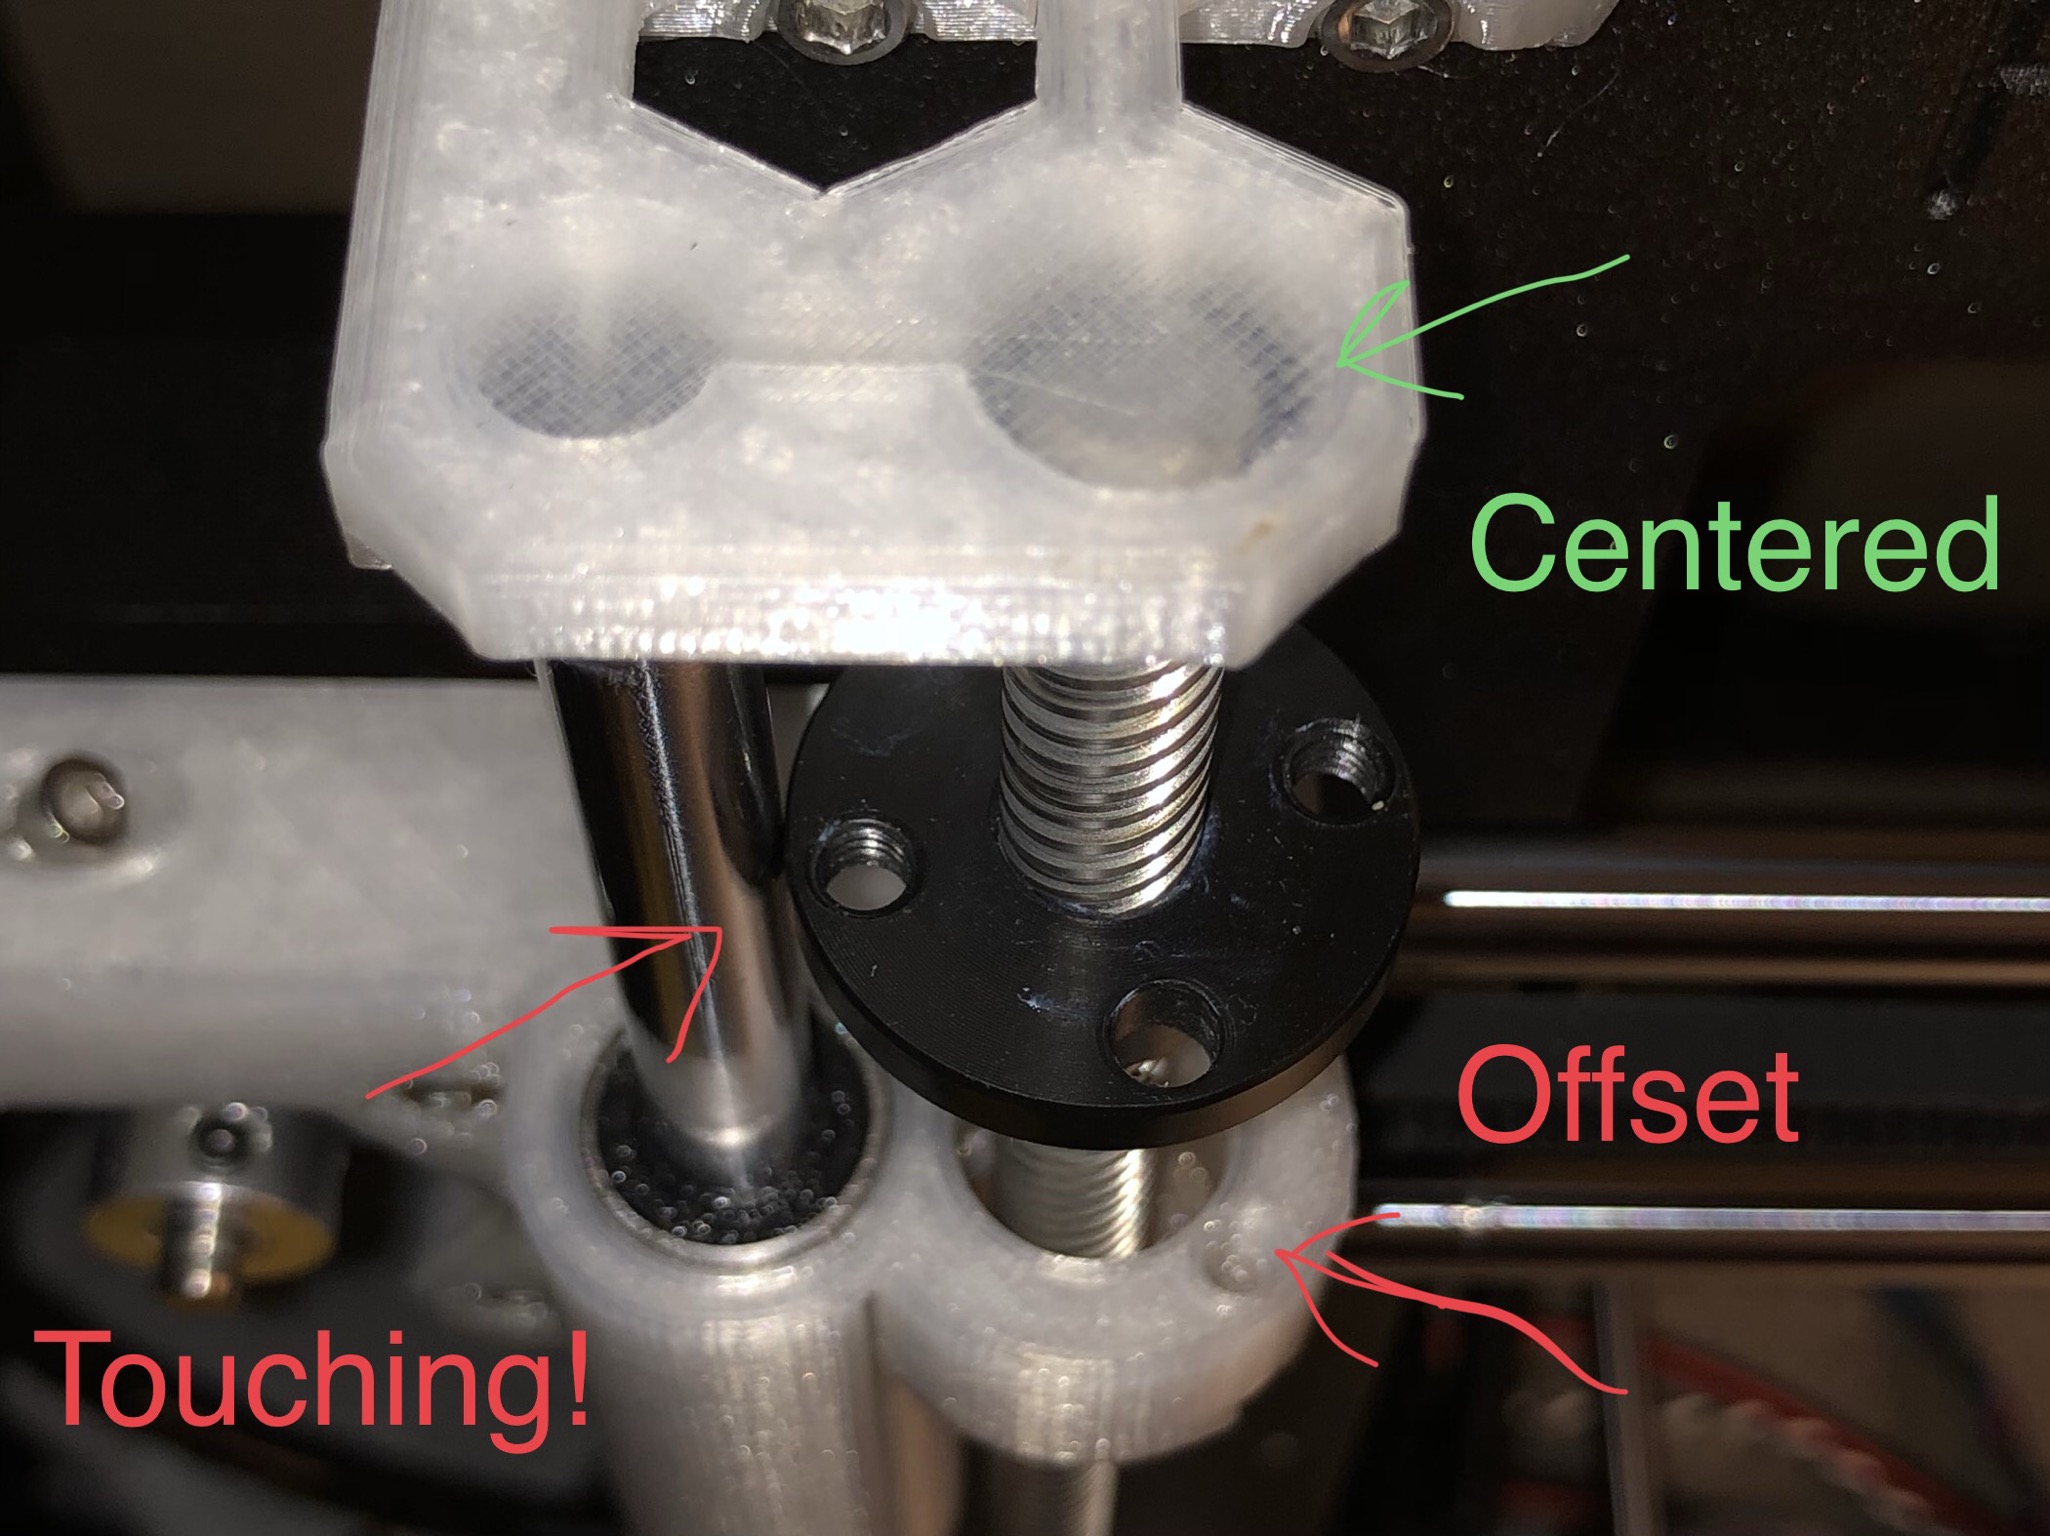
I have something strange going on. First I upgraded the Z holders a couple weeks back, and for the first time ever the threaded rod was perfectly centered in the Z-top hole through the whole range. Now I swapped out the X-ends for the R2 version and the threaded rod is off center again!
I checked all the CAD models and the center distance on the Z and X parts are all 17.0 mm as expected. But something has changed in the print. If I remove the screws in the T-nut and twist it up out of the X-end I can see the threaded rod snap back to center in the Z-top. You can visually see the threaded rod is not in the center. As I twist the T-nut back into place you can feel it slightly catch the edge and the push the threaded rod to the side a bit.
So if all the models are perfect on center, they are all oriented the same on the print bed, same PETG, same setting, how am I getting different print dimensions?
Re: Many new printed parts on GitHub
WTF. Picture is a bit hard to see. Same z-top I had before and was centered, working with original x-end. Now x-end is clearly offset and the t-nut is touching the smooth rod, but not when screwed down. Then there is the expected gap but it pushes the threaded rod to the right.
Re: Many new printed parts on GitHub
The center distance must be 17 mm between the two shafts. Has the material that you have used shrink so much?
It should be exactly 0.5 mm between Trapezoid nut and smooth rods.
Bear MK3 with Bondtech extruder
Re: Many new printed parts on GitHub
The center distance must be 17 mm between the two shafts. Has the material that you have used shrink so much?
It should be exactly 0.5 mm between Trapezoid nut and smooth rods.
Exactly. So there are two choices here (or others?):
1. the X came out too big, but really could not be smaller or else the T-nut will touch the smooth rod.
2. both(!) Z parts, which are different shapes and sizes, happened to shrink the exact same amount. But it was working perfect with the original X parts.
So neither explanation makes sense to me. I hesitate to tear it all down since it is such a pain and I'm not sure that I'll discover anything new.
Re: Many new printed parts on GitHub
FYI, assembly manual updated and includes the latest printed parts (X-ends and X-carriage), see chapters 3 and 4:
http://manual.prusa3d.com/c/Original_Prusa_i3_MK3_kit_assembly
Re: Many new printed parts on GitHub
The center distance must be 17 mm between the two shafts. Has the material that you have used shrink so much?
It should be exactly 0.5 mm between Trapezoid nut and smooth rods.
Exactly. So there are two choices here (or others?):
1. the X came out too big, but really could not be smaller or else the T-nut will touch the smooth rod.
2. both(!) Z parts, which are different shapes and sizes, happened to shrink the exact same amount. But it was working perfect with the original X parts.
So neither explanation makes sense to me. I hesitate to tear it all down since it is such a pain and I'm not sure that I'll discover anything new.
Z parts can’t have shrunk because fits nema 17 like glove. X parts are snug on bearings so don’t seem too big.
There must be some simple explanation I’m overlooking.
Re: Many new printed parts on GitHub
The lower parts for the Z-axle, (motor holder), are they correctly positioned and has the right center distance (17 mm)?
Bear MK3 with Bondtech extruder
Re: Many new printed parts on GitHub
The lower parts for the Z-axle, (motor holder), are they correctly positioned and has the right center distance (17 mm)?
All CAD models are exactly 17 mm on center. I can't measure that with enough precision on the print itself. What I can say is those Z motors are exactly the same as before. I didn't move them. Still screwed down tight.
Only the Z top was re-installed, but it has no play. If it were somehow off axis, it would move the smooth rod and the X end would follow suit. What is clear is when I remove the T-nut (so now the X is only attached to the smooth rod) then the threaded rod snaps to perfect center on the Z top. So both Z parts are in agreement. I only swapped out the X parts so they would seem suspect. But I don't get how they could have uniquely printed odd sized (model is correct) and if it was any tighter T-nut would touch.
Re: Many new printed parts on GitHub
figured it out. mostly. The belt tension was causing flex. When I released it, the rods re-centered. What it looks like is there is a bit more room on the rod sockets on the X ends so that when you have the correct width set for the Z rods, there is a small amount of gap on the X rods. On MK2 there were screws to take up this slack, but are gone now on MK3. When you tension the belt, it is able to pull the X ends closer together (flexing the Z rods a hair). Since you are not tensioning against the X rods axially (because there is play) you are using the Z rod lateral flex. The belt tension felt correct, not over tight. Though I did set it a mid-height where Z rod flex would be maximal.
I checked the models and both R1 and R2 have the same socket depth the ends 1mm before bearing center. So I wonder if my print is off somehow internally. Still diagnosing.
Re: Many new printed parts on GitHub
Really weird.
Is it exactly 307 mm between X motor holder and X end idler parts? (The visible part of the X smooth rods)
Bear MK3 with Bondtech extruder