RE: Weird Pattern In the Sides of My Prints
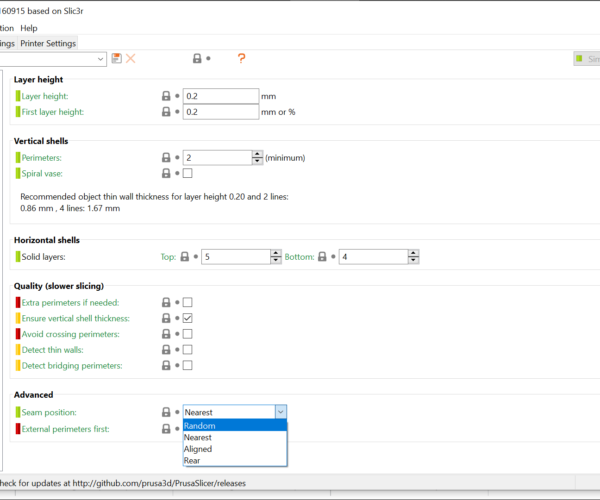
the cause of this is the start and stop of each layer,
On an object with corners, the slicer tries to put the seam, in one of the corners... so you don't see it (there aren't many corners on a circular piece, so slicer tries it's best... which isn't always good.... )
there are 4 options,
you are probably using 'Nearest' at the moment,
'Random' might provide a better result,
'Rear' will align all of the seams and put them to the rear of the build plate, which may help because you can often put the seam, out of sight on a model...
otherwise you need to tinker with the the speed and layer settings to achieve the best results.
regards Joan
I try to make safe suggestions,You should understand the context and ensure you are happy that they are safe before attempting to apply my suggestions, what you do, is YOUR responsibility.Location Halifax UK
RE: Weird Pattern In the Sides of My Prints
That is the z-seam. It is created when the nozzle is moved from layer to layer. It is an unfortunate part of current consumer-grade FFF printing. You can move it around under Print Settings->Advanced->Seam Position. Going by your picture, you've got it set to nearest. If you set it to random, it will move around. If you set it to nearest or aligned, the slicer will try to tuck it into a corner. Unfortunately, on cylindrical parts with no corners, the seam has to go somewhere. The best is sometimes just set it to rear and be prepared to do some sanding.
Some things you can try to reduce (not eliminate) the seam are:
- Calibrate your extrusion multiplier for each filament.
- Do a Linear Advance calibration.
Those will help minimize any over-extrusion and maintain an even flow of filament as the nozzle accelerates and slows. These might reduce the size of the bump. Again though, you can't get rid of it completely.
and miscellaneous other tech projects
He is intelligent, but not experienced. His pattern indicates two dimensional thinking. -- Spock in Star Trek: The Wrath of Khan Unfortunately,…

