Uneven first layers with gaps and blobs
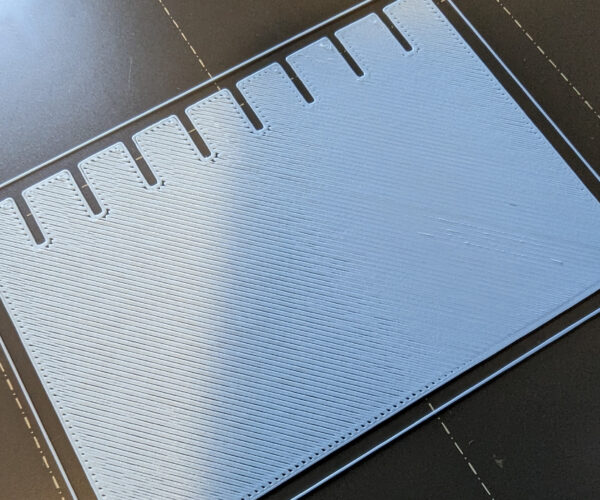
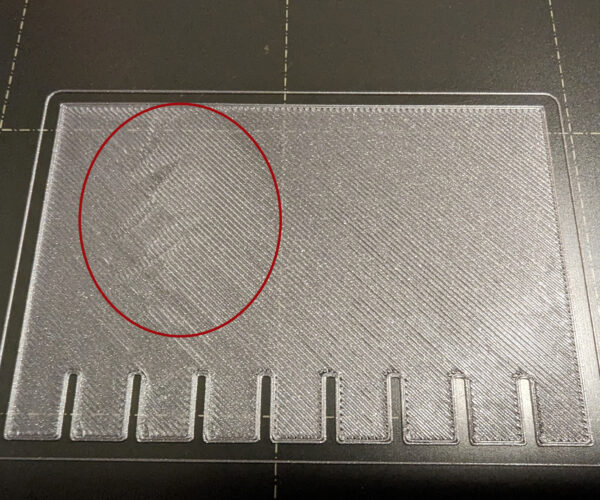
I just finished my first printer build of the MK3S+, and the Benchy came out perfectly. I tried to then print another model with a larger footprint, and noticed that one end of the print's first layers had gaps between lines, while the other end was very tight and was squishing blobs/artifacts onto the upper layers (which adds up and causes prints to fail after a while). It's very consistent too, I can reprint the same print with the same material and get the same defects in the same spots.
After digging through the forums, I found an almost identical issue here that doesn't seem to have been resolved, but points to a possible skew with the XYZ calibration. I'll re-run my calibration tomorrow to compare my values, but before I start undoing the printer to try and adjust belts/tensions/screws, I wanted to see if this is even a likely culprit for this print issue, or if there's something else I could be looking at. Any help or insight would be greatly appreciated!
Details: I've done as much z-calibration as I can stomach, both having it too high, too low, and just right, and no matter what it's set to I'll get an uneven distribution. The issue occurs with the Prusa Galaxy Silver PLA filament, as well as the PolyTerra filaments I have (it's harder to spot on the glossy/glittery silver, and more pronounced on the matte PolyTerra). I sliced with PrusaSlicer, all default settings for Prusa PLA, first layer height 0.2. Adjusting print speed and temperatures don't seem to affect the behaviour. Cleaned the nozzle as well, and re-ran the calibration steps including adjusting the PINDA sensor and XYZ calibration.
Don't do anything drastic right now.
I would rate that print as good enough for the first month.
Every user builds their printer slightly differently and pre-built models are shaken up in transit so during the first few weeks of use the printer will run-in and settle its parts together; then you will have to go over the basic maintenance checks, lubricate and recalibrate. Even if you got everything dialled in perfectly today, it would all need re-doing.
Better to settle, temporarily, for a basic working printer and get some useful printing done, make your early mistakes, establish a routine and generally get used to the process. Then when you do your one month service you can take extra care knowing the new settings on your now stable printer are likely to last for several months.
If this issue persists after a month come back and we'll go through the built in bed levelling procedures.
See: https://help.prusa3d.com/article/bed-level-correction_2267
... BUT DON'T DO IT YET ...
It's quite likely to correct itself as you run-in the printer.
Cheerio,
RE: Uneven first layers with gaps and blobs
Thank you for the advice! Just letting things settle is not something I ever would have considered. The perfectionist in me hates it, but I'll power through it and see what the first month does and report back if anything changes!
RE: Uneven first layers with gaps and blobs
Just wanted to follow-up, as I've been doing more prints throughout the day. This unevenness I'm seeing is affecting most prints now, beyond the size of a 3D Benchy. Several prints have failed today as the nozzle is digging through built-up layers of filament on half of the prints, which is quite discouraging and is making this printer feel pretty useless "out of the box". And if I adjust the offset or flow to print fine on that side, the other side becomes worse due to less filament/squish.
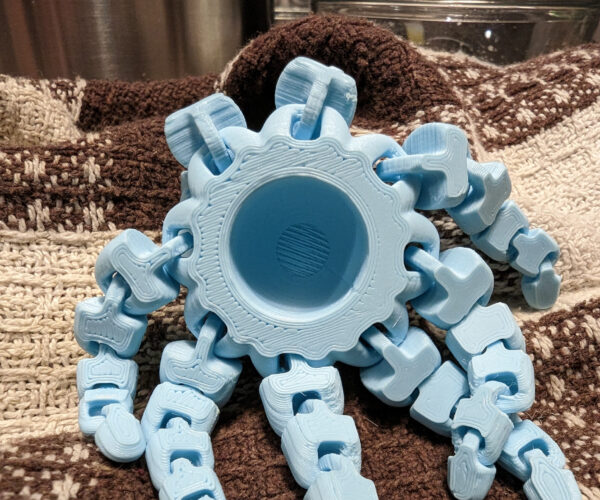
I tried to print the "cute octopus" model, and found that the layers for the tentacles on one half of the print looked decent with my current z-offset (calibrated to try and find a sweet spot with this unevenness), while the other half of the tentacles and main body looked very squished and blobby. After a handful of layers, I was seeing significant build-up of filament on the squished side, which was causing parts of the print to deform more over time (and cause failures in a few other prints as the nozzle was picking up more and more excess filament until it was knocking parts).
The consistency of the unevenness on the print hints at it being a levelling issue to me. I can print the same print 3 times and get the same issues in the same spots, and then if I change where the model is printed on the bed, the issues appear in new spots, also consistently across multiple prints in the same spot. If this was an extrusion issue, or issue with the filament itself, or even the belts, I'd expect more randomness in where these issues are appearing.
Are there any other suggestions I can explore? As much as I'd love to let my printer settle over a month of use, I feel like I'm just wasting filament on failed prints at this point which is discouraging. I'd also just like to reiterate for anyone else seeing this, that I have absolutely calibrated the z-offset to be as perfect as I can get it at any given point in a calibration print - the nature of this unevenness means that if I set the z-offset to be perfect at one end of the print, it'll appear either too high or too low on the other end (as if the back half of the bed is warped up, or the front of the bed is warped down).
Thanks again!
It is a levelling issue ...
The two most likly causes are: Improperly placed linear bearings - you might try slightly loosening the mounts to allow them to settle.
And unevenly tightened heated bed screws.
Both of these may resolve themselves but if you want to hasten the process:
See step 17 of: https://help.prusa3d.com/guide/7-heatbed-psu-assembly_172872
Again just loosen them enough that they can settle - take them back so the bed is detectably loose and then follow the tightening pattern a half-turn at a time until all are just gripping.
Run the printer a while to allow it to settle then return and complete the tightening - you will need to recalibrate each time.
Cheerio,


