Smooth Steel Sheet - Damage?
Hello!
I was hoping someone from the community could help me out.
I'm new to the 3d printing world but took my time to research, purchase and build the I3 MK3S+. The build went great with the attached instructions and I took my time to ensure everything was level and sound.
I've had my printer since December 2020 and I've been tinkering, running test prints and small trinkets ~50mm x 50mm x 5mm maximum.
I've tried to ensure that my printer was "dialed in" first layer wise, having run the first layer calibration multiple times along with the Prusa logo which came with the SD card and the 3x3 Bed Level Calibration found here:
https://www.prusaprinters.org/prints/45752-3x3-bed-level-calibration
I would say my current first layer calibration is good with no pulling/scuffing indicating it's too low or poor bed adhesion indicating it's too high.
I clean my sheet with 99% IPA before every print
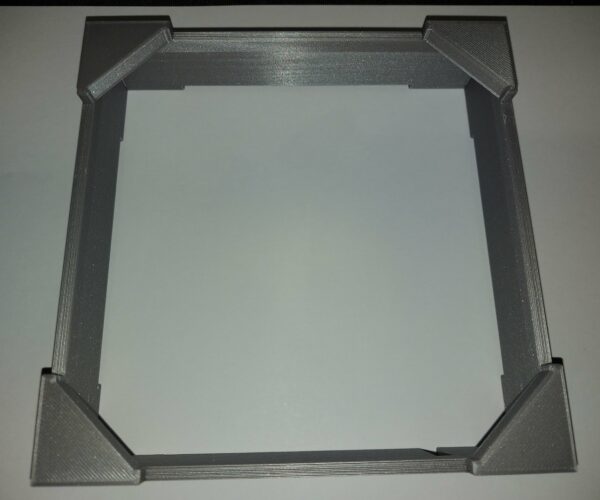
Today I've printed my first self-designed (larger 150x150) item from Fusion 360 a fan-box with triangular feet/stand offs for a cooling project.
The image above shows this box, you're looking at the bottom side i.e layer 1
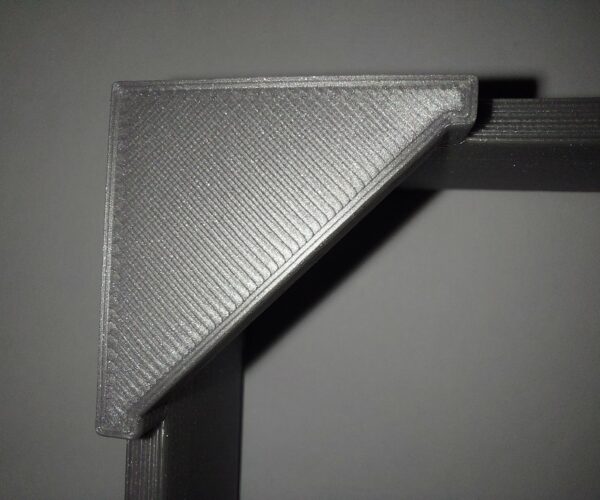
The image below is further detail of the feet, again you're looking at the bottom side or layer 1
I printed the box with the bundled PLA (made for Prusa) with the standard "Prusa PLA" filament in PrusaSlicer 2.3 (updated today)
I printed this at 0.3layer height with 20% infill and supports enabled for the bridges.
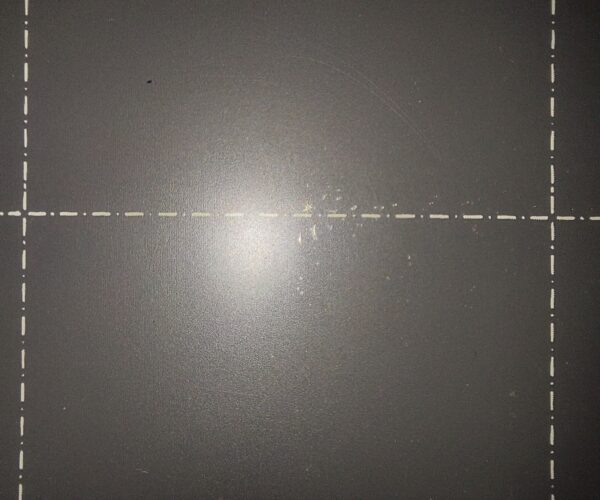
The issue is I believe I have damaged the smooth steel sheet, this has occurred on all four corners of the box, the image below shows the damage in one of the corners.
I have a few questions, if anyone could help it would be greatly appreciated.
- Is this indeed damage to the sheet or could it be resolved via acetone which is often mentioned on the forum?
- If it is damage what do you think caused it/how do I stop it from happening again?
- Is this side of the sheet still "Safe" to print on or would I likely cause more damage now it's started?
Finally the only changes I have made since printing the smaller trinkets (no damage) are as follows:
- Previously printed at 0.2 layer height
- Previously printed a maximum of 50mm x 50mm x 5 (x,y,z)
- Previously used Prusa Slicer 2.2 , now using 2.3(top/bottom infill has changed)
- Previously didn't use supports (the damage is only in the corners where there is infill)
Thanks in advance if anyone can help
Best Answer by JoanTabb:
Large models can do this when the adhesion is good...
Those marks should disappear over the next few prints.
Some folk turn the build plate over to let that side rest while the next print is done.
My personal view on Acetone is Put it with the paints and forget about it...
the only damaged build plate that I have, is the one I tried to rejuvenate with Acetone, the PEI became brittle and cracked this was a one way street, as little pieces broke out... first on the purge line, ( A bit of kapton tape stopped that getting worse), but then the main print area started to crack and the surface was largely doomed...
Now I just use Dish Soap(detergent) and water to clean the print surface. on the textured surfaces I use the green side of a kitchen sponge
I don't use IPA or hairspray, or magigoo, or painters tape or the plethora of other adhesion aids...
I do use talcum powder or windex to reduce the adhesion of PETG,and TPU, on smooth PEI, some folk use Gluestick for reducing adhesion (if you choose to use gluestick in this manner, wiping over the gluestick with IPA, can smooth the surface out by thinning the gluestick)
If a model sticks too well, dribbling IPA around the print on the PEI sheet, will help loosen the bond without damaging your PEI.
Regards Joan
RE: Smooth Steel Sheet - Damage?
Large models can do this when the adhesion is good...
Those marks should disappear over the next few prints.
Some folk turn the build plate over to let that side rest while the next print is done.
My personal view on Acetone is Put it with the paints and forget about it...
the only damaged build plate that I have, is the one I tried to rejuvenate with Acetone, the PEI became brittle and cracked this was a one way street, as little pieces broke out... first on the purge line, ( A bit of kapton tape stopped that getting worse), but then the main print area started to crack and the surface was largely doomed...
Now I just use Dish Soap(detergent) and water to clean the print surface. on the textured surfaces I use the green side of a kitchen sponge
I don't use IPA or hairspray, or magigoo, or painters tape or the plethora of other adhesion aids...
I do use talcum powder or windex to reduce the adhesion of PETG,and TPU, on smooth PEI, some folk use Gluestick for reducing adhesion (if you choose to use gluestick in this manner, wiping over the gluestick with IPA, can smooth the surface out by thinning the gluestick)
If a model sticks too well, dribbling IPA around the print on the PEI sheet, will help loosen the bond without damaging your PEI.
Regards Joan
I try to make safe suggestions,You should understand the context and ensure you are happy that they are safe before attempting to apply my suggestions, what you do, is YOUR responsibility.Location Halifax UK


