Scarring on top surface
Hi, I recently finished a new MK3S and have been experimenting with Slic3r PE and the printer with test prints of a component for a project I'm working on. I've been using Pretty PLA V3 as the baseline profile. The results seem to be fairly promising, except that the top surface leaves something to be desired:
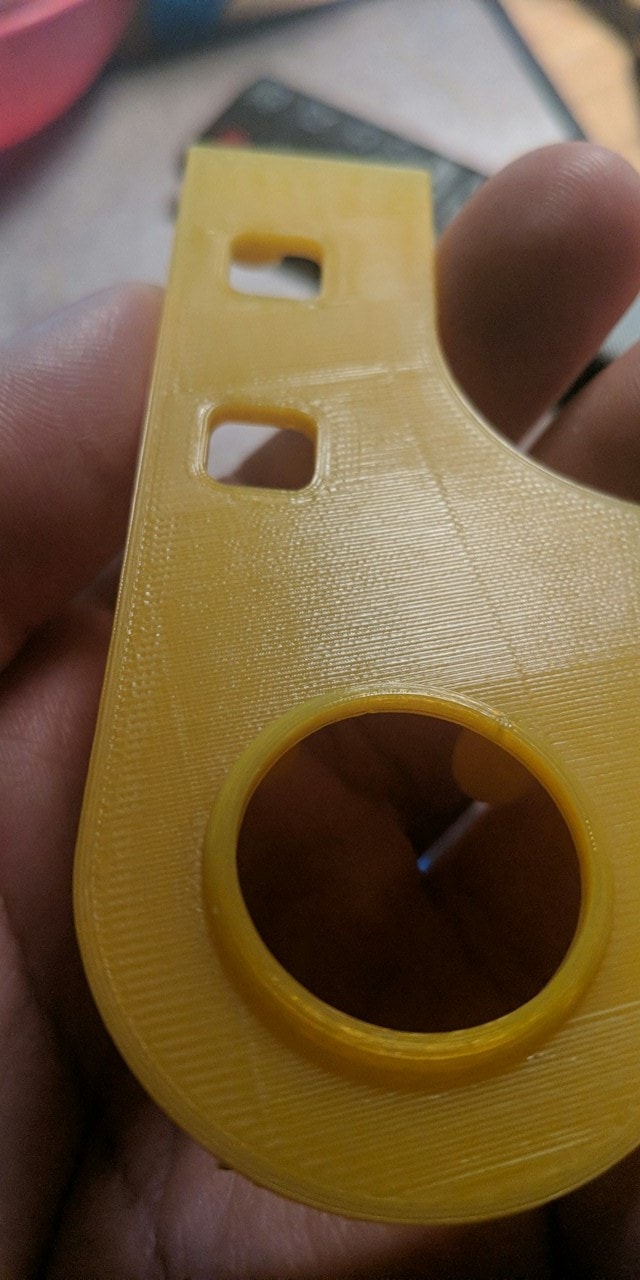
This weird scarring does not seem to correspond to internal support, as the part was printed with 6 top solid layers and the infill is at 20%. I tried raising the profile's default z-lift of 0.6mm to 0.8mm but that didn't seem to make much difference.
If anyone is interested, the bottom surface (support contacting) looks like this:
Which is probably about as good as can be hoped for.
Anyone know how I can improve the top surface finish?
(PS: The machine also seems to be fairly loud during rapid movements/rapid infill layers, even in stealth mode. Can't tell if that's normal or not. I hope I didn't do something wrong with the Y-bearings. I don't think I did)
Re: Scarring on top surface
The top surface looks pretty normal. There are variations in nozzle speed, acceleration, and flow direction that are more or less randomly decided by Slic3r PE. Except for slowing the top infill print speed down, I can't suggest any remedy.
Also looks like there is a seam on the top layer - which doesn't make sense - and I'd look for a rough spot on the X and Y axis.
The noise can be reduced by selecting Stealth mode from the LCD.
Re: Scarring on top surface
Yeah, it's those weird lines (I'm calling them scars, but they might look like seams too) in a sort of loose grid on the surface which I can't explain (otherwise the finish is excellent). I have not seen their like on the other test prints I've done (I printed an LCD cover for the printer, and the standard PRUSA test gcode from the sd card).
I'm printing in stealth mode by default. The printer is nearly silent when printing slowly(ish), but it gets fairly noisy when doing rapid movements (like infill)
Re: Scarring on top surface
I just ran a test with the stock 0.15mm profile and it also produced a strange surface finish. I'm getting a bit worried. Either there's something weird happening with my printer, or maybe Slic3r PE is producing weird gcode?
Re: Scarring on top surface
Your top surface looks totally normal. What I suggest is that you rotate your model in Slic3er. Depending on the model and how well your printer is calibrated, certain angles may give you better finish. In comparison if you print the same model sliced by another slicer (for ex. Cura) you will see the scars will look different, but they arent going anywhere.
What you are calling scar, is exact reason why professional 3D designers design their parts so that the major faces are laying on bed. Take your prusa LCD cover as an example.
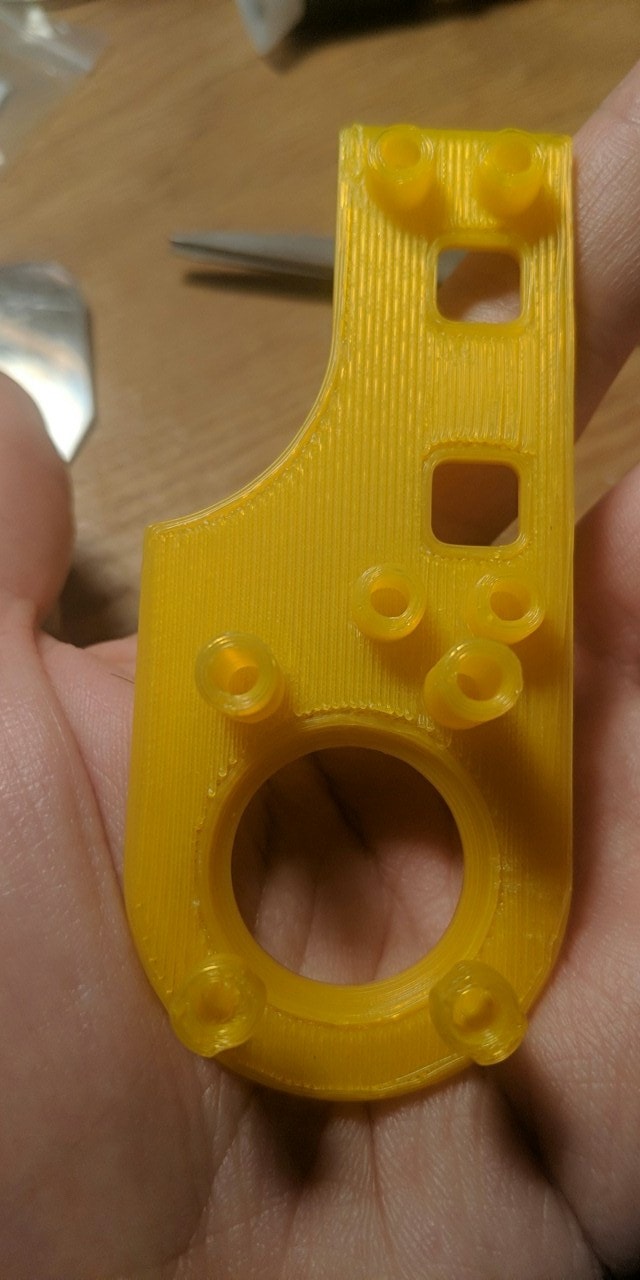
I never saw that kind of "scar" (for lack of a better word) on my old (lower quality) printer. It had all manner of other problems, but not that one. I'd print that part with the top surface facing the bed, but the area around the big hole is raised so it would need supports and that would ruin the finish (even with Slic3r's pretty good support interfaces). Is there some calibration you'd suggest? I may also try to do an equivalent test print from cura to see what it does (I tried, but for some reason the print wouldn't adhere. I'm thinking cura has the carriage slightly too high or something).
Re: Scarring on top surface
I never saw that kind of "scar" (for lack of a better word) on my old (lower quality) printer. It had all manner of other problems, but not that one. I'd print that part with the top surface facing the bed, but the area around the big hole is raised so it would need supports and that would ruin the finish (even with Slic3r's pretty good support interfaces). Is there some calibration you'd suggest? I may also try to do an equivalent test print from cura to see what it does (I tried, but for some reason the print wouldn't adhere. I'm thinking cura has the carriage slightly too high or something).
Could you please print this and share the result it with us:
https://www.thingiverse.com/thing:2741800
Just to make sure your Z level is ok
Re: Scarring on top surface
Arnt these scars normal? Its just the hotend moving across the top layer isn't it?
Z lift during move helps, but you still see the lines when the hotend moves across the surface to get to a new point in the model. Slicer has an option "Avoid Crossing Perimeters" which I believe helps, but I havnt' tried it....
I could be wrong, so please ignore me if this is no help.
Re: Scarring on top surface
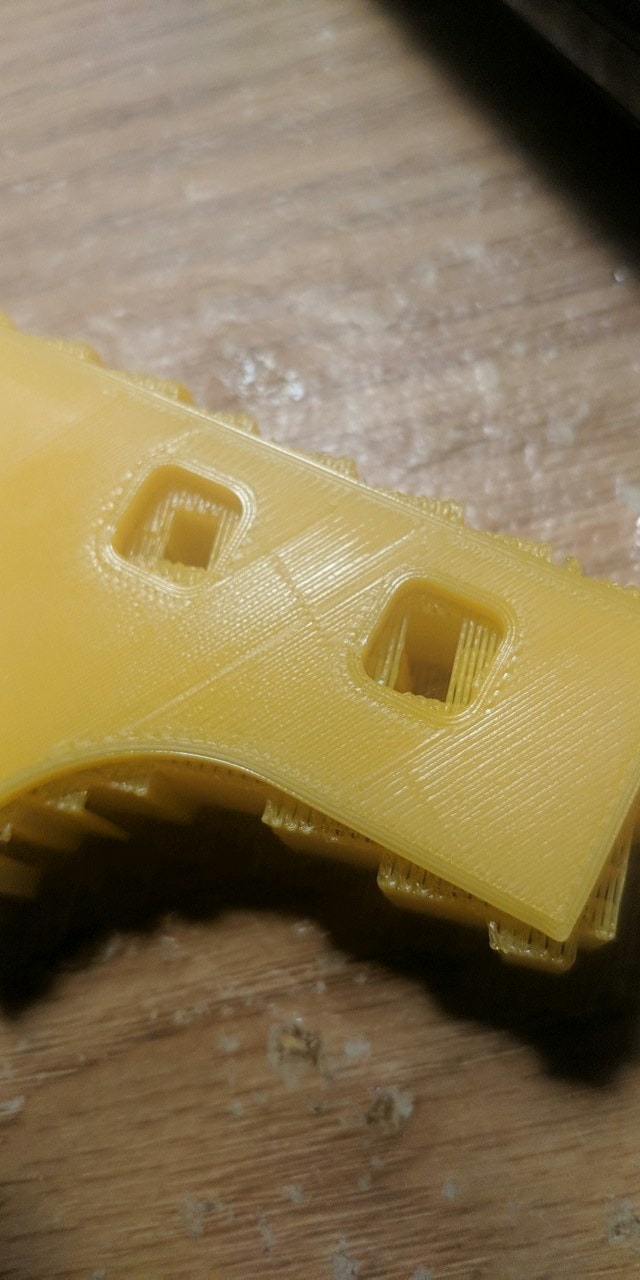
Just to make sure we are all looking at the same thing. We are talking about the features I highlighted in red in the below image, correct?
That certainly looks like a seam to me. Never seen one on a horizontal surface though. Normally they show up on vertical surfaces where one layer perimeter ends, and another starts.
Now, the top one is due to the infill algorithm in the slicer. Infill is printed continuously from the top of the circle, up to the bottom of the square, then proceeds on the left side of the square, to the top of the square. At that point, the printer probably comes back and fills in to the left of the square, of to the top, the returns to the top of the square and resumes full width infill up to the second square, at the very top.
Are you, by some chance, using Octolapse, or some other time lapse package?
Re: Scarring on top surface
Yes, the lines you highlighted are what I was referring to. I've never seen anything like them before. My theory is that for some weird reason slic3r is deciding to fill in that top surface in blocks rather than flood filling hence the lines look like seams because they essentially are seams between blocks... But that's really quite strange. I have a bog standard MK3S right now, no octoprint/pi/camera/etc, sorry.
When I have time I'll take a swing at the "First layer calibration helper".
You should be able to see it in the slicer preview. Once you export the gcode, you can turn on retractions and un-retractions. You should be able to see the seams show up. The only reason I can think that Slic3r would do this is a geometry related issue. Since the seam seems to line up with the circular cutout, it makes me wonder if the model has some internal geometry that is intercepting the top surface, or if the STL file has the top surface divided into multiple faces. If the faces of the top surface are marginally not in the same plane for some reason, but are within the boundaries of a single layer, I could see Slice3r getting confused and sectioning things up.
Re: Scarring on top surface
The occasional fat extrusion along the parallel tracks is a symptom of the slicer moving the nozzle one direction until it hits a hole, then it comes back the other way to fill in remaining gaps. This delay allows one side to cool enough the second pass doesn't weld as well, and tends to overfill the long joint.
The inline seam is odd. As others have stated, look at the Slic3r preview tab, Preview is available whenever you slice, no gcode needed. But creating gcode provides more info in the preview tab, like overhang detection and seams. If it does have a seam in preview, then a setting in Slic3r has been changed or Slic3r has changed. I'm only at v1.41.2 on Windows x64. Maybe a new "feature" in 1.42.3 ?
ps: modified to mention seams aren't visible unless you create gcode.
Re: Scarring on top surface
The occasional fat extrusion along the parallel tracks is a symptom of the slicer moving the nozzle one direction until it hits a hole, then it comes back the other way to fill in remaining gaps. This delay allows one side to cool enough the second pass doesn't weld as well, and tends to overfill the long joint.
The inline seam is odd. As others have stated, look at the Slic3r preview tab, You should be able to see if the slice has the seam. preview is available whenever you slice, no gcode needed, though creating gcode provides more info in the preview tab, like overhang detection. If it does have a seam in preview, then a setting in Slic3r has been changed or Slic3r has changed. I'm only at v1.41.2 on Windows x64. Maybe a new "feature" in 1.42.3 ?
I looked last night (when I first suspected a slicer related issue) and didn't see a seam, but Slic3r's preview isn't as good as Cura's (which will animate the nozzle path). It looked like it was slicing strips along the face, but I don't remember if they line up with the seams. If I have time tonight I'll check it again and post a screen shot. One other thing Slic3r was doing that seemed suspicious to me (though I'm used to Cura) was that when I'd align the model parallel to the bed, it would keep slicing it in these odd slightly angled layers that don't correspond to the model. What's weird is that in fusion, at least, that flat section of the model is perfectly parallel (aside from the ridge around the big circular opening. That section is a mounting hole for a mini-joystick and the raised section is a partially domed relief to allow the joystick to move freely. See the structure on a PS4 controller, for comparison. Same idea). Perhaps there's something weird about the model as exported from Fusion 360 that is confusing Slic3r? (Or perhaps there's something wrong with my printer? I hope not).
I'm using the latest stable release of Slic3r PE: 1.41.3.
Thanks for the help investigating this so far, everyone. Hopefully we'll figure it out. It certainly seems like an awfully strange artifact.
Re: Scarring on top surface
I've never experienced Slic3r placing a seam mid flat. So I'm not surprised you're not seeing one in the preview. But I just checked, and I was wrong - you do need to create gcode to see seam positions.
In Slic3r, you set the infill angle - it can be 0 to 360. Use this setting to adjust the first layer: place part in a desired orientation, set infill angle accordingly to align. The angle sets the first layer, Alternate layers are 90 off. Works well for flat parts where the finished surface is layer 1; requires preview to check top layer orientations.
Put the stl into a zip file and save it as an attachment. We can have a look for anything else odd about the part.
Re: Scarring on top surface
The STL for the part is attached in a zip, as requested.
Re: Scarring on top surface
the surface you are concerned about appears to be sloped.
Re: Scarring on top surface
the surface you are concerned about appears to be sloped.
Oh? That's very odd. It appears to be perfectly parallel in fusion. Ill take a closer look later. Could that even cause this kind of weirdness?
Re: Scarring on top surface
in slicer if I mis-clicked the placement and it was slightly off. my bad as long as you didn't click like me.
Re: Scarring on top surface
The STL looks fine to me: and definitely no seams on the top surface in my slice. I'm back to something mechanical...

Re: Scarring on top surface
I don't even know what could cause that kind of weirdness. Rather disconcerting in any case. I haven't been able to find other threads about similar problems, though there must be something