Prusament PETG temperature tower and print problem
Prusa PETG printed on Prusa MK3S with 0.4 nozzle.
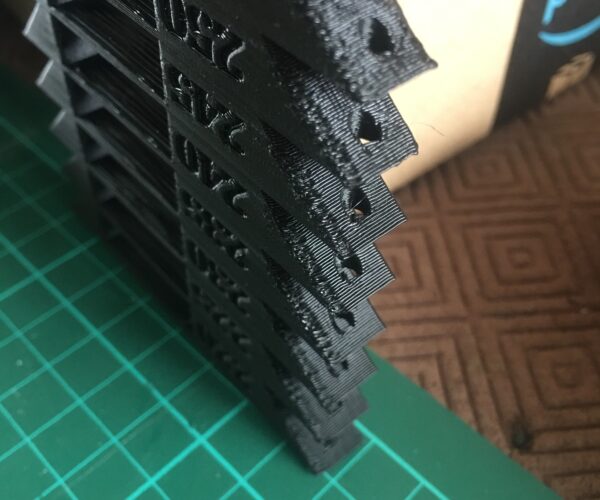
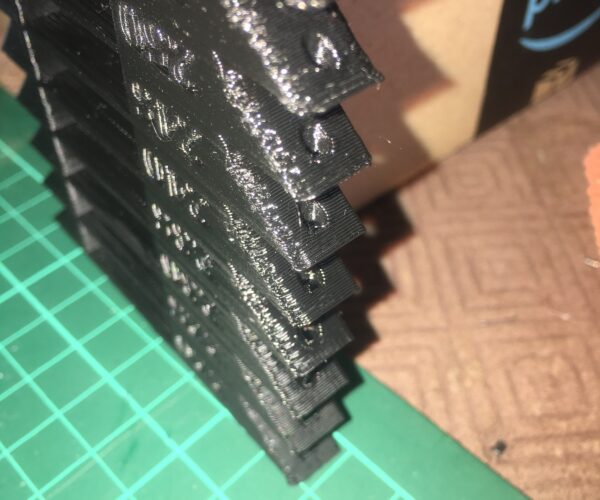
I am not getting clean prints on the edges, almost look melted. Mainly on the XMotor side.Any ideas what would cause this?I have had this problem before replacing the following and the problem is the same with the new parts.I’ve replaced all axis bearingsComplete new Prusa E3D V6 hotend with heater and thermistor I have carried out a full reset of the printed and calibration. I think the sweet spot is 230C, what do you think?Thanks in advance
PETG temperature test along X axis.
RE: Prusament PETG temperature tower and print problem
Prusa recommends 240-260°C for Prusament PETG (250°C default in slicer) -yes, it needs a bit higher temperatures than some of other PETG brands (btw. I'm printing at 245°C).
Of course it's printable at 230°C. But if you get the best result at 230°C, then that makes me thinking... in sense, there must be some drawback somewhere else (slower speed, not the best layer adhesion, etc.).
Just sharing my opinion
[Mini+] [MK3S+BEAR]
RE: Prusament PETG temperature tower and print problem
Thanks for your reply.
I just need to solve the bad edges now. I find it hard to believe it could be my x acid raging as it is very free and the belt tension I have tried from 160 to 250 and still ~I get bad, almost melted edges. I a shall persevere and get to the bottom of this
When you try everything, go back to check the basics
I would not use a temp tower to calibrate the X belt. I would use the belt tension gauge. I would not use a temp tower to test bearing drag.
One thing to note from your pictures - the temperature does not seem to change over the entire height of the tower. That tells me that possibly, just possibly, that you sliced the temperature tower yourself and forgot to go into the generated Gcode and modify it to change temps at the differen heights (you can do it in gcode, or you can do it in the slicer manually, one modfier for each layer you want.
Generally, a temperature tower is downloaded as GCODE that is already modified. At that point, it is a valid test for calibrating filament temparatures for bridging and small points (given the tower you used).
Now, since the temp tower is not ideal shape or goal for your issue (edges seem off), how about taking your modeling tool, or downloading a calibration cube - 20mm x 20mm, with x y an Z on the faces - you've probably seen those. Let's start there for analyzing what is gong on with your left hand edges. It's not layer shift. Lets get a small thing going if you aren't going to use a pre-calibrated temperature tower.
RE: Prusament PETG temperature tower and print problem
Wow, that is a great reply and thank you.
I did download the gcode and printed directly from it. I watched the temperature change correctly at each step as well, so all good there.
I will do a pid and temperature calibration for the hod end again tomorrow and also look for and print off the belt gauge and check both x and y axis with it. The bed calibration I did with good old octoprint plug-in for Prusa bed levelling and that is at 0.015 over the whole bed at PETG temperatures, then print of a 20mm and 30mm xyz test cube as I haven’t done that for at least 12 months. I’ll post my results back hopefully with in the next 24 hour.
again thankyou
RE: Prusament PETG temperature tower and print problem
For the belt tension - Get the panotune app on your phone, slide the Y plate all the way to the back, and pluck the Y-belt like a guitar string. The frequency on the app should be around 90 hz. On the X-belt slide the extruder all the way to the left and the frequency should be about 80 hz. For the printing profile - get pretty petg here and load it in slicer as a config profile - I use a temperature of 232 first layer and 247 on subsequent layers for Prusament PETG. https://github.com/eoprede/prusa_profiles/tree/master/MK3/Slic3r
RE: Prusament PETG temperature tower and print problem
For the belt tension - Get the panotune app on your phone, slide the Y plate all the way to the back, and pluck the Y-belt like a guitar string. The frequency on the app should be around 90 hz. On the X-belt slide the extruder all the way to the left and the frequency should be about 80 hz. ....
Meh.. I just let Placido Domingo singing over my hi-fi audio 😊 .
But seriously, belt tension on printers isn't some nuclear science -common sense and feeling is enough.
[Mini+] [MK3S+BEAR]
RE: Prusament PETG temperature tower and print problem
almost spot on depending if it's lower of upper part of the belt you pluck 89 and 81 soothes seem ok
For the belt tension - Get the panotune app on your phone, slide the Y plate all the way to the back, and pluck the Y-belt like a guitar string. The frequency on the app should be around 90 hz. On the X-belt slide the extruder all the way to the left and the frequency should be about 80 hz. For the printing profile - get pretty petg here and load it in slicer as a config profile - I use a temperature of 232 first layer and 247 on subsequent layers for Prusament PETG. https://github.com/eoprede/prusa_profiles/tree/master/MK3/Slic3r
RE:
UPDATE: I found the sweet spot!
The belts are now tweaked to 91 hz and 82 hz (as close as I could get)
Print Settings: Pretty V3 Print (unaltered)
Filament: I used the Pretty V3 PTEG filament profile and altered it to Plaidbear's temperature. (I now have a 'Pretty V3 PTEG (Plaidbear) filament' profile.
Printer: I used the Pretty V3 PTEG one but altered it as I did not like the mesh levelling being done at a lower temperature as the filament printing temperature.
This is the altered Pretty V3 PTEG 'Start G_code'...
M83  ; extruder relative mode
M104 S[first_layer_temperature] ; set extruder temp
M140 S[first_layer_bed_temperature] ; set bed temp
M109 ; Set extruder temp before bed level
M190 S[first_layer_bed_temperature] ; wait for bed temp
M109 S[first_layer_temperature] ; wait for extruder temp
G28 W ; home all without mesh bed level
G80 ; mesh bed leveling

M109 S[first_layer_temperature] ; wait for extruder temp

M221 S100 ; Set flow to 100

G1 Y-3.0 F1000.0 ; go outside print area
G92 E0.0
G1 E8 ; Purge Bubble
G1 X60.0 E9.0  F1000.0 ; intro line
G1 X100.0 E12.5  F1000.0 ; intro line
G92 E0.0


