Parts print perfectly until knocked off the bed
Hey everyone. I've had my i3 Mk3 Kit assembled for about 2 weeks, and in that time I've only had 4 successful prints. In every other case the parts will print flawlessly for an unpredictable duration (usually longer than 15% completion, but up to 90%), then suddenly snap off of the build platform. I've gone through a role of filament and several hundred hours of printing trying to overcome this issue.

First of all I wanted to thank everyone on this forum for your responses to other troubleshooting posts, I've used much of your feedback in my own troubleshooting. Anyway, here are the print settings and the solutions I've tried so far:
Settings/Setup:
Materials: Prusament PLA (Galaxy Black), Hatchbox PLA (White)
Build platform: Powder-coated PEI
Slicer: Slic3r Prusa Edition
Extruder Temperature: 210
Bed Temperature: 60-65
Layer Height: .20mm
Attempted solutions:
*Increase bed temperature - Increased to 65c, no improvement.
*Clean build surface - I clean with an 70% isopropyl alcohol prep pad before every print. I also tried the other side of the PEI sheet.
*Calibrate z-height - The z-height was calibrated using this guide: https://shop.prusa3d.com/forum/assembly-and-first-prints-*troubleshooting-f62/life-adjust-z-my-way-t2981.html . I'm confident that this setting is now correct.
*Print using brim - I used an extended brim touching the object for increased adhesion, no luck.
*Different model - I've tried simpler models and sometimes a simple cube will succeed and with flawless quality. But even Benchy fails 70% of the way through.
*Confirm correct belt tension - Belts are at 267 and 270
*Temperature stability - Extruder and bed temperatures were stable following a failed print.
My conclusions:
I don't believe this is a bed adhesion issue because the z-height is calibrated perfectly as far as I can tell, and I can even put pressure on the parts during printing that would cause them to dislodge if the adhesion was poor. I was able to carefully monitor a print until it witness it failed and I saw that the part was printing without issue until it suddenly snapped off the platform. To me this suggests that the nozzle is interfering with the print violently enough that it knocks it off the platform.
But I don't know the next step to take with this theory. Does anyone have any suggestions of what to try next? I'm open to trying just about anything at this point. Thanks in advance for your help!
Re: Parts print perfectly until knocked off the bed
Ahhh you're using the grid infill. Check out this thread: https://shop.prusa3d.com/forum/others-archive--f66/nozzle-bumping-against-infill-t14229.html
That could be your problem, not sure but by what you said towards the end, it sound like it might be hitting. Either that, or your bed temp is dropping allowing the first layer to cool and break free from the bed. I'm no pro, just what I think may be going on.
Re: Parts print perfectly until knocked off the bed
Try changing you infill pattern.
Its worth noting there has been issues with the powder coated sheets. You could try some Kapton tape and see if that helps as a test.
Re: Parts print perfectly until knocked off the bed
Ahhh you're using the grid infill. Check out this thread: https://shop.prusa3d.com/forum/others-archive--f66/nozzle-bumping-against-infill-t14229.html
That could be your problem, not sure but by what you said towards the end, it sound like it might be hitting. Either that, or your bed temp is dropping allowing the first layer to cool and break free from the bed. I'm no pro, just what I think may be going on.
Try changing you infill pattern.
Its worth noting there has been issues with the powder coated sheets. You could try some Kapton tape and see if that helps as a test.
Good suggestion, thanks guys. I haven't come across the infill pattern issue yet. Are there any patterns you suggest trying? It seems like some options (honeycomb) add significant print time. Would just switching from "Grid" to "Rectilinear" have an impact? I'm also considering trying out Gyroid.
Re: Parts print perfectly until knocked off the bed
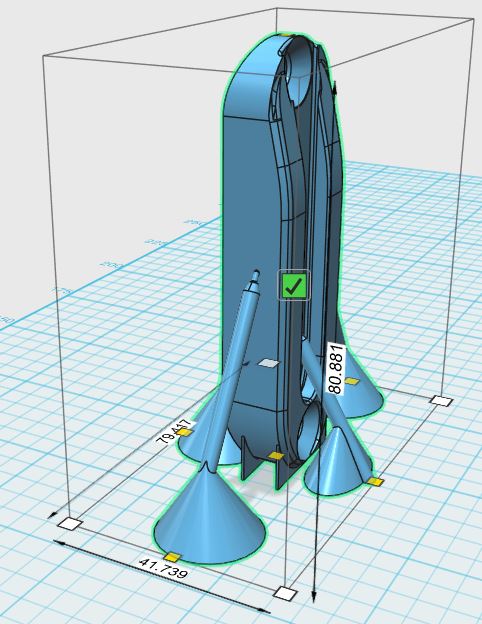
All of the parts shown are difficult designs to print. Most have small bottom surfaces and large top volumes.
The tips of the "jawbone" shaped objects in the lower right of the picture are built with sharp overhangs. The tips have a tendency to curl upwards and get bumped by the print head. Tall objects have more leverage to break them loose.
I don't have the powder coated bed, so I can't offer advice on how to prep it for better adhesion. My recommendation is to try a few lower and shallower objects that will have a higher success rate. Save the challenging designs for a later date.
Steve
Re: Parts print perfectly until knocked off the bed
All of the parts shown are difficult designs to print. Most have small bottom surfaces and large top volumes.
The tips of the "jawbone" shaped objects in the lower right of the picture are built with sharp overhangs. The tips have a tendency to curl upwards and get bumped by the print head. Tall objects have more leverage to break them loose.
I don't have the powder coated bed, so I can't offer advice on how to prep it for better adhesion. My recommendation is to try a few lower and shallower objects that will have a higher success rate. Save the challenging designs for a later date.
Steve
Thanks, Steve. Two comments on this.
1. While this part has some challenging features, I can print it on the Flashforge Creator Pro on a smooth PEI sheet no problem, and I don't think it's unreasonable to expect the MK3 to do the same. Are my expectations unrealistic?
2. Even if the model itself was the source of my issues, that wouldn't explain why I'm seeing an identical failure on the 3D Benchy model, would it?
I initially suspected it was in issue with this particular part as well, but as I'm continuing to troubleshoot I'm not so sure.
Thanks for your feedback, really appreciate it.
Steven
Re: Parts print perfectly until knocked off the bed
Your prints are looking very good, and I can‘t see any defects where the nozzle would catch.
They should not pop off the bed that easily.
Can you post closeups of the bottom? It would be helpful to see the first layer.
If that is not right, then the print adhesion will be affected.
How did you prepare the sheet and how did you set the Live-Z value?
That is critical. If in doubt wash the sheet with dish washing soap and warm water, and dry with a paper towel.
Print a single layer. Is it completely welded together and has a smooth surface?
You have to get the adhesion right, it‘s literally the foundation of successful prints.
I have never had an issue with rectilinear infill when the first layer adhesion was ok.
EDIT: a second look makes me less sure if there are any issues with the print that might cause the nozzle to knock it off the bed. But still, please show the first layer for analysis
Re: Parts print perfectly until knocked off the bed
It looks like you are doing all the right things. Brims help low adhesion parts. Extra skirts do nothing. Grid infill can cause issues; the default print speed settings are too fast for PLA and the nozzle leaves infill a bit thick, causing the nozzle to bump as it crosses the last extrusion at 90 degrees. Usually as issue in large prints, not small things like yours.
The bed cleanliness is a top suspect. One finger print will ruin a print. Soap and hot water, rinse with water as hot as you can stand, do not use your dish sponge. Hold the plate by the edges, do not touch the surface.
Use compressed air or new paper towels to dry the plate. Again, no touching the surface.
Place the plate on the bed, no touching the surface. Wipe the surface with a paper towel wetted with 90%+ alcohol. Dry with a new paper towel. Let it evaporate. Then with a new paper towel wetted with acetone wipe the surface of the bed and let it evaporate to dry.
I cut a paper towel into a few strip for this cleaning. You can usually print dozens of parts between cleanings. And use alcohol once in a while to remove dust and plasticizers left behind.
When clean, a first layer cal, that one line PLA strip should be stuck to the PEI bed so tight you need tweezers to wedge under it to pop it loose. A 1 cm x 10 cm build a lever or resorting to bending the spring plate. Again never touch the bed surface with your fingers - your prints will thank you.
Re: Parts print perfectly until knocked off the bed
How did you prepare the sheet and how did you set the Live-Z value?
That is critical. If in doubt wash the sheet with dish washing soap and warm water, and dry with a paper towel.
Print a single layer. Is it completely welded together and has a smooth surface?
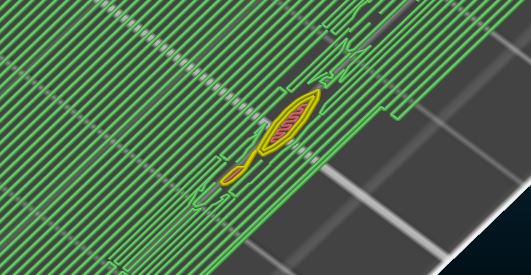
Here are some photos of the first layer on my custom part and the failed 3D Benchy:


The camera highlights the individuals path lines, but in person it looks more like one solid surface.
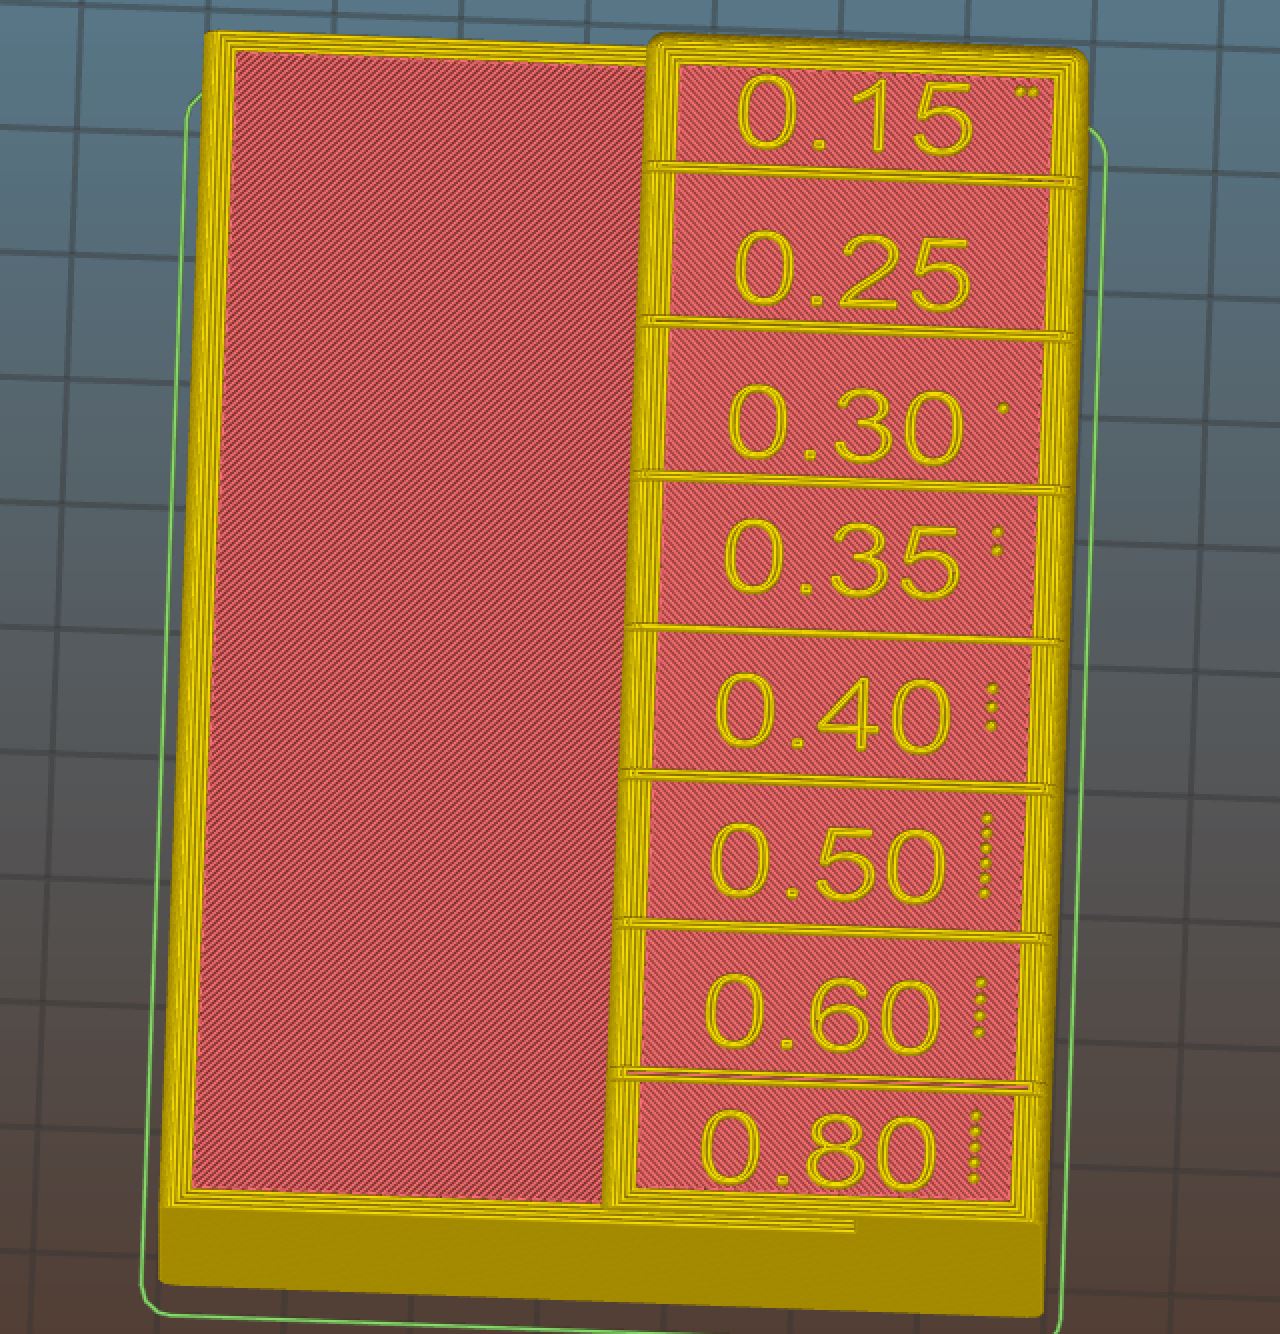
A look at the process for dialing-in the z-value:

Based on the results above I went with a value of 710.
Re: Parts print perfectly until knocked off the bed
The benchy is very hard to judge for me, as I am not familiar with the look of the first laye from the PC bed.
In the first photo however the individual strands can be clearly seen and especially on the top there are gaps visible between them, also between the brim and the print itself.
The first layer calibration squares look like 710 should be a good value, 725 looks too low, 715 actually looks good too. Did you try pulling the sheet apart in the 715 section?
If your first layer is good, then try washing the print bed.
I have never had to follow the compete routine as explained by tim above, just did one of them at a time.
IPA for quick cleaning, Acetone when IPA is no good, and soap wash to renew the surface. I would not use compressed air from a compressor, as there might be some oil in it.
The hint about speed was good, I agree, I also feel the standard profile is too fast, and I like to reduce it to 80% in the tune menu.
Re: Parts print perfectly until knocked off the bed
It looks like you are doing all the right things. Brims help low adhesion parts. Extra skirts do nothing. Grid infill can cause issues; the default print speed settings are too fast for PLA and the nozzle leaves infill a bit thick, causing the nozzle to bump as it crosses the last extrusion at 90 degrees. Usually as issue in large prints, not small things like yours.
The bed cleanliness is a top suspect. One finger print will ruin a print. Soap and hot water, rinse with water as hot as you can stand, do not use your dish sponge. Hold the plate by the edges, do not touch the surface.
Use compressed air or new paper towels to dry the plate. Again, no touching the surface.
Place the plate on the bed, no touching the surface. Wipe the surface with a paper towel wetted with 90%+ alcohol. Dry with a new paper towel. Let it evaporate. Then with a new paper towel wetted with acetone wipe the surface of the bed and let it evaporate to dry.
I cut a paper towel into a few strip for this cleaning. You can usually print dozens of parts between cleanings. And use alcohol once in a while to remove dust and plasticizers left behind.
When clean, a first layer cal, that one line PLA strip should be stuck to the PEI bed so tight you need tweezers to wedge under it to pop it loose. A 1 cm x 10 cm build a lever or resorting to bending the spring plate. Again never touch the bed surface with your fingers - your prints will thank you.
Thanks for the tip. This seems like a good, thorough cleaning process and I'll definitely give it a shot, but does anyone else think this an extreme requirement just to get basic, PLA parts to stick to the bed of a consumer grade printer? I'm currently also printing on an older Flashforge Creator Pro with a DIY glass+PEI bed which when wiped with an alcohol prep pad will reliably hold on to PLA until the bed returns to room temperature.
I make this comparison because it seems to me like there's something more going on here than just a dirty bed. Ultimately if the "dirty" bed really is the issue then I'll definitely look into an alternative built plate with a different surface because I know we can do better than regularly sterilizing our beds with acetone.
Anyway, thanks again for the cleaning tips. I'll definitely use your process and try again.
Re: Parts print perfectly until knocked off the bed
I'd go with 725 ... better to be a little thin than a little thick.
Since the layer 1 samples don't have creases or bends where you pulled them from the bed, I still vote for cleanliness... here's my L1 test. Yes, that crease is because it is so hard to pull off the bed.
Re: Parts print perfectly until knocked off the bed
My vote goes to : Clean the build plate. For a short while I too while started to get parts being separated after a build height of a 10 or more mm.
Dish washing liquid followed by acetone and IPA fixed it. This was after claeaning before each print with IPA
i3 Mk3 [aug 2018] upgrade>>> i3MK3/S+[Dec 2023]
Re: Parts print perfectly until knocked off the bed
Thanks for the suggestions, everyone.
I tried another print with your suggestions:
- Cleaned bed with hot water, dish soap, acetone, and IPA
- Changed infill pattern from grid to gyroid
- Reduced print speed to 90% (also printed in stealth mode)
The bad news is that the print failed again (spaghetti monster). The good news is that it got farther along than any previous print by about 20%, so we might be on to something. I think the print speed reduction is helping a lot, I'm going to try another at 80% speed and see how it goes. For now I'm printing a copy in this orientation just so I have a part to work with.

Thanks for all of the good suggestions, I was really running out of options. I'll update again after I try another at 80% speed, hopefully I can get this thing working properly.
Re: Parts print perfectly until knocked off the bed
*Clean build surface - I clean with an 70% isopropyl alcohol prep pad before every print. I also tried the other side of the PEI sheet.
You must use 99% isopropyl alcohol. 70% isopropyl alcohol contains 30% other substances that reduce the attachment to the bed.
However, first wash the bed with detergent and warm water to remove the old contaminants.
Bear MK3 with Bondtech extruder
Re: Parts print perfectly until knocked off the bed
I have a model, that has a very small footprint, and I don't want to use traditional supports so I built supports into the model
prints fine in PETG
maybe you can do similar
regards Joan
I try to make safe suggestions,You should understand the context and ensure you are happy that they are safe before attempting to apply my suggestions, what you do, is YOUR responsibility.Location Halifax UK
Re: Parts print perfectly until knocked off the bed
The bad news is that the print failed again (spaghetti monster).
Upload the stl in a .zip folder attached to this thread. It'd allow folk to look at the problem more directly. Supports work, but they have their place. And there are things that happen on overhangs that can still upset the supported print.
As Joan said, adding tree supports can help stubborn parts. A large base pad and a tree that connects solidly. I've done that on figures I've printed: ballerina with only toes touching the bed, that sort of thing. Tall, skinny, and nothing on the bed is hard to print.
This part was tricky to print, 30h print knocked loose at 75%, overhangs would curl and grab the nozzle, and there was little material in contact with the bed and hold the actual part. It broke from the supports and the bed. My second attempt I had to hand hold the print during the tough transitions, manually reforming edges to flatten them before they caught. Some recommend slower print speeds to help with curling, though I didn't try it on this part.
Re: Parts print perfectly until knocked off the bed
I have a model, that has a very small footprint, and I don't want to use traditional supports so I built supports into the model
Thanks for the suggestion Joan, I'll give this a shot.
This part was tricky to print, 30h print knocked loose at 75%, overhangs would curl and grab the nozzle, and there was little material in contact with the bed and hold the actual part.
I think this is what's happening in my case too. Before a print fails you can see a curled up edge which I suspect is hitting the nozzle. It's surprising to me that this printer is causing print quality issues severe enough to knock the part from the bed, especially with such a simple part.
The STL file is attached to this post, maybe someone will spot an obvious issue with the model.
Thanks for the suggestions
Re: Parts print perfectly until knocked off the bed
When oriented with the small flat down, there are two notches that have overhangs that are an issue and need support.
The holes and extreme angle at the base are subject to print issues, but shouldn't kill the print.
The major print issue I see is the base area is very small when printed vertically and a brim is needed.
I sliced with default 0.15 mm Prusa PLA, but set Extra Perimeters when needed; 0 skirt; 15 mm brim (to get a large base area); Supports Everywhere; and support angle to 11 degrees (to get into holes but minimizes support in places where it affects the brim -- layer 1 support infill is very weak).
I'd not be worried about printing this part as shown.
Re: Parts print perfectly until knocked off the bed
Thanks Tim, I'll give it another shot with these settings tonight.
Steven